How to Fix Wood Too Dark After Staining
It happens to many people. You’re excited to stain your wood project, but after you’re done, it looks way too dark. This is a common problem, especially when you’re new to woodworking or staining.
It can feel frustrating when your project doesn’t turn out how you imagined. But don’t worry! There are simple ways to fix wood that’s too dark after staining.
This guide will walk you through it step by step.
Addressing Wood Stains That Are Too Dark
When a wood staining project ends up darker than expected, it can be a surprising setback. Many beginners find this issue particularly tricky because they may not know the best approach to correct it without damaging the wood or starting over completely. Factors like wood type, the number of coats applied, and even the ambient temperature can influence the final color.
Thankfully, fixing a dark stain is usually achievable with the right methods and a bit of patience. This section will explore effective techniques for lightening wood that has become too dark.
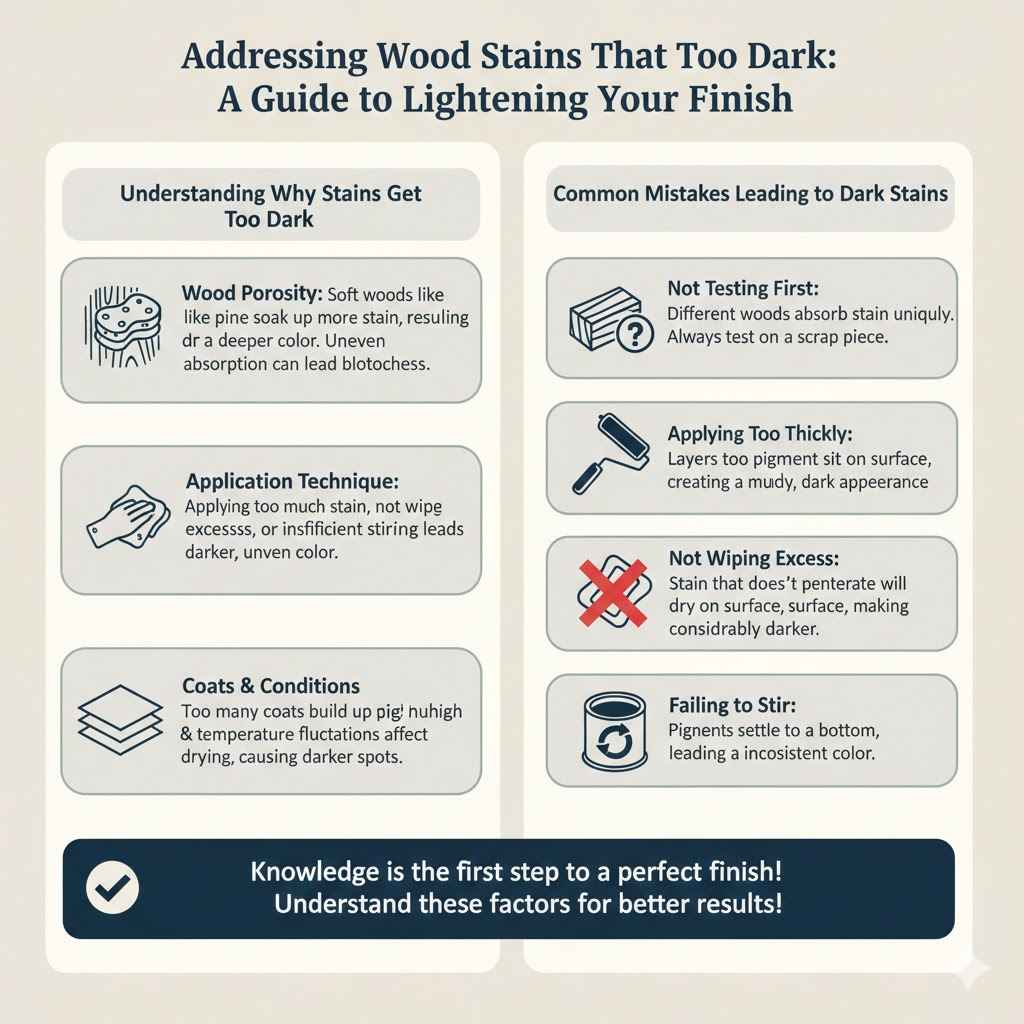
Understanding Why Stains Get Too Dark
Several factors can contribute to a wood stain turning out darker than you intended. Understanding these common causes can help you prevent the issue in the future and better tackle it when it happens. It’s often a combination of the wood’s porosity and the stain’s application.
The wood itself acts like a sponge, and some woods soak up more stain than others, leading to a deeper color. This is especially true for soft woods like pine.
Additionally, the way the stain is applied plays a huge role. If you apply too much stain at once, or if you don’t wipe off the excess quickly enough, it will penetrate deeper into the wood grain. This results in a much darker finish than if you had wiped off the excess promptly, allowing for a more even and lighter hue.
Even the type of stain matters; oil-based stains often penetrate more deeply than water-based ones, leading to richer, darker colors.
Another significant factor is the number of coats. While some projects benefit from multiple coats for depth, applying too many can quickly lead to an overly dark finish. Each coat adds more pigment and penetration.
Environmental conditions, such as humidity and temperature, can also affect how the stain dries and cures. Warmer temperatures can sometimes accelerate drying, but if it dries too fast before you can wipe, it can lead to darker spots. Cooler, more humid conditions might cause the stain to remain wet longer, allowing for more absorption and a darker outcome.
Common Mistakes Leading to Dark Stains
Beginners often make a few common mistakes when staining wood. One of the biggest is not testing the stain on a scrap piece of the same wood first. Wood types absorb stain differently, and a test swatch is the best way to predict the final color.
Without this step, you’re essentially guessing.
Another frequent error is applying the stain too thickly. Staining is more like painting a thin coat of color rather than applying a solid layer. Applying a thick layer means more pigment sits on the surface and soaks into the wood more deeply.
This usually results in a dark, muddy appearance. This often happens when users try to cover a large area quickly without proper technique.
Not wiping off the excess stain is a critical mistake. Stains work by coloring the wood as they penetrate. If you leave the excess stain to dry on the surface, it will darken the wood considerably.
It’s crucial to wipe off any stain that hasn’t soaked in within a few minutes, following the manufacturer’s recommendations. This prevents the stain from pooling and creating an uneven, dark finish.
Finally, failing to stir the stain properly before use can cause uneven color. Pigments in stain can settle at the bottom of the can. If you don’t stir it well, you might end up with lighter color from the top and darker color from the bottom, leading to inconsistency.
This is true for most types of wood stains, whether oil-based or water-based.
Methods to Lighten Dark Wood Stains
Fortunately, there are several effective ways to lighten a wood stain that has turned out too dark. These methods range from simple surface treatments to more involved processes. The best approach often depends on the type of stain used and how deeply it has penetrated the wood.
It’s important to choose a method that suits your specific situation and desired outcome.
Using Mineral Spirits for Oil-Based Stains
For oil-based stains, mineral spirits are often your first line of defense. Mineral spirits are a solvent that can help to break down and lift oil-based pigments from the wood surface. This is a relatively gentle method and is best for stains that are not excessively dark or that have not fully cured into the wood.
To use mineral spirits, you will need a clean, lint-free cloth. Dampen the cloth with mineral spirits – do not soak it. Gently rub the stained surface in the direction of the wood grain.
You should begin to see the stain lifting onto the cloth. Continue this process, using clean sections of the cloth as needed. It is important to work in small sections and wipe away any excess mineral spirits promptly.
This method is most effective when the stain is still somewhat fresh. If the stain has been on the wood for a long time and has fully dried and cured, mineral spirits may not be able to lift enough pigment to make a significant difference. It’s a process of gradually removing the stain, so you may need to repeat it several times to achieve the desired lightness.
Always ensure you are working in a well-ventilated area when using mineral spirits, as they have strong fumes.
After using mineral spirits, it is a good idea to wipe down the surface with a clean, dry cloth to remove any lingering solvent. You may then need to reapply a lighter stain or a wash of a different color to achieve the look you want. Be aware that this process can sometimes slightly alter the texture of the wood, so a light sanding might be necessary before re-staining.
The Role of Denatured Alcohol
Denatured alcohol is another solvent that can be effective for lightening wood stains, particularly water-based stains or certain types of lacquer finishes. It works by dissolving the stain’s pigments, allowing them to be wiped away. Similar to mineral spirits, it’s best used when the stain isn’t too deeply set.
Apply denatured alcohol to a clean, lint-free cloth. You don’t need to saturate the cloth, just make it damp. Gently rub the stained wood, working with the grain.
As with mineral spirits, you’ll see the color transfer to the cloth. Keep moving to clean sections of the cloth and continue working on small areas at a time.
Denatured alcohol evaporates quickly, which can be an advantage. However, it can also dry out the wood, so it’s a good idea to follow up with a light application of mineral oil or a wood conditioner once the area is dry if you plan to restain. This helps to restore some of the wood’s moisture and prepares it for a new finish.
Always use this in a well-ventilated space due to its fumes.
The effectiveness of denatured alcohol depends heavily on the stain type. It’s generally more successful with lighter stains or when the stain has not had a long time to cure. For very dark or deeply penetrated stains, you might find that denatured alcohol only lightens the surface layer, and a more aggressive method might be needed if significant lightening is required.
It’s a good option for minor touch-ups or when you need to remove a thin layer of color.
Chemical Strippers for Stubborn Stains
When mineral spirits or denatured alcohol aren’t enough, chemical strippers are the next step. These are powerful solvents designed to break down and remove old finishes and stains, even those that are deeply embedded. Chemical strippers can be very effective, but they also require more caution and careful application.
Before using a chemical stripper, it’s crucial to read and follow the manufacturer’s instructions precisely. Wear protective gear, including chemical-resistant gloves, eye protection, and a respirator, as these chemicals can be hazardous. Ensure you are in a very well-ventilated area, ideally outdoors.
Apply the stripper with a brush or roller, following the product’s directions. Allow it to sit for the recommended time to soften the stain. Then, use a scraper or stiff brush to gently lift the softened stain away from the wood.
You will likely need to rinse the wood with a solvent recommended by the stripper manufacturer to neutralize the chemicals and remove any residue.
After stripping, the wood may appear dull or blotchy, and it will likely need to be lightly sanded to smooth the surface and prepare it for a new stain. Chemical strippers can sometimes lighten the wood significantly, potentially even removing some of its natural color. This is why a test on a hidden area or a scrap piece is highly recommended.
This method is for when other options have failed and a significant color correction is needed.
Light Sanding Techniques
Light sanding is a versatile method that can be used in conjunction with other techniques or as a standalone solution for minor darkening. It involves removing a thin layer of wood along with the stain. The key is to sand lightly to avoid removing too much material or changing the wood’s profile.
Start with a fine-grit sandpaper, such as 150 or 180 grit. For very minor darkening, even 220 grit might suffice. Always sand in the direction of the wood grain to prevent visible scratches.
Use a sanding block or an orbital sander for larger areas to ensure an even finish. Apply consistent, light pressure.
The goal of light sanding is to remove just enough of the stained layer to lighten the overall color. After sanding, vacuum away all the dust thoroughly. You can then assess the color.
If it’s still too dark, you can repeat the light sanding process with the same grit or slightly coarser sandpaper if needed. Remember, you can always sand more, but you can’t put wood back on.
This method is particularly useful if the stain is only on the surface or has only penetrated slightly. It’s also a good preparation step before restaining, as it can help to create a uniform surface. For projects where the stain is very deep, sanding might not remove enough color without significantly altering the wood.
In such cases, it’s best used as a follow-up to solvent-based methods to smooth the surface after the stain has been partially lifted.
Using a Wood Bleach
For situations where the stain is very dark and has penetrated deeply, wood bleach might be necessary. Wood bleach is a chemical product designed to lighten or remove the natural color of the wood itself, as well as any stain. There are two main types: oxalic acid bleach, which is good for removing water stains and rust marks, and a two-part (often chlorine and lye based) bleach, which is more aggressive and can lighten wood significantly.
Using wood bleach requires careful handling and adherence to safety instructions. Always wear protective gear like gloves, eye protection, and a respirator. Work in a well-ventilated area.
Apply the bleach according to the manufacturer’s instructions, which usually involves mixing the components and applying them evenly with a brush.
After application, let the bleach work for the specified time. You will see the wood color change. Once the desired lightness is achieved, you must neutralize the bleach.
This is a critical step to stop the bleaching process and prevent damage to future finishes. Follow the neutralization instructions, which typically involve washing the wood with water or a specific neutralizing solution.
After neutralization and allowing the wood to dry completely (which can take 24-48 hours), the wood might appear lighter than you want, or it might have a slightly altered undertone. You may need to lightly sand the wood again to smooth it out and prepare it for a new stain. Wood bleach is a powerful tool and should be used as a last resort, as it can significantly alter the wood’s appearance and may require careful re-staining to achieve a natural look.
Some sources suggest that using a wood bleach can lighten the wood by up to 40 percent.
Preparing for Restaining After Correction
Once you’ve successfully lightened a dark wood stain, the next crucial step is preparing the surface for a new stain or finish. This preparation ensures that the new color applies evenly and adheres properly, preventing future problems. Skipping this stage can lead to a patchy or inconsistent final appearance, undoing all your correction efforts.
Cleaning and Neutralizing Residue
After using any solvents like mineral spirits, denatured alcohol, or chemical strippers, it’s essential to thoroughly clean the wood. These products can leave behind residue that may interfere with the new stain’s adhesion. For mineral spirits and denatured alcohol, a clean, dry cloth is usually sufficient to wipe away any remaining solvent.
If you used chemical strippers or wood bleach, neutralization is a key part of the cleaning process. Chemical strippers often require a specific rinsing agent to remove all traces of the stripper. Wood bleach needs a neutralizer to stop the chemical reaction.
Failing to neutralize properly can lead to continued chemical activity within the wood, which can damage the finish or cause discoloration over time. Always refer to the product manufacturer’s instructions for the correct cleaning and neutralizing agents.
A general rule is to wipe down the entire piece with a damp cloth (using clean water) after neutralization and allow it to dry completely. This removes any lingering dust or residue. Proper cleaning ensures that the wood surface is neutral, clean, and ready to accept the new stain evenly.
The Importance of Light Sanding
Even after using solvents or bleaches, a light sanding is almost always necessary before restaining. Sanding does more than just smooth the surface; it opens up the wood’s pores to accept the new stain. It also helps to create a uniform surface, ensuring that the stain absorbs consistently across the entire piece.
Use a fine-grit sandpaper, typically 180 to 220 grit. Sand with the direction of the wood grain. The goal here is not to remove a lot of wood but to create a fresh, receptive surface.
This also helps to remove any slight fuzziness that might have occurred from the cleaning process or from the wood fibers swelling.
After sanding, it’s vital to remove all dust. A vacuum cleaner with a brush attachment followed by a tack cloth is the best way to ensure no fine dust particles remain. Dust left on the surface will show up as imperfections in the new stain, making the finish look unprofessional.
This thorough cleaning after sanding is a critical step for a smooth, even finish.
Testing the New Stain
Before you apply the new stain to your entire project, always test it on an inconspicuous area or a scrap piece of the same wood. This step is absolutely critical, especially after correcting a previous staining issue.
When you test, apply the stain just as you plan to on the main project. Observe how the wood absorbs the color. Does it look too light?
Too dark? Does it have an unexpected undertone? Since you’ve treated the wood, its porosity might have changed, or it might react differently to the new stain.
You might discover that the wood now accepts a lighter shade of your original desired color perfectly, or you might need to adjust your approach. Perhaps a wash of a different tone is needed to achieve the final look. Testing allows you to make these adjustments without ruining the whole piece.
It gives you confidence that the final result will be exactly what you want.
Achieving the Desired Wood Tone
Getting the wood color just right is a rewarding part of any woodworking project. After you’ve corrected a dark stain, you have a fresh opportunity to achieve the perfect tone. It’s about carefully layering color and understanding how the wood will respond to different finishes.
This process requires a bit of finesse and attention to detail.
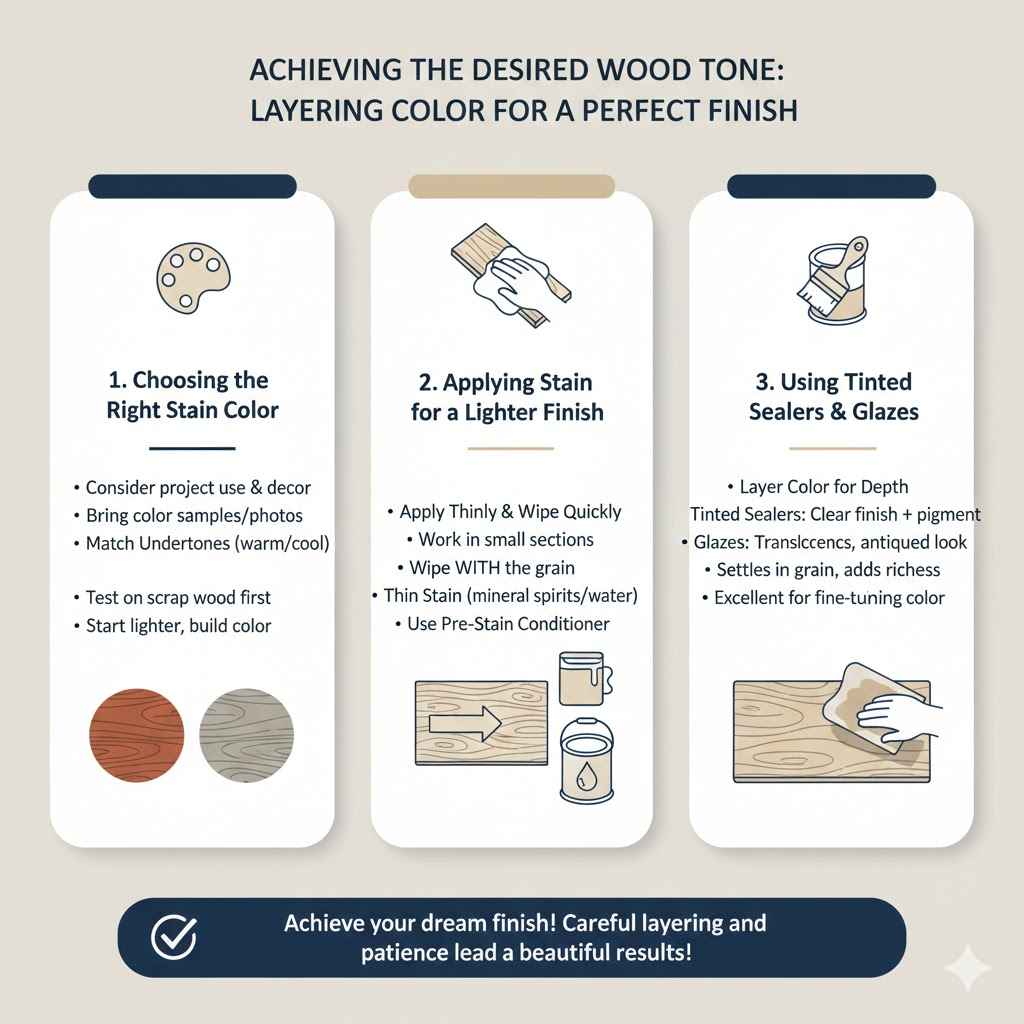
Choosing the Right Stain Color
Selecting a new stain color involves considering the project’s intended use and the surrounding decor. Think about whether you want a natural wood look or a more dramatic color. If you are trying to match an existing piece of furniture, bring a sample or a photo to help you choose.
Stain colors come in a vast spectrum. Some are transparent, letting the wood grain show through beautifully. Others are semi-transparent, offering more color with visible grain, or opaque, covering the grain entirely for a painted effect.
For a natural look, consider light to medium browns, grays, or even subtle tans. If you want something more striking, explore blues, greens, or reds, but use these with a lighter hand.
Don’t forget to consider undertones. Some stains have warm undertones (reds, yellows), while others have cool undertones (blues, grays). The type of wood you are staining can also influence how the stain looks.
For example, oak tends to have yellow undertones, while cherry has red undertones. Matching these can enhance the wood’s natural beauty or create a specific mood.
Applying Stain for a Lighter Finish
To achieve a lighter finish, the key is to apply the stain thinly and wipe off the excess quickly. This prevents the stain from penetrating too deeply and saturating the wood. Apply a small amount of stain to your applicator (brush, rag, or sponge) and spread it evenly over a small section of the wood.
Work in sections, covering the entire surface. As soon as you’ve applied stain to a section, immediately wipe it off with a clean, lint-free cloth. Wipe with the direction of the wood grain.
The goal is to color the wood without leaving excess pigment on the surface. This technique allows the wood’s natural color to show through more, resulting in a lighter, more subtle tone.
If you want an even lighter look, you can thin the stain. For oil-based stains, you can mix in mineral spirits. For water-based stains, use water.
Always follow the stain manufacturer’s recommendations for thinning ratios. Thinning the stain means less pigment will be deposited, making it easier to achieve a very light color.
Another effective method for a lighter finish is to use a pre-stain conditioner. This product seals the wood slightly, controlling how much stain it absorbs. This results in a more even color and prevents blotchiness, which is especially helpful on soft woods like pine.
Apply the conditioner, let it dry for the recommended time, and then apply your thinned stain, wiping off the excess promptly.
Using Tinted Sealers or Glazes
Tinted sealers and glazes offer a different way to adjust the color of wood, especially after you’ve already stained it. They are applied over a base coat and can add subtle tones or deepen the color without the deep penetration of a stain.
A tinted sealer is essentially a clear finish mixed with a small amount of pigment. Applying this over a lighter base stain can add a hint of color or depth. For example, a clear coat with a touch of brown pigment can add warmth.
They are generally easy to apply and can be built up in thin layers to achieve the desired hue.
Glazes are typically more translucent and are used to add depth, highlight the wood grain, or create an antiqued look. A glaze is applied over the finish, allowed to set briefly, and then wiped off. The glaze settles into the wood grain and contours, creating a beautiful shadowing effect.
This can be used to subtly darken certain areas or to add a rich, aged appearance without making the entire piece look too dark.
These products are excellent for fine-tuning the color. If your corrected stain is still a little too light or lacks a certain richness, a well-applied glaze can make all the difference. They offer more control than a direct stain application, allowing for gradual color building and easier correction if you overdo it.
Frequently Asked Questions
Question: Can I fix wood that’s too dark without sanding?
Answer: Yes, in some cases. If the stain is not too dark and is still relatively fresh, you might be able to lighten it using solvents like mineral spirits for oil-based stains or denatured alcohol for water-based stains. These methods work by dissolving and lifting the stain from the surface.
However, for deeply penetrated or very dark stains, sanding or chemical strippers are often necessary for significant correction.
Question: How long does it take for wood stain to dry?
Answer: The drying time for wood stain varies greatly depending on the type of stain (oil-based, water-based, gel), temperature, and humidity. Oil-based stains typically take longer to dry, often 24-48 hours before recoating. Water-based stains can dry faster, sometimes ready for a second coat in 4-6 hours.
Always check the product’s label for specific drying times. Ensure it is completely dry before applying a topcoat.
Question: Will sanding remove all the stain?
Answer: Light sanding will only remove the stain from the surface layer. If the stain has penetrated deeply into the wood, sanding might not remove it completely without removing a significant amount of wood. For very deep stains, you might need to use chemical strippers or wood bleach first, followed by sanding to prepare for a new finish.
Question: How do I know if I’ve removed enough dark stain?
Answer: After applying a lightening method, let the wood dry completely. Then, assess the color in good natural light. Compare it to your desired shade or a test swatch.
If it’s still too dark, you can repeat the lightening process or try a slightly more aggressive method. Remember, it’s better to lighten gradually than to overdo it and remove too much color.
Question: Can I stain over a dark stain without fixing it?
Answer: It’s generally not recommended to stain directly over a dark stain that is too dark if you want a lighter result. Applying another stain will likely just make it even darker, or the color will be muddy and uneven. You must lighten the existing stain first to achieve a lighter or different color successfully.
Final Thoughts
Fixing wood that’s too dark after staining is a common challenge, but it’s definitely manageable. By using solvents like mineral spirits or denatured alcohol, or employing light sanding and even chemical strippers if needed, you can effectively lighten the wood. Proper cleaning and light sanding afterward are key to preparing the surface for restaining, ensuring an even and beautiful new color.
With patience and the right techniques, you can achieve the perfect look for your project.