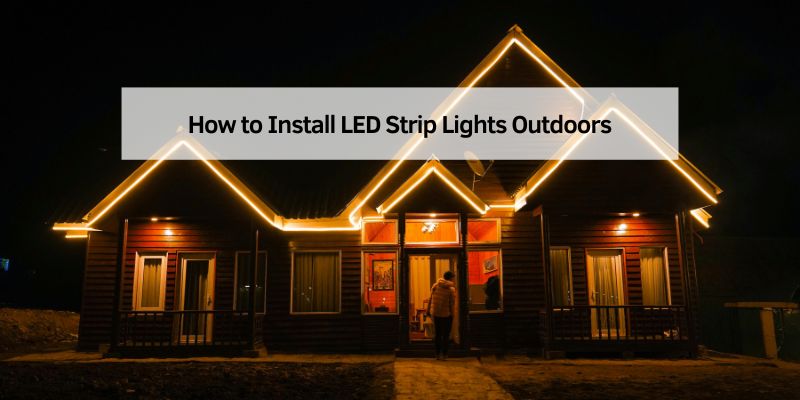
How to Install LED Strip Lights Outdoors
Hey there! If you’re looking to brighten up your outdoor space, LED strip lights are a fantastic choice. They’re energy-efficient, versatile, and can completely transform your patio, deck, or garden into a cozy, inviting spot. I’ve spent plenty of time experimenting with outdoor lighting projects, and let me tell you, installing LED strip lights outdoors is easier than you might think. Whether you want to highlight your walkways, add some flair to your pergola, or create a festive vibe for gatherings, this guide has you covered. I’m excited to walk you through every step, share my tips, and help you avoid common pitfalls. Let’s dive into how you can install LED strip lights outdoors and make your space shine!
Why Choose LED Strip Lights for Outdoor Use?
I fell in love with LED strip lights because they’re so practical and stylish. They use way less energy than traditional bulbs, which means lower electric bills. Plus, they last for years—sometimes up to 50,000 hours! Outdoors, they’re perfect for adding ambiance without worrying about constant replacements.
Another reason I’m a fan is their flexibility. You can cut them to size, bend them around corners, and stick them almost anywhere. They come in various colors and brightness levels, so you can set the mood you want. Most importantly, many LED strip lights are designed for outdoor use, meaning they’re weatherproof and can handle rain, heat, or cold. Just make sure to check the IP (Ingress Protection) rating—IP65 or higher is ideal for outdoor setups.
Tools and Materials You’ll Need
Before we get started, let’s gather everything you need. I learned the hard way that having all your tools and materials ready saves a ton of time. Here’s what I recommend:
| Item | Purpose |
|---|---|
| LED strip lights (IP65 or higher) | Weatherproof lights for outdoor durability. |
| Power supply (waterproof) | Powers the LED strips safely in outdoor conditions. |
| Controller (optional) | For dimming or changing colors if using RGB strips. |
| Mounting clips or adhesive tape | Secures the strips to surfaces. |
| Waterproof connectors | Joins strip segments or connects to the power supply. |
| Measuring tape | Ensures accurate measurements for cutting and placement. |
| Scissors or wire cutters | For cutting LED strips to the right length (only at marked points). |
| Outdoor-rated extension cord | Extends power reach if needed. |
| Cleaning supplies (alcohol wipes) | Preps surfaces for better adhesive grip. |
| Drill and screws (optional) | For mounting clips on tough surfaces like wood or metal. |
| Silicone sealant | Adds extra waterproofing at connection points. |
| Cable ties or clips | Keeps wires tidy and secure. |
I always double-check that my LED strips and power supply are rated for outdoor use. Trust me, using indoor-rated lights outside is a recipe for disaster. Also, grab a ladder if you’re working on high spots like eaves or pergolas.
Planning Your Outdoor LED Strip Light Installation
Planning is where the magic starts. I can’t stress enough how important it is to map out your project before sticking anything down. First, decide where you want the lights. I’ve used them along deck railings, under outdoor furniture, and even around my garden beds. Think about the vibe you’re going for—soft and cozy or bold and vibrant.
Next, measure the area. Use a measuring tape to get the exact length of the surfaces you’re lighting. Add a little extra to account for corners or curves. I once underestimated by a foot and had to reorder strips—annoying! Also, check where your power source is. You’ll need to run the strips to an outdoor outlet or use a waterproof extension cord.
Finally, think about control options. Do you want a simple on/off setup, or do you want to dim the lights or change colors? If you’re going for RGB strips, you’ll need a controller. I love using a remote or app-controlled system for convenience, especially for parties.
Preparing the Surface for Installation
Before sticking those LED strips down, you’ve got to prep the surface. I learned this the hard way when my first set of lights peeled off after a rainy week. Clean the area thoroughly with alcohol wipes to remove dirt, dust, or grease. This helps the adhesive stick better.
If you’re mounting on a rough surface like brick or wood, consider using mounting clips instead of relying solely on the adhesive backing. I’ve found that combining adhesive with clips gives the best hold, especially in windy or wet conditions. For extra security, you can apply a thin layer of silicone sealant around the edges of the strips after installation to keep water out.
Cutting and Connecting LED Strip Lights
One of the coolest things about LED strip lights is that you can customize their length. Most strips have marked cutting points every few inches. I always double-check the instructions to find these spots—cutting in the wrong place can ruin the strip. Use sharp scissors or wire cutters for a clean cut.
If you need to connect multiple strips, use waterproof connectors. I’ve found push-in connectors to be super easy, but you might need to solder for a more permanent setup. Just make sure all connections are sealed with silicone or heat-shrink tubing to keep them weatherproof. I once skipped this step, and a single rainstorm fried my setup. Lesson learned!
Installing the LED Strip Lights
Now comes the fun part—putting up the lights! Start by peeling off the adhesive backing a little at a time and pressing the strip firmly onto the surface. Go slow to avoid air bubbles or crooked lines. I like to work in small sections, especially around corners or curves.
If you’re using mounting clips, mark where they’ll go with a pencil, then screw or stick them in place. Attach the strip to the clips as you go. For tricky spots like under railings, I use cable ties to keep everything neat. Make sure the strip is secure but not stretched too tight—it can damage the wiring.
If your setup requires a power supply or controller, mount those in a dry, accessible spot. I tuck mine inside a waterproof enclosure near an outlet. Run the wires neatly and secure them with cable clips to avoid tripping hazards.
Powering Your LED Strip Lights
Powering your lights correctly is crucial. Most LED strips run on low voltage (12V or 24V), so you’ll need a compatible power supply. I always check the wattage requirements of my strips and choose a power supply with at least 20% more capacity than needed. This prevents overheating and extends the life of your setup.
For outdoor use, the power supply must be waterproof. I place mine in a weatherproof box or under a covered area. Connect the power supply to the LED strips using waterproof connectors, and plug it into an outdoor-rated outlet. If you’re using an extension cord, make sure it’s rated for outdoor use too.
If you want to get fancy, add a controller for dimming or color-changing. I love using a Wi-Fi controller so I can adjust the lights from my phone. Just make sure all connections are sealed tight to keep water out.
Testing and Troubleshooting
Once everything’s installed, it’s time to test. Plug in the power supply and flip the switch. If the lights don’t turn on, don’t panic—I’ve been there! Check all connections to make sure they’re secure. Loose connectors are often the culprit. Also, ensure the power supply is working and matches the voltage of your strips.
If only part of the strip lights up, you might have a bad connection or a damaged section. Inspect where you cut or connected the strips. I once had a strip that flickered because I didn’t seal a connector properly, and water got in. A quick fix with silicone solved it.
If you’re using a controller, test the dimming or color-changing features. Make sure the remote or app is paired correctly. If everything looks good, step back and admire your work!
Maintaining Your Outdoor LED Strip Lights
To keep your lights glowing for years, a little maintenance goes a long way. I check my setup every few months, especially after big storms. Look for loose strips, damaged wires, or water sneaking into connectors. Clean the strips gently with a damp cloth if they get dusty.
If you live in an area with harsh winters, consider taking down the lights or covering them during heavy snow. I leave mine up year-round, but I make sure they’re rated for extreme temperatures. Also, check the power supply and controller periodically to ensure they’re still waterproof.
Creative Ideas for Outdoor LED Strip Lighting
Now that your lights are up, let’s talk about how to use them creatively. I’ve tried a bunch of ideas, and here are my favorites:
- Pathway Lighting: Run strips along walkways or garden paths for a magical effect. I did this along my stone path, and it looks stunning at night.
- Deck or Patio Glow: Install strips under railings or furniture for a cozy vibe. I put them under my patio table, and it’s a hit during dinners.
- Tree or Pergola Accents: Wrap strips around tree trunks or pergola beams for a festive look. I used warm white lights on my pergola, and it feels like a fairy tale.
- Holiday Themes: If you have RGB strips, change colors for holidays—red and green for Christmas, orange for Halloween. My kids love when I switch it up!
Experiment with what works for your space. The beauty of LED strips is how versatile they are.
Safety Tips for Outdoor Installation
Safety is super important when working with outdoor lighting. I always turn off the power when installing or troubleshooting. Use a ground-fault circuit interrupter (GFCI) outlet to protect against electrical shocks. Make sure all components are rated for outdoor use to avoid fire hazards.
If you’re climbing ladders to install lights, have someone spot you. I almost took a tumble once, and now I never work alone on high spots. Also, keep wires away from walkways to prevent tripping.

Conclusion
Installing LED strip lights outdoors has been one of the most rewarding home improvement projects I’ve tackled. The process is straightforward, and the results are absolutely worth it. From planning and prepping to installing and troubleshooting, I’ve shared everything I’ve learned from my own projects. Your outdoor space can go from plain to spectacular with just a few hours of work. Whether you’re lighting up a cozy patio or a sprawling garden, LED strip lights offer endless possibilities. So grab your tools, pick out some quality strips, and let your creativity shine. I can’t wait for you to see how amazing your space looks all lit up!
FAQs
Can I leave LED strip lights on all night?
Yes, you can, as long as they’re rated for outdoor use and properly installed. I leave mine on for hours during gatherings, and they’re fine. Just make sure the power supply is waterproof and not overheating. For energy savings, consider using a timer or smart plug to turn them off automatically.
How do I clean outdoor LED strip lights?
I clean mine with a soft, damp cloth to remove dirt or dust. Avoid harsh chemicals, as they can damage the protective coating. Make sure the power is off before cleaning, and dry the strips thoroughly to prevent water damage.
Can I install LED strip lights in extreme weather?
Most outdoor LED strips with an IP65 or higher rating can handle rain, heat, and cold. I’ve had mine up through hot summers and chilly winters with no issues. Just check the manufacturer’s temperature range and protect the power supply from extreme conditions.
What’s the best way to hide the wires?
I use cable clips or ties to tuck wires along railings or under surfaces. You can also run them through conduit pipes for a cleaner look. For my patio setup, I hid wires behind trim, and it looks seamless.
Do I need a professional to install LED strip lights?
Not at all! I installed mine with no prior experience, and it was pretty easy. As long as you follow the steps, use the right tools, and prioritize safety, you can do it yourself. If you’re working with complex electrical setups, though, consulting a pro might be a good idea.