What Is Low Voltage Lighting?
Hey there! If you’re thinking about sprucing up your home or backyard, you’ve probably heard about low voltage lighting. It’s one of those home improvement trends that’s both practical and beautiful, and I’ve spent a lot of time diving into it for my own home projects. So, let me walk you through what low voltage lighting is, why it’s awesome, and how you can use it to make your space shine. Whether you’re a DIY newbie or a seasoned pro, this guide is packed with everything you need to know to light up your life—literally!
Low voltage lighting is a system that uses less electricity than standard household lighting. It typically operates at 12 or 24 volts, compared to the 120 volts of traditional lighting. This makes it safer, more energy-efficient, and super versatile for both indoor and outdoor spaces. I’ve used it in my garden and living room, and let me tell you, it’s a game-changer. Ready to learn more? Let’s break it down.
Understanding Low Voltage Lighting
So, what exactly is low voltage lighting? In simple terms, it’s a lighting system that runs on a lower electrical voltage than your typical household lights. Most homes in the USA run on 120-volt systems for things like ceiling lights or outlets. Low voltage lighting, on the other hand, uses a transformer to step down that voltage to 12 or 24 volts. This lower voltage means less power consumption and a safer setup, especially for outdoor areas where water or weather might be a concern.
When I first started exploring low voltage lighting for my backyard, I was amazed at how easy it was to install. The lower voltage means you don’t have to worry as much about electrical shocks, and many systems are designed for DIYers. You can find low voltage lighting in things like string lights, landscape spotlights, or even under-cabinet lighting in your kitchen. It’s flexible, affordable, and gives you that cozy, professional look without breaking the bank.
Why Choose Low Voltage Lighting?
You might be wondering, “Why should I go for low voltage lighting instead of regular lights?” Great question! I asked myself the same thing when I was planning my patio makeover. Here are some reasons why low voltage lighting won me over.
First, it’s energy-efficient. These lights use less electricity, which means lower utility bills. Who doesn’t love saving money? Second, it’s safer. The lower voltage reduces the risk of serious electrical issues, which is a big deal if you’re installing lights near water, like a fountain or pool. Third, it’s super versatile. You can use low voltage lighting for everything from highlighting your garden path to creating a warm ambiance in your living room.
I also love how customizable it is. You can choose from different bulb types, colors, and brightness levels to match your style. Plus, many systems come with dimmers or timers, so you can set the mood or save even more energy. For me, it was the perfect way to make my outdoor space feel inviting without spending a fortune.
Types of Low Voltage Lighting
There’s no one-size-fits-all when it comes to low voltage lighting. I’ve tried a few different types in my home, and each has its own charm. Here’s a rundown of the most common types you’ll come across.
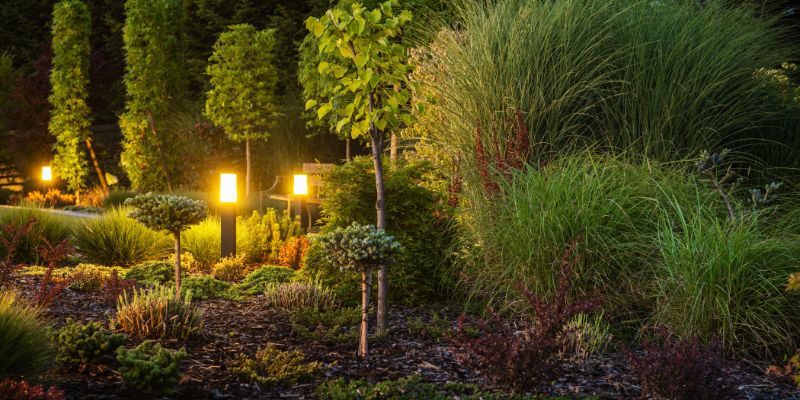
Path lights are probably the most popular for outdoor spaces. They’re small, stake-mounted lights that line walkways or driveways. I used these along my garden path, and they make nighttime strolls feel magical. Spotlights are another great option. They’re perfect for highlighting a tree, statue, or even your home’s exterior. I’ve got a couple aimed at my favorite oak tree, and it looks stunning at night.
Then there are deck lights, which you can mount on railings or steps. These are awesome for safety and style on your deck or patio. I installed some on my deck stairs, and they’ve saved me from tripping more than once! For indoors, under-cabinet lighting is a big hit. It’s great for kitchens or workspaces where you need focused light. I added some under my kitchen cabinets, and it makes cooking at night so much easier.
Finally, string lights are a fun, trendy option. You’ve probably seen them draped across patios or pergolas. I strung some across my backyard, and they’re perfect for summer barbecues. Each type has its own vibe, so you can mix and match to create the look you want.
Benefits of Low Voltage Lighting
Let’s talk about why low voltage lighting is such a smart choice. I’ve already mentioned a few perks, but there’s more to love. Here’s a quick list of benefits that sold me on it.
- Energy Efficiency: Low voltage lights use less power, which means lower energy bills. I noticed a difference in my electricity costs after switching my outdoor lights to low voltage.
- Safety: The lower voltage makes these lights safer to handle, especially in wet areas like gardens or near pools.
- Easy Installation: Most systems are plug-and-play, so you don’t need to be an electrician to set them up. I had my backyard lights up in an afternoon!
- Versatility: You can use them indoors or outdoors, for functional lighting or pure decoration.
- Longevity: Low voltage bulbs, especially LEDs, last longer than traditional bulbs. I haven’t had to replace a single bulb in my system yet.
- Customizable: With dimmers, timers, and color options, you can create the perfect ambiance for any occasion.
Here’s a quick table to sum it up:
| Benefit | Why It Matters |
|---|---|
| Energy Efficiency | Saves money on utility bills and reduces environmental impact. |
| Safety | Lower risk of electrical shock, especially in outdoor or wet areas. |
| Easy Installation | DIY-friendly, no need for professional help. |
| Versatility | Works for indoor and outdoor spaces, from kitchens to gardens. |
| Longevity | LED low voltage bulbs can last for years, reducing maintenance. |
| Customizable | Adjust brightness, colors, and schedules to fit your style and needs. |
How Low Voltage Lighting Works
If you’re curious about the tech behind low voltage lighting, don’t worry—it’s not as complicated as it sounds. I was a bit intimidated at first, but once I got the hang of it, it was smooth sailing. Here’s how it works in simple terms.
Low voltage lighting systems rely on a transformer. This device takes the standard 120-volt electricity from your home and converts it to 12 or 24 volts. The transformer is usually plugged into a regular outlet, and then it sends the lower voltage to your lights through special wiring. This wiring is thinner and easier to work with than standard electrical cables, which makes installation a breeze.
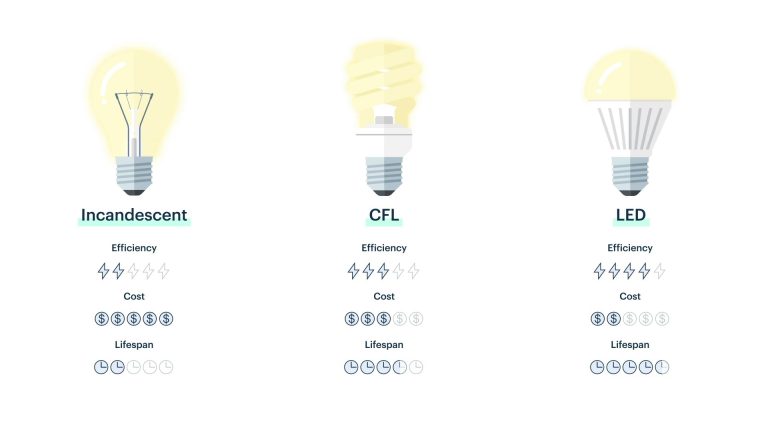
The lights themselves can be LED, halogen, or incandescent, but LEDs are the most popular because they’re energy-efficient and long-lasting. I went with LEDs for my system because they’re bright, durable, and don’t heat up as much. You connect the lights to the transformer using a low voltage cable, and you can arrange them however you like—along a path, around a patio, or even in your home.
One thing I learned is that you need to plan your layout carefully. The transformer has a maximum wattage, so you can’t overload it with too many lights. I made this mistake early on and had to adjust my setup. Most kits come with instructions to help you figure out how many lights you can use, so it’s not too tricky.
Installing Low Voltage Lighting
One of the best things about low voltage lighting is how easy it is to install. I’m no electrician, but I managed to set up my backyard lights in a single weekend. Here’s a step-by-step guide based on my experience.
First, plan your layout. Decide where you want your lights—along a pathway, around a deck, or maybe under your kitchen cabinets. Sketch it out on paper to get a clear idea. Next, choose your transformer. Make sure it has enough wattage to support all your lights. I picked a 100-watt transformer for my 10-light garden setup, and it works perfectly.
Then, gather your materials. Most low voltage lighting kits come with everything you need: lights, cables, connectors, and a transformer. If you’re buying pieces separately, double-check that everything is compatible. Lay out your cables and lights according to your plan. For outdoor setups, you might need to bury the cables slightly to keep them tidy and safe.
Connect the lights to the cable using the provided connectors. I found that “pierce” connectors are super easy—they just snap onto the cable. Plug the transformer into an outlet, and test your lights. If they don’t work, check your connections or make sure the transformer isn’t overloaded. Once everything’s working, secure the lights in place. For path lights, just push the stakes into the ground. For deck lights, you might need screws or adhesive.
My biggest tip? Start small. I began with just a few path lights to get the hang of it, then added more as I got confident. It’s a fun project, and the results are so rewarding.
Where to Use Low Voltage Lighting
The beauty of low voltage lighting is that you can use it almost anywhere. I’ve experimented with it in different parts of my home, and it’s amazing how it transforms a space. Here are some ideas to get you started.
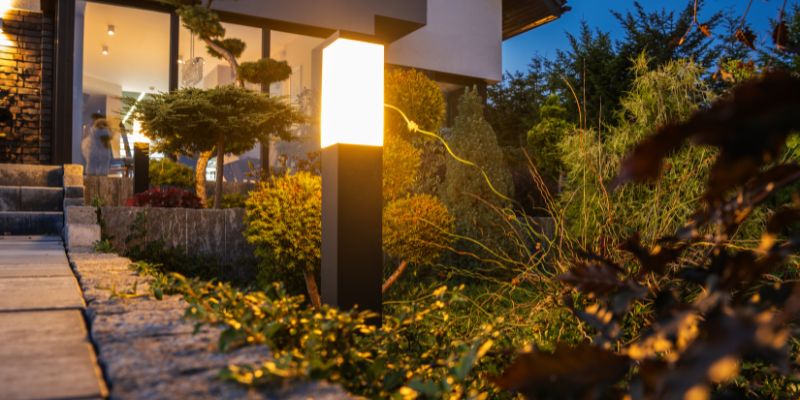
Outdoors, low voltage lighting is perfect for landscaping. Path lights can guide guests along walkways, while spotlights can highlight trees, shrubs, or architectural features like a stone wall. I used spotlights to show off my garden fountain, and it’s now the centerpiece of my backyard at night. Deck lights are great for safety on stairs or railings, and string lights add a festive touch to patios or pergolas.
Indoors, low voltage lighting shines in kitchens and bathrooms. Under-cabinet lighting is a lifesaver for prep work or late-night snacks. I also added some low voltage strip lights under my floating shelves, and it gives my living room a modern, cozy vibe. You can even use low voltage lighting in closets or hallways for a soft, welcoming glow.
One cool idea I came across is using low voltage lighting for holiday displays. Instead of dealing with heavy-duty extension cords, you can use low voltage string lights to decorate your porch or trees. It’s safer and easier to manage.
Choosing the Right Low Voltage Lighting System
With so many options out there, picking the right low voltage lighting system can feel overwhelming. I went through a bit of trial and error, so let me share what I learned to make it easier for you.
First, decide on your purpose. Are you lighting a pathway for safety, creating ambiance, or highlighting a feature? This will help you choose the right type of lights. For example, I picked bright LED path lights for my walkway but softer string lights for my patio.
Next, check the transformer’s wattage. Make sure it can handle the total wattage of your lights. I learned the hard way that overloading a transformer leads to dim or flickering lights. Also, look at the bulb type. LEDs are my go-to because they last longer and use less energy, but halogen bulbs can give a warmer glow if that’s your vibe.
Consider the design, too. Some lights are sleek and modern, while others have a rustic or traditional look. I chose black metal path lights to match my garden’s aesthetic, but you might prefer something more decorative. Finally, think about controls. Some systems come with timers, dimmers, or even smart features that let you control the lights from your phone. I added a timer to my setup, and it’s so convenient to have the lights turn on automatically at dusk.
Maintenance and Care
One thing I love about low voltage lighting is how low-maintenance it is. Still, a little care goes a long way to keep your system looking great. Here are some tips based on my experience.
For outdoor lights, check the connections regularly. Weather can loosen cables or connectors, so I make it a habit to inspect my garden lights every few months. Clean the lenses of your lights to remove dirt or debris—this keeps them bright and clear. I use a soft cloth and some water for this.
If you’re using LED bulbs, you won’t need to replace them often, but it’s good to keep a few spares on hand. I had one bulb go out after a year, and having spares saved me a trip to the store. Also, check your transformer for signs of wear, especially if it’s exposed to the elements. I keep mine in a weatherproof box to protect it.
For indoor lights, dust is the biggest enemy. I wipe down my under-cabinet lights every couple of months to keep them sparkling. If you notice flickering or dimming, double-check the transformer and connections before assuming a bulb is bad.
Cost of Low Voltage Lighting
You’re probably wondering how much low voltage lighting will set you back. The good news? It’s pretty affordable, especially compared to traditional lighting. Here’s what I’ve learned about the costs.
A basic low voltage lighting kit with a transformer, cables, and a few lights can cost between $50 and $150, depending on the brand and number of lights. I found a great 6-light kit for my garden for about $80, and it’s held up beautifully. Individual lights, like path lights or spotlights, typically range from $10 to $30 each. Transformers vary widely—anywhere from $20 for a small one to $100 for a high-capacity model with smart features.
LED bulbs are pricier upfront but save money in the long run because they last so long. I spent about $15 per LED bulb, but I haven’t replaced any in two years. Installation is usually free if you do it yourself, which is easy with most kits. If you hire a professional, expect to pay $100-$300, depending on the size of your project.
Overall, low voltage lighting is budget-friendly, especially when you factor in the energy savings. My electric bill dropped noticeably after switching to low voltage LEDs, so it’s a win-win.
Environmental Impact
As someone who cares about the planet, I was thrilled to learn that low voltage lighting is eco-friendly. Since it uses less electricity, it reduces your carbon footprint. Most low voltage systems, especially those with LEDs, consume a fraction of the energy of traditional lights. For example, my old incandescent path lights used 20 watts each, but my new LED ones use just 3 watts and are just as bright.
Plus, LED bulbs last longer, so you’re not throwing out bulbs as often. This means less waste in landfills. Some systems even let you use solar-powered low voltage lights, which I’m considering for my next project. They’re powered by the sun, so you’re using renewable energy and saving even more on your bills.
Common Mistakes to Avoid
I’ve made a few mistakes with low voltage lighting, so let me save you some trouble. First, don’t overload your transformer. I tried to connect too many lights at first, and they barely glowed. Check the wattage and stick to the limit.
Second, don’t skimp on quality. Cheap lights might save you money upfront, but they can fail quickly, especially outdoors. I had to replace a couple of bargain-brand lights after a rainy season. Third, plan your cable layout. I made the mistake of running cables all over my yard without a plan, and it looked messy. Bury or hide them for a clean look.
Finally, test everything before securing it in place. I learned this the hard way when I had to dig up a cable to fix a bad connection. Take your time, and you’ll avoid headaches.
Conclusion
Low voltage lighting is one of the best home improvement investments I’ve made. It’s safe, energy-efficient, and so easy to work with, whether you’re lighting up your backyard or adding a cozy glow to your kitchen. From path lights to string lights, there’s a style for every space and vibe. I love how it’s transformed my home, making it safer, more inviting, and even a little magical at night. Plus, it’s kind to your wallet and the planet.
Whether you’re a DIY beginner or a home improvement pro, low voltage lighting is a fantastic way to elevate your space. Start small, plan carefully, and have fun experimenting with different setups. I promise you’ll love the results as much as I do. So, grab a kit, get creative, and let your home shine!
FAQs
What’s the difference between low voltage and regular lighting?
Low voltage lighting runs on 12 or 24 volts, while regular lighting uses 120 volts. This makes low voltage safer, more energy-efficient, and easier to install, especially for outdoor use.
Can I install low voltage lighting myself?
Absolutely! Most low voltage systems are designed for DIY installation. They come with simple connectors and instructions, so you don’t need to be an electrician.
Are low voltage lights bright enough?
Yes, they can be very bright, especially LED versions. I use low voltage LEDs in my garden, and they’re plenty bright for pathways and ambiance.
Can low voltage lighting be used indoors?
Definitely! I have low voltage lighting under my kitchen cabinets, and it’s perfect for task lighting or creating a cozy atmosphere.
How much does low voltage lighting cost?
A basic kit can cost $50-$150, with individual lights ranging from $10-$30. Transformers and smart features might add to the cost, but energy savings make it worthwhile.
Is low voltage lighting eco-friendly?
Yes! It uses less electricity, and LED low voltage lights last longer, reducing waste. Some systems even offer solar-powered options for extra sustainability.