How to Prepare A Door For Hinges
Getting doors ready for hinges can seem a bit tricky for folks just starting out. You want everything to line up just right so the door swings smoothly. If it’s not done well, doors can stick or not close properly, which nobody wants.
But don’t worry, it’s actually quite simple when you break it down. We’ll show you exactly how to prepare a door for hinges properly with easy steps. After this, you’ll know just what to do for your next project.
Preparing A Door For Hinges Accurately
This section is all about making sure the door itself is ready to accept hinges. It covers the essential first steps before you even think about fitting the hinges to the door frame. Getting these basics right means the whole process will go much smoother.
We’ll cover measuring and marking precisely, which is super important for a good fit. You’ll learn how to create the perfect spaces for the hinges so they sit flush and work as they should.
Measuring And Marking For Hinge Placement
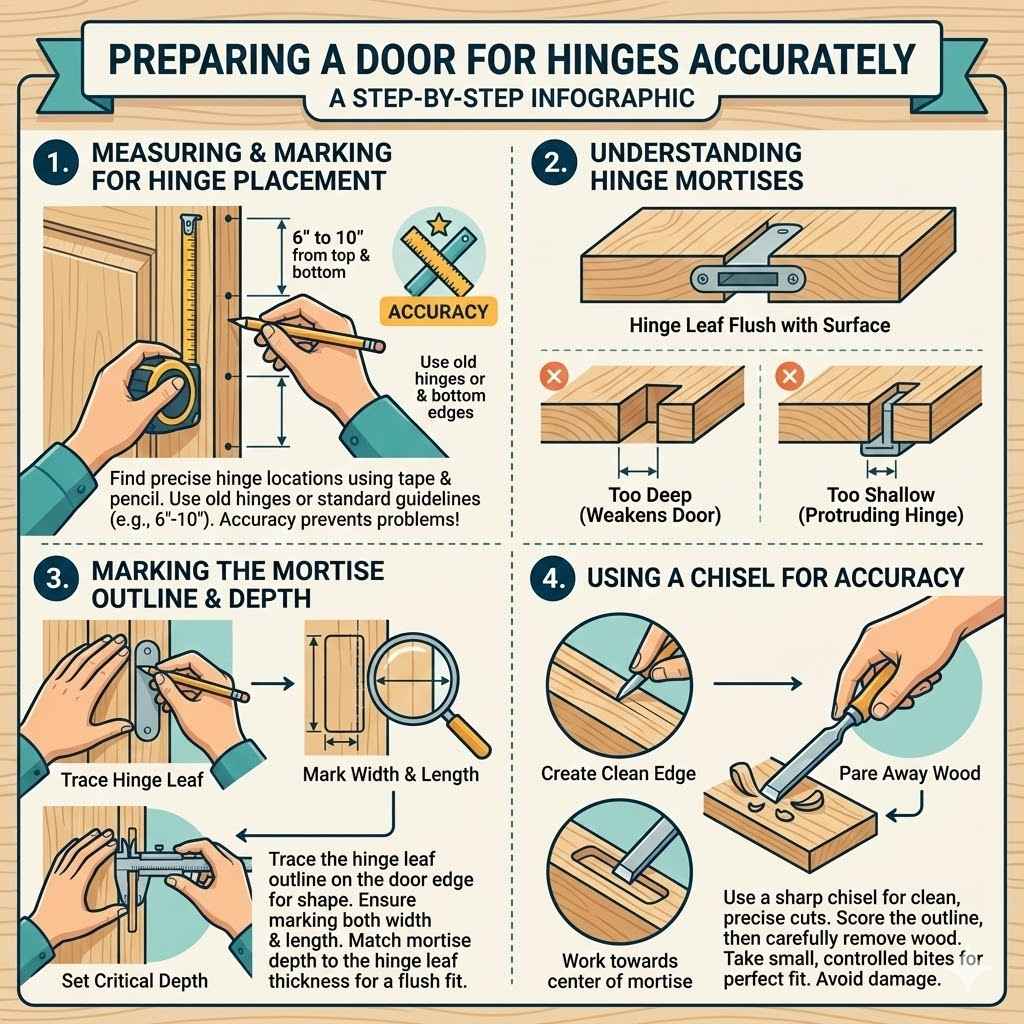
The first thing you need to do is figure out exactly where the hinges will go. This is usually done by looking at the old hinges if you’re replacing them, or by following standard guidelines if it’s a new door. You’ll need a tape measure and a pencil.
Measure from the top and bottom of the door to where the hinge will be. Common placements are about 6 to 10 inches from the top and bottom edges, with one hinge in the middle if it’s a larger door.
Once you have your measurements, mark the spots on the edge of the door. Make sure these marks are clear. These marks will guide you when you start to cut out the space for the hinges.
Accuracy here prevents problems later. A slight mistake can mean the door won’t hang straight or will rub against the frame. Taking your time now saves a lot of frustration down the road.
Understanding Hinge Mortises
A hinge mortise is a small, rectangular cut into the edge of a door (or the door frame) where the hinge leaf will sit. This cut is made so that the hinge sits flush with the surface of the wood, rather than sticking out. When the mortise is done correctly, the door will close properly and look neat.
If you don’t make a mortise, the hinge will protrude, making the door sit unevenly.
The depth of the mortise is very important. It needs to be deep enough for the hinge leaf to sit in but not so deep that it weakens the door edge. Usually, the depth is about the thickness of the hinge leaf itself.
You can test this by holding the hinge up to the door edge to see how much material needs to be removed. A well-cut mortise ensures the door hangs perfectly square and operates smoothly.
Marking The Mortise Outline
When you know where your hinges will sit, you need to draw the exact outline of where the mortise will be cut. Use a sharp pencil and a measuring tape or a hinge-mortising jig. Lay the hinge leaf flat on the edge of the door, aligned with your hinge placement marks.
Carefully trace around the hinge leaf. This will give you the precise shape and size needed for the mortise. Ensure you mark both the width and length of where the hinge leaf will recess.
Depth Of The Mortise
The depth is critical for a flush fit. You want the mortise to be exactly the thickness of the hinge leaf. If it’s too shallow, the hinge will stick out.
If it’s too deep, the hinge will be recessed too far, potentially weakening the door edge. A good way to check is to place the hinge leaf in the mortise as you cut. It should sit perfectly even with the door edge when fully recessed.
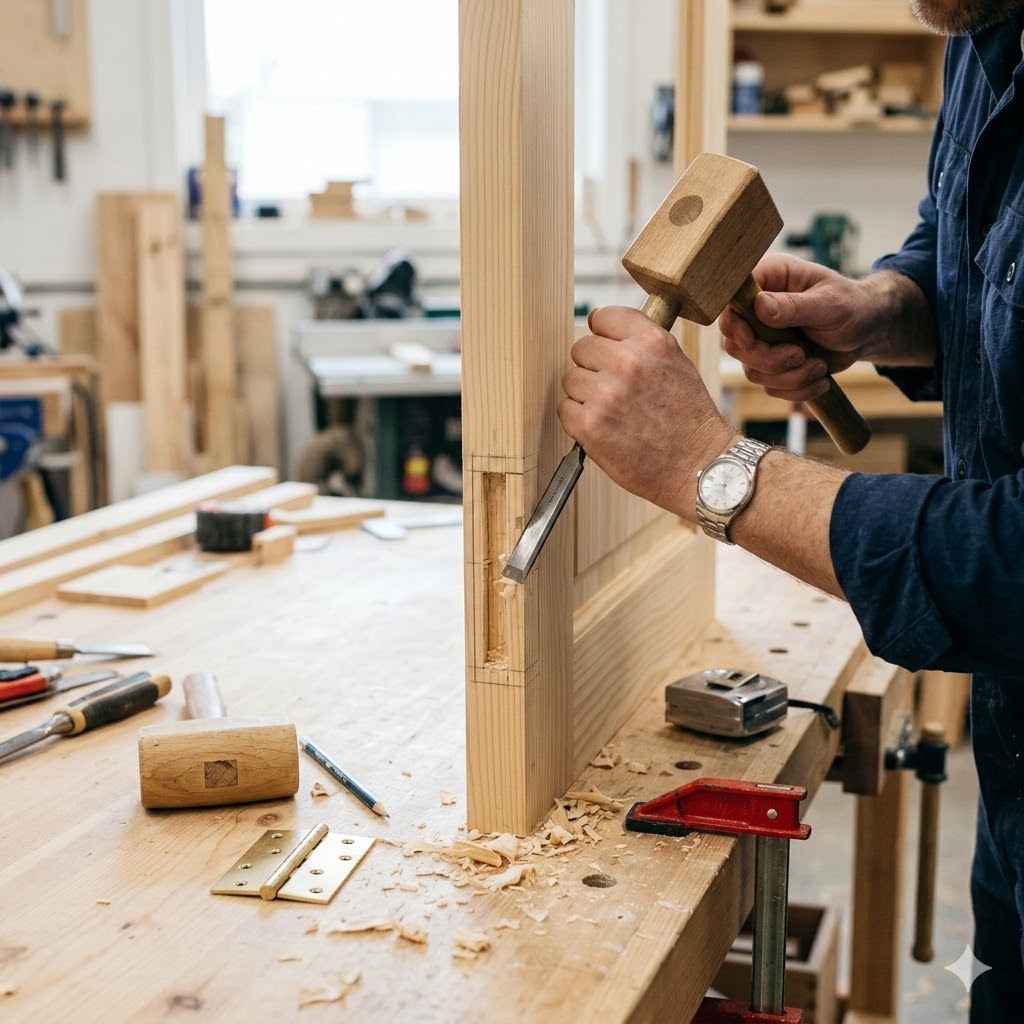
Using A Chisel For Accuracy
A sharp wood chisel is your best friend for cutting mortises. After outlining the mortise, you can make a series of shallow cuts along the traced lines to remove the wood. Start by making a shallow cut along the entire outline to create a clean edge.
Then, use the chisel to carefully pare away the wood inside the outline, working towards the center of the mortise. Take small, controlled scoops rather than trying to remove a lot of wood at once. This prevents mistakes and damage to the door.
How To Prepare A Door For Hinges Tools And Materials
To successfully prepare a door for hinges, having the right tools and materials makes all the difference. It’s not just about having items; it’s about understanding what each one does and why it’s important. We’ll go through the essential items you’ll need, explaining their purpose so you know exactly what to gather.
This list will help you be fully equipped and ready to tackle the job without any last-minute shopping trips.
Essential Tools For Hinge Preparation
You’ll need a few key tools to get the job done right. A tape measure is fundamental for accurate measurements. A sharp pencil is used for marking.
You’ll also need a reliable wood chisel. Make sure it’s sharp; a dull chisel can tear the wood and make the job much harder. A hammer is used to gently tap the chisel when needed.
For creating cleaner cuts and ensuring perfect alignment, a hinge mortising jig is incredibly helpful, especially for beginners. If you don’t have one, you can still do it with just a chisel, but it takes more practice. Safety glasses are also a must to protect your eyes from flying wood chips.
Finally, a utility knife can be useful for scoring wood before chiseling.
Choosing The Right Hinges
Not all hinges are the same, and choosing the right type is important. For interior doors, standard butt hinges are most common. They come in various sizes and finishes like satin nickel, brass, or black.
Make sure the hinge size matches the size of the mortise you’ll be cutting. The door’s weight also plays a role; heavier doors might need stronger, thicker hinges.
Consider the ‘knuckle’ of the hinge. This is the part that pivots. The thickness of the knuckle determines how far the door will sit away from the frame when closed.
Most standard hinges are designed to allow the door to close tightly. Also, think about the screw holes. Ensure the screws provided are suitable for your door material.
Sometimes, longer screws are needed for a more secure fit, especially if the wood is soft.
Butt Hinges Explained
Butt hinges are the most common type used for doors. They consist of two flat plates, called leaves, joined by a pin that forms a knuckle. One leaf attaches to the door edge, and the other attaches to the door frame.
They are called “butt” hinges because the door is “butted” up against the frame when closed, and the hinge fits into a mortise. They are simple, effective, and come in many sizes and finishes to match your decor.
Ball-Bearing Hinges
For heavier doors or doors that are used very frequently, ball-bearing hinges are a great option. These hinges have ball bearings placed between the hinge knuckles. This reduces friction, making the door open and close more smoothly and with less effort.
They are also more durable and can help prevent squeaking over time. They are typically a bit more expensive than standard butt hinges.
Safety Considerations For Screws
When attaching hinges, using the right screws is vital for security. Typically, hinges come with screws that are appropriate for standard wood doors. However, if you are installing hinges on a particularly heavy door or if the wood is soft, you might need longer or thicker screws.
For added security, especially on exterior doors, some people
Step By Step How To Prepare A Door For Hinges
Now, let’s walk through the process step-by-step. This guide will take you from having a door ready for installation to having it perfectly prepared for its hinges. We will cover every detail, making sure you know precisely what to do at each stage.
Following these instructions will help ensure a professional-looking and functional result for your door.
Step 1 Mark Hinge Locations
First, decide where your hinges will go. For a standard door, the top hinge is usually placed 6 to 10 inches from the top of the door. The bottom hinge is similarly placed 6 to 10 inches from the bottom.
If you have a third hinge, it goes in the middle. Measure these distances carefully and mark a light pencil line on the edge of the door where the hinge will sit. These lines are your guides.
Step 2 Trace Hinge Outline
Place a hinge leaf flat on the edge of the door, aligning its top edge with the pencil line you just made. Use a sharp pencil to carefully trace around the entire perimeter of the hinge leaf. Repeat this for all hinge locations.
This traced line shows you the exact area where you need to create the mortise. Ensure the tracing is clear and precise.
Step 3 Score The Outline
To get a clean cut, use a utility knife or the edge of your chisel to score along the traced pencil lines. This creates a channel that guides the chisel and prevents the wood fibers from tearing as you remove material. Press firmly enough to cut into the wood but not so deep that you go through the door edge.
This step helps define the edges of your mortise.
Step 4 Cut The Mortise
Now it’s time to remove the wood. Position your sharp chisel along the scored line, with the bevel side facing into the mortise area. Hold the chisel at a slight angle and use your hammer to tap the end of the chisel gently.
Work in shallow passes, removing small amounts of wood at a time. As you get deeper, you can start to angle the chisel to pare away the wood. Continuously check the depth against the thickness of your hinge leaf.
Aim for a mortise that is the same depth as the hinge leaf.
Starting The Cut
Begin by making shallow cuts along the traced lines. This helps to create a defined edge for the mortise. Use the chisel and hammer to tap it gently, removing thin slivers of wood.
Work your way along the entire outline, creating a shallow groove. This initial scoring and cutting help to keep the wood fibers from splintering outwards when you start removing larger chunks.
Removing Bulk Wood
Once the edges are defined, you can start removing the bulk of the wood from the center of the mortise. Use the chisel to scoop out the wood, working from the center outwards towards the edges. Always aim to cut with the grain of the wood as much as possible to avoid tear-out.
If you encounter resistance or the wood isn’t cutting cleanly, your chisel might need sharpening.
Checking Depth And Fit
Periodically place a hinge leaf into the mortise to check its depth and fit. The hinge leaf should sit perfectly flush with the surface of the door edge when fully seated. If the mortise is too shallow, continue to pare away wood until it is the correct depth.
If it’s too deep, you may need to add a thin shim to the mortise before installing the hinge, or carefully build up the depth with wood filler if it’s a minor issue.
Here’s a simple scenario:
- You’re hanging a new interior bedroom door.
- You’ve measured and marked the spots for three hinges on the door edge.
- Using a sharp pencil and a hinge, you trace the outline of where each hinge leaf will sit.
- You score these lines with a utility knife for clean edges.
- With a sharp chisel and hammer, you carefully remove the wood inside the traced outlines until each mortise is the exact depth of the hinge leaf and the hinge sits flush.
Final Touches For Hinge Preparation
Once the mortises are cut, there are a few final things to do to ensure everything is perfect. These steps might seem small, but they contribute significantly to the final look and function of your door. They help make sure the hinges will install smoothly and the door will operate without any hitches.
Sanding And Smoothing
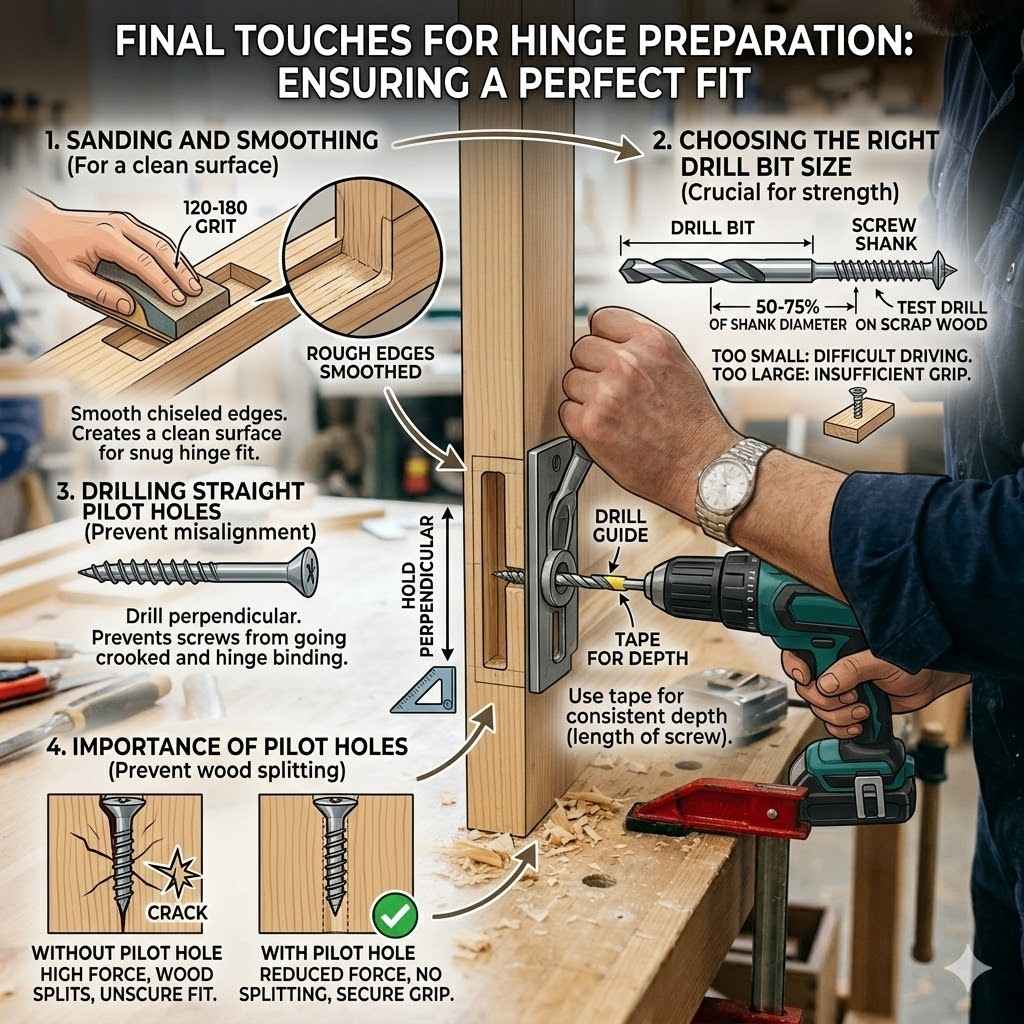
After chiseling out the mortises, the wood edges might be a little rough. Lightly sand the inside of the mortises with fine-grit sandpaper (around 120-grit or 180-grit). This will smooth out any jagged edges and create a cleaner surface for the hinge to sit against.
Be careful not to enlarge the mortise too much while sanding. A smooth surface ensures the hinge sits snugly and operates without binding.
Pre-Drilling Screw Holes
Before you screw the hinges into place, it’s a good idea to pre-drill pilot holes for the screws. Use a drill bit that is slightly smaller than the diameter of the screw threads. This prevents the wood from splitting when you drive the screws in, especially in hardwoods.
It also makes driving the screws much easier and ensures they go in straight. The depth of the pilot hole should be about the length of the screw you are using.
When pre-drilling, ensure you drill straight into the mortise. The pilot hole should align with where the screw will enter the door frame or edge. If the pilot holes are not drilled straight, the screws will go in at an angle, which can affect how the hinge sits and operates.
For consistency, you can mark the depth on your drill bit with a piece of tape.
Importance Of Pilot Holes
Pilot holes are tiny holes drilled into the wood before screws often go into dense wood or near edges, pilot holes are especially important.
They create a channel for the screw threads, reducing the force needed to drive the screw and ensuring it goes in straight and secure.
Choosing The Right Drill Bit Size
The size of the drill bit for pilot holes depends on the screws you are using. Generally, you want a bit that is about 50-75% of the diameter of the screw’s shank (the solid part without threads). If you’re unsure, test on a scrap piece of wood.
A bit that’s too small might make it hard to drive the screw, while a bit that’s too large won’t provide enough grip for the threads.
Drilling Straight Pilot Holes
To ensure the screws go in straight, it’s crucial to hold the drill perpendicular to the surface. You can use a drill guide or simply pay close attention to keep the drill bit aligned with the intended path of the screw. If the pilot holes are crooked, the screws will also be crooked, which can cause the hinge to bind or not sit flush, impacting the door’s swing and alignment.
Aim for a consistent depth as well, usually matching the length of the screw.
Consider this situation:
- You’ve finished chiseling the mortises for your door hinges.
- You lightly sand the inside of each mortise to make it smooth.
- You select a drill bit that’s slightly smaller than your hinge screws.
- You carefully drill pilot holes into the center of each mortise, ensuring they are straight and the correct depth.
- This prepares the door perfectly for attaching the hinges.
Frequently Asked Questions
Question: How deep should a hinge mortise be?
Answer: A hinge mortise should be exactly the thickness of the hinge leaf so that the hinge sits flush with the door edge.
Question: Can I hang a door without mortising the hinges?
Answer: Yes, you can surface-mount hinges, but they will stick out from the door edge, which is not standard and can affect door closure and appearance.
Question: What happens if my mortise is too deep?
Answer: If your mortise is too deep, the hinge will sit too far into the door. You might need to add thin cardboard shims behind the hinge leaf to bring it out to the correct level.
Question: How do I know where to place the hinges on the door?
Answer: Typically, hinges are placed about 6-10 inches from the top and bottom of the door, with a third hinge centered if it’s a large or heavy door.
Question: What is the best tool for cutting a hinge mortise?
Answer: A sharp wood chisel is the traditional and most effective tool. A router with a straight bit and a jig can also be used for faster, more precise cuts, especially for multiple doors.
Summary
Preparing a door for hinges correctly ensures a smooth, functional, and attractive finish. By accurately measuring, marking, and cutting precise mortises, you create the perfect recess for each hinge leaf. Taking these steps, along with pre-drilling pilot holes, guarantees the hinges will be securely installed and the door will swing as it should.
You now have the knowledge to prepare your door with confidence.