How To Remove Cabinet Doors With Salice Hinges: An Essential Guide
Quick Summary: Removing cabinet doors with Salice hinges is straightforward! Typically, you’ll locate the release button or screw on the hinge arm, press or turn it, and the door will detach. This guide provides clear, step-by-step instructions for easy DIY removal.
Ever found yourself needing to take a cabinet door off for a quick repair, a thorough cleaning, or perhaps a stylish update? If your cabinets are fitted with Salice hinges, you might be wondering how to detach them without causing damage. It’s a common question, and thankfully, Salice hinges are designed with user-friendliness in mind. Many homeowners feel a bit daunted by DIY tasks involving hardware, but with a few simple steps, you’ll be able to confidently remove your cabinet doors. This guide is here to break down the process into easy-to-follow instructions, making it a breeze for any homeowner.
We’ll walk you through exactly what to look for and how to gently detach those doors. Get ready to tackle this project with ease, and discover just how simple it can be!
Understanding Salice Hinges
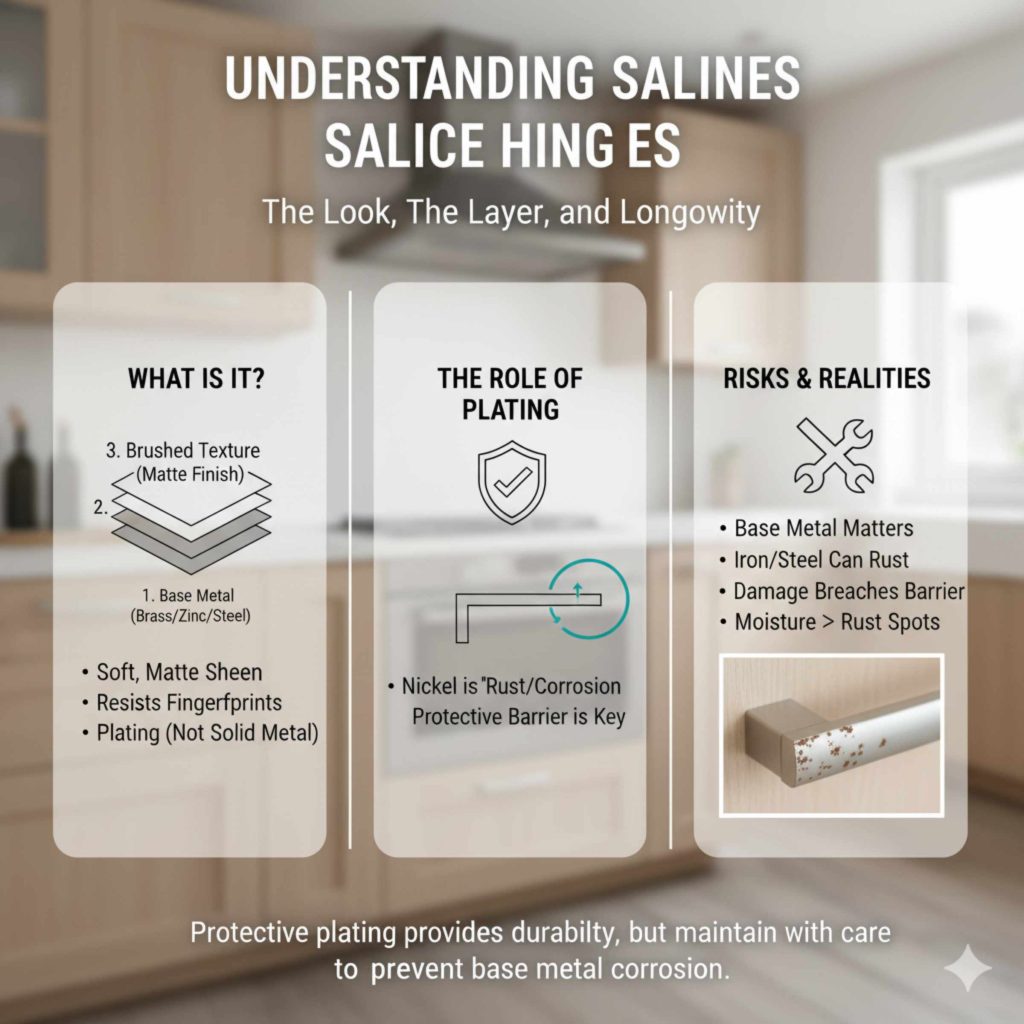
Salice hinges are a popular choice in cabinetry, known for their quality, durability, and smooth operation. They come in various types, but most modern Salice hinges share a common mechanism for easy door removal. This mechanism is designed to allow for quick detachment and reattachment, which is incredibly handy for maintenance or deep cleaning. Understanding the basic construction of these hinges will make the removal process much smoother.
These hinges are typically made up of two main parts: the hinge arm that attaches to the cabinet frame and the hinge cup that sits within the cabinet door. The magic happens at the point where these two parts connect, usually involving a release mechanism. Knowing this helps you anticipate where to look for the detachment point.
Common Types of Salice Hinges and Their Mechanisms
While the exact appearance can vary, Salice hinges generally fall into a few categories based on their mounting and function. The most common ones you’ll encounter in residential kitchens and bathrooms are:
- Clip-On Hinges: These are incredibly popular for their ease of use. The hinge arm on the cabinet frame has a mechanism that allows the hinge cup on the door to simply “clip” on and off.
- Screw-On Hinges: Older or more specialized Salice hinges might require unscrewing a few fasteners to detach the door.
- Concealed Hinges: These are the most common type, where the hinge is hidden when the door is closed, providing a sleek look. Most concealed Salice hinges use a clip-on or a specific release button system.
The key to removing your cabinet doors lies in identifying which type of Salice hinge you have and locating its specific release mechanism. Don’t worry if you’re unsure; we’ll cover how to identify and operate them.
Tools You’ll Need
One of the best things about removing cabinet doors with Salice hinges is that you usually don’t need a lot of specialized tools. In most cases, you can get the job done with common household items. Having the right tools, even simple ones, makes the process faster and reduces the risk of accidental damage.
Here’s a list of tools that will likely come in handy:
- Phillips Head Screwdriver: This is the most common type of screwdriver and is often needed for adjusting hinges or, in some cases, for specific release mechanisms.
- Flathead Screwdriver (Small): A small flathead screwdriver can be useful for gently prying or manipulating small clips if the release button is a bit stiff.
- Soft Cloth or Towel: To protect surfaces from scratches and to wipe away any dust or debris.
- Optional: A Helper: For larger doors, having a second person to support the door as it detaches can be very helpful and prevent it from dropping unexpectedly.
Before you begin, take a moment to gather these items. Having everything ready will ensure a smooth workflow.
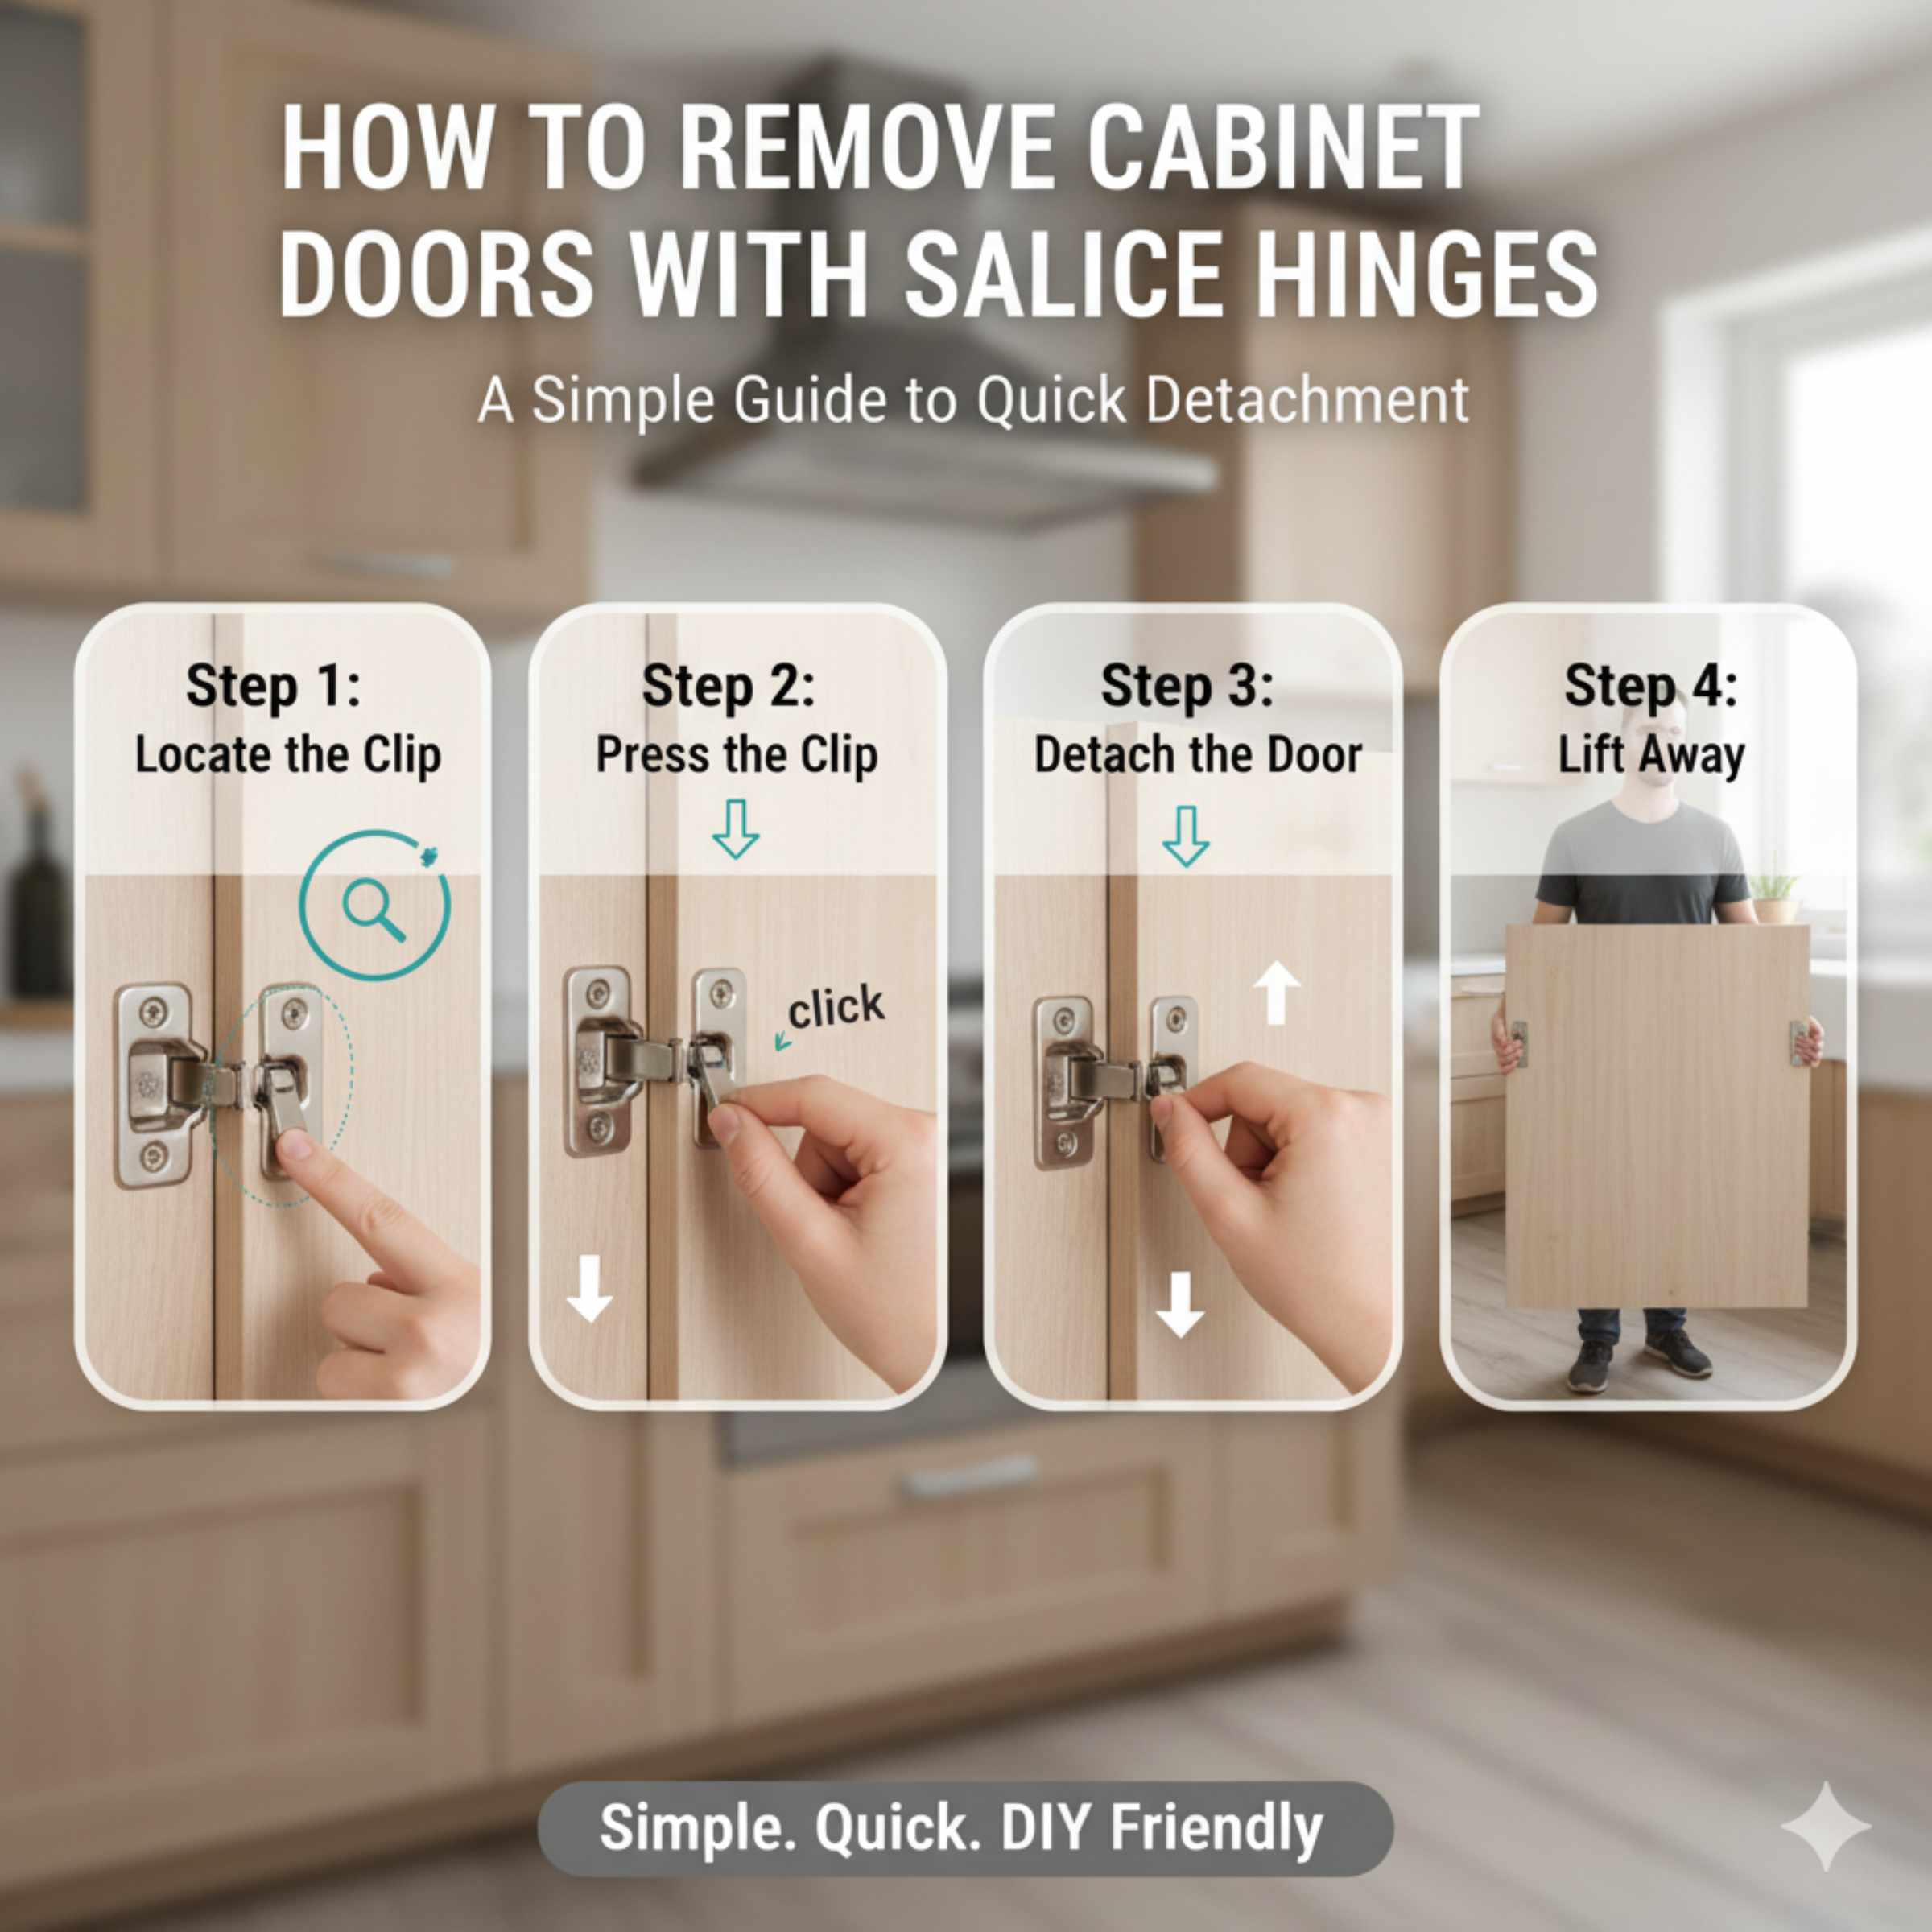
Step-by-Step Guide: How to Remove Cabinet Doors with Salice Hinges
Let’s get straight to it! Removing cabinet doors with Salice hinges is usually a two-part process: identifying the hinge type and then operating the release mechanism. We’ll cover the most common scenarios.
Step 1: Identify Your Salice Hinge Type
Open the cabinet door fully. Look closely at the hinge where it attaches to the cabinet frame. You’re looking for a specific feature that indicates the release mechanism. Most modern Salice concealed hinges will have either:
- A Button or Lever: Usually located on the underside or back of the hinge arm that is attached to the cabinet frame. It might be a small plastic or metal button you press.
- A Screw: Some older or specific models might have a screw that, when loosened or removed, releases the door.
- A Clip System: You might see a small gap or a lever that suggests a clipping mechanism.
Take a good look at all the hinges on the door. Sometimes, one hinge might have a slightly different design or be easier to access than others.
Step 2: Locate the Release Mechanism
Once you’ve identified the likely hinge type, focus on finding the specific release point. For clip-on or button-release hinges, this is usually quite visible.
For Hinges with a Release Button/Lever:
Look for a small button or lever on the part of the hinge attached to the cabinet. This is often on the side or bottom of the hinge arm. You might need to push or pull this lever to disengage the hinge from its mounting plate on the cabinet frame.
For Hinges with a Screw Release:
If you see a screw that seems to be holding the hinge arm to a mounting plate, this might be your release. You’ll likely need to loosen or remove this screw. Be careful not to lose it!
For Clip-On Hinges:
These often have a small tab or lever that you need to press or lift. Sometimes, you might need to use a small flathead screwdriver to help depress the clip.
Step 3: Engage the Release Mechanism
This is where you’ll actually detach the door. Work one hinge at a time, or if possible, try to disengage both hinges simultaneously if the mechanism allows.
Using a Release Button/Lever:
Gently press the button or move the lever. You might hear a slight click as the hinge disengages. If it feels stuck, try wiggling the door slightly while applying pressure to the button. Sometimes, a small amount of movement is needed to fully release it.
Using a Screw:
Using your Phillips head screwdriver, carefully loosen the identified screw. You usually don’t need to remove it completely; just loosening it a few turns is often enough to allow the hinge arm to slide off the mounting plate. If you do remove it, keep it in a safe place!
Using a Clip System:
Press the release tab or lever firmly. If it’s tight, you can use the tip of a small flathead screwdriver to help push it down. Be gentle to avoid breaking the plastic clip.
Step 4: Support the Door and Detach
As you release the mechanism on one hinge, the door will start to pivot or loosen. It’s a good idea to have a hand ready to support the weight of the door. If you have a helper, now is the time for them to steady the door.
Once one hinge is released, move to the other hinge on the same door and repeat the process. As the last hinge disengages, carefully lower the door.
Important Tip: If the door feels like it’s going to fall unexpectedly, stop and reassess. It’s always better to take an extra moment to ensure you have a firm grip or help ready.
Step 5: Remove the Door
With all hinges detached from their mounting plates, the cabinet door is now free! Carefully set it aside in a safe place where it won’t get scratched or damaged. You might want to lay it on a soft cloth or blanket.
What About the Hinges Left on the Cabinet?
The part of the Salice hinge that remains attached to the cabinet frame is usually the mounting plate. Most Salice hinge systems allow the door-mounted hinge arm to simply slide off this plate. If your hinges are the clip-on type, the plate stays on the cabinet, and the hinge “clips” onto it. If you need to remove the mounting plates from the cabinet frame, there will usually be a couple of screws holding them in place. You can then use your screwdriver to remove these screws.
Troubleshooting Common Issues
Even with clear instructions, sometimes things don’t go exactly as planned. Here are a few common issues you might encounter and how to solve them:
- Hinge is Stuck: If the release button or lever feels jammed, try applying a small amount of lubricant like WD-40. Let it sit for a few minutes, then try again. Gently wiggling the door or hinge arm can also help free it.
- Can’t Find the Release Mechanism: Double-check the hinge. Sometimes, the button or lever is very small or cleverly integrated. Look for any small plastic tabs, levers, or even specific screw heads that look different from others. You can also search online for your specific Salice hinge model number (often printed on the hinge itself) to find diagrams or videos. A great resource for hardware identification and repair can be found on sites like WoodworkingTalk forums, where experienced users share their knowledge.
- Door is Heavy: For larger or heavier doors, always enlist a helper. Trying to manage a heavy door alone can lead to dropped doors, damaged hinges, or even injury.
- Damaged Hinge: If a hinge appears broken or damaged, it might be difficult to remove using the standard method. In such cases, you may need to carefully unscrew the entire hinge from the door or cabinet frame, or even cut it off as a last resort, being extremely careful not to damage the cabinet itself.
Remember, patience is key. If something isn’t working, take a step back, re-examine the hinge, and try a different approach. For more in-depth information on hinge repair and adjustment, the Rockler Guide to Cabinet Hinges offers valuable insights.
Reattaching Cabinet Doors with Salice Hinges
Putting the doors back on is usually even easier than taking them off! The process is essentially the reverse.
- Align the Hinge Arm: Hold the cabinet door up to the cabinet frame. Align the hinge arms on the door with the mounting plates on the frame.
- Clip or Slide into Place: For clip-on hinges, simply push the hinge arm firmly onto the mounting plate until you hear or feel a click. For slide-on types, align the hinge arm with the plate and slide it on until it’s fully seated.
- Secure if Necessary: If you loosened or removed screws in Step 3 of the removal process, re-tighten them now. For clip-on systems, ensure the clip has engaged properly.
- Test the Door: Open and close the door a few times to ensure it operates smoothly and is securely attached.
- Adjustments: Salice hinges often have adjustment screws that allow you to fine-tune the door’s position (up/down, left/right, in/out). If the door isn’t hanging perfectly, use these screws to make minor adjustments. A helpful resource for understanding hinge adjustments can be found through guides like the one provided by Family Handyman.
It’s always a good idea to make any necessary adjustments immediately after reattaching the doors. This ensures your cabinets look and function their best.
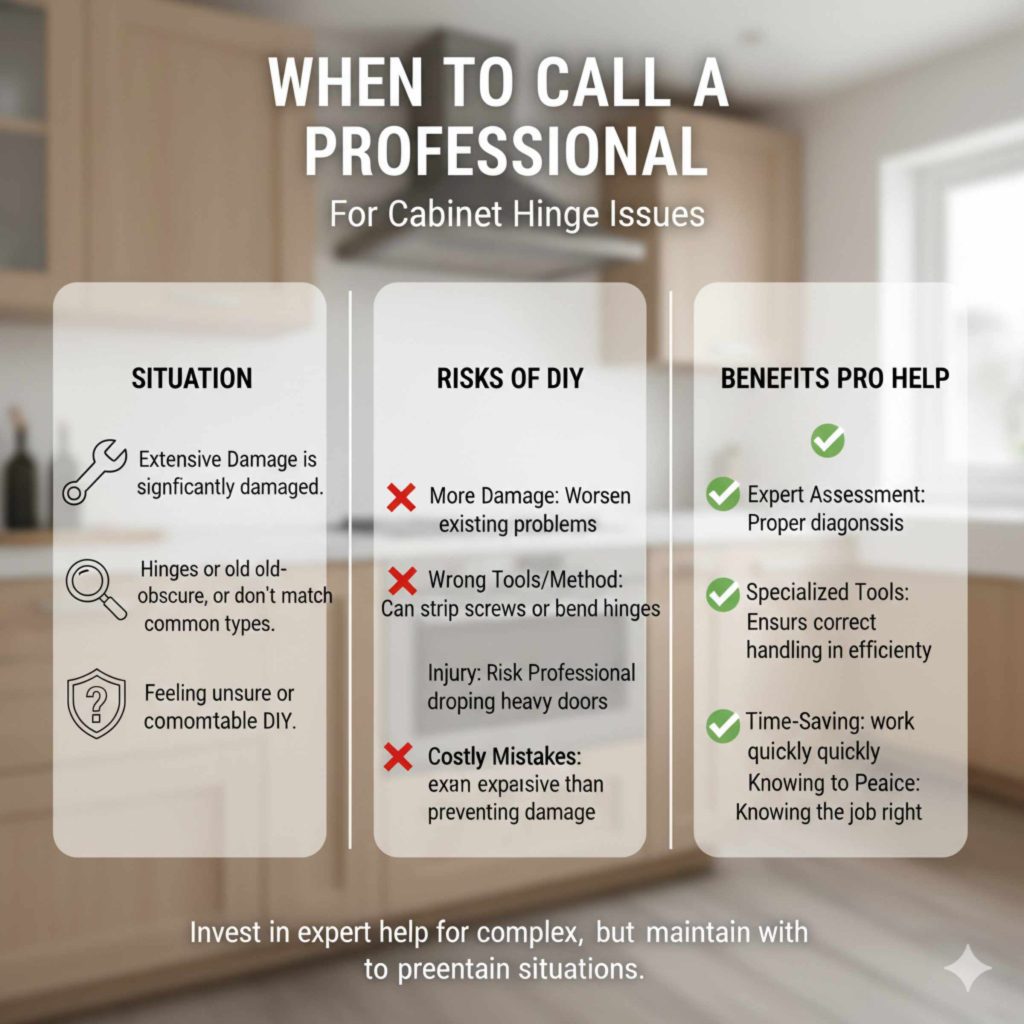
When to Call a Professional
While removing cabinet doors with Salice hinges is a manageable DIY task for most homeowners, there are times when it’s best to call in a professional. If you encounter any of the following situations, don’t hesitate to seek expert help:
- Extensive Damage: If the cabinet frame or the door itself is significantly damaged around the hinge area, a professional can assess the best repair strategy.
- Unusual or Old Hardware: If you have very old, obscure, or unusually designed hinges that don’t match the common Salice mechanisms, a professional might have the experience and tools to handle them.
- Lack of Confidence: If you’re feeling unsure or uncomfortable with the process, it’s always wise to let a handyman or carpenter take over. It’s better to invest in professional help than to risk damaging your cabinetry.
- Complex Cabinetry: For custom-built cabinets or high-end finishes, professionals can ensure that no damage occurs during the removal or reinstallation process.
A professional cabinet installer or handyman can save you time, stress, and potential costly mistakes. Organizations like the National Association of Home Builders (NAHB) can help you find reputable professionals in your area.
Frequently Asked Questions (FAQ)
Q1: How do I know if I have Salice hinges?
You can usually find the brand name “Salice” stamped or printed on the hinge itself, often on the hinge arm or the hinge cup. Look closely at the metal or plastic components of your cabinet hinges.
Most modern Salice concealed hinges feature a clip-on or release button mechanism for easy door removal. However, some older or specialized models might use screws for detachment. Always inspect the hinge for the specific mechanism.
Q3: Can I remove just one side of the hinge?
Salice hinges are designed so that the door-mounted part of the hinge detaches from the cabinet-mounted plate. You generally detach the entire hinge from the door by disengaging it from the plate, rather than removing just one side of the physical hinge component.
If the release button is stiff, try applying a small amount of lubricant like WD-40 and letting it sit for a few minutes. Gently wiggling the hinge or door while pressing the button can also help. Avoid excessive force, which could damage the hinge.
Q5: How do I reattach the cabinet door?
Reattaching is usually the reverse of removal. Align the hinge arm with the mounting plate and push or slide it into place until it clicks or secures. Then, test the door’s movement and make any necessary adjustments using the hinge’s adjustment screws.
Q6: My cabinet door is heavy. What should I do?
For heavy doors, it’s highly recommended to have a second person assist you. One person can support the door while the other operates the hinge release mechanism, ensuring safety and preventing damage.
Q7: Can I remove the mounting plate from the cabinet frame?
Conclusion:
Removing cabinet doors with Salice hinges doesn’t have to be a mystery. By understanding the common mechanisms and following these straightforward steps, you can confidently detach and reattach your cabinet doors for cleaning, repairs, or updates. Remember to work patiently, use the right tools, and don’t hesitate to ask for help if needed. With this guide, you’re well-equipped to handle this common home improvement task with ease and achieve great results. Happy DIYing!