How to Remove Refrigerator Door Handles Easily
Many people wonder about How to Remove Refrigerator Door Handles Easily. It seems like a simple task, but sometimes these handles can be tricky, especially if you haven’t done it before. You might worry about scratching your fridge or breaking something.
But don’t fret! We’ll walk you through this step by step. It’s easier than you think, and we’ll make sure you know exactly what to do.
How to Remove Refrigerator Door Handles Easily Step By Step
This section is all about making sure you can successfully take off your refrigerator door handles without any headaches. We’ll break down the entire process into simple, manageable steps that anyone can follow. From gathering your tools to the final gentle pull, each part is explained clearly.
You’ll learn about common handle types and the best ways to approach each one. This guide is designed to give you the confidence to tackle this task yourself, saving you time and potential repair costs. By the end, you’ll be a pro at removing these common fridge parts.
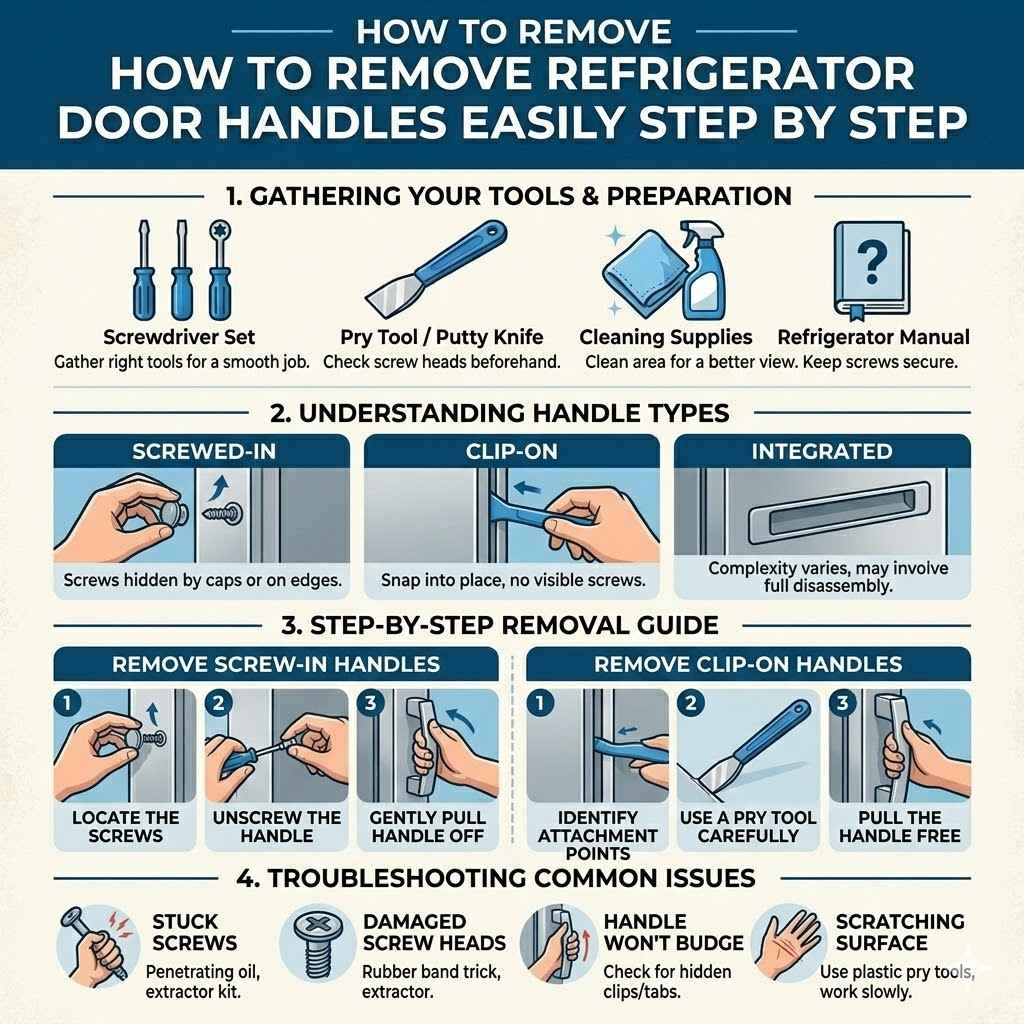
Gathering Your Tools and Preparation
Before you start, having the right tools makes the job much smoother. You’ll want to be prepared so you don’t have to stop and search for something mid-task. This preparation phase is key to a hassle-free experience.
Screwdriver Set: A good set with various sizes and types of screwdrivers is essential. Most refrigerator handles use Phillips head screws, but some might use flathead or even Torx screws. Having a range ensures you’re ready for whatever your fridge throws at you.
It’s wise to check the screw heads beforehand if possible. A magnetic tip can also be a lifesaver, preventing dropped screws from disappearing into the fridge’s nooks and crannies.
Pry Tool or Putty Knife: Sometimes, handles have plastic covers or clips that need a little gentle persuasion to come off. A plastic pry tool is ideal because it’s less likely to scratch your appliance than a metal one. A thin, flat putty knife can work in a pinch, but be extra careful.
You just need to create a small gap to get leverage. Always start in an inconspicuous area if you’re unsure about potential damage.
Cleaning Supplies: A soft cloth and some mild cleaner are helpful for cleaning the area around the handle before and after removal. This also helps you see the screws or clips more clearly. It’s a good habit to keep your appliances clean anyway, and this is a perfect opportunity.
A little bit of care now can prevent future issues.
Your Refrigerator Manual: If you still have it, your refrigerator’s manual can offer specific instructions for your model. It might show you exactly where screws are hidden or how clips work. Even older manuals can be found online if you don’t have the physical copy.
This is often the most reliable source of information for your specific appliance.
Understanding Different Handle Types
Refrigerators come with various handle designs, and knowing what you’re dealing with is half the battle. Each type has its own way of being attached, often involving hidden screws or clips.
Screwed-In Handles: These are the most common. You’ll usually find screws on the inside of the door, often hidden behind a small plastic cover or cap. Sometimes, the screws are on the top or bottom edge of the handle itself.
They are designed to be secure but removable with the right screwdriver. The key is locating these screws, which are often the primary attachment point.
Clip-On Handles: Some older or simpler models might use a clip system. These handles snap into place and don’t have visible screws. They usually require a bit of gentle prying to disengage the clips.
The trick here is to find the seam where the handle meets the door and carefully insert a pry tool. You might hear a click as the clips release.
Integrated Handles: Modern refrigerators sometimes feature handles that are built directly into the door panel or are part of a larger trim piece. Removing these can be more complex and might involve disassembling parts of the door itself. For these, it’s often best to consult the manufacturer’s guide or a professional, as they might not be designed for easy DIY removal.
Step-by-Step Guide How to Remove Refrigerator Door Handles Easily
Let’s get to the practical steps. Following these carefully will ensure you can remove your refrigerator door handles smoothly. We’ll cover both common screw-in and clip-on styles.
Removing Screw-In Handles
This is the most frequent scenario for homeowners. The process usually involves locating and removing screws that hold the handle in place. It’s designed to be a straightforward process with a bit of know-how.
Locate the Screws: Open the refrigerator door. Look for a small plastic cap or cover on the inside of the door where the handle attaches. These caps often conceal the screws.
You might need a small, flathead screwdriver or a fingernail to gently pry these caps off. If there are no caps, check the top and bottom edges of the handle itself for visible screw heads.
Unscrew the Handle: Once you’ve found the screws, use the appropriate screwdriver to remove them. Turn the screws counter-clockwise. Make sure you have a secure grip on the screwdriver to avoid stripping the screw head.
Keep the screws in a safe place, like a small container or a magnetic dish, so they don’t get lost.
Gently Pull the Handle Off: After all screws are removed, the handle should loosen. Gently pull the handle away from the door. It might require a slight wiggle or tug.
If it feels stuck, double-check for any missed screws or clips. Some handles might have a small alignment tab that needs to be lifted or pushed.
Removing Clip-On Handles
Clip-on handles are less common but appear on some models. They rely on tension and clips rather than screws for attachment.
Identify Attachment Points: Look for the seams where the handle meets the refrigerator door. You are searching for areas where the handle might be slightly separated from the door panel, suggesting a clip mechanism.
Use a Pry Tool Carefully: Insert a plastic pry tool or a thin putty knife into the seam. Gently work your way along the edge, applying steady pressure to release the clips. You might hear audible clicks as each clip disengages.
Be patient; forcing it can damage the handle or the door.
Pull the Handle Free: Once all clips are released, the handle should come off easily. If it’s still attached, go back and check for any missed clips or areas that need more leverage. Some clip systems might require you to push a small tab while pulling.
Troubleshooting Common Issues
Even with clear instructions, you might encounter a snag. Don’t worry, most issues have simple solutions. The key is to stay calm and address the problem systematically.
Stuck Screws: If a screw is stuck and won’t turn, it might be stripped or corroded. You can try applying a penetrating oil to the screw threads and letting it sit for a few minutes. If the head is stripped, you might need a screw extractor kit, which can grip the damaged head for removal.
Sometimes, applying firm downward pressure while turning can help engage the remaining grooves.
Damaged Screw Heads: A stripped screw head is frustrating. If it’s slightly damaged, a rubber band placed between the screwdriver and the screw head can sometimes provide enough grip to turn it. For more severe stripping, consider using a screw extractor or a Dremel tool to cut a new slot for a flathead screwdriver.
Handle Won’t Budge: If the handle is resisting after removing visible fasteners, there might be hidden clips or adhesive. Inspect the handle and door for any slight gaps or areas that look different. Gently try to apply pressure in different directions or use a bit more leverage with your pry tool.
Be cautious not to bend or break the handle.
Scratching the Fridge Surface: To prevent scratches, always use plastic pry tools instead of metal ones. If you must use metal, cover the edge with tape. Work slowly and deliberately.
If you do get a minor scratch, a touch-up pen or furniture polish might help disguise it. Keeping the area clean also helps.
Replacing Refrigerator Door Handles
After you’ve successfully removed the old handles, you’ll likely want to put new ones on or reattach the original ones. This process is generally the reverse of removal, but there are a few things to keep in mind to ensure a secure and proper fit.
Choosing the Right Replacement Handles
If you’re replacing damaged or outdated handles, selecting the correct ones is crucial. Using handles designed for your specific refrigerator model will ensure they fit perfectly and match the aesthetic of your appliance.
Model Number is Key: Your refrigerator’s model number is usually found on a sticker inside the door frame or on the back of the appliance. Once you have this, you can search online for compatible replacement handles. Many appliance parts websites allow you to search by model number.
This is the most reliable way to find parts that are guaranteed to fit.
Handle Style and Finish: Consider the original style and finish of your handles. Do you want an exact match, or are you looking to update the look? Handles come in various materials like stainless steel, black, white, and brushed nickel.
Ensure the new handles are designed for your door type (e.g., French door, side-by-side).
Check Dimensions: Even if a handle is listed as compatible, it’s wise to check its dimensions. Ensure the screw hole spacing matches your door and that the handle’s projection from the door is appropriate. A handle that is too large or too small can look awkward and may not function correctly.
Reputable Suppliers: Purchase
Reattaching Your Handles
Putting the handles back on is usually simpler than taking them off, but attention to detail ensures they are secure and look good.
Align the Handle: Position the new or old handle against the door, making sure any alignment tabs or slots fit correctly. For screw-in handles, ensure the screw holes on the handle line up perfectly with the corresponding holes or posts on the door.
Insert and Tighten Screws: Insert the screws and begin tightening them by hand first. This helps prevent cross-threading. Once the screws are snug, use your screwdriver to tighten them fully.
Be careful not to overtighten, which can strip the screws or damage the plastic components.
Test the Handle: Gently pull on the handle to ensure it is secure and feels stable. Open and close the door a few times to make sure the handle doesn’t interfere with anything or feel loose.
Common Scenarios and Solutions
Let’s look at some situations where replacing or reattaching handles might be necessary and how to handle them.
Scenario 1: Cleaning Your Refrigerator Thoroughly. You decide to give your fridge a deep clean, and the handles are greasy or dull. Removing them allows you to clean them separately and the door surface behind them.
This results in a sparkling, like-new finish and ensures no grime is hidden away.
Scenario 2: Upgrading Appliance Finishes. You’ve recently updated your kitchen appliances to stainless steel, but your refrigerator still has white handles. Removing the old ones and installing sleek new stainless steel handles will make your fridge match the rest of your kitchen for a cohesive look.
This enhances your kitchen’s overall appearance.
Scenario 3: Replacing Broken Handles. One of your refrigerator handles has cracked or broken from daily use. You can order a direct replacement and follow the reattachment steps to restore your refrigerator’s functionality and aesthetics.
This prevents further damage and makes the door easy to open again.
Example Case Study: The Stubborn Screw
Sarah wanted to clean her refrigerator doors thoroughly. She opened the freezer door and noticed the handle screws were hard to reach. She found the small plastic caps, but one screw seemed completely stuck.
She tried a different screwdriver, which helped a little. After applying a small amount of WD-40 and letting it sit for 10 minutes, the screw finally loosened. She was then able to remove the handle and clean both the handle and the door effectively.
This allowed her to achieve a truly spotless appliance.
Maintenance and Long-Term Care
Keeping your refrigerator door handles in good condition involves regular cleaning and checking for any signs of wear. Proper care ensures they remain functional and look good for a long time.
Regular Cleaning: Wipe down your handles regularly with a soft, damp cloth. For tougher grime or sticky spots, use a mild dish soap diluted in water. Avoid abrasive cleaners or harsh chemicals, as they can dull the finish or scratch the material.
A quick wipe after cooking or when handling food can prevent buildup.
Check for Tightness: Periodically check that the screws holding the handles are still tight. Over time, vibrations from the refrigerator or frequent use can cause them to loosen slightly. A loose handle can be annoying and might even lead to damage if it’s left unchecked.
A quick turn with a screwdriver every few months can prevent this.
Inspect for Damage: Keep an eye out for any cracks, chips, or signs of rust on your handles. Early detection of damage can prevent the problem from worsening. If you notice any issues, it’s best to address them promptly, either by cleaning, tightening, or planning for a replacement.
Lubrication for Moving Parts: While most handles don’t have many moving parts, some might have components that could benefit from light lubrication if they start to squeak or feel stiff. A small amount of silicone spray can sometimes help, but use it sparingly and only if necessary.
Tips for Easy Cleaning
Cleaning refrigerator handles doesn’t have to be a chore. Here are a few simple tips to make it easier:
Use warm water and a mild dish soap for general cleaning. This effectively cuts through grease and grime.
For stubborn spots, a paste of baking soda and water can work wonders. Apply it, let it sit for a few minutes, then gently scrub with a soft cloth.
Always rinse thoroughly with a clean, damp cloth to remove any soap residue.
Dry the handles completely with a soft, lint-free towel to prevent water spots and streaks.
Frequently Asked Questions
Question: How often should I remove my refrigerator door handles for cleaning?
Answer: You typically don’t need to remove your refrigerator door handles for regular cleaning. A simple wipe-down with a damp cloth and mild soap is usually sufficient for daily maintenance. Removing them is more for deep cleaning, repairs, or replacement.
Question: What if I can’t find replacement handles for my old refrigerator?
Answer: For very old or obscure models, finding exact
Question: Can I paint my refrigerator door handles?
Answer: Yes, you can paint refrigerator door handles, but it requires proper preparation. You’ll need to clean them thoroughly, lightly sand them, apply a primer suitable for plastic or metal, and then use spray paint designed for appliances or metal. Ensure the paint is durable and can withstand temperature changes and frequent handling.
Question: My handles feel loose even after tightening the screws. What should I do?
Answer: If the screws feel tight but the handle is still loose, the screw holes might be stripped or the internal mounting points could be damaged. You might need to use slightly larger screws or consider using a small amount of epoxy or wood filler in the stripped holes before reinserting the screws. If the internal mounting is damaged, you may need to consult a professional or look into more extensive repair options.
Question: Are there any safety concerns when removing refrigerator door handles?
Answer: The main safety concern is accidental damage to your refrigerator’s finish or the handles themselves. Always work gently and use appropriate tools. Ensure the refrigerator is unplugged if you are doing any work that involves removing internal door panels, though handle removal usually does not require this.
Summary
Knowing How to Remove Refrigerator Door Handles Easily empowers you to handle basic appliance maintenance. Whether it’s for cleaning, repair, or a style update, the process is manageable with the right tools and patience. Follow the steps outlined to confidently tackle handle removal and reattachment for a well-maintained appliance.