How to Remove Water Rings From Wood Furniture: Local Pro Tips
Water rings on wood furniture can look bad and be tricky to get rid of. Many people don’t know where to start when they see those white or dark spots. It feels like a big problem that might ruin your favorite table or dresser.
But don’t worry! This guide is here to help. We will show you easy ways that really work to fix those annoying water marks.
You’ll learn simple steps for How to Remove Water Rings From Wood Furniture: Local Pro Tips so your furniture looks great again.
Common Water Ring Issues On Wood
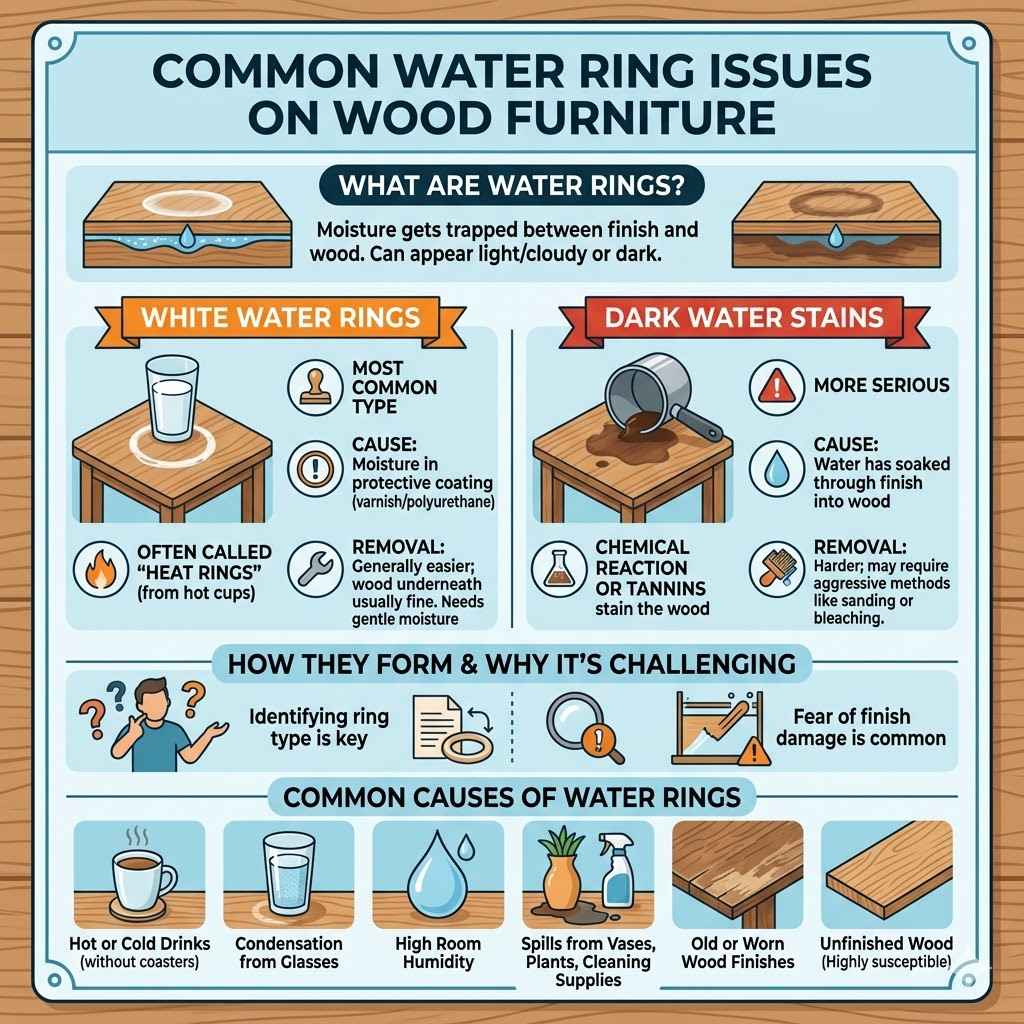
Water rings are a frequent problem for wood furniture owners. They happen when moisture gets trapped between the wood’s finish and the surface. These rings can appear as light, cloudy marks or darker stains, depending on the wood and finish type.
For beginners, identifying the type of ring and choosing the right removal method can be confusing. Many fear damaging the finish further. This section will help you understand why these rings form and what makes them challenging.
We’ll cover the basics so you can confidently tackle these spots.
Understanding White Water Rings
White water rings are the most common type. They occur when moisture gets trapped in the top layers of the furniture’s protective coating, like varnish or polyurethane. This moisture causes the coating to cloud up, creating a visible white mark.
These are often called “heat rings” too, as hot cups are a frequent cause. Because the moisture hasn’t penetrated the wood itself, these are generally easier to remove than dark rings. The key is to gently coax the moisture out of the finish without causing more damage.
Think of it like fogging up a mirror. The moisture is on the surface. When it’s a white ring, the wood underneath is usually still fine.
The problem is just with the top coating. This makes it a good starting point for DIY furniture repair. Most homes have the items needed to try and fix this type of ring without needing special tools.
Recognizing Dark Water Stains
Dark water stains are more serious than white rings. These happen when water or another liquid has soaked through the finish and into the wood itself. This often happens if the finish is old, cracked, or not very protective.
The liquid causes a chemical reaction with the wood, or it can contain tannins that stain the wood dark. Removing dark stains is harder because you’re not just dealing with the finish; you’re dealing with a stain in the wood. Sometimes, you might need to lighten the wood itself.
These stains can be caused by things like pet accidents, leaky plant pots, or prolonged contact with wet objects. Unlike white rings that can sometimes be buffed out, dark stains might require more aggressive methods. This could include sanding and refinishing or using specialized wood bleaches.
It’s important to correctly identify a dark stain versus a white ring before attempting any fixes.
Causes of Water Rings on Wood
Several everyday actions can lead to water rings on your wood furniture. The most frequent culprits are hot or cold beverages placed directly on the surface without coasters. Condensation from glasses or cups is a major cause of white rings.
High humidity in a room can also contribute over time, slowly weakening the finish. Spills from vases, plants, or even cleaning supplies can lead to both white rings and darker stains if left unattended.
The type of wood and the finish applied to it also play a role. Some finishes are more resistant to moisture than others. Older furniture might have finishes that are less protective.
Also, unfinished wood is highly susceptible to staining. Knowing these causes helps you prevent future damage and choose the best method for removal.
Easy Methods To Remove White Water Rings
White water rings are often removable with common household items. These methods work by gently drying out the trapped moisture or by lightly abrading the clouded finish. It’s important to start with the gentlest method and work your way up if needed.
This ensures you don’t accidentally damage the wood’s finish in the process of fixing the ring. The goal is to restore the clear finish without leaving any trace of the ring.
These techniques are usually quite quick and can often be done in under an hour. They require very little skill and are perfect for first-time furniture fixers. You’ll be surprised at how effective simple items can be.
We will walk through several popular and effective ways to get rid of those unsightly white marks.
Using Common Household Items
Many effective ways to remove white water rings use items you already have in your kitchen or cleaning cabinet. These are budget-friendly and readily available. They work by interacting with the finish to draw out moisture or by providing a mild abrasive.
Iron and Cloth Method
This is a classic and effective technique. You’ll need a clean, soft cloth (like a cotton t-shirt or microfiber cloth) and a household iron.
- First, place the clean cloth directly over the water ring. Ensure the cloth covers the entire mark.
- Next, set your iron to a low heat setting with no steam. It is crucial that the iron is not too hot, as this can damage the finish.
- Gently move the warm iron over the cloth over the ring for short periods, about 10-15 seconds at a time. Lift the iron and check the ring.
- Repeat this process, lifting the iron frequently to check. The heat from the iron will help to evaporate the trapped moisture in the finish.
This method is excellent because it uses heat and a barrier to gently lift the moisture. It’s like steaming the cloudiness away. Many people have success with this method on their first try.
It requires patience, as you don’t want to rush the process.
Mayonnaise or Petroleum Jelly
Believe it or not, mayonnaise or petroleum jelly can help. The oils in these products can sometimes displace the moisture trapped in the finish.
- Apply a small amount of full-fat mayonnaise or petroleum jelly directly onto the white water ring.
- Gently rub it into the affected area with a soft cloth.
- Let it sit for several hours or overnight. This gives the oils time to work on the trapped moisture.
- Wipe away the excess with a clean, dry cloth and then polish the area.
This is a very gentle method and works best on lighter rings. It’s a good option if you’re worried about using heat or other more abrasive substances. The oils essentially lubricate the finish and help the trapped moisture to release.
Toothpaste (Non-Gel)
A paste made from baking soda and non-gel toothpaste can act as a very mild abrasive.
- Mix a small amount of white, non-gel toothpaste with an equal amount of baking soda. You want a paste consistency.
- Apply this paste gently to the water ring using a soft cloth.
- Rub in the direction of the wood grain. Do not scrub aggressively.
- Wipe the area clean with a damp cloth and then dry thoroughly. Polish the surface.
This method works by gently polishing away the damaged part of the finish. It’s like giving the surface a very light scrub. Always test this in an inconspicuous spot first.
You are essentially buffing out the hazy layer.
Specialized Commercial Products
Beyond household items, there are products made specifically for removing water rings. These are often found in hardware stores or furniture care sections of department stores.
- Commercial Water Ring Removers These are often paste-like compounds designed to lift moisture and haze from wood finishes. Follow the product instructions carefully, typically involving applying the paste, letting it sit, and then buffing it off.
- Rubbing Compounds/Polishes Some fine-grit rubbing compounds, used for automotive paint correction, can also be effective on furniture finishes. Use them with extreme caution and always test first. They are essentially very fine abrasives.
- Specialized Waxes and Conditioners Certain furniture waxes and conditioners are formulated to help mask or remove minor surface imperfections, including light water rings. They nourish the wood and can help blend the finish.
These products offer a more targeted approach. They are formulated to be effective without damaging the underlying finish if used correctly. Always read the labels and test in a hidden area.
This ensures compatibility with your furniture’s specific finish.
How To Use Rubbing Alcohol Carefully
Rubbing alcohol can be effective but requires extreme care. It works by dissolving the finish slightly, allowing trapped moisture to escape. However, if used too much, it can strip the finish entirely.
- Dampen a cotton ball or soft cloth very lightly with isopropyl alcohol (70% is usually sufficient).
- Gently dab the water ring. Do not rub vigorously.
- Work quickly and in small areas. The goal is to make the ring disappear without soaking into the wood or stripping the finish.
- Immediately wipe the area with a clean, damp cloth and then dry thoroughly. Follow up with furniture polish.
This method is best for stubborn white rings that don’t respond to gentler treatments. It’s a more aggressive approach, so it’s crucial to be cautious and use minimal product. The alcohol evaporates very quickly, which helps in the process of drying the finish.
Dealing With Dark Water Stains
Dark water stains mean the moisture has gone deeper, into the wood itself. This is a tougher problem to solve than a simple white ring. It requires methods that can either lighten the wood or remove the stained layer.
Unlike white rings, you can’t just buff out a dark stain from the finish.
These methods might take more time and effort. Some may even require refinishing a small part of the furniture. It’s important to be patient and methodical.
For severe stains, professional help might be the best option. But for many dark stains, there are DIY solutions that can yield good results.
Wood Bleaches
Wood bleaches are designed to lighten the color of wood. They work by chemically altering the pigments within the wood that cause the stain. There are generally two types: oxalic acid and two-part (often chlorine-based).
- Oxalic Acid Bleach This is best for removing water stains and rust marks. It is a mild acid that lightens wood without removing its natural color, making it a good choice for preserving the wood’s character. You usually mix the crystals with water and apply the solution.
- Two-Part Bleach This is a stronger bleach, often using sodium hydroxide and hydrogen peroxide. It removes a wider range of stains and can significantly lighten wood. It’s more aggressive and requires careful handling.
When using wood bleach, always follow the manufacturer’s instructions. Wear protective gloves and eyewear. After bleaching, the wood will likely need to be neutralized (as per product instructions) and then sanded lightly to prepare it for refinishing.
It’s a multi-step process but can be very effective for deep stains.
Applying Wood Bleach For Stains
Applying wood bleach correctly is key to success. It involves several steps to ensure the stain is treated and the wood is prepared for the next stage.
- Prepare the area: Ensure the furniture is clean and the surrounding area is protected from drips.
- Mix and apply: If using a powdered bleach, mix it according to the product’s directions. Apply the bleach solution evenly to the stained area using a brush or cloth. Work in a well-ventilated area.
- Let it work: Allow the bleach to sit on the stain for the time recommended by the manufacturer. You should see the stain start to lighten.
- Neutralize: After the bleaching time is up, you will need to neutralize the wood. This stops the bleaching action and prepares the surface. Follow product instructions for the correct neutralizer.
- Rinse and dry: Gently wipe the area with a damp cloth to rinse away any residue. Allow the wood to dry completely, which may take 24 hours.
- Light sanding: Once dry, lightly sand the bleached area with fine-grit sandpaper to smooth the surface and remove any raised grain.
It’s common to need multiple applications for stubborn stains. Always test the bleach on an inconspicuous area of the furniture first. This allows you to see how it affects the wood and practice the application.
Sanding and Refinishing
For deep or stubborn dark stains that bleach doesn’t fully remove, sanding and refinishing is often the most effective solution. This involves removing the damaged layer of wood and then re-applying a protective finish.
- Light Sanding Start with a medium-grit sandpaper (around 120-grit) and sand the stained area. Work your way up to finer grits (180, then 220-grit) for a smooth finish. Sand in the direction of the wood grain.
- Deeper Sanding If the stain is very deep, you might need to sand down to the bare wood. Be careful not to over-sand, which can create an uneven surface.
- Applying Stain (Optional) If the sanded area looks lighter than the surrounding wood, you may need to apply a matching wood stain. Test the stain on a scrap piece of wood first.
- Applying Finish Once the stain is dry (if used), apply a clear protective finish, such as polyurethane or varnish. Apply multiple thin coats, allowing each to dry and lightly sanding between coats for a smooth finish.
This method is more labor-intensive but offers the best chance of completely removing the stain. It essentially allows you to create a fresh surface. It’s a great way to give an older piece of furniture a new lease on life.
Sanding Techniques for Wood Furniture
Proper sanding is crucial for a good refinishing job. It removes imperfections and prepares the surface for new finishes.
- Start with the right grit: Choose sandpaper based on the condition of the wood. Start with a coarser grit (e.g., 100-120) for rough spots or old finishes, and progress to finer grits (e.g., 180, 220, or even 320) for smoothing.
- Always sand with the grain: Sanding across the wood grain will leave visible scratches that are difficult to remove. Use long, even strokes following the direction of the wood grain.
- Use a sanding block or orbital sander: For flat surfaces, a sanding block helps maintain an even pressure. An orbital sander can speed up the process but requires careful handling to avoid over-sanding.
- Clean between grits: After sanding with one grit, wipe the surface with a tack cloth or a slightly damp cloth to remove dust. This prevents coarser grit from scratching the wood when you move to a finer grit.
- Feather the edges: When spot-sanding a stain, feather out the edges of the sanded area. This helps the new finish blend more seamlessly with the surrounding area.
Sanding can seem daunting, but with practice, you can achieve a smooth, professional finish. The key is patience and paying attention to the details of the wood grain.
When to Call a Professional
Sometimes, water rings or dark stains are too severe to fix with DIY methods. This is especially true for antique furniture or pieces with delicate finishes. If you’re unsure about a method or afraid of causing more damage, it’s best to seek expert help.
- Antique or Valuable Furniture For pieces that are rare, valuable, or have sentimental importance, the risk of error might outweigh the savings of DIY. Professional restorers have specialized knowledge and tools.
- Deep or Widespread Staining If a dark stain is very deep, covers a large area, or has significantly warped the wood, a professional might be needed. They can assess the damage and determine the best course of action.
- Complex Finishes Some furniture has complex finishes like French polish or ebonized wood, which require expert handling. DIY attempts could easily ruin these delicate surfaces.
- Uncertainty About Methods If you’ve tried a few methods without success, or if you’re not confident in your ability to apply bleach or refinish, a professional can save you time and potential costly mistakes.
A professional furniture restorer or refinisher can assess the damage accurately. They can then use specialized techniques and products to restore the piece to its former glory. While more expensive, it can be the most reliable way to preserve cherished furniture.
Preventing Future Water Rings
The best way to deal with water rings is to prevent them from happening in the first place. Taking simple precautions can save your furniture from damage and keep it looking its best for years to come. Prevention is always easier than repair.
These tips are straightforward and can be easily incorporated into your daily routine. They focus on protecting the wood’s finish from moisture and spills. By being mindful of how you use and care for your furniture, you can avoid the frustration of water rings altogether.
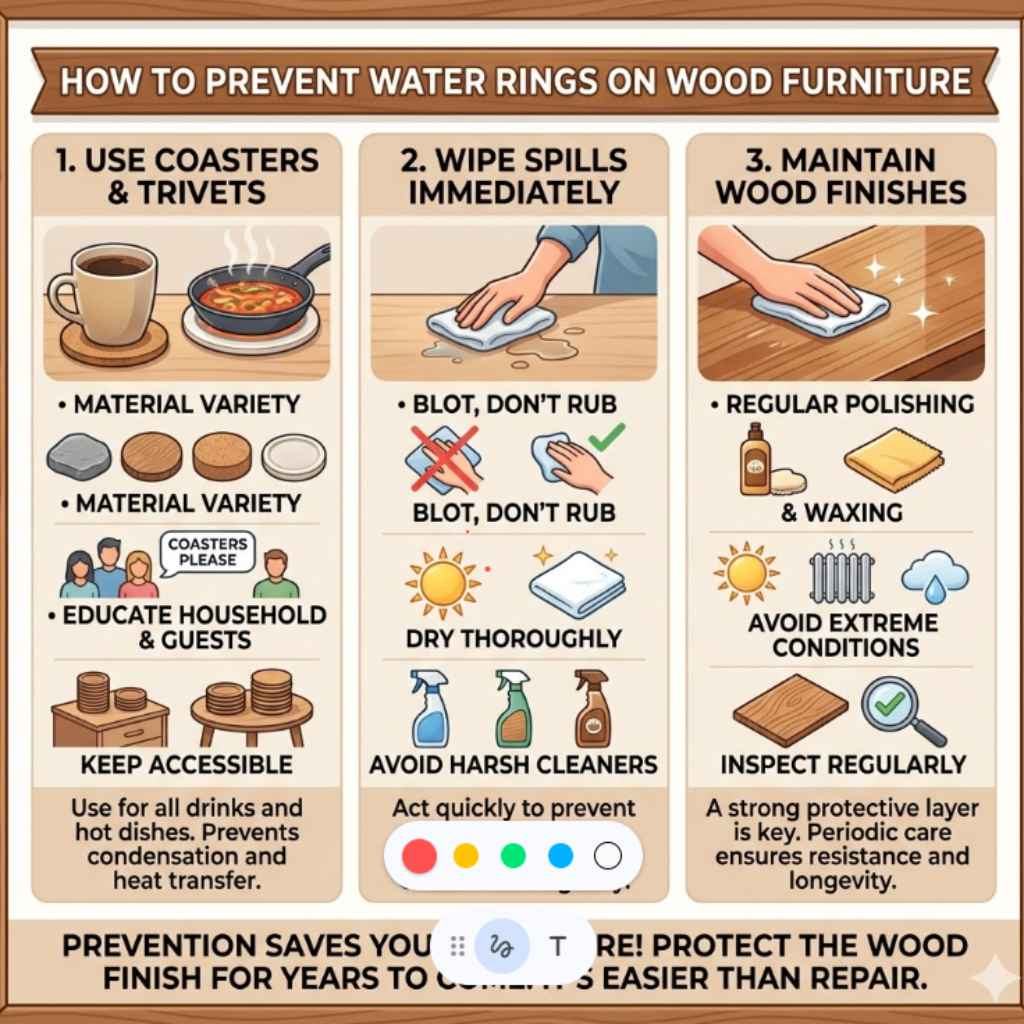
Using Coasters and Trivets
This is the most fundamental step in preventing water rings. Always use coasters for drinks, no matter how short the time. For hot dishes or pots, use trivets.
- Variety of Materials Coasters and trivets come in many materials, including cork, stone, wood, ceramic, and metal. Choose ones that match your decor and provide adequate protection.
- Educate Household Members and Guests Make sure everyone in your home understands the importance of using coasters. Politely remind guests as well.
- Keep Them Accessible Place coasters and trivets in convenient locations, such as on coffee tables, side tables, and dining tables. If they are easy to grab, people are more likely to use them.
This simple habit drastically reduces the risk of condensation or heat transfer damaging your wood finish. It’s an easy way to protect your investment and keep your furniture looking new.
Wipe Spills Immediately
Accidents happen, but how quickly you respond makes a big difference. If you spill anything on your wood furniture, wipe it up immediately with a soft, absorbent cloth.
- Blot, Don’t Rub When wiping up a spill, blot the liquid gently rather than rubbing it in. Rubbing can spread the liquid and push it deeper into the finish or wood.
- Dry Thoroughly After blotting, gently dry the area with a clean, dry cloth. Ensure no moisture is left behind.
- Avoid Harsh Cleaners For general cleaning, use a cleaner specifically designed for wood furniture. Avoid abrasive cleaners or excessive water, which can damage the finish over time.
Prompt action prevents moisture from having time to penetrate the finish and cause damage. This is especially important for liquids that can stain, like juice or coffee.
Maintain Wood Finishes
The protective finish on your wood furniture is its first line of defense against moisture. Keeping this finish in good condition is vital.
- Regular Polishing and Waxing Periodically polishing or waxing your furniture helps to maintain the integrity of the finish. It adds a protective layer and can help fill minor scratches that could otherwise trap moisture. Use a good quality furniture polish or wax appropriate for your furniture’s finish.
- Avoid Extreme Conditions Try to keep wood furniture away from direct sunlight, extreme heat sources (like radiators), and very dry or humid environments. These conditions can cause the wood to expand and contract, leading to cracks in the finish.
- Inspect Regularly Periodically inspect your furniture for any signs of wear or damage to the finish, such as small cracks or dull spots. Addressing these issues early can prevent more significant problems like water rings.
A well-maintained finish is more resistant to moisture and damage. This proactive care ensures your furniture stays beautiful and functional for longer.
Frequently Asked Questions
Question: How quickly can I expect to see results when removing a white water ring?
Answer: For many white water rings, you can see improvement within minutes to a few hours, especially with methods like the iron and cloth or mayonnaise. Stubborn rings might take a day of soaking with oil-based methods or require a second attempt.
Question: Can these methods damage my furniture’s finish?
Answer: While these methods are generally safe, improper use can cause damage. Always start with the gentlest approach, test in an inconspicuous area first, and avoid excessive heat or harsh abrasives. If unsure, consult a professional.
Question: What is the difference between a white ring and a dark stain?
Answer: A white ring is moisture trapped in the finish, making it cloudy. A dark stain means moisture has penetrated the finish and stained the wood itself, which is harder to remove.
Question: Is it safe to use a hairdryer on water rings?
Answer: A hairdryer on a low, cool setting can sometimes help with white rings, but it’s less effective and riskier than the iron method. High heat can warp or damage the finish. Use with extreme caution and at a distance.
Question: How do I know if I should sand and refinish my furniture?
Answer: You should consider sanding and refinishing if dark water stains are deep, widespread, or if other methods have failed. It is also an option for general wear and tear or if you want to change the furniture’s appearance.
Summary
Removing water rings from wood furniture is achievable with simple, local pro tips. White rings often respond to household items like iron, mayonnaise, or toothpaste. Darker stains may require wood bleaches or sanding and refinishing.
Always prioritize gentler methods and test first. Prevention through coasters, immediate spill cleanup, and finish maintenance is key. You can restore your furniture’s beauty with these straightforward techniques.