Remove Paint From a Wood Door Without Chemicals: A Simple Guide
Getting ready to repaint your wood door? That’s awesome! A common challenge, especially for beginners, is how to Remove Paint From a Wood Door Without Chemicals. Chemical strippers can be strong and might damage the wood or make you a bit nervous about fumes. Don’t worry, though! It’s totally possible to get that paint off using some simple, safe methods. I’ll share some easy steps to help you get started.
Choosing the Right Approach
Before you start, it’s good to decide what method is best for your door. There are a few different ways to remove paint without using chemicals, and each has its own benefits. For example, some methods work faster, while others are gentler on the wood. The type of paint on your door and the condition of the wood will affect which approach is the perfect fit. So, let’s explore your options to help you choose the best way to get that paint off without chemicals.
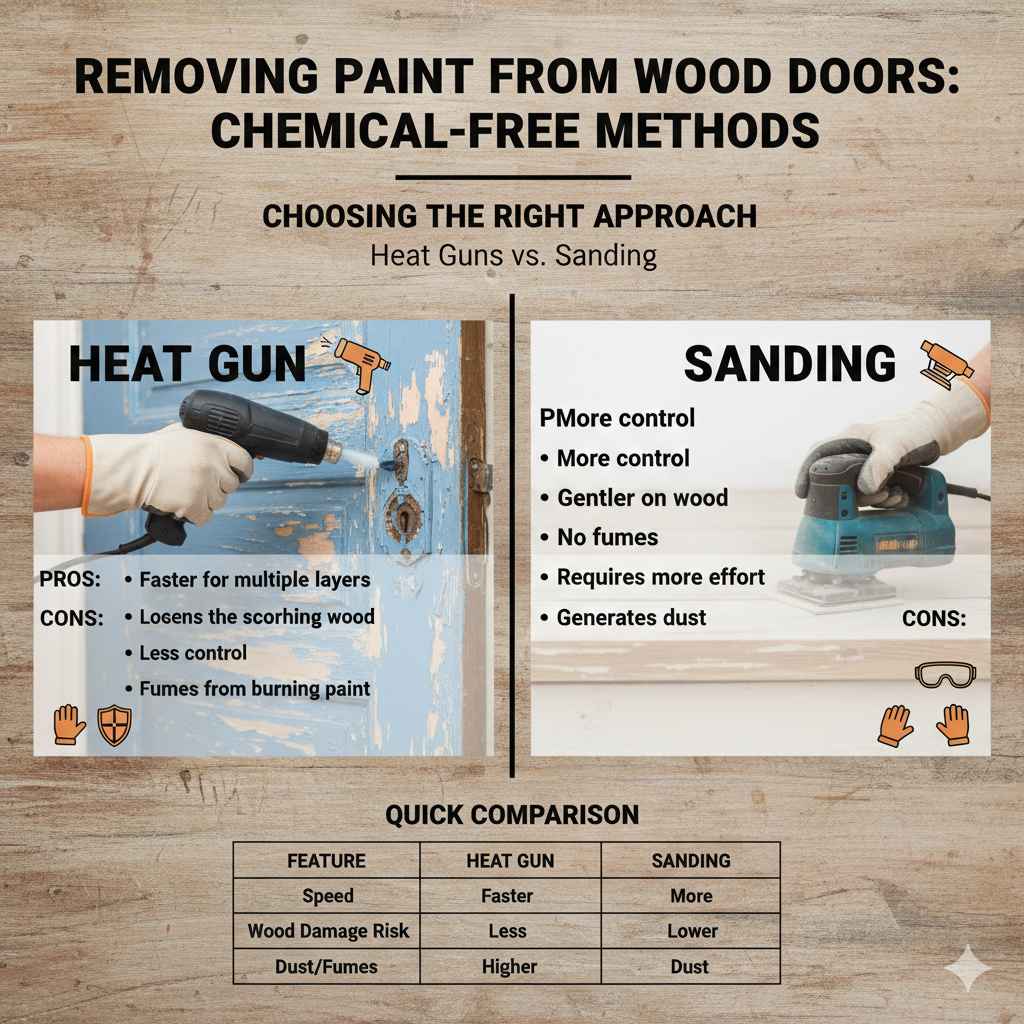
Heat Guns versus Sanding
Two main options are popular: using a heat gun or sanding. Heat guns work by softening the paint, making it easier to scrape off. Sanding, on the other hand, involves rubbing away the paint with sandpaper. Both approaches require some elbow grease, but they can be very effective. Your choice depends on what you have available and how much work you want to do.
Heat Guns: A heat gun directs a blast of hot air at the paint, softening it so you can scrape it away. This method is often quicker, especially for multiple layers of paint, because it helps loosen the bond between the paint and the wood.
Heat guns heat the paint to a high temperature, typically between 800 and 1200 degrees Fahrenheit (425 to 650 degrees Celsius). This heat causes the paint to blister, bubble, and soften, making it easier to scrape. Be very cautious and wear safety gear, including heat-resistant gloves and eye protection, as the hot surfaces can cause burns. Consider using a heat shield to protect delicate areas of the door, such as glass panes or decorative moldings, from extreme temperatures. While heat guns can quickly remove paint, they can also scorch or damage the wood if not used correctly, so keep the gun moving and avoid holding it in one spot for too long.
Sanding: Sanding is another method to get the paint off. It involves using sandpaper to grind away layers of paint until you reach the bare wood. It’s a slower process than using a heat gun, but it can be a great option if you want more control.
Sanding is a physical paint removal method that relies on friction to wear down the paint layers. This process uses sandpaper of varying grits to gradually remove the coating. Start with a coarser grit (e.g., 80-grit) to remove the bulk of the paint and then switch to finer grits (e.g., 120-grit, then 220-grit) to smooth the surface. The main advantage of sanding is the level of control it offers, allowing you to carefully remove paint without the risk of scorching or damaging the wood. It also eliminates the need for any chemical agents. Be aware that sanding creates dust, and proper safety equipment such as a dust mask or respirator, eye protection, and gloves is essential to minimize health risks. If using a power sander, be careful to avoid excessive pressure, which can damage the wood.
Which to Choose? Choosing between a heat gun and sanding depends on your door and preferences. If the door has many layers of paint, a heat gun may be faster. However, if the door has intricate details or you want more control, sanding is a good choice.
Here’s a quick comparison:
| Feature | Heat Gun | Sanding |
|---|---|---|
| Speed | Faster (especially for multiple layers) | Slower |
| Control | Less control, risk of scorching | More control |
| Wood Damage Risk | Higher if used incorrectly | Lower |
| Dust/Fumes | Fumes from burning paint | Dust from sanding |
Getting Ready for Paint Removal
Before you get to work, there are some important steps to take to prep your door and space. This preparation will make the job much easier and safer. You will want to create a safe work area, and make sure you have everything you need on hand. Proper preparation keeps things easy, safe, and effective!
Safety First
Safety is key when you’re working on any project. Protecting yourself and your space should always be your top concern. You will want to think about what you are wearing, what tools you need, and what could go wrong. Taking a few precautions can save a lot of headaches later on. Here are some key things you should do to ensure the job goes well.
Protective Gear: Always wear safety glasses or goggles to shield your eyes from paint chips and dust. Use a dust mask or a respirator to prevent breathing in paint particles, especially when sanding.
Protective gear is your armor in this project. Safety glasses prevent flying debris from entering your eyes, critical when scraping or sanding. A dust mask or respirator protects your lungs from paint dust, especially when sanding. The kind of respirator matters: N95 masks capture about 95% of airborne particles, while a more advanced respirator with a particulate filter is preferable for extended exposure or working on older paint that might contain lead. Always ensure the mask fits properly, creating a tight seal around your nose and mouth to maximize protection. Remember to replace filters regularly to maintain effectiveness.
Ventilation: Work in a well-ventilated area. Open windows and doors to allow fresh air to circulate, and consider using a fan to direct paint fumes and dust away from you.
Good ventilation is crucial, whether you are using a heat gun or sanding. When heating paint, ventilation helps disperse fumes that can be irritating or even hazardous. When sanding, ventilation carries away the dust created, improving visibility and reducing the amount you inhale. You can set up a box fan or exhaust fan to draw air away from your work area. If working indoors, open windows and doors to create cross-ventilation. Ensure the area is away from flammable materials when using a heat gun. If you’re unsure about ventilation, consider working outdoors, weather permitting.
Protect the Area: Cover the floor around your door with drop cloths to catch paint chips and dust. Use painter’s tape to protect any areas you don’t want to remove paint from, such as glass panes or door hardware.
Protecting the surrounding areas is an easy way to save yourself a lot of cleaning later on. Drop cloths are essential because they collect paint chips, preventing them from scattering and making cleanup much easier. Painter’s tape is useful for defining the edges and protecting any parts you don’t want to affect, like glass panes, door hardware, or surrounding trim. Be sure to press the tape firmly to ensure a good seal. It is a good idea to remove the door from its hinges and place it on a work surface, such as sawhorses, to improve access and protect the area further.
Gather Your Supplies
Having everything ready will make the paint removal go much smoother. You won’t have to stop and search for things in the middle of the job. You will want to plan out what you need, get the tools, and organize them. Having everything you need ready to go keeps things simple.
Tools for Heat Gun Method: If you’re using a heat gun, you’ll need the gun itself, a scraper with a sharp blade (metal or plastic), heat-resistant gloves, and eye protection.
If you’ve decided on the heat gun method, gather the tools you need. Choose a heat gun that allows you to control the temperature; this helps prevent damage to the wood. Metal or plastic scrapers are essential for removing softened paint. A metal scraper is very durable, but it can scratch the door, so use it carefully. Heat-resistant gloves prevent burns from contact with the hot gun or softened paint. Safety glasses protect your eyes from chips, and a dust mask prevents inhaling fumes. Have a metal putty knife for scraping hard-to-reach areas and a wire brush for cleaning the door surface.
Tools for Sanding: If you’re sanding, you’ll need sandpaper in various grits (from coarse to fine), a sanding block or power sander, eye protection, a dust mask or respirator, and possibly a vacuum cleaner to clean up the dust.
For sanding, you’ll need sandpaper, a sanding block, eye protection, and a dust mask or respirator. A sanding block can help you apply even pressure, or a power sander can speed up the process. A vacuum with a brush attachment is a good idea to clean up the sanding dust. Choose a grit to start with, usually a coarser one, and work your way to a finer grit to smooth the surface. Make sure you have plenty of sandpaper on hand, and you may want to have multiple sanding blocks for different areas of your door.
Optional Supplies: You might also want some paint thinner to clean up tools, some wood filler to repair any imperfections, and a tack cloth to wipe away dust before painting.
Beyond the core tools, some optional supplies can be very helpful. Paint thinner will clean up tools and any paint spills. Wood filler can fill in any scratches or imperfections. A tack cloth will remove any dust from the door, which is essential for a smooth painting surface. If you plan to stain the door, consider using a wood conditioner before applying the stain, which ensures more even absorption. Have a small paintbrush ready for touch-ups or detail work.
The Step-by-Step Removal Process
Now that you have your equipment and everything is in order, let’s explore the process. Regardless of your method, it will be essential to follow these steps. There will be some variance based on the method, but these are the basics you will need.
Using a Heat Gun
Using a heat gun to remove paint requires patience. Move slowly, and pay close attention to the details. A careful approach ensures a clean result. While this method can be fast, rushing can cause problems. Taking your time will reward you with a cleaner finish.
Set Up: Place the door on a stable surface, like sawhorses. Put on your safety gear.
A stable work surface is important for safe and effective paint removal. Whether you use sawhorses, a workbench, or even a sturdy table, ensure it can support the weight of the door without wobbling. Also, you should have your safety gear on, including eye protection and heat-resistant gloves.
Heat the Paint: Hold the heat gun a few inches away from the door’s surface and move it back and forth, heating a small area at a time. Watch the paint, and as it begins to bubble or blister, move to the next section.
Start heating the paint at a distance to prevent accidental damage, typically 3-6 inches from the surface. The goal is to heat the paint until it softens, but not to burn the wood. Use a sweeping motion, preventing the heat gun from staying in one spot for too long, which can scorch the wood. As the paint starts to bubble or blister, you’ll know it’s ready to be scraped. Work in small sections to maintain control and avoid overheating any portion.
Scrape the Paint: Use a scraper to remove the softened paint. Work quickly before the paint cools and hardens again. Scrape in the direction of the wood grain to avoid scratching the surface.
As the paint softens, use your scraper to remove it. When the paint is hot, the softened paint should come off relatively easily. Use your scraper, holding it at a slight angle to the surface. It will help to prevent gouging or scratching the wood. If the paint is difficult to remove, apply more heat. Be patient and work in small sections to keep the paint from cooling down too much.
Repeat: Continue heating and scraping until all the paint is removed. Use the scraper’s edge for detailed areas and corners.
Continue this process until all the paint is gone. The detail work can be tricky, so use the scraper’s edges to get into the corners and other small areas. If the paint is stubborn in specific areas, you may need to repeat the heating and scraping process. After the initial paint removal, there may still be some stubborn spots left behind, and a second pass with the heat gun and scraper will often be necessary.
Clean Up: Wipe down the door with a tack cloth to remove any remaining paint residue and dust.
Once the paint is off, clean up the remaining residue and dust with a tack cloth. A tack cloth is a sticky cloth designed to collect even the smallest particles. Using it ensures the surface is smooth and ready for painting. This step is important for a smooth, even finish.
Sanding the Paint Away
Sanding is a more gradual process, but it gives you great control. You can start with rougher sandpaper and work your way to a smoother finish. Proper sanding will ensure a clean, beautiful result.
Set Up: Place the door on a stable surface, and put on your safety gear.
Put on your safety glasses, dust mask, or respirator. A good work surface, like sawhorses, is the best option for holding the door while you’re sanding. You’ll need enough space to maneuver around the door easily and to keep everything organized, from the different sandpaper grits to your tools and supplies.
Choose Your Grit: Start with a coarse-grit sandpaper (80-100 grit) to remove the bulk of the paint.
Choose the right grit based on the condition of your paint and wood. Begin with a coarser grit to get rid of the initial layers of paint. A good range to start with is 80 to 100 grit, which is strong enough to remove paint effectively, but also won’t gouge the wood too badly. As you progress, you will gradually move to finer grits to smooth out any imperfections.
Sand the Surface: Sand in the direction of the wood grain, applying even pressure. Work in small sections, overlapping each pass to ensure even removal.
Sanding with the wood grain will prevent scratches. You can use a sanding block to help. Apply even pressure and don’t push too hard, as you could damage the wood. You’ll also want to work in small sections and overlap each pass for a consistent finish. If you’re using a power sander, be careful not to leave it in one spot for too long.
Change Grits: After removing the bulk of the paint, switch to a medium-grit sandpaper (120-150 grit) to smooth out the surface and remove any scratches from the coarser grit.
After you have removed most of the paint, switch to a medium-grit sandpaper, typically around 120-150 grit. This will help smooth the surface. This step will remove any scratches from the coarser grit and prepare the wood for the final smoothing. This intermediate step ensures you have a surface that is ready for the finish.
Final Sanding: Finish with a fine-grit sandpaper (220 grit or higher) to achieve a smooth surface, ready for painting or staining.
The last step is using a fine-grit sandpaper, which typically ranges from 220 grit to higher. The fine grit refines the surface and makes it feel smooth. This will also ensure good paint adhesion. This step gives you a clean and ready surface for the final finish.
Clean Up: Wipe the door with a tack cloth to remove all dust.
After sanding, wipe down the door with a tack cloth to remove any dust. A tack cloth is designed to trap the smallest particles, making sure your surface is clean and ready for painting or staining.
Addressing Paint Issues and Finishing Touches
After removing the paint, you might find some issues with the wood. Here is what you should do to address these problems. Then you can do the final prep to finish up your project.
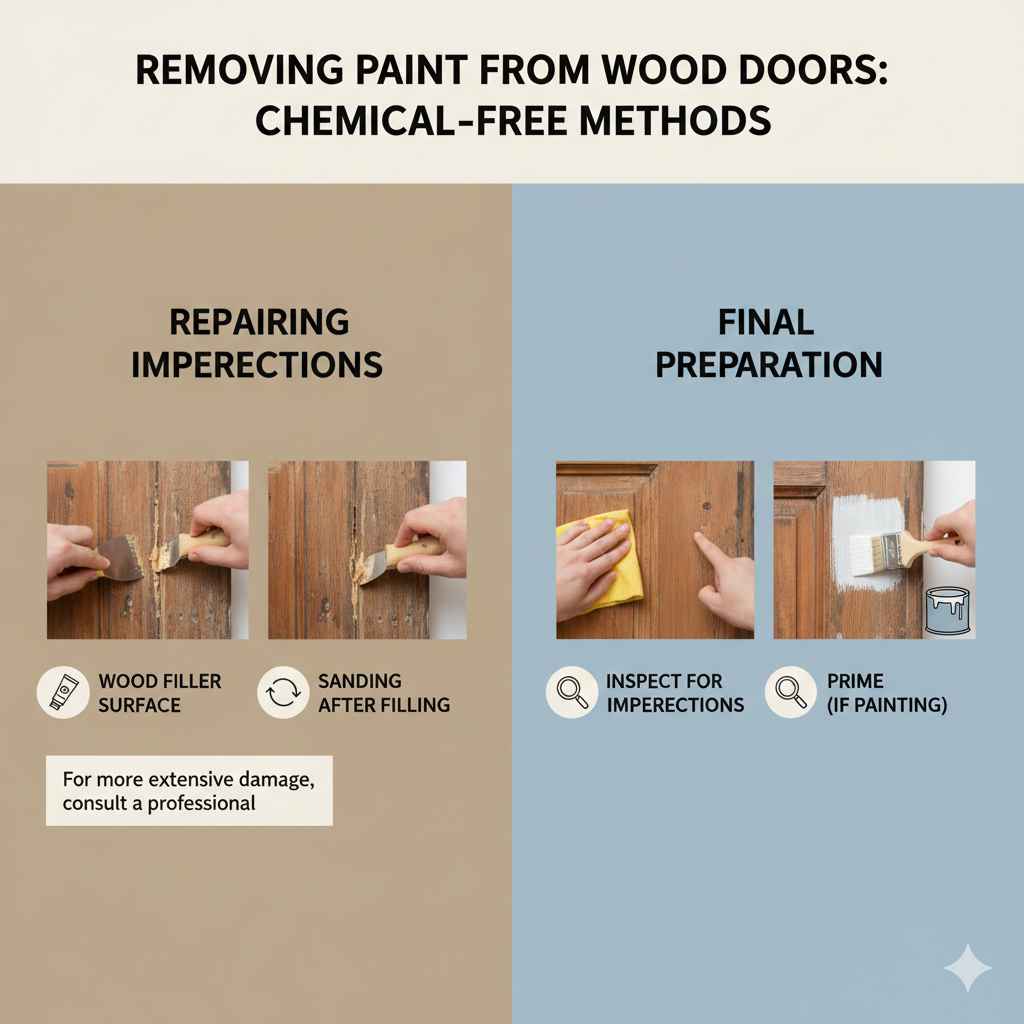
Repairing Imperfections
As you remove the paint, you might find areas that need some fixing. This is normal. You can often repair these issues quickly and easily. This extra care ensures your door looks its best.
Wood Filler: Use wood filler to fill any dents, scratches, or holes in the wood. Apply the filler with a putty knife, let it dry, and then sand it smooth.
Wood filler is great for filling dents, scratches, and holes. After removing the paint, inspect the door for any imperfections. Apply the wood filler with a putty knife. Make sure to apply it evenly to cover the damaged areas. Let the filler dry completely, following the manufacturer’s instructions. Once it’s dry, sand the filled areas to make them flush with the surrounding surface.
Sanding After Filling: After the filler is dry, sand the filled areas to make them smooth and even with the surrounding wood.
After the wood filler has dried, you need to sand it so that it is level with the rest of the surface. This will provide a smooth base for painting or staining. Use fine-grit sandpaper for this step. Sand lightly, being careful not to over-sand or damage the surrounding areas. You want to make sure the filled spots are smooth and seamlessly blend with the rest of the door.
Dealing with Damaged Wood: For more extensive damage, you might need to replace the damaged wood or consult a professional.
If the damage is more extensive than just dents or scratches, you might need to
Final Preparation
Before painting or staining, some final steps will make the result better. These steps are easy and make a big difference in how the finish looks. Preparing the door correctly is essential for a good finish.
Clean the Surface: Use a tack cloth to remove all dust and debris from the door’s surface.
A tack cloth is your best friend when removing all dust and debris before painting or staining. It has a slightly sticky surface, which effectively picks up even the smallest particles. Run the tack cloth gently over the entire surface of the door, ensuring you get into any corners or crevices. Any dust left behind can ruin the paint. This final cleaning step is essential for achieving a professional-looking finish.
Inspect for Imperfections: Look for any remaining imperfections and address them with wood filler and sanding.
Before painting, take a second look at your door for any imperfections you may have missed. Use wood filler for any remaining dents, scratches, or small holes. Sand down the filler to ensure it is smooth. This step can enhance the finished appearance. Inspect the entire surface thoroughly, as the paint will highlight any imperfections. If you are doing this right, the end result will be smooth and seamless.
Prime (If Painting): If you’re painting, apply a primer coat to the bare wood. This will help the paint adhere better and provide a uniform base.
A primer coat is necessary if you’re painting your door. It is like an adhesive layer that helps the paint stick to the wood. Primer also helps seal the wood, preventing the paint from being absorbed unevenly. This can lead to blotchy results. Choose a primer that is suitable for wood and follow the manufacturer’s instructions. Apply the primer evenly, and allow it to dry completely. A good primer will ensure a professional-looking finish with excellent coverage and durability.
Frequently Asked Questions
Question: Can I use a chemical stripper instead of these methods?
Answer: Yes, you can. However, chemical strippers contain harsh chemicals that can be dangerous to your health and the environment. They also may damage the wood.
Question: How long does the heat gun method take?
Answer: The time will depend on the size of the door, the number of paint layers, and your skill. Usually, it takes a few hours to a day.
Question: Is sanding better than using a heat gun?
Answer: Both methods have their pros and cons. Sanding is slower but gives you more control. Heat guns are faster but can risk damaging the wood.
Question: What safety gear do I need for this project?
Answer: You should wear safety glasses, a dust mask or respirator, and possibly heat-resistant gloves, depending on the method you use.
Question: Can I remove paint from a door outside?
Answer: Yes, you can. Make sure to work in a well-ventilated area, and protect the surrounding environment from paint chips and dust.
Final Thoughts
Removing paint from a wood door without chemicals might seem like a big job at first. However, by using methods like heat guns and sanding, you can get great results. Remember to prioritize safety, prepare your work area, and gather the right tools. Take your time, focus on the details, and remember that patience is key. The steps we’ve covered will help you through the process, whether you decide on heat or sanding. By taking these actions, you’re not just removing paint; you’re taking steps towards a fresh look for your door and adding to your home’s appeal. So, roll up your sleeves, explore the options, and get ready to transform your door into something fresh and new. Happy painting!