Remove Scratches From Engineered Hardwood Fast
Scratches can really upset you when they appear on your beautiful engineered hardwood floors. It often feels like a huge problem, especially for folks who are new to fixing things around the house. You might wonder if it’s too hard to fix or if you’ll make it worse.
Don’t worry! We’ve got a super simple, step-by-step way to help you Remove Scratches from Engineered Hardwood Fast. We’ll show you how to get your floors looking great again without any fuss.
Keep reading to find out exactly what to do.
Quick Ways To Remove Scratches From Engineered Hardwood
When you notice scratches on your engineered hardwood floors, it can be disheartening. These floors add so much warmth and style to a home, and scuffs can quickly take away from their charm. For many people, especially those new to home maintenance, the idea of fixing these marks can seem tricky.
You might worry about damaging the finish further or using the wrong products. But the truth is, with the right approach, you can often fix these issues quickly and easily. This section will guide you through the most effective and speediest methods to get your floors looking as good as new, focusing on simple techniques that anyone can follow.
Surface Scratches Explained
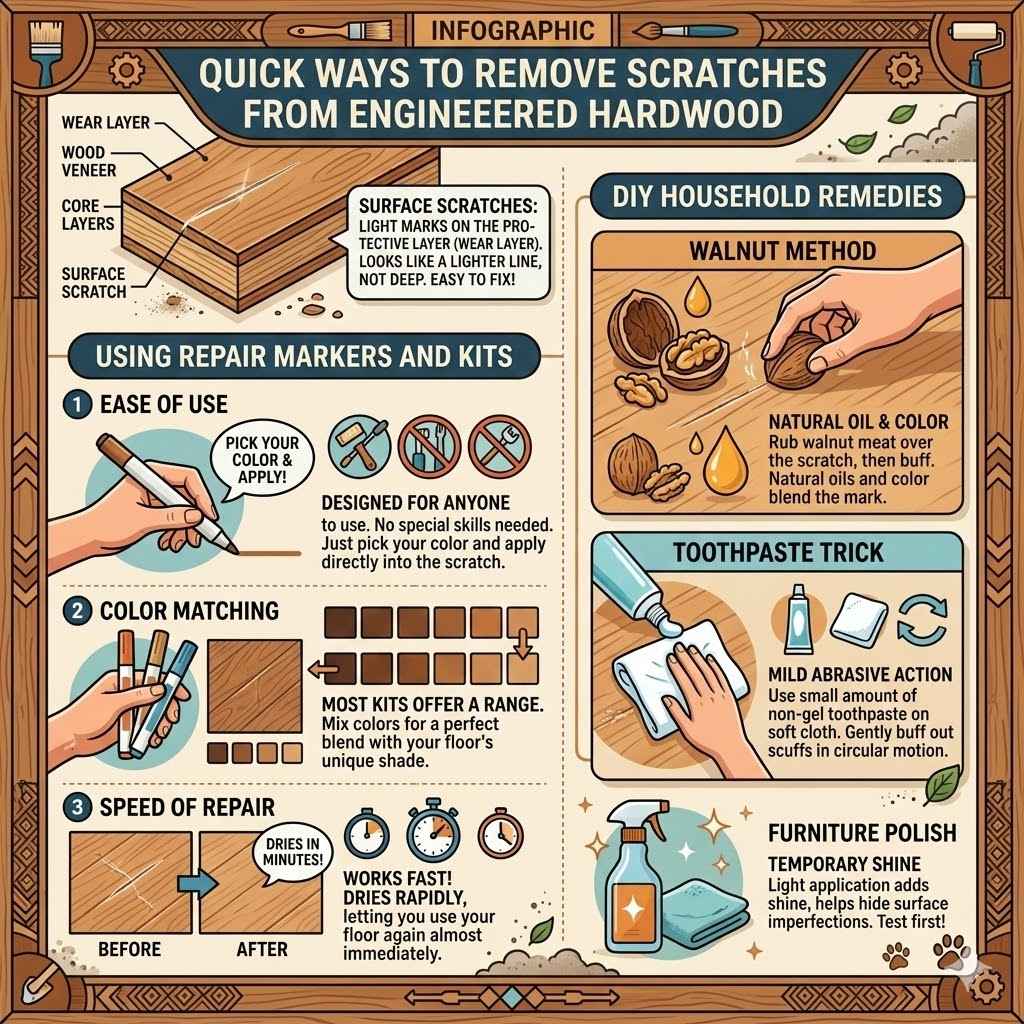
Surface scratches are the most common type you’ll encounter on engineered hardwood floors. These are light marks that don’t go all the way through the top protective layer, often called the wear layer. Think of them like a scratch on your car’s paint job that you can’t feel with your fingernail.
They happen from everyday activities like pets walking across the floor, furniture being dragged, or even grit brought in from outside. Because they’re on the surface, they are usually the easiest to repair. The key is to use products that can fill in or buff out these shallow imperfections without harming the surrounding finish.
Understanding the depth of a scratch is important for choosing the right fix. A surface scratch typically looks like a lighter line on the floor’s finish. It doesn’t show the raw wood underneath.
If you run your finger over it, you usually won’t feel a significant indentation. These are the types of scratches that can often be improved dramatically with simple cleaning and buffing techniques, or by using specialized scratch repair kits. The wear layer on engineered hardwood is designed to offer some protection, and these minor abrasions are well within its capabilities to handle for repair.
Using Repair Markers and Kits
One of the fastest ways to tackle light scratches is by using furniture repair markers or specialized hardwood floor scratch repair kits. These kits come with small bottles of colored compounds or crayons that match common wood tones. You simply select the color that best matches your floor, apply it directly into the scratch, and then wipe away any excess.
It’s like using a colored pencil on your floor, but designed for durability. This method works best for shallow scratches where the color of the wood has been slightly dulled or marred.
These repair markers are incredibly user-friendly. They don’t require any special tools or skills. You can often find them at home improvement stores or online.
Many kits include a variety of shades, allowing you to mix colors to achieve a perfect match for your specific floor. For deeper scratches that might show a bit of the underlying material, a filler included in some kits can also be used to level the surface before applying the color. The speed comes from the direct application and quick drying time.
You can often fix multiple scratches in just a few minutes.
- Ease of Use: These markers are designed for anyone to use. You don’t need to be a DIY expert. Just pick your color and apply.The simplicity of these markers means you can tackle floor repairs whenever you notice them, without needing to set aside a whole day. They are perfect for quick touch-ups that make a big difference.
- Color Matching: Most kits offer a range of colors. You can even blend them to get the exact shade of your engineered hardwood.Getting the color right is key to making the scratch disappear. The ability to mix shades ensures a seamless blend with your existing floor, so the repair is virtually unnoticeable.
- Speed of Repair: Many markers dry within minutes. You can walk on the floor soon after the repair.This is a huge advantage for busy households. You don’t have to cordon off an area for days. A quick fix means your life can get back to normal immediately.
DIY Household Remedies
Sometimes, you can find quick fixes for light scratches using items you already have at home. These methods are usually for very minor scuffs and marks. For instance, a walnut can be surprisingly effective.
Simply crack open a walnut and rub the meat of the nut over the scratch. The natural oils and color from the walnut can help fill in and disguise light scratches. After rubbing, buff the area with a soft cloth.
This is a natural, non-toxic way to improve the appearance of your floors.
Another common household trick involves using furniture polish or even toothpaste. For scuffs that are more like marks on top of the finish rather than deep gouges, a dab of non-gel toothpaste on a soft cloth can sometimes buff them out. Rub gently in a circular motion.
Be sure to wipe the area clean afterwards with a damp cloth and then dry it. Similarly, a light application of furniture polish can add a bit of shine that might mask minor imperfections. Always test these methods in an inconspicuous spot first to ensure they don’t damage your floor’s finish.
- Walnut Method: Rub the meat of a walnut into the scratch. The oils and color help blend the mark.This is a great natural option. It’s safe for most finishes and can work wonders on those annoying little marks that catch your eye.
- Toothpaste Trick: Use a small amount of non-gel toothpaste on a soft cloth to gently buff out scuffs.This works by providing a very mild abrasive action. It’s best for marks that are on the surface of the protective layer.
- Furniture Polish: A light application can add shine and help hide surface imperfections.Furniture polish can restore some luster to a dulled scratch, making it less noticeable. It’s a quick spritz and wipe for a temporary fix.
Addressing Deeper Scratches Effectively
While surface scratches are one thing, deeper scratches on engineered hardwood floors can feel a bit more daunting. These are the marks that you can feel with your fingernail, and they might even show a different color beneath the surface layer. They often happen from accidents like dropping something heavy or from dragging furniture without proper protection.
It’s important to address these promptly to prevent further damage or moisture getting into the wood. Luckily, there are still straightforward methods to fix them without calling in a professional, ensuring you can Remove Scratches from Engineered Hardwood Fast even when they are more significant.
Understanding Scratch Depth
Knowing if a scratch is deep or superficial is the first step to fixing it correctly. You can usually tell by running your fingernail across the scratch. If your nail catches on an edge or dips into the groove, it’s likely a deeper scratch.
If you can’t feel it at all, it’s probably a surface scratch. Deeper scratches penetrate further into the wear layer and sometimes even into the decorative layer of the engineered hardwood. These require a bit more attention than a simple buff or color fill.
The impact of scratch depth is significant. A light scratch might just be an aesthetic annoyance, but a deep scratch can compromise the integrity of the floor. It creates an entry point for dirt, moisture, and spills to seep into the wood layers, potentially leading to swelling, discoloration, or even mold and mildew growth over time.
Therefore, addressing deeper scratches isn’t just about looks; it’s also about protecting your investment and maintaining the lifespan of your engineered hardwood floors. Prompt repair is crucial to prevent these issues from escalating.
Using Wood Filler Products
For scratches that have dug into the wood, wood filler is an excellent solution. These products come in various forms, including putties, pastes, and even wax sticks. You choose a color that closely matches your flooring.
The filler is then carefully pressed into the scratch using a putty knife or spatula. It’s important to slightly overfill the scratch, as the filler might shrink slightly as it dries. Once dry, you can sand it smooth and then reapply stain or a matching repair marker if needed to blend the color perfectly.
Wood fillers are designed to be durable and can stand up to foot traffic once cured. They essentially replace the missing material in the scratch, restoring the floor’s surface to a more even plane. This is essential for preventing future problems and for achieving a visually seamless repair.
When selecting a wood filler, look for one specifically designed for wood floors. Some fillers are water-based and easy to clean up, while others might be solvent-based for greater durability. Always follow the manufacturer’s instructions for application and drying times.
- Repairing Gouges: Wood filler fills deep grooves and gouges, restoring the surface level.This product is like a patch for your floor. It fills in where material has been lost, making the surface smooth again.
- Color Matching: Many fillers come in a range of wood tones or can be stained to match.Finding the right color is vital for a nearly invisible repair. You can often stain a neutral filler to perfectly match your unique floor color.
- Durability: Once cured, wood filler provides a hard, lasting repair that can handle everyday wear.You want a repair that lasts. Wood filler creates a strong bond that stands up to traffic, keeping your floors looking good for longer.
The Rub-N-Buff Method
A less common but sometimes effective technique for deeper scratches involves using products like Rub ‘n Buff. This is a unique wax-based polish infused with metallic or color pigments. It’s often used for furniture restoration and crafts, but it can be adapted for wood floors.
You apply a small amount to a soft cloth and then rub it gently into the scratch. The fine pigments can help to fill and color the scratch, making it less noticeable. It’s particularly good for scratches that have removed some of the original finish color.
When using Rub ‘n Buff on floors, it’s essential to use it sparingly and test it first. The product can add a slight sheen, so you want to ensure it blends well with your floor’s existing finish. For engineered hardwood, it’s best applied to minor to moderate scratches where the color has been removed.
After application, buff the area to a shine. This method is a bit more art than science and requires a careful hand to avoid over-application. The benefit is its ability to add a subtle metallic or colored sheen that can mimic wood grain or finish.
One example of this method in action involved a homeowner with a few noticeable scratches on their oak engineered hardwood. They chose a Rub ‘n Buff color that was slightly darker than their floor’s natural tone. They applied it very thinly with a cotton swab directly into the scratched areas.
After letting it sit for a minute, they buffed it gently with a soft cloth. The result was that the scratches, which had previously appeared as light lines, now had a subtle depth and color that made them blend in with the surrounding wood grain, significantly improving the floor’s appearance. This shows how creative solutions can work.
Preventing Future Scratches
Once you’ve learned how to Remove Scratches from Engineered Hardwood Fast, the next logical step is to prevent them from happening again. Prevention is always better than cure, and with a few simple habits, you can keep your engineered hardwood floors looking pristine for years to come. This section will cover easy, everyday strategies to protect your floors from the usual culprits that cause scratches and scuffs, saving you time and effort in the long run.
Protecting Furniture Legs
Furniture is one of the biggest causes of scratches on wood floors. When furniture is moved, even slightly, the legs can drag and create unsightly marks. The easiest and most effective solution is to attach protective pads to the bottom of all furniture legs.
Felt pads are incredibly popular and affordable. They create a smooth, gliding surface that significantly reduces friction. These pads come in various shapes and sizes to fit different furniture feet, from tables and chairs to couches and beds.
Beyond felt pads, you can also find plastic glides or rubber caps for heavier items. For dining chairs that are moved frequently, consider investing in furniture socks. These are fabric sleeves that slip over the legs and prevent scratching.
Regularly check the condition of these protectors. Felt pads can wear down or collect debris, so replacing them every few months or when they show signs of wear is a good practice. This simple step is a game-changer for scratch prevention.
- Felt Pads: Stick-on felt pads are cheap and effective for most furniture.These are the go-to solution for a reason. They’re easy to apply and provide a soft barrier between furniture and floor.
- Furniture Socks: Fabric covers for chair legs prevent scraping.These are great for high-traffic areas like dining rooms where chairs are moved often. They offer a more secure fit.
- Regular Checks: Make sure pads are still attached and not worn out.It’s easy to forget about these protectors. A quick inspection every so often ensures they are still doing their job effectively.
Entrance Mats and Rugs
Dirt, sand, and grit tracked in from outside are tiny abrasives that can act like sandpaper on your floors, causing micro-scratches that dull the finish over time. Placing durable doormats both outside and inside every entrance to your home is a crucial first line of defense. The outside mat should be coarse enough to scrape off the worst of the dirt, while the inside mat can catch any remaining particles.
In addition to doormats, using area rugs in high-traffic zones within your home can provide an extra layer of protection. Hallways, living room seating areas, and even the space in front of the kitchen sink are prime spots for wear and tear. Rugs not only add comfort and style but also absorb impact and catch debris, keeping it from reaching your hardwood.
Make sure rugs have a non-slip backing or use a rug pad to prevent them from shifting and causing their own damage.
- Outside Doormats: A tough mat outside traps most dirt before it enters.This is your first defense. It takes the brunt of the dirt from shoes, stopping it before it even gets inside.
- Inside Doormats: A secondary mat inside catches finer particles.This mat acts as a backup, catching anything that made it past the first mat. It’s the final gatekeeper for dirt.
- Area Rugs: Use rugs in busy areas to protect the floor beneath.These add an extra layer of cushion and protection. They cover the most walked-on parts of your floor, reducing wear.
Proper Cleaning Techniques
How you clean your engineered hardwood floors plays a significant role in preventing scratches. Using the wrong cleaning tools or solutions can actually cause damage. Always sweep or vacuum your floors regularly with a soft brush attachment to remove loose dirt and debris.
Avoid vacuum cleaners with beater bars that spin aggressively, as these can scratch the finish. For damp cleaning, use a microfiber mop and a wood floor cleaner specifically designed for engineered hardwood.
Never use excessive water on your engineered hardwood floors. Water can seep into the seams and cause the wood to swell or warp. A damp mop is sufficient.
Also, avoid abrasive cleaners, steel wool, or harsh chemicals. These can strip the protective finish, making the wood more vulnerable to scratches and damage. A gentle, consistent cleaning routine will help maintain the floor’s integrity and appearance.
Statistics show that proper maintenance can significantly extend the life of hardwood flooring. According to the National Wood Flooring Association, over 75% of premature floor wear is caused by improper maintenance and cleaning. This highlights how crucial simple cleaning habits are.
For instance, a study found that regularly sweeping and using a damp mop with a pH-neutral cleaner reduced the appearance of micro-scratches by up to 40% over a year compared to inconsistent cleaning.
Here’s a quick comparison of cleaning tools and their impact:
| Tool | Impact on Engineered Hardwood | Recommendation |
|---|---|---|
| Broom with stiff bristles | Can scratch the finish, especially if grit is present. | Avoid; opt for a soft brush or microfiber. |
| Vacuum with beater bar | Aggressively scratches the floor surface. | Use only vacuums with a hard floor setting or a soft brush attachment. |
| Microfiber mop | Gently picks up dirt and dust without scratching. | Highly recommended for damp cleaning. |
| Abrasive cleaners (e.g., scouring powder) | Strips finish, dulls appearance, and can cause micro-scratches. | Never use. |
| Wood floor cleaner (pH-neutral) | Safely cleans and protects the finish. | Ideal for regular cleaning. |
When To Call A Professional
While this guide focuses on how to Remove Scratches from Engineered Hardwood Fast, there are times when DIY solutions might not be enough. Recognizing these situations is key to avoiding further damage and ensuring the best possible outcome for your floors. Professional floor care specialists have the tools, expertise, and products to handle more complex issues that might be beyond the scope of typical home repairs.
Deep Damage and Large Areas
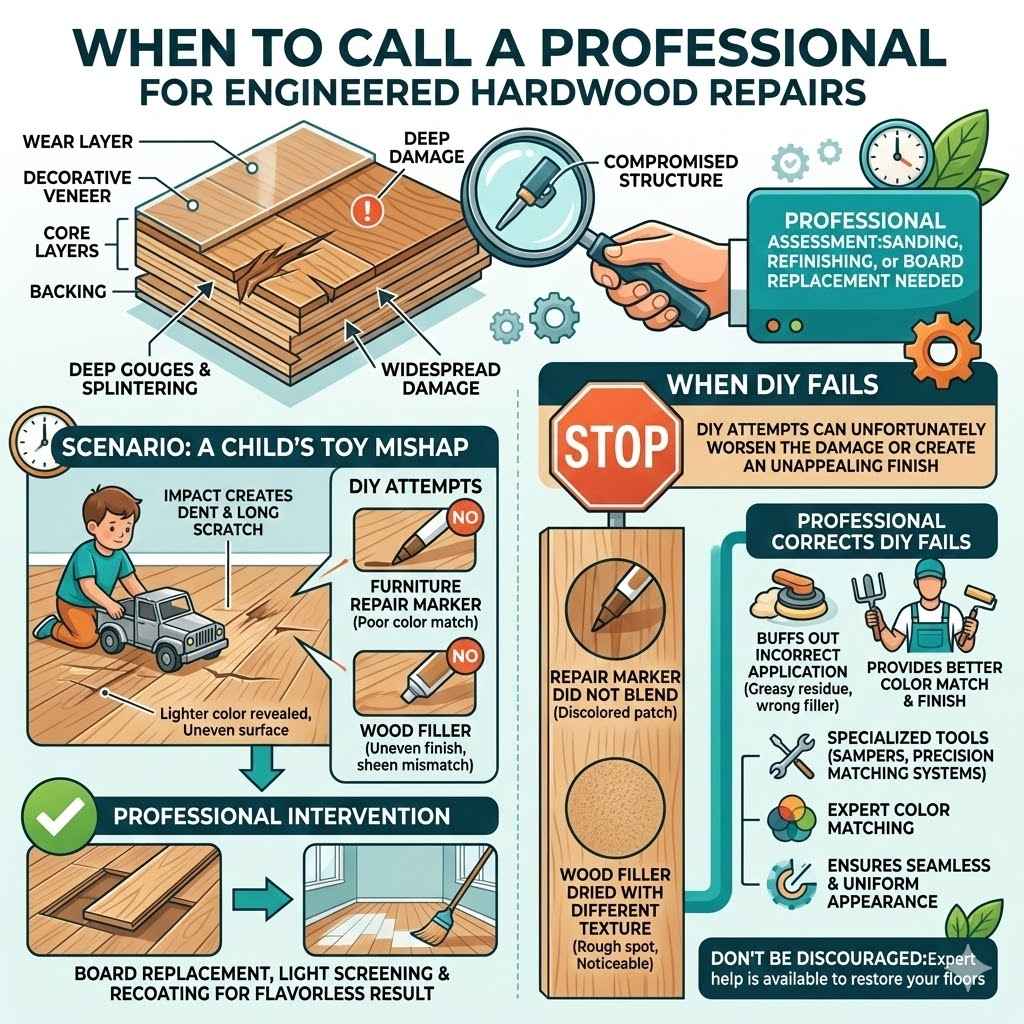
If your engineered hardwood floor has suffered very deep gouges, significant splintering, or widespread damage, it’s usually best to consult a professional. These types of issues may indicate that the structural integrity of the wood has been compromised. Professionals can assess the extent of the damage and determine if sanding, refinishing, or even board replacement is necessary.
Attempting extensive repairs yourself on such damage could potentially worsen the problem or lead to an uneven and unappealing finish.
For example, imagine a heavy piece of furniture that was dragged across the floor, leaving a long, deep gash that tore away a significant portion of the wear layer and even some of the decorative layer. A DIY approach might involve filling this with wood filler, but achieving a smooth, seamless finish that matches the surrounding area can be incredibly difficult. A professional has specialized tools like industrial sanders and precise color-matching systems that can achieve results far superior to what’s typically possible at home.
They can also ensure any repairs blend perfectly with the existing floor’s patina and finish.
Scenario: A Child’s Toy Mishap
A young child was playing with a metal toy truck, and it slipped from their hands, landing on the engineered hardwood floor. The impact created a noticeable dent and a long scratch about three feet long. The scratch was deep enough to reveal a lighter color beneath the surface, and the dent created a slight unevenness.
- The homeowner first tried a furniture repair marker, but the color didn’t quite match, and the scratch was too deep for the marker to effectively fill and hide.
- They then considered wood filler but were concerned about getting a smooth, uniform finish that would match the rest of the floor’s sheen.
- Ultimately, they decided to contact a local flooring professional. The professional assessed the damage and recommended a board replacement for the most severely damaged section, followed by a light screening and recoating of the entire room to ensure a uniform appearance. This was a more extensive repair than a simple scratch, justifying professional intervention for a flawless result.
When DIY Fails
Sometimes, even with the best intentions, DIY repairs don’t turn out as planned. You might find that a repair marker didn’t blend well, a wood filler dried with a different texture, or a cleaning product dulled the finish. In these cases, it’s better to stop and seek professional help.
A professional can often correct or repair previous DIY attempts. They have access to a wider range of products and techniques that can fix errors and restore the floor’s appearance.
Don’t be discouraged if a DIY attempt doesn’t work out. It’s a learning process, and sometimes the damage requires expert intervention. For instance, if you tried to repair a scratch with a polish that left a greasy residue, or a filler that dried too light and is very noticeable, a professional can often buff out the incorrect application or provide a better color match and finish.
They can also advise on whether further repairs are needed or if a full refinish is the best course of action.
Frequently Asked Questions
Question: Can I remove scratches from engineered hardwood without damaging the finish?
Answer: Yes, by using gentle methods like repair markers, walnuts for light scratches, or specialized cleaning products designed for wood floors. Always test in an inconspicuous area first.
Question: How do I know if a scratch is too deep to fix myself?
Answer: If you can feel a significant indentation with your fingernail or if the scratch has removed a large portion of the wear layer and shows the wood underneath, it might be too deep for easy DIY repair.
Question: What is the fastest way to deal with minor scuffs on engineered hardwood?
Answer: For light scuffs, a soft cloth with a bit of wood floor cleaner or a furniture polish can often buff them out quickly. A walnut can also be effective for minor marks.
Question: Should I use a polish on my engineered hardwood floors?
Answer: Some polishes can temporarily hide minor scratches by adding shine. However, it’s important to use products specifically made for engineered hardwood and to avoid those that build up layers or leave a greasy residue.
Question: How often should I clean my engineered hardwood floors to prevent scratches?
Answer: Regular sweeping or vacuuming with a soft brush attachment daily or every other day is recommended to remove grit. A damp mopping with a wood floor cleaner once a week or as needed will help maintain cleanliness and prevent damage.
Summary
You’ve learned how to Remove Scratches from Engineered Hardwood Fast using simple home remedies, repair kits, and wood fillers. We covered identifying scratch depth and protecting your floors from future damage with pads, mats, and correct cleaning. If damage is severe, professionals are your best bet.
Keep your floors looking great with these easy steps.