Repairing a Rotting Wood Post Without Replacement
Dealing with a rotting wood post can seem tricky, especially if you’re new to home repairs. It’s a common problem because wood is exposed to the weather and can get damaged over time. The good news is that you often don’t need to
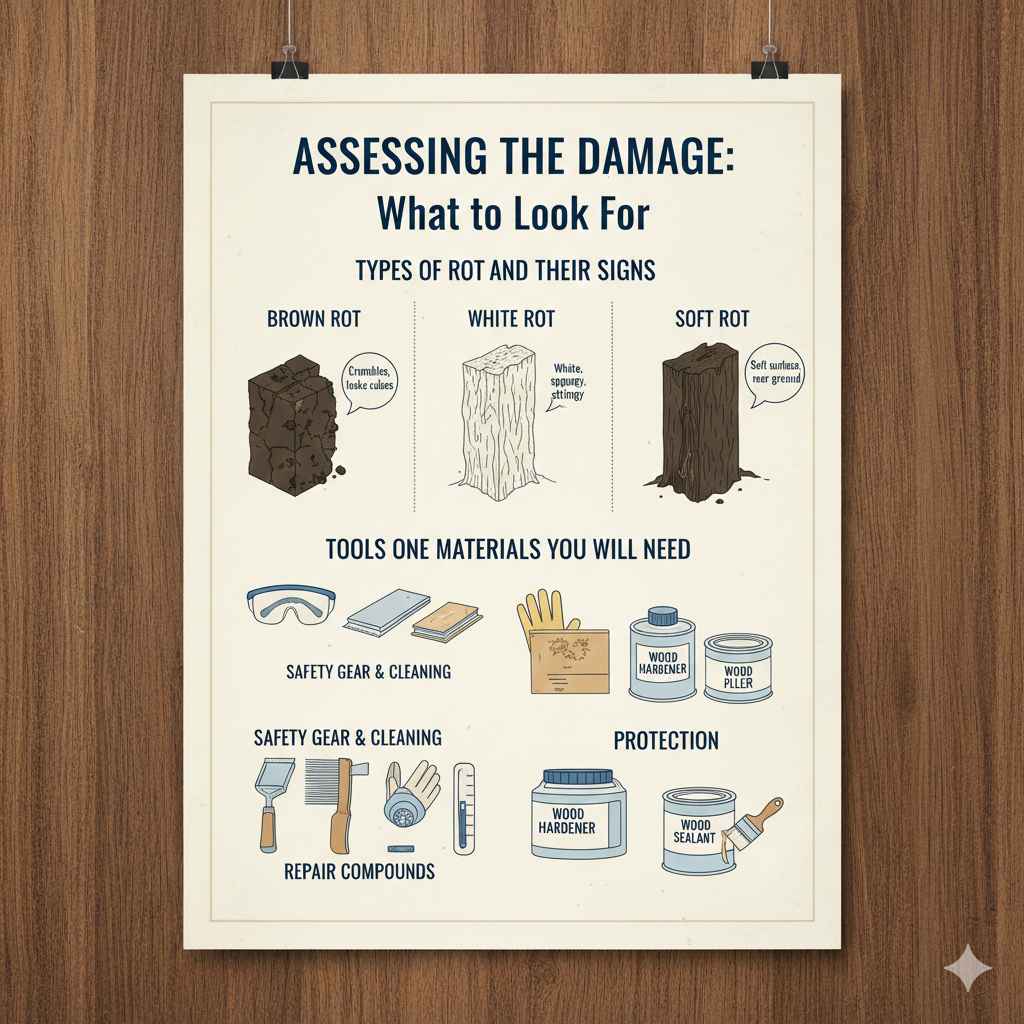
Assessing the Damage: What to Look For
Before you start any repair work, you need to check how bad the damage is. The extent of the rot will determine the best way to fix the wood post. You should explore the whole post, from top to bottom, to find out the full scope of the issues. This step helps you decide if you can simply fix it or if you have a bigger problem.
Types of Rot and Their Signs
There are different types of rot that can affect a wood post, each showing its own set of clues. Recognizing these types will help you find the right repair methods. The common types are brown rot, white rot, and soft rot. Each one has different effects on the wood and requires specific attention. These various conditions are usually caused by fungal decay, a natural part of wood decomposition when certain conditions exist.
Brown Rot: This type of rot attacks the cellulose in the wood, making it turn brown and crumble. You might see cracks that go across the grain, making the wood look like it’s been cut into small cubes. This is often the most dangerous type of rot, as it quickly weakens the structure. Brown rot often happens in damp, poorly ventilated areas.
If you touch the wood and it crumbles, that’s a big sign of brown rot.
White Rot: White rot mainly affects the lignin in the wood, which causes it to turn pale or white and become stringy or spongy. In the early stages, it might look like the wood is bleached. White rot can make the wood soft and mushy over time. It commonly affects hardwoods and is also found in areas with high moisture.
You can often see the fine strands of the fungus if you look closely.
Soft Rot: Soft rot happens when the wood gets wet for a long time. It usually affects the outer layers of the wood, making it soft and crumbly. This type of rot often attacks in very wet places, like where wood is in contact with the ground. It can look similar to brown rot but often has a slightly different texture and color.
The surface feels soft, almost like it’s been worn away by water.
Tools and Materials You Will Need
Gathering the right tools and supplies before you start is important. Having everything ready makes the work easier and helps ensure you do a good job. You’ll need some basic tools and materials, like safety gear, cleaning tools, repair compounds, and some way to protect your work once it’s complete.
Safety Gear: You’ll need safety glasses, gloves, and a dust mask. Protecting yourself is the first thing to think about. Wear safety glasses to protect your eyes from debris, gloves to protect your hands from chemicals and splinters, and a dust mask to stop you from breathing in wood dust or chemicals.
Safety first!
Cleaning Tools: A scraper, wire brush, and sandpaper will remove the loose or damaged wood and prep the surface. A scraper removes big chunks of loose wood and debris. A wire brush helps clean out any rot or dirt. Sandpaper smooths out the surface so the repair material can stick properly.
These tools get the surface ready for the repair.
Repair Compounds: Wood hardener and wood filler are your main choices for repairing the post. Wood hardener soaks into the soft, rotten wood to make it strong again. Wood filler is used to replace missing wood and fill cracks. You might also need epoxy if the damage is serious.
These are the core products for the repair.
Protection: You will need a primer, paint, and sealant to protect the repaired area from the weather. The primer makes the paint stick better. Paint protects the wood from water and sunlight, and the sealant provides an extra layer of protection, particularly at ground level.
These materials shield your repair from the elements.
Methods to Repair a Rotting Wood Post Without Replacing It
When you discover rot in a wood post, you have several methods to restore its strength and appearance. The approach you choose depends on how serious the damage is. The main goal is to remove the rot, strengthen the wood, and protect it from future damage. Each method has its own steps and is suitable for different levels of rot.
Using Wood Hardener and Filler
This method works best for moderate rot, where the surface is damaged but the core of the post is still solid. The process includes using wood hardener to reinforce the existing wood and then using wood filler to replace the missing material. This approach is effective for smaller areas of decay.
Clean the Rot: Use a scraper and wire brush to remove the rotten wood, making sure you get down to solid wood. Then, use sandpaper to rough up the surface.
This creates a good surface for the hardener and filler to stick.
Apply Wood Hardener: Put the wood hardener on the rotten area. Follow the instructions on the package for the best results. It should soak into the wood and make it strong again.
This step strengthens the weakened wood.
Fill with Wood Filler: Once the hardener is dry, mix the wood filler according to the instructions. Use a putty knife to put the filler into the areas where the wood is missing. Make sure it’s smooth and level with the rest of the post.
The filler replaces missing wood.
Sand and Paint: After the filler dries, sand it smooth. Then, prime and paint the repaired area to match the rest of the post.
This finishes the repair and protects the wood.
Using a Structural Repair Sleeve
For more serious damage, when the bottom of the post is severely decayed or if it’s in contact with the ground, a structural repair sleeve can be very useful. This method gives extra support to the post and stops the rot from getting worse. It is often used for posts that bear weight, such as those supporting a deck or porch. This approach provides a strong solution.
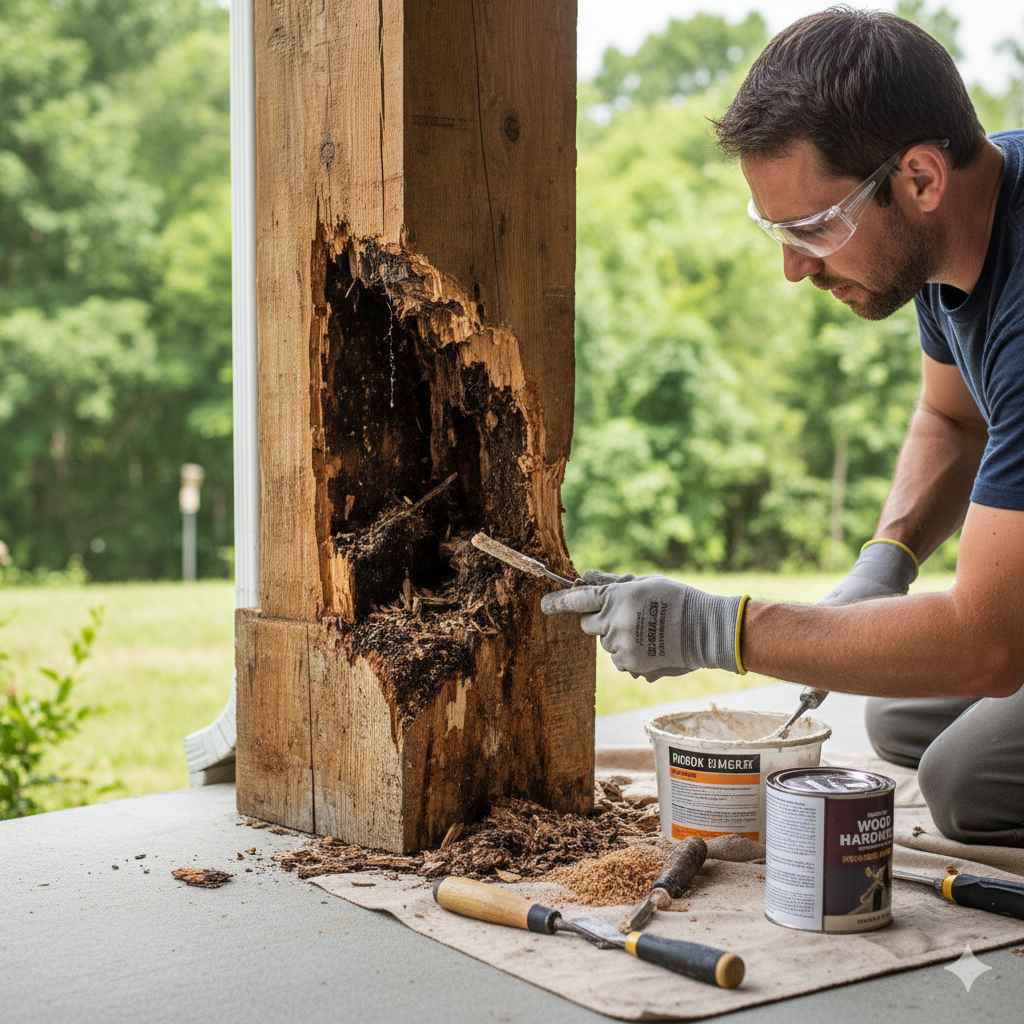
Cut Out Rot: Remove all rotten wood from the post, particularly at the ground level where rot often starts. Make sure you get down to healthy, solid wood before proceeding.
Get rid of the bad stuff.
Install the Sleeve: Place the repair sleeve around the post, making sure it fits snugly. Use fasteners, like screws, to attach the sleeve firmly to the post. Make sure the sleeve extends a good distance above the rot.
This adds strength and stability.
Fill the Space: Fill the space between the post and the sleeve with a suitable filler like epoxy or a concrete mix. This will offer extra support and stop moisture from getting in.
Fill the empty space for extra support.
Protect the Repair: Once the filler is dry, prime and paint the repair. Consider adding a sealant to the bottom edge where it meets the ground to stop water from getting in.
Seal it up to keep water out.
Preventing Future Rot: Protection and Maintenance
After you’ve successfully repaired your wood post, the next step is to make sure it doesn’t rot again. Preventing future damage is key to keeping your post strong and lasting longer. This means taking steps to protect the wood from the elements and doing regular maintenance. Think of this as giving your wood post a shield and regular check-ups.
Applying Protective Coatings
One of the best ways to stop rot is to put on protective coatings. These coatings act as a barrier to moisture and sunlight, which are major causes of wood decay. Using the right kind of coating can extend the life of your wood post and help prevent it from rotting.
Paint: Paint creates a protective layer that stops water from getting into the wood. Choose a paint that is made for outside use and that can resist weather changes. You might also want to add a primer before painting, to help the paint stick better and last longer.
Paint is a classic way to protect wood.
Stain: Wood stain soaks into the wood, protecting it from moisture and UV rays while also letting the wood’s natural grain show. Stains often have chemicals that stop mold and rot. You can choose from many stains, including oil-based and water-based types, depending on the look you want.
Stain adds color and protection.
Sealants: Sealants are especially good at protecting the bottom part of the post, where it meets the ground. Sealants form a strong barrier against moisture, reducing the chance of rot from the ground up. Use a sealant made for outdoor use to get the best protection.
Sealants offer extra defense.
Regular Maintenance Tips
Regular maintenance is important for keeping your wood post in good shape. It means inspecting the post regularly, fixing any damage quickly, and keeping the area around the post clear. Even with protective coatings, maintenance helps you catch any problems early and keeps your post strong for years. It’s like giving your wood post a regular check-up.
Inspect Regularly: Check your wood posts at least twice a year, or after any big storms. Look for any signs of rot, such as cracks, soft spots, or discoloration. The sooner you find any problems, the easier they are to fix.
Look carefully and often.
Keep it Clean: Make sure the area around the post is always clean. Remove any leaves, dirt, or debris that could trap moisture and cause rot. Make sure water can drain away easily.
Keep the area clear.
Trim Vegetation: Trim any plants or bushes that are near the post. Plants can trap moisture and limit airflow, which can make rot worse. Keep a safe distance between plants and your wood posts.
Cut back any plants near the posts.
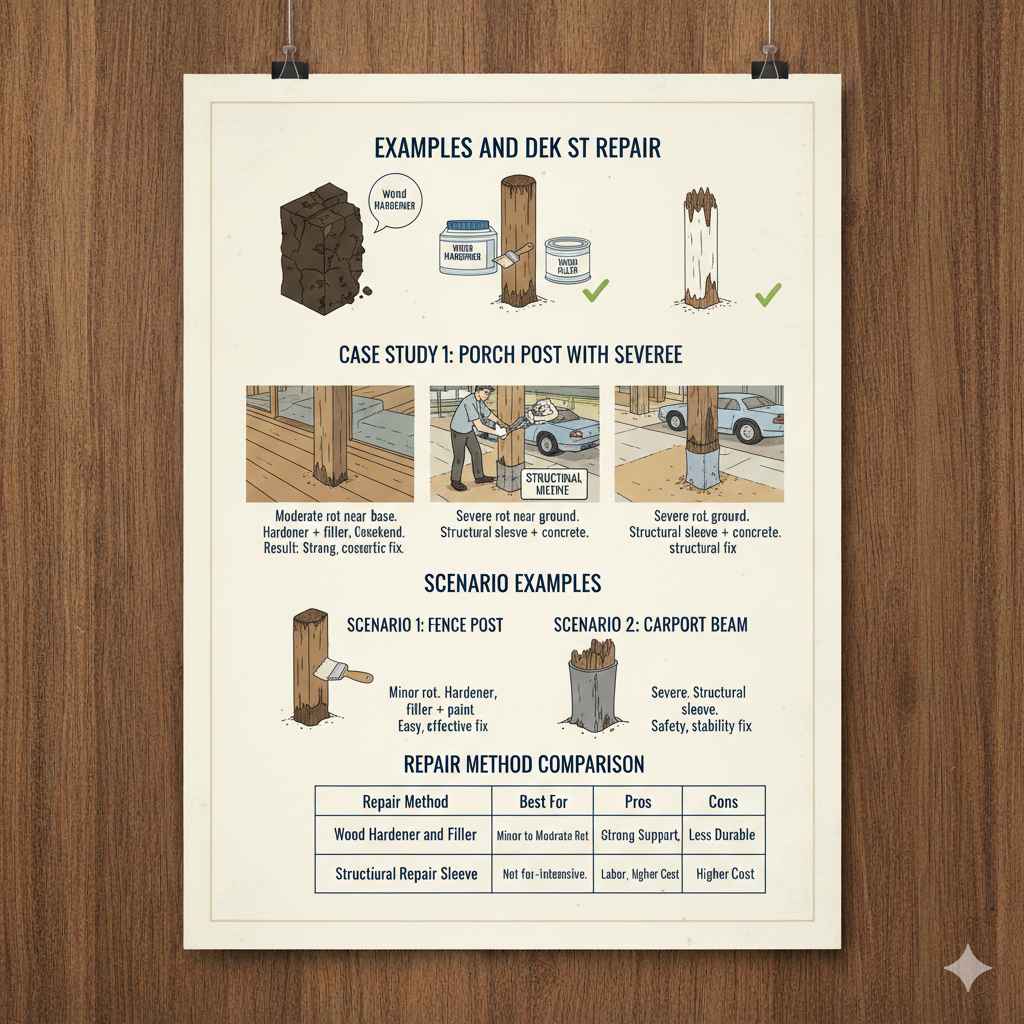
Examples and Case Studies
Seeing how these repair methods work in real-life situations can provide a better grasp of what to expect and what results you can achieve. Real-world examples show how different techniques were used to solve various problems, with both positive and negative results. These examples highlight the impact of choosing the right approach and how to avoid mistakes.
Case Study 1: Deck Post Repair
A homeowner noticed that a deck support post was starting to rot near the base. The damage was moderate, so they chose to use wood hardener and filler. They first cleaned out the rot, applied the hardener, and then filled the missing sections with filler. After sanding and painting, the post looked like new, and the deck was strong and safe again. The repair cost about $50 and took a weekend, showing a quick and inexpensive fix for moderate rot.
This case shows a straightforward solution.
Case Study 2: Porch Post with Severe Rot
A porch post suffered from significant rot near the ground, where water frequently splashed. The owner chose to use a structural repair sleeve. After removing the rotten wood, they fitted the sleeve, filled the gap with a concrete mixture, and painted the post. The repair cost around $150, but it provided a long-lasting fix for a very serious problem. The porch was again safe and strong after the repair.
This case provides a longer-lasting solution.
Here are a couple of example scenarios you might run into:
Scenario 1: A wooden fence post shows signs of rot at the bottom. The rot is not too deep, and most of the post is still solid. The homeowner could use wood hardener and filler to fix the damage, following up with a protective coat of paint to prevent further decay.
The solution is easy and effective.
Scenario 2: A support beam for a carport has severe rot at its base, making it unstable. The homeowner needs a strong, durable repair. They could use a structural repair sleeve, which will reinforce the beam and offer lasting support, ensuring the structure’s safety.
The repair is about safety and stability.
| Repair Method | Best For | Pros | Cons |
|---|---|---|---|
| Wood Hardener and Filler | Minor to Moderate Rot | Cost-effective, easy to apply, good for cosmetic repairs | Not suitable for severe damage, might not last as long in high-moisture areas |
| Structural Repair Sleeve | Severe Rot, Ground Contact | Provides strong support, prevents further rot, durable solution | More labor-intensive, higher cost, requires careful installation |
Frequently Asked Questions
Question: How can I tell if a wood post is rotten?
Answer: Look for signs such as soft or crumbling wood, discoloration, cracks, and the presence of fungal growth. Press the wood with a tool or your finger; if it feels soft or crumbles, it indicates rot.
Question: What’s the best way to remove rotten wood?
Answer: The best method is to use a combination of tools like a scraper, wire brush, and sandpaper. Start by scraping away loose material, then use the wire brush to clean out debris, and finally, sand the surface to get it ready for repair.
Question: Is it possible to repair a rotting wood post without taking it down?
Answer: Yes, in many cases. The methods described, like using wood hardener and filler or a repair sleeve, allow you to fix the post while it is still in place, avoiding the need for complete replacement.
Question: How do I protect the repaired wood after fixing it?
Answer: Applying protective coatings is the key. You can use paint, stain, or sealants. Primer before paint and sealants at ground level can offer extra protection against water and weather.
Question: What are the main causes of wood post rot?
Answer: The main causes are moisture, sunlight, and fungi. Moisture from rain and humidity, combined with exposure to the sun, can create the right environment for fungi to thrive and cause the wood to decay.
Final Thoughts
Learning how to Repair a Rotting Wood Post Without Replacing It is a useful skill that can save you money and keep your structures in great condition. Remember, before you start, make sure you check the damage thoroughly to figure out the best way to fix the problem. You can often make the right choice between using wood hardener and filler or a structural repair sleeve, depending on how bad the rot is. The most important thing is to take care of the issue early and stop it from getting worse. Always protect your repaired work with paint, stain, or sealants to prevent future problems. By taking these steps, you can confidently address rot and make your wood posts strong again. Go ahead, give it a try—you’ll be happy with the results!