Easy Fire Starters: Wax & Wood Shavings Made Simple
Starting a fire can seem hard, right? Many people find it tough to get a good flame going. It’s common to struggle with choosing the right materials and knowing the best way to put them together. But don’t worry! This guide on Easy Fire Starters: Wax & Wood Shavings Guide will show you a simple method to get your fire going quickly and easily. We’ll explore the basics and provide step-by-step instructions. Ready to learn how to make fire starting easier?
What Are Easy Fire Starters?
Easy fire starters are helpful tools that make it simple to ignite a fire. They’re designed to burn for a longer time, giving the kindling a chance to catch fire. Using these starters is a great way to avoid the frustration of repeatedly trying to light a flame. They can also be a life saver for outdoor activities or in emergency situations. The primary function of a fire starter is to provide a sustained heat source to ignite the fuel.
These fire starters are particularly advantageous for beginners, as they reduce the skill required. They ensure a higher success rate when starting a fire. Whether it’s a campfire for a fun outdoor event or a wood stove in your house, a good fire starter can make your life easier. This reduces the time and effort needed to get a fire going, making outdoor experiences better and more enjoyable.
Types of Fire Starters
There are many different types of fire starters available, each with its own advantages. Some are homemade, using common household items. Others are store-bought, with advanced formulas to guarantee ignition. Choosing the right one depends on your needs and the conditions you are in. It’s useful to know the options to make a good choice.
Wax and Wood Shavings: This is a popular homemade option. Combining wax with wood shavings creates a fire starter that burns for a good amount of time, giving you time to set your fire.
Wax-based fire starters are generally water resistant. This makes them work in various weather conditions, and it is a good option for outdoor situations.
Commercial Fire Starters: These starters are available in many forms. They come in cubes, sticks, and other shapes. They are usually pre-made, so they are really convenient to use.
Commercial fire starters are easy to find and often very reliable. They are perfect if you want a no-fuss option.
Natural Fire Starters: These are made from natural materials. They use things like pine cones, tree bark, and dry leaves.
Natural fire starters are eco-friendly, and perfect for the outdoors. If you enjoy camping, this can be the perfect option.
Benefits of Using Fire Starters
Using fire starters offers various benefits for both beginners and experienced fire users. The biggest advantage is a reduced chance of failure. They boost the odds of successfully lighting a fire, even in difficult conditions. This leads to a safer and more enjoyable experience.
Easy to Use: Fire starters don’t require much skill. They can make the process simpler. You do not need years of training.
With an easy-to-use fire starter, you can get a fire going quickly without any real effort. This saves time and frustration.
Saves Time: Fire starters help ignite a fire faster than using just kindling and tinder. This is helpful for camping or in cold weather.
Instead of struggling for a long time, the fire starts quickly. This lets you spend more time enjoying the fire and less time trying to start it.
Works in Various Conditions: Good fire starters are designed to work in different environments.
Some fire starters work even when it’s wet or windy. This makes them reliable for outdoor use.

How to Make Easy Fire Starters: Wax & Wood Shavings
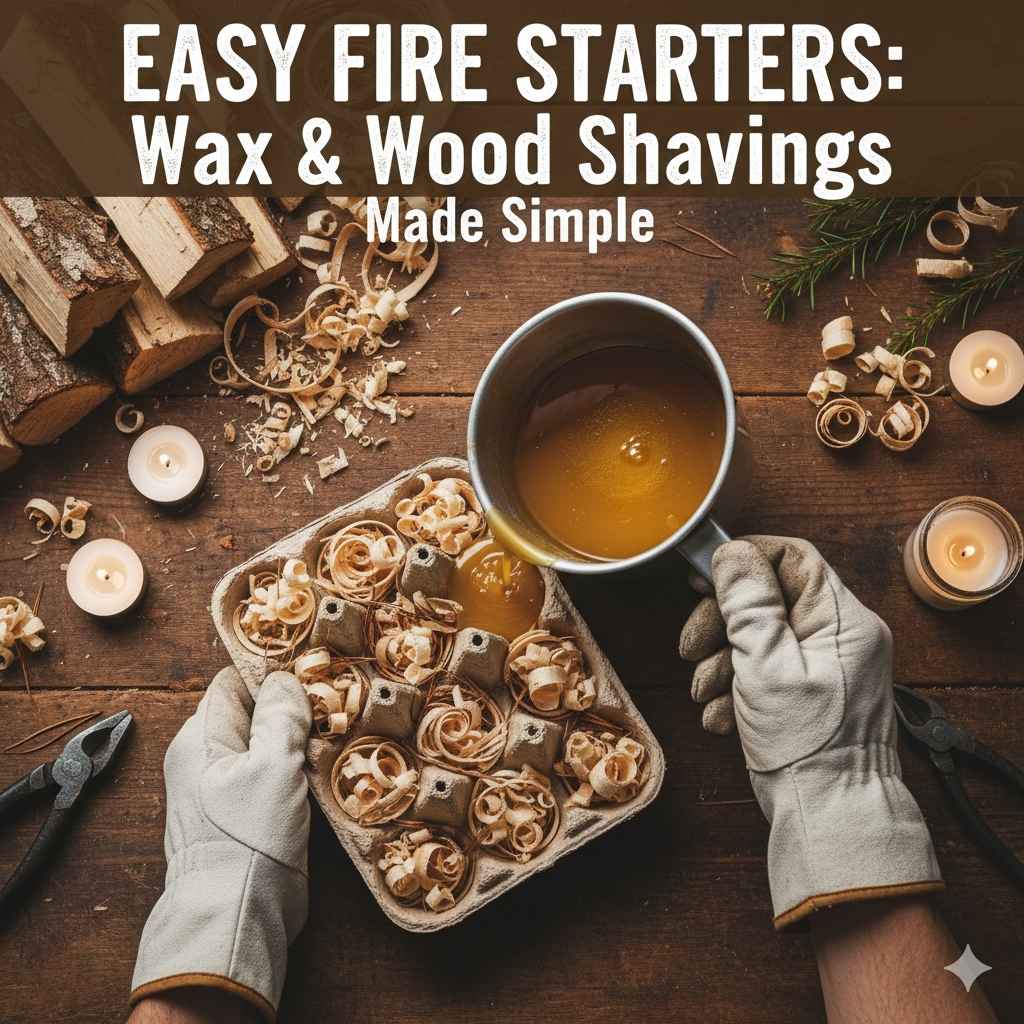
Making your own Easy Fire Starters: Wax & Wood Shavings Guide is a fun and easy project. It only requires a few simple materials that are easy to get. You can make a good supply for your camping trips or for your fireplace at home. The process is simple, and it allows you to personalize your fire starters to your needs.
This method focuses on using wax and wood shavings. These materials are inexpensive and easy to find. The wax provides the fuel, while the wood shavings act as an easy-to-ignite base. This combination gives you a great fire starter that’s effective and affordable. It’s a great way to recycle and be resourceful.
Gathering Materials
Gathering the correct materials is the initial phase. The materials you choose will impact the performance of your fire starters. Some choices can affect how long they burn and how easily they ignite. Getting the right things ensures a good result.
Wax: There are several types of wax that can be used. Paraffin wax, soy wax, or even old candle stubs work very well. The choice of wax affects how quickly the fire starters burn.
Paraffin wax is popular because it’s cheap and readily available. Soy wax is another good option. It burns cleanly. Recycled candle stubs are a useful, eco-friendly option. Each type brings different properties.
Wood Shavings: Untreated wood shavings are essential. Avoid shavings from treated wood, which may have chemicals that are dangerous when burned. The shavings should be dry to light easily.
Wood shavings serve as the base that absorbs the wax. They catch the flame easily and keep the fire going. You can get wood shavings from a hardware store. Many woodworkers or hobbyists may have extra shavings.
Container: You will need a container to hold the wax and wood shavings during the melting process. You can use old muffin tins, small paper cups, or even egg cartons. The container helps shape the fire starters and makes them easy to handle.
The container needs to be heat-resistant and able to hold the molten wax. Small containers help make individual fire starters. This makes them easier to store and use.
Step-by-Step Instructions
Making the fire starters is a simple process. It needs a little care, but the final outcome is well worth it. Following these steps carefully will lead to a successful result. Safety is very important when working with hot wax, so it’s a good idea to wear gloves and have an adult with you if you’re a child.
Prepare the Wax: If using wax blocks or old candles, break them into smaller pieces. This will help them melt evenly. Smaller pieces will melt faster and more evenly.
Putting the wax into small pieces reduces the time it takes to melt, making the process faster.
Melt the Wax: Place the wax pieces in a heat-safe container. You can melt the wax in a double boiler, or carefully in a pot on low heat on the stove. Be careful to watch it closely. Stir the wax often until it is fully melted.
A double boiler keeps the wax from getting too hot and possibly catching fire. If using a pot, keep the heat on low. Constant stirring stops the wax from sticking to the bottom.
Add Wood Shavings: Once the wax is melted, carefully add the wood shavings. Mix the shavings into the wax until they are well coated. Make sure every shaving gets wax on it for better burning.
Proper mixing is very important. The wax must reach all shavings to guarantee the fire starters work properly. Make sure every shaving gets coated in wax.
Fill the Containers: Carefully pour the wax and wood shavings mixture into your containers. Fill each container almost to the top. Let it cool and harden completely.
Pouring the wax gently is very important to avoid spills. Make sure the containers are on a stable surface. Allowing the fire starters to cool completely is crucial for them to solidify.
Cool and Store: After the fire starters have cooled and hardened, they’re ready. Store them in a cool, dry place until you need them. They are ready to be used whenever you need to start a fire.
Keeping the fire starters in a dry area will ensure they stay in good condition and are ready for use. Proper storage helps the fire starters last longer.
Tips for Using Fire Starters
Knowing how to use your Easy Fire Starters: Wax & Wood Shavings Guide is just as important as knowing how to make them. Proper use guarantees a successful fire. Following the guidelines below can increase your chances of starting a fire, whether it’s in a fireplace, a wood stove, or a campfire.
These tips are designed for different scenarios. They provide guidance on lighting the fire starters, and arranging kindling and fuel for a good burn. They are important for beginners and can help you avoid common mistakes.
Arranging the Fire Starter
Placing the fire starter correctly is the initial step to successful fire making. The way you arrange the fire starter in your fire pit or stove affects how well the fire will light and how long it will burn. A correct placement is key to an easy start.
Place the Fire Starter Properly: Put the fire starter in the center of your fire pit or stove. This lets the flame spread in all directions. Make sure it’s stable and won’t tip over.
A central location lets the fire spread evenly. This provides heat to all the kindling around it.
Add Kindling: Arrange small pieces of kindling around and over the fire starter. The kindling should be dry and easily ignited. Gradually add bigger pieces to build the fire.
Good kindling is essential for the fire to catch. It catches the flame and helps the fire move to the larger pieces of wood.
Ensure Airflow: Arrange the kindling to allow for airflow. Good airflow is essential for a healthy fire. Airflow supplies oxygen, which is necessary for combustion.
Airflow helps the fire burn effectively. The best arrangement allows the fire to receive enough oxygen to burn brightly.
Lighting the Fire Starter
Lighting the fire starter must be done with caution. This step requires a reliable ignition source, like matches or a lighter. It is very important to keep safety in mind, especially when outdoors.
Use Matches or a Lighter: Carefully light the fire starter using matches or a lighter. Hold the flame to the fire starter until it catches fire. Make sure you hold the flame for some time.
Matches and lighters are the most common ignition tools. Make sure to choose matches or a lighter that work well, even in windy conditions.
Position Flame Properly: Hold the flame at the bottom of the fire starter. This allows the heat to rise and ignite the wood shavings around the wax. It will burn slowly but steadily.
The right flame position is essential for the fire to catch quickly. Start from the bottom for the best results.
Monitor the Flame: Watch the fire starter and kindling carefully as they start to burn. Ensure the kindling catches fire and that the fire starts to spread. Adjust the arrangement if needed.
Monitor the fire until it gets going, so you know it is catching well. Early adjustments can ensure the fire starts properly.
Dealing With Problems
Even with good preparations, issues can come up. Maybe the fire doesn’t catch, or it burns out too quickly. Knowing how to handle these situations can save you time and energy. It means you can quickly get back on track to enjoying your fire.
If the Fire Doesn’t Catch: If the fire doesn’t light, check the fire starter and the kindling. Make sure the kindling is dry and close to the fire starter. Use more matches or relight the fire starter.
Sometimes, extra efforts are needed to ignite a fire. Making sure everything is close and dry is very important.
If the Fire Goes Out: If the fire goes out, check for a lack of airflow or wet kindling. Carefully add more kindling and relight the fire starter. Make sure the airflow is good.
If the fire goes out, find out why it happened. Adding fuel and ensuring good airflow are key to getting the fire going again.
Adjust the Arrangement: If the fire burns unevenly, change the arrangement of the kindling. Shift the wood to provide better airflow. Adjust the placement of the fire starter.
You can adjust the fire as needed to ensure even burning. This means shifting the wood, to improve airflow and provide more oxygen.
Alternative Fire Starter Ideas
While the Easy Fire Starters: Wax & Wood Shavings Guide is a great starting point, other methods offer new ways to start a fire. Using alternative methods can provide a better choice for different situations or materials that are available. Learning about a few options can boost your skill in fire starting and increase your chances of success in different situations.
The following are a few other options you can explore. These fire starters vary in complexity. They also provide alternatives if you do not have the supplies needed for wax and wood shaving fire starters. Experimenting with different materials lets you refine your abilities and adapt to any circumstance.
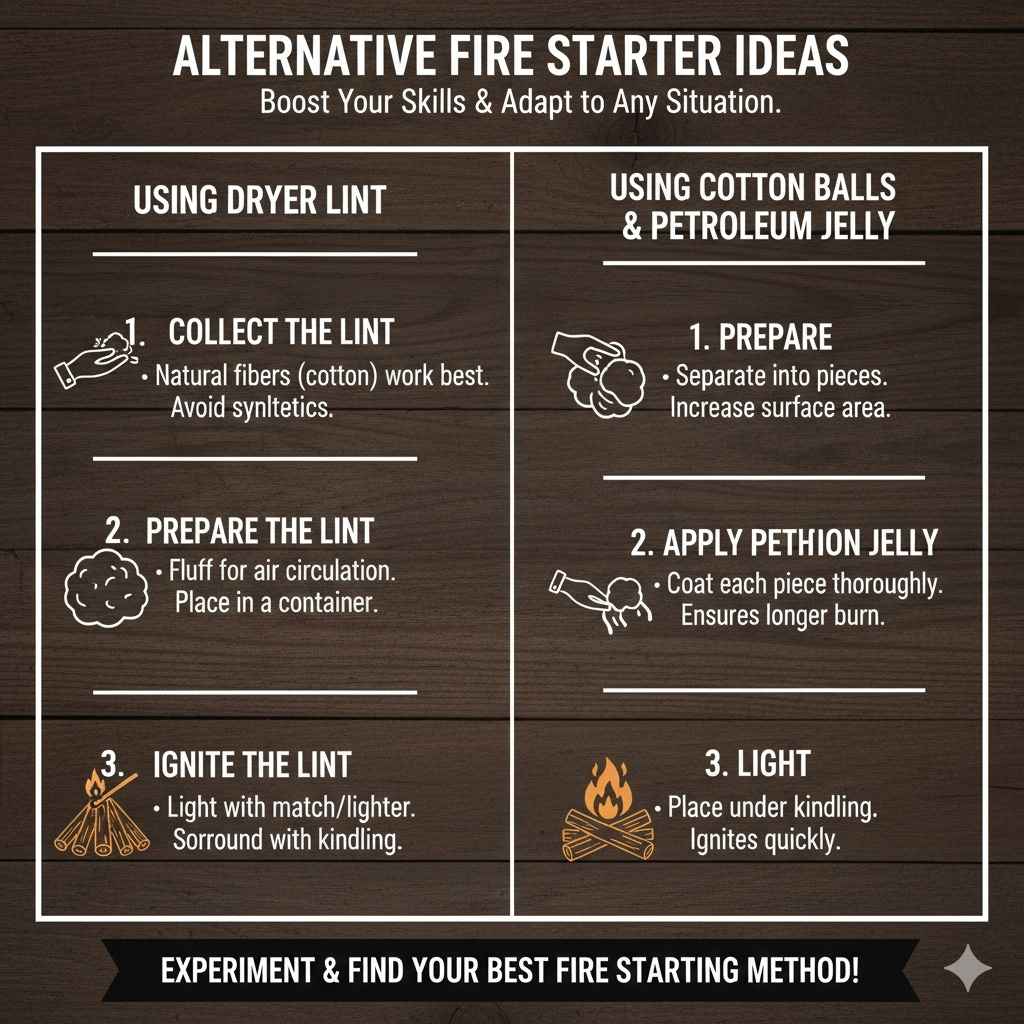
Using Dryer Lint
Dryer lint is a simple and effective fire starter. It is made up of a bunch of tiny, flammable fibers. It catches fire quickly and can easily ignite kindling. Dryer lint is a great eco-friendly and inexpensive option for starting a fire.
Collect the Lint: Make sure the lint is from natural fibers, like cotton. Stay away from lint containing synthetic materials. Synthetic materials can cause fumes.
The type of lint affects the way it burns. Natural fibers are easier and better for the environment.
Prepare the Lint: Fluff up the lint to increase air circulation. Place the lint in a container for easy handling. A container makes it easy to handle.
Adding air boosts the way the lint burns, so the kindling catches faster.
Ignite the Lint: Use a match or a lighter to light the lint. Put the kindling around the lit lint to start the fire.
Lint can light easily, making it perfect for lighting kindling.
Using Cotton Balls and Petroleum Jelly
Cotton balls with petroleum jelly make a reliable fire starter. Petroleum jelly is very flammable. It is also good at repelling water, making this option great for outside use. These two materials combine to create a great fire starter.
Prepare the Cotton Balls: Separate the cotton balls into small pieces. Spread them out to increase surface area. This will make it easier to add petroleum jelly.
The cotton ball surface area increases the amount of petroleum jelly it will hold.
Apply Petroleum Jelly: Cover each cotton ball with a layer of petroleum jelly. Make sure every part gets covered. It will help them burn longer.
Coverage with the petroleum jelly makes the cotton balls burn better. It acts as fuel and keeps the fire going longer.
Light the Cotton Balls: Place the cotton balls under your kindling. Then light the cotton balls with a match or lighter.
Cotton balls catch fire quickly and provide a good base for the fire to grow.
Frequently Asked Questions
Question: How long do wax and wood shaving fire starters burn?
Answer: Wax and wood shaving fire starters typically burn for 5-15 minutes, depending on the amount of wax used and the size of the fire starter.
Question: Can I use any kind of wax?
Answer: Yes, you can use various types of wax, including paraffin, soy, and beeswax. Choose the wax based on availability and how it burns.
Question: Are there any safety precautions I should take?
Answer: Always work in a well-ventilated area, and keep a fire extinguisher or water nearby. Never leave a fire unattended.
Question: What if my fire starters get wet?
Answer: If your fire starters get wet, let them dry completely before use. They may not light as easily if they are damp.
Question: Can I make fire starters ahead of time?
Answer: Yes, you can make fire starters well in advance and store them in a dry place. This prepares you for any situation.
Final Thoughts
Mastering the technique for Easy Fire Starters: Wax & Wood Shavings Guide opens the door to worry-free fire-making. By now, you’ve explored the core components: understanding the process of creating wax and wood shaving fire starters, gathering the right supplies, and following simple steps for effective ignition. This gives you a solid base for various situations, from enjoying a camping trip to keeping warm in a fireplace.
Remember, the main thing is preparation and safety. Always collect materials, arrange them correctly, and handle fire with care. Try out different kinds of wax and wood shavings to discover what works best for you. Practice makes perfect. Keep trying, and soon you’ll be starting fires with confidence. Now, you can look forward to warm and easy fires with minimal effort.