What Hardness Should I Set My Water Softener To: Essential Guide
What Hardness Should I Set My Water Softener To?You should set your water softener hardness level based on the grain hardness (GPG) of your incoming untreated water. The goal is to set it just slightly higher than your measured hardness (e.g., add 2 GPG buffer) to ensure soft water throughout your home without wasting salt. Always test your water first!
Have you ever wondered if your water softener is working exactly right? It’s a common question for homeowners. Getting the setting wrong means you might be using too much salt—costing you money—or not enough, leaving that hard water residue on your fixtures. It can feel confusing, but don’t worry! We’re going to walk through this step-by-step, just like setting up a new tool. By the end of this guide, you will feel completely confident dialing in the perfect hardness setting for your home. Let’s make sure your softener is running efficiently!
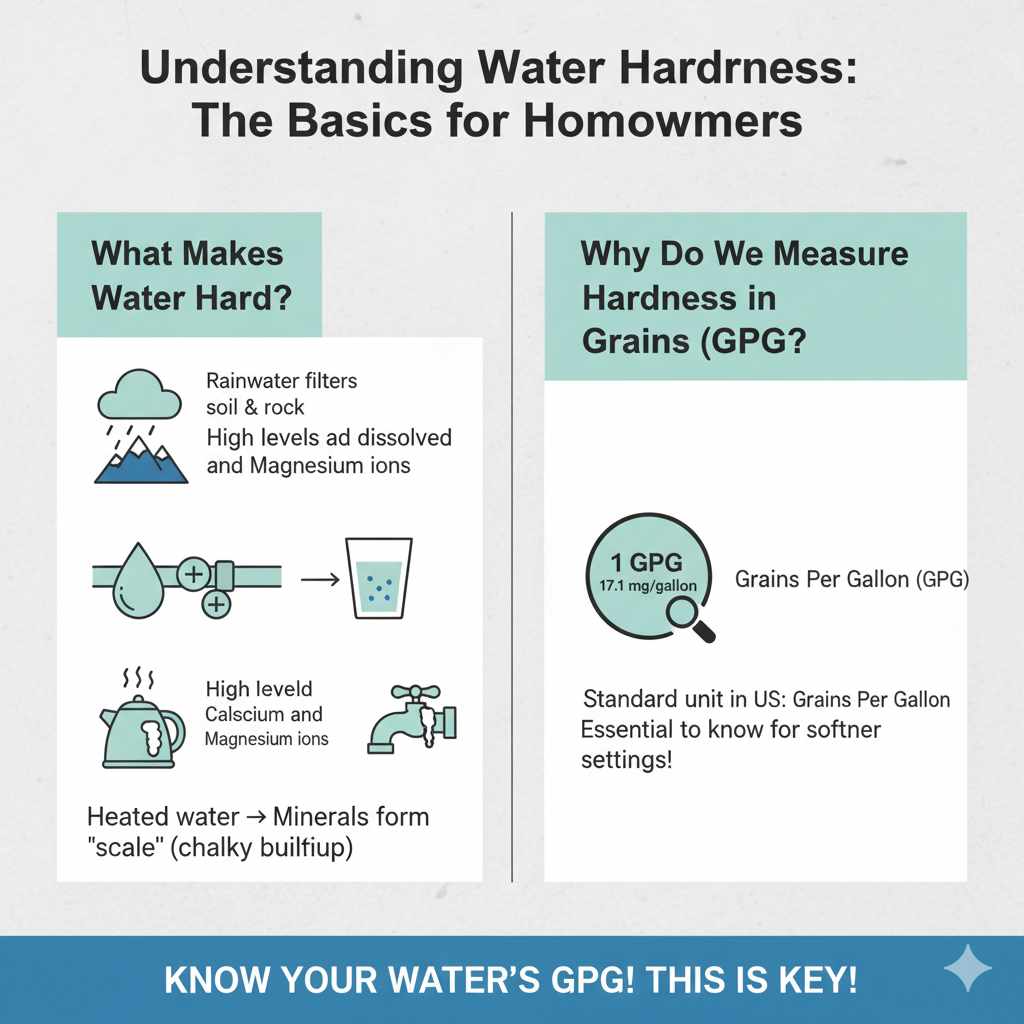
Understanding Water Hardness: The Basics for Homeowners
Before we touch the control panel, let’s quickly define what we are fighting against. Water hardness isn’t about how “strong” the water is; it’s about minerals dissolved in it.
What Makes Water Hard?
Hard water is simply water containing high levels of dissolved calcium and magnesium ions. These minerals enter your water supply when rainwater filters through soil and rock, like limestone.
When hard water is heated or evaporates, these minerals don’t disappear; they turn into scale. Scale is that chalky white buildup you see on showerheads, faucets, and inside your water heater.
Why Do We Measure Hardness in Grains (GPG)?
Water hardness is measured in different ways globally, but in the US, we most commonly use Grains Per Gallon (GPG).
One Grain: Equals 17.1 milligrams of hardness minerals per gallon of water.
If you are setting up your softener, you must know your source water’s GPG reading. This number is the key that unlocks the correct softener setting.
Step 1: Accurately Test Your Source Water Hardness
You cannot guess this number; you must measure it. This is the single most important step. Think of it like measuring lumber for a project—measure twice, cut once!
Methods for Testing Water Hardness
There are several reliable ways to find out your GPG:
- Water Testing Kits (DIY Strips or Drops): These are the easiest and most affordable options. You dip a strip or add drops to a water sample, and the color change tells you the approximate hardness level. They are great for a quick check.
- Mail-In Lab Testing: For the most precise results, you can send a water sample to a certified laboratory. This often gives you the exact mineral content, which is helpful if you have specific concerns.
- Contact Your Local Water Utility: If you are on a municipal system, your water provider is legally required to test the water. They usually publish an annual water quality report (sometimes called a Consumer Confidence Report) that lists the average hardness for your area. You can often find this report online by searching “[Your City] water quality report.”
A Simple Reference Chart for Hardness Levels
Knowing where your water falls helps you understand the severity of the issue.
| Hardness Level (GPG) | Classification | Impact on Home |
|---|---|---|
| 0 – 3.0 GPG | Soft to Slightly Hard | Minimal scaling issues. |
| 3.1 – 7.0 GPG | Moderately Hard | Soap scum appears; minor scale buildup possible. |
| 7.1 – 10.0 GPG | Hard | Visible scale on fixtures; potential appliance lifespan reduction. |
| 10.1+ GPG | Very Hard | Significant scaling; clothes look dingy; soap doesn’t lather well. |
Step 2: Determine the Correct Water Softener Setting
Once you have your measured hardness (let’s say you tested it at 18 GPG), it’s time to tell the softener what number to aim for. This setting is often called the “Regeneration Setting,” “Hardness Setting,” or “Control Value.”
The Golden Rule: Add a Buffer
You generally do not want to set your softener to the exact hardness number you measured. Why? Because water softener regeneration cycles don’t happen instantly. If your water is 18 GPG, and you set the softener to 18 GPG, it might run out of softening resin capacity (get exhausted) halfway through the day, letting slightly hard water sneak through before the next scheduled regeneration.
To avoid this, experts recommend adding a small “buffer” to your actual reading.
Recommended Buffer: Add 2 GPG to your measured hardness reading.
Example 1: If your water tests at 12 GPG, set the softener to 14 GPG.
Example 2: If your water tests at 25 GPG, set the softener to 27 GPG.
This buffer ensures that you have a small reserve capacity, so your water stays perfectly soft even on slightly busier water usage days.
When to Adjust the Buffer (Advanced Tip)
While 2 GPG is a great starting point, you might adjust this slightly based on usage:
High Water Usage Homes (Big Families/Lots of Laundry): You might lean toward a 3 GPG buffer.
Low Water Usage Homes (Small Apartments): A 1 GPG buffer might save a little salt.
Step 3: Locating and Changing the Setting on Your Softener
Water softeners vary widely, but nearly all modern units have a digital control head that allows you to input this setting. This is similar to setting the clock on your oven, but you need to find the right menu option.
Common Control Head Locations
The control head is the box usually mounted on top of the brine tank or the main resin tank.
1. Find the “Menu” or “Program” Button: This button is often recessed or requires holding down for a few seconds to enter programming mode. Check your owner’s manual if you can’t find it—it’s the best friend for any DIY homeowner!
2. Navigate to Hardness Setting: Use the up/down arrows to cycle through the settings. You are looking for labels like:
“Hardness”
“SET H”
“Control Value”
“Water Hardness Input”
3. Input Your Buffered Number: Enter the number you calculated in Step 2 (Measured GPG + 2 GPG buffer).
4. Save and Exit: Look for a “Save,” “Enter,” or “Program” button again to lock in the new setting, and then exit programming mode.
A Note on Older/Mechanical Softeners
If you have a very old, purely mechanical (non-digital) timer-based system, the setting might be physical, often involving turning a dial or moving a small lever corresponding to GPG ranges. Consult the manual immediately, as these can be less intuitive.
Why Setting the Right Hardness Matters (The Financial and Practical Side)
Getting this number right isn’t just about perfectly clear glasses; it directly impacts your wallet and the life of your appliances.
The Salt Waste Problem
Water softeners use salt (sodium chloride or potassium chloride) to regenerate the resin beads. Regeneration happens when the resin is saturated with hardness minerals. The softener uses the salt brine solution to “wash off” those minerals down the drain.
If you set the hardness too high (e.g., your water is 10 GPG, but you set it to 30 GPG):
The softener thinks the resin is exhausted much faster than it actually is.
It initiates regeneration prematurely.
You use significantly more salt and water than necessary. This is costly and wasteful.
The Hard Water Creep Problem
If you set the hardness too low (e.g., your water is 20 GPG, but you set it to 10 GPG):
The softener waits too long to regenerate.
The resin becomes completely saturated, and hard water starts flowing through your plumbing before the next scheduled regeneration cycle.
You get scale buildup, cloudy dishes, and dry skin until the next cycle fixes it temporarily.
Protecting Your Appliances
According to the Water Quality Association (WQA), hard water scale buildup can reduce the efficiency of your water heater by up to 30%. Setting the correct hardness ensures your appliances run efficiently, saving you money on energy bills and preventing costly repairs.
Water Hardness Conversion Chart: Milligrams to Grains
Sometimes, your water test results might come back in milligrams per liter (mg/L) or parts per million (PPM). Since softeners typically use GPG for programming, you need a quick conversion. Thankfully, 1 PPM is roughly equal to 0.0584 GPG.
Here is a table to help you convert common lab results into the GPG unit your softener expects:
| PPM (mg/L) | Equivalent GPG (Grain Per Gallon) | Recommended Softener Setting (Add 2 GPG Buffer) |
|---|---|---|
| 60 PPM | 3.5 GPG | 5.5 GPG |
| 100 PPM | 5.8 GPG | 7.8 GPG |
| 150 PPM | 8.7 GPG | 10.7 GPG |
| 200 PPM | 11.7 GPG | 13.7 GPG |
| 300 PPM | 17.5 GPG | 19.5 GPG |
Step 4: Verifying Soft Water After Setting the Hardness
Setting the number is only half the battle. You need to confirm that the softener is doing its job correctly. This is crucial for building your confidence in the system!
The Soap Test
This is the easiest, hands-on way to check your work. Hard water fights soap, preventing a good lather. Soft water creates thick, fluffy suds instantly.
How to Perform the Soap Test:
1. Go to a sink connected to the softened water supply (usually the bathroom or kitchen sink).
2. Run the hot water.
3. Add a few drops of liquid dish soap or hand soap.
4. Agitate the water vigorously with your fingers.
5. What you are looking for: If the water is truly soft, you should see a large, rich, stable lather with very few bubbles on top almost immediately. If you see many small, weak bubbles that disappear quickly, your water might still be slightly hard, and you may need to increase your GPG buffer slightly.
The Feel Test
Soft water feels different on your skin. After washing your hands:
Hard Water: Leaves a film or “squeaky” feeling that might make you want to immediately use lotion.
Soft Water: Leaves your skin feeling clean, smooth, and naturally moisturized, sometimes feeling “slippery” because the soap rinses away completely without leaving residue.
If you are still experiencing scale or soap scum after a week of setting the new hardness level, it’s time to revisit Step 2 and slightly increase the buffer (maybe from 2 GPG to 3 GPG).
Maintaining Your System for Consistent Results
Setting the correct hardness is vital, but long-term performance depends on routine maintenance. Think of this like tuning your favorite woodworking plane—a little upkeep keeps it running smoothly.
Keep the Salt Level Up
Your softener won’t work if it has no brine to create the softening solution.
Rule of Thumb: Always keep the salt level in the brine tank at least 4 to 6 inches above the water level. For most standard tanks, this means keeping it at least half full.
Salt Bridge Alert: Sometimes, a hard crust forms across the top of the salt, blocking the water below. If the salt level hasn’t dropped for weeks, use a broom handle or wooden dowel to gently break up the crust, ensuring the salt touches the water.
Resin Bed Cleaning
Over time, iron or sediment in your water can coat the resin beads, preventing them from softening water effectively. This is more common if you use well water.
If you suspect iron fouling (rust stains returning despite softening), you may need to run a special resin cleaner (often an iron-removing formula) through the system as directed by the manufacturer. For reliable information on water treatment processes, consult resources from organizations like the National Ground Water Association (NGWA).
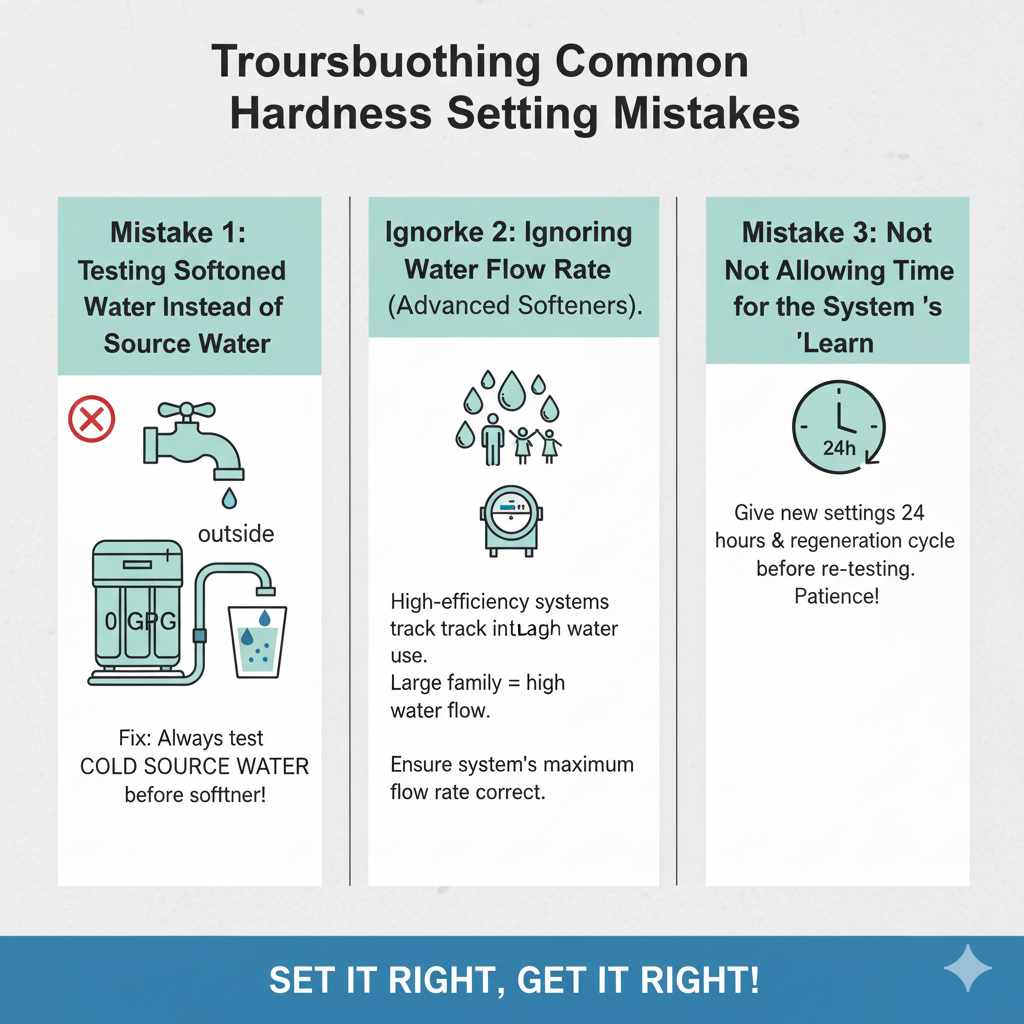
Troubleshooting Common Hardness Setting Mistakes
If you’ve followed the steps and things still don’t look right, here are common snags homeowners run into.
Mistake 1: Testing Softened Water Instead of Source Water
This is easy to do! If you take a water sample from a faucet after your softener, the water should read 0 GPG (or very close to it). If you program your softener based on this 0 GPG reading, it will never regenerate, leading to completely exhausted resin and hard water flowing into your home within days.
Fix: Always test the water directly from a cold water tap that feeds into the softener (like an outside hose spigot before the softener unit) or use your utility’s official reading.
Mistake 2: Ignoring Water Flow Rate (Advanced Softeners)
Some high-efficiency softeners use “Demand Regeneration,” meaning they track how much water you use versus the programmed hardness level to predict when to regenerate. If you have a large family and use huge amounts of water, you might need to ensure the system’s maximum flow rate settings are also correct, though the hardness input remains the primary driver for cycle timing.
Mistake 3: Not Allowing Time for the System to “Learn”
After setting a new hardness value, especially on a digital system, give it at least one full 24-hour cycle before re-testing the water quality or soap lather. The system needs time to process the change and complete its next scheduled regeneration cycle at the new capacity.
Frequently Asked Questions (FAQ) for Water Softener Settings
Q1: What if my water hardness reading is zero?
If your measured source water is 0 GPG, you don’t need a water softener for hardness minerals! You should still set your softener’s hardness setting to 0 GPG so it never attempts to regenerate, saving you salt and energy. However, if you have high iron or other contaminants, the softener might still be needed for other reasons, but the hardness setting remains zero.
Q2: Should I set the hardness setting to 0 if I use a potassium chloride system?
No. The hardness setting tells the machine how much mineral load it needs to clean off the resin. Even if you use potassium chloride instead of sodium salt, the GPG reading of your incoming water stays the same. Set the GPG based on your source water, regardless of the salt substitute you choose.
Q3: What is the difference between the “Hardness Setting” and the “Regeneration Time”?
The Hardness Setting (GPG) tells the machine how much water it can treat before needing to clean the resin. The Regeneration Time tells the machine when to clean (usually based on time of day or water usage). They work together: the GPG setting dictates the capacity, and the time setting dictates the schedule.
Q4: My softener is set correctly, but I still see white spots on glassware. What gives?
This usually means your softener is not softening 100% of the water going to that specific glass. Check if the glass was washed at a faucet that bypasses the softener (sometimes utility sinks or outdoor taps are
Summary: Choosing the Right Water Softener Hardness Setting
Setting the correct hardness level on your water softener is less about guesswork and more about understanding how your system responds to real-world water conditions. The hardness setting tells your softener how much mineral load it must remove before regeneration is required, making it the single most important input for efficient operation.
In most residential situations, the correct setting is your measured source water hardness in grains per gallon (GPG), plus a small buffer—typically 2 GPG. This buffer accounts for daily fluctuations in water use and prevents hard water from slipping through between regeneration cycles. Setting the number too low allows mineral breakthrough and scale buildup, while setting it too high causes unnecessary regenerations, wasting salt, water, and money!