How Do You Clean Hen Of The Woods Mushrooms Properly?
Properly cleaning hen of the woods mushrooms involves gentle brushing and a quick rinse. Focus on removing dirt without making the mushrooms soggy. This ensures they cook beautifully and taste their best.
Understanding Hen of the Woods
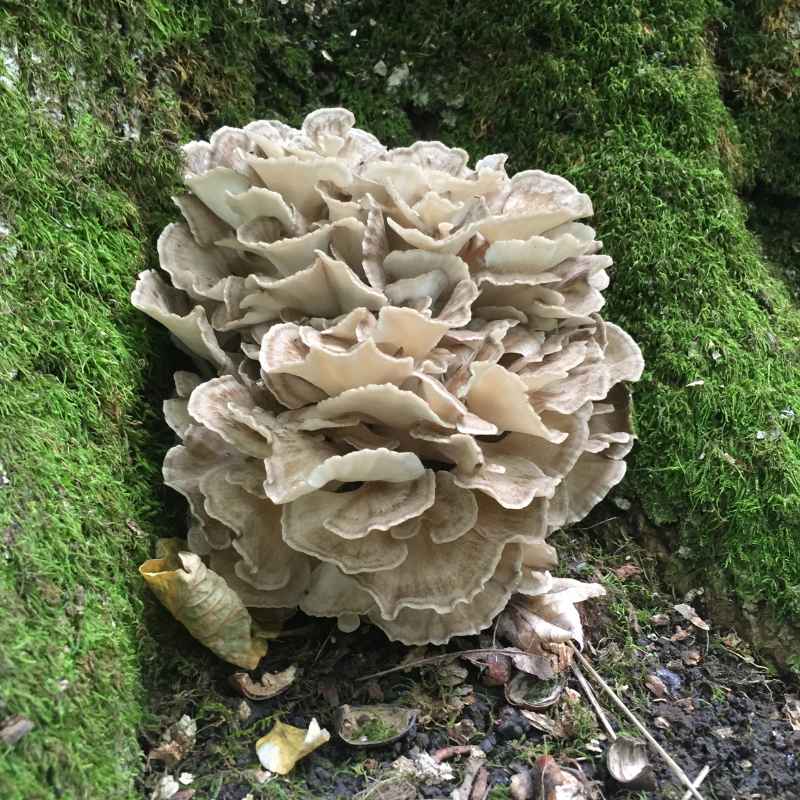
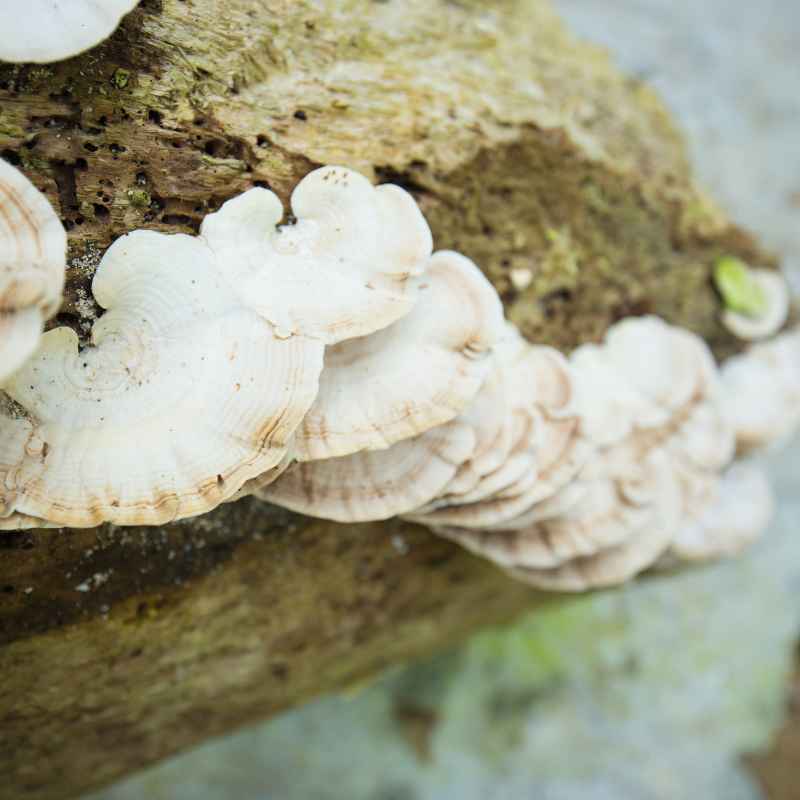
Hen of the woods mushrooms, also known as Maitake, are a type of edible fungus. They grow in clusters at the base of trees. Oak trees are a favorite.
They typically appear in late summer and fall. Their unique appearance resembles a hen sitting on her nest. This gives them their common name.
Their texture is firm yet tender. Their flavor is rich and earthy. Many chefs and home cooks seek them out.
They are a versatile ingredient. You can roast them, sauté them, or add them to soups.
Because they grow on the ground and around wood, they can pick up a lot of things. This includes soil, leaves, twigs, and even small insects. It is very important to clean them well.
You want to remove all this unwanted material. But you also want to keep the mushroom firm. Mushrooms are like sponges.
They soak up water easily. Too much water can make them mushy. This will affect their texture and flavor when you cook them.
So, the goal is a clean mushroom. It should be firm and ready for your favorite recipe.
Understanding their structure helps. The mushroom is made up of many delicate, frilly layers. These layers are where dirt often hides.
This means you need a method that reaches into all those nooks. But it must also be gentle. Harsh scrubbing can damage these delicate parts.
It can also lead to waterlogging.
My First Hen of the Woods Mishap
I remember the first time I found a really beautiful hen of the woods. It was huge, probably close to three pounds! I was so excited.
I brought it home, ready to cook it up. I looked at it, all those lovely frilly bits. Then I saw the dirt.
It was packed in there. My first thought was, “I need to wash this really well!” So, I turned on the faucet. I held the mushroom under the running water.
I scrubbed with my hands. I thought I was doing a great job. But when I finished, the mushroom felt heavy.
It felt wet and a bit sad. When I tried to sauté it later, it released so much water. It steamed more than it fried.
The texture was soft, not the crispy bite I expected. It was a real learning moment. I realized that just blasting it with water wasn’t the right approach.
It taught me to be more thoughtful about cleaning.
The Dirt Dilemma
Problem: Hen of the woods mushrooms grow low. They gather soil and debris. This dirt gets trapped in their frilly layers.
It needs to be removed for safe eating and best taste.
Challenge: Mushrooms absorb water easily. Over-washing makes them soggy. Soggy mushrooms don’t cook well.
They lose their nice texture.
Goal: Clean them thoroughly. Keep them as dry as possible. Preserve their firm texture.
Best Practices for Cleaning Hen of the Woods
The best way to clean hen of the woods mushrooms is to be gentle. You want to remove dirt. But you do not want to make them wet.
Think of it like cleaning a delicate piece of art. You need care and the right tools. The main tools you will need are a soft brush and a damp cloth.
Start with a dry brush. A pastry brush works very well. You can also use a clean paintbrush.
Or even a soft vegetable brush. Hold the mushroom gently. Use the brush to sweep away loose dirt.
Pay attention to the frilly parts. Get into all the little nooks and crannies. Brush in one direction if you can.
This helps to lift the dirt away. Do this for a few minutes. You will be surprised how much dirt comes off just by brushing.
After brushing, inspect the mushroom. You might still see some stubborn bits of dirt. Or perhaps some leaves are stuck on.
This is where a damp cloth comes in. Get a clean kitchen towel or paper towel. Dampen it slightly.
Do not make it wet. It should be just a little bit moist. Then, gently wipe away any remaining dirt.
Again, be very gentle. You are just dabbing or wiping. You are not rubbing hard.
Some people prefer to trim the very base. The very bottom part of the mushroom might be tough or woody. It might also have the most dirt.
You can use a small, sharp knife to carefully trim this part away. Just cut off the very end. This is usually a small piece.
If there is still some dirt you cannot remove, a very quick rinse might be okay. But this is the last resort. If you do rinse, be fast.
Use cold water. Do not soak the mushroom. Just a very brief swirl under cold running water.
Immediately after, pat it completely dry. Use paper towels. Press gently to absorb all the moisture.
You want it as dry as possible right away.
The key is always to use as little water as possible. The less water, the better. This keeps the mushroom firm.
It ensures it will cook up nicely. It will develop that lovely browned exterior. It will have a great texture.
Step-by-Step: The Gentle Cleaning Process
Let’s break down the cleaning process into simple steps. This will make it easy to follow. Even if you are new to cooking mushrooms, you can do this.
Step 1: Initial Dry Brush
First, gather your tools. You’ll need a soft brush. A pastry brush is perfect.
You also need a clean kitchen towel or paper towels. Lay the mushroom on a clean surface. Gently begin to brush away loose dirt.
Focus on the frilly parts. Work your way around the entire mushroom. Be thorough but gentle.
This step removes most of the surface debris.
Step 2: Inspect and Target Stubborn Spots
After brushing, look closely at the mushroom. See any bits that are still stuck? Maybe a small leaf or a bit of soil?
This is normal. Do not worry if not all the dirt came off with the brush. This is what the next step is for.
Step 3: Damp Wiping
Take your kitchen towel or paper towel. Dampen it slightly with cool water. Wring it out well.
It should feel just a little bit damp. Gently wipe away any remaining dirt. Use a dabbing or light wiping motion.
Get into the folds of the mushroom. This carefully lifts away the stubborn bits. Try not to saturate the mushroom.
You are just trying to remove the dirt.
Quick Scan Table: Cleaning Tools
| Tool | Purpose | Why it Works |
| Soft Brush (Pastry brush, clean paintbrush) | Removing loose dirt and debris | Reaches into frilly layers gently without absorbing water. |
| Damp Cloth/Paper Towel | Wiping away stubborn dirt | Targets specific spots without soaking the mushroom. |
| Sharp Knife | Trimming the base | Removes tough or dirty woody parts. |
| Paper Towels | Drying | Absorbs excess moisture immediately after any rinsing. |
Step 4: Trim the Base (Optional)
Look at the very bottom of the mushroom stem. Sometimes this part is darker or tougher. It might have more dirt clinging to it.
If it does, use your sharp knife. Carefully trim off just the very end. This makes the mushroom cleaner and more pleasant to eat.
This step is often very quick.
Step 5: The Quick Rinse (If Absolutely Necessary)
Only do this step if you still have dirt. If the mushroom is pretty clean, skip it. If you must rinse, use very cold water.
Swirl the mushroom in the water for just a few seconds. Do not let it sit in the water. Lift it out immediately.
Then, place it on paper towels. Press gently to dry it completely. You want it as dry as possible, right away.
This is the most critical part if you rinse.
Step 6: Final Drying
No matter which steps you took, a final dry is important. Gently pat the entire mushroom dry with paper towels. Ensure all surfaces are dry to the touch.
This helps prevent sogginess. It ensures your mushroom cooks up perfectly.
What If I Find an Insect?
It is not uncommon to find small insects on wild mushrooms. They are part of nature. If you see a small bug, do not panic.
The gentle brushing and wiping steps should often dislodge them. If you see one, try to brush it off gently. If it is stubborn, you can try to pick it off with your fingers or tweezers.
If you are concerned, a very quick rinse (as described in step 5) can help wash them away. Just be sure to dry the mushroom thoroughly afterward. Most of the time, these are small and harmless.
The cleaning process usually takes care of them.
When to Worry About Dirt or Damage
Most of the time, hen of the woods are straightforward to clean. But there are times when you might want to be more cautious. Or perhaps discard a piece of the mushroom.
If the mushroom feels slimy, it might be a sign it is starting to go bad. Or it might have absorbed too much moisture already. This can happen if it sat in damp conditions for too long.
Slimy mushrooms are best avoided.
Look for signs of mold. Mold can appear as fuzzy patches. These can be white, green, or black.
If you see mold on any part of the mushroom, it is best to discard the entire mushroom. Mold can spread invisibly within the mushroom. Do not try to cut away the moldy part.
If the mushroom is heavily damaged. Maybe it was crushed during harvest. Or it has large, soft, mushy spots.
These areas might not clean well. They might also indicate spoilage. In such cases, it might be better to use only the firm, undamaged parts.
Or to discard the whole thing.
The goal is to have a firm, clean mushroom. If any part of it feels questionable, it is always better to err on the side of caution. Your health and enjoyment of the meal are most important.
Contrast Matrix: Normal vs. Concerning
Normal Findings
- Light soil or leaf debris
- Small, harmless insects
- Slightly dry or firm texture
- Earthy smell
Concerning Signs
- Slimy or overly wet texture
- Visible mold (fuzzy patches)
- Unpleasant or sour smell
- Large mushy or damaged spots
- Signs of rot or decay
Common Mistakes to Avoid
It is easy to make a mistake when cleaning mushrooms. Especially if you are trying to rush. Here are some common mistakes.
Knowing them can help you avoid them.
Mistake 1: Soaking the mushrooms. This is the biggest one. Putting hen of the woods in a bowl of water for a long time is a recipe for disaster. They will absorb water.
They will become heavy and waterlogged. This ruins their texture. It makes them steam instead of fry or roast.
Remember, mushrooms are like little sponges.
Mistake 2: Using too much water. Even a quick rinse can be too much if you are not careful. If you must rinse, make it super fast. And dry them immediately.
Do not let them sit wet.
Mistake 3: Scrubbing too hard. These mushrooms have delicate layers. Aggressive scrubbing can damage them. It can break them apart.
It can also push dirt deeper into the flesh.
Mistake 4: Not drying them enough. If you do rinse, or even if you just wipe them, you must dry them thoroughly. Use paper towels. Press gently.
Get them as dry as possible before cooking.
Mistake 5: Forgetting to check the base. The bottom part can be tough and dirty. Trimming it is a simple step that makes a big difference.
By avoiding these common errors, you will have much better results. Your hen of the woods will cook up perfectly. They will have the best flavor and texture.
What This Means for Your Cooking
Getting your hen of the woods clean properly is not just about appearances. It directly impacts how your dish turns out. A well-cleaned mushroom will sear beautifully.
It will get a lovely golden-brown color. This browning creates a rich, complex flavor. This is called the Maillard reaction.
If your mushrooms are wet, they will not brown. They will release their water. This water will then steam the mushrooms.
This leads to a softer texture. It can also make your other ingredients in the pan watery. For example, if you are cooking them with onions and garlic, the onions might not caramelize properly.
They might end up steamed too. This affects the overall flavor profile of your dish.
A clean, dry mushroom will absorb flavors better. When you sauté them with butter, garlic, and herbs, the flavors can penetrate the mushroom. This makes them more delicious.
If they are waterlogged, the added flavors will have a harder time getting in.
So, the cleaning process is an essential first step. It is part of the cooking itself. Taking a few extra minutes to clean them correctly will pay off.
Your meals will taste better. The texture will be more pleasing. It is a small effort for a big reward.
Quick Tips for Perfect Preparation
Here are some final tips to make cleaning your hen of the woods a breeze.
- Work in good light: Make sure you can see clearly. This helps you spot all the dirt.
- Use a large cutting board: This gives you space to work. It keeps things tidy.
- Have paper towels ready: You will need them for drying. Have plenty on hand.
- Don’t overcrowd the brush: When you brush, do not try to do too much at once. Work section by section.
- Gentle pressure is key: Always remember to be gentle. Treat the mushroom with care.
- When in doubt, trim it out: If a part looks too dirty or damaged to clean, it is okay to remove it.
- Store them properly after cleaning: Once clean and dry, store them in a paper bag in the refrigerator. This keeps them fresh until you are ready to cook.
Frequently Asked Questions About Cleaning Hen of the Woods
Can I just wash hen of the woods mushrooms under running water?
While a very quick rinse can be used as a last resort, it is generally not recommended to wash hen of the woods mushrooms under running water. Mushrooms are porous and absorb water easily, which can make them soggy and affect their texture when cooked. It’s best to use a dry brush and a damp cloth for cleaning.
How do I know if my hen of the woods mushroom is too dirty to clean?
If the mushroom is heavily caked with mud or has large amounts of debris that you cannot remove with brushing and wiping, it might be too dirty to clean effectively without soaking. In such cases, especially if the mushroom seems soft or damaged in those dirty areas, it may be best to discard it or trim away the unusable parts.
Should I peel hen of the woods mushrooms?
No, you do not need to peel hen of the woods mushrooms. The frilly outer parts are delicious and meant to be eaten. The primary cleaning method involves brushing and wiping away dirt, not removing the skin.
What if I find a small worm or larva in my mushroom?
It’s not uncommon to find small insects or larvae in wild mushrooms. The best approach is to try and brush them off gently. If that doesn’t work, you can pick them off with tweezers.
A quick rinse can also help wash them away, but remember to dry the mushroom thoroughly afterward.
How long can I store cleaned hen of the woods mushrooms?
Once cleaned and thoroughly dried, hen of the woods mushrooms should be stored in a paper bag in the refrigerator. They will typically last for about 3-5 days. Avoid storing them in plastic bags, as this can trap moisture and cause them to spoil faster.
Can I clean hen of the woods mushrooms ahead of time?
Yes, you can clean hen of the woods mushrooms a day or two in advance. Just be sure to dry them thoroughly after cleaning. Store them in a paper bag in the refrigerator.
This makes them ready to go when you are.
Final Thoughts on Getting Them Ready
Cleaning hen of the woods mushrooms might seem like a chore. But it is a simple process when you know how. By using a gentle touch and the right tools, you can prepare them perfectly.
This ensures they are safe to eat. It also makes them taste their absolute best. Enjoy your delicious mushrooms!