How to Build Double Shed Doors Step-by-Step
Building shed doors can seem like a big job, especially for people who haven’t done much woodworking before. You might wonder if you have the right tools or if you can even get the doors to hang straight. But it doesn’t have to be tricky!
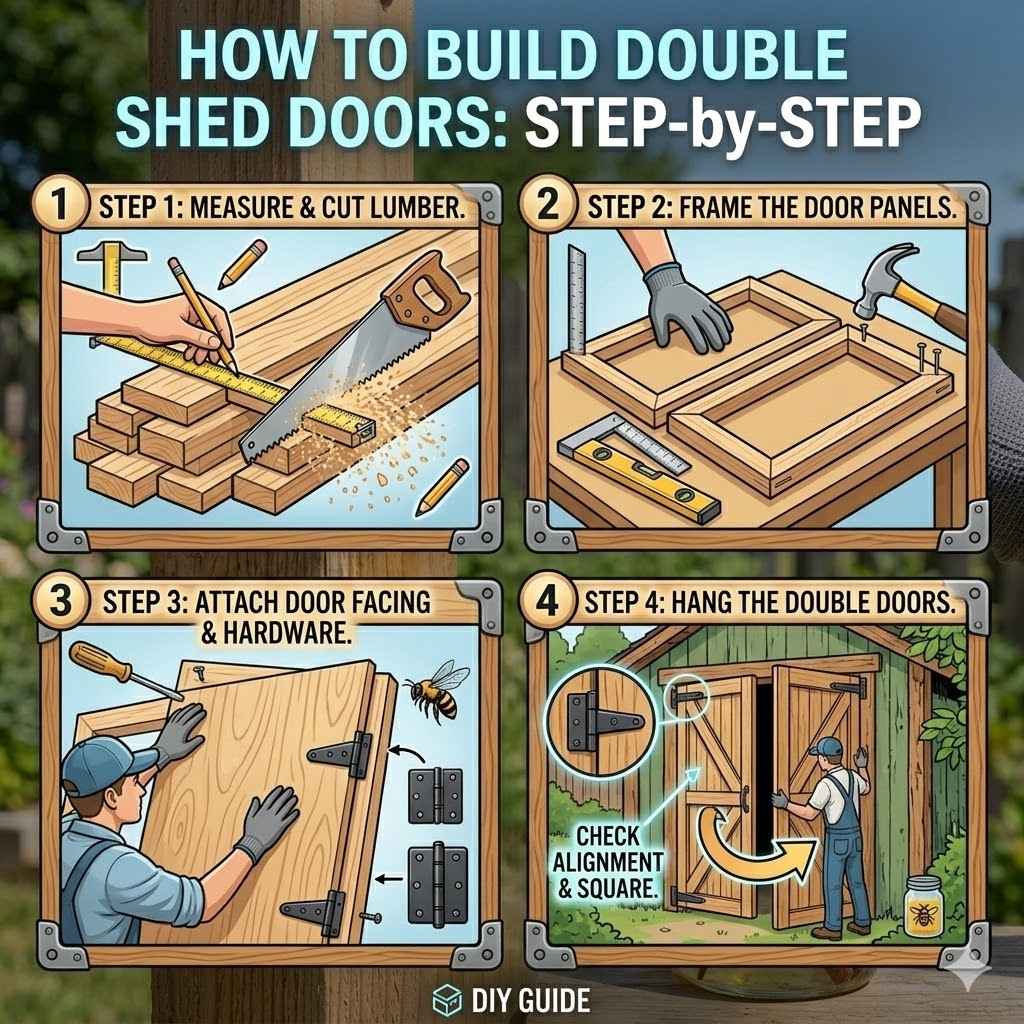
This guide will show you exactly How to Build Double Shed Doors Step-by-Step. We’ll break it down into easy steps so you can build sturdy, good-looking doors for your shed with confidence. Let’s get started on making your shed more functional and secure.
Planning Your Shed Door Build
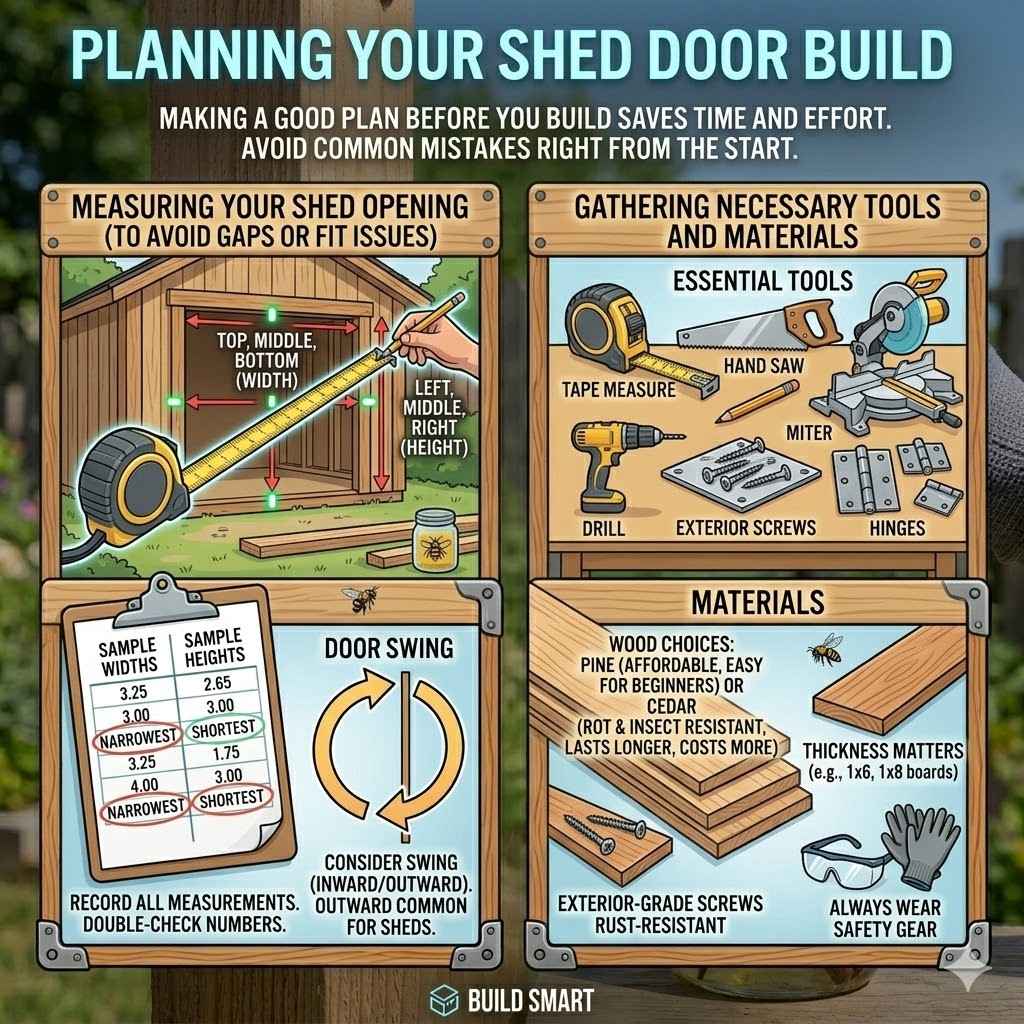
This section covers the important first steps before you even pick up a saw. It’s all about making sure you have a good plan. This saves you time and effort later.
We’ll look at what you need and how to measure things just right. A well-planned project is a successful project. This part helps you avoid common mistakes right from the start.
Measuring Your Shed Opening
Getting the right size for your doors is super important. If they are too big, they won’t fit. If they are too small, you will have big gaps.
You need to measure the height and width of the opening where the doors will go. Measure at the top, middle, and bottom of the opening for the width. Do the same for the height, measuring on the left, middle, and right side.
This helps you find the narrowest width and shortest height. These measurements will be your guide.
- Measure the opening carefully in several spots. This is key to getting doors that fit perfectly. Even a small difference can cause problems.
- Record all your measurements. Write them down in a safe place so you don’t forget. Double-checking these numbers is a good idea.
- Consider the swing of the doors. Will they open inwards or outwards? This affects how much space you need around the shed. Outward swinging doors are common for sheds.
Gathering Necessary Tools and Materials
To build your shed doors, you will need some basic tools. A tape measure, pencil, saw (hand saw or power saw), drill, screws, and hinges are essential. You’ll also need wood for the doors themselves.
Common choices include pine or cedar. Make sure you have safety glasses and gloves too.
The type of wood you choose matters. Pine is often less expensive and easy to work with, making it a good choice for beginners. Cedar is more resistant to rot and insects, meaning your doors might last longer, but it costs more.
The thickness of the wood also matters; something like a 1×6 or 1×8 board works well for door frames and panels.
- Wood: You’ll need wood for the door frames and panels. Usually, you’ll buy boards that are about an inch thick.
- Screws: Use exterior-grade screws that won’t rust. They should be long enough to go through your frame pieces and into the panels.
- Hinges: Choose sturdy hinges designed for outdoor use. The number and size of hinges depend on the weight and size of your doors.
- Safety Gear: Always wear safety glasses to protect your eyes and gloves to protect your hands.
Building the Door Frames
This part is where the doors start to take shape. We will build the basic structure for each door. The frame is like the skeleton of your door.
It gives it strength and a solid edge to attach other parts. We will focus on making these frames sturdy and square. This is important so the doors hang well and look good.
Cutting Frame Pieces
For each door, you will need to cut four pieces of wood for the frame. Two pieces will be the full height of your door, and two will be the width of your door minus the thickness of the two height pieces. This creates a rectangle.
Measure twice and cut once to make sure your pieces are the correct length. A square is helpful here to mark your cut lines so they are perfectly straight.
Let’s say your shed opening is 6 feet tall and 4 feet wide. You want each door to be a little smaller than half the width and the full height. So, each door might be 3 feet wide and 6 feet tall.
For one door frame, you would cut two pieces that are 6 feet long. Then you’d cut two pieces that are 3 feet minus the thickness of your wood. If your wood is 1 inch thick, you’d cut two pieces that are 35 inches long.
- Cut your wood pieces to the exact lengths needed for your frame. Precision here makes a big difference.
- Ensure your cuts are straight. A miter saw or a circular saw with a guide can help make clean, square cuts.
- Layout your four cut pieces to form a rectangle. This allows you to visualize the door frame before assembly.
Assembling the Frame
Once your wood is cut, it’s time to put the frame together. Lay out the four pieces to form a rectangle. Apply wood glue to the ends where the pieces meet.
Then, use screws to secure them. It’s best to pre-drill holes for the screws to prevent the wood from splitting. Use a drill bit slightly smaller than your screws.
Make sure the frame is square by measuring diagonally from corner to corner. The two diagonal measurements should be equal.
Wood glue adds extra strength to the joints. It fills small gaps and creates a strong bond. For even more strength, you can add a piece of wood in the corner, called a corner brace.
This is a small triangle-shaped piece that screws into both pieces of the frame. It acts like a support.
- Apply wood glue to the ends of the frame pieces.
- Join the pieces to form a rectangle.
- Pre-drill holes and drive screws to hold the frame together.
- Check for squareness by measuring diagonals. Adjust if needed before the glue dries.
Adding Panels and Support
Now that you have the frames, it’s time to add the panels. These are the flat parts that make up the main surface of the door. We will also add bracing for extra strength.
This makes the doors solid and prevents them from sagging over time. Good bracing is important for long-lasting shed doors.
Cutting and Attaching Panels
For the door panels, you can use plywood or planks of wood. If you use plywood, cut it to fit inside the frame. You want it to sit flush with the front of the frame.
Attach the plywood using screws, making sure they go into the frame pieces. If you are using planks, you will attach them one by one to the frame. Leave a small gap between planks for a classic look, or butt them up tightly against each other.
When using plywood, aim for a thickness of at least 1/2 inch. This provides good rigidity. For planks, you can use 1×4 or 1×6 boards.
Attach the first plank flush with the top of the frame. Then attach the next plank below it. If you want a gap, measure and space them evenly.
If you want them tight, butt them close together.
- Cut your plywood or planks to the correct size to fit your door frame.
- Attach the panels to the frame using screws. Space screws about every 8-12 inches for good support.
- If using planks, consider the pattern and spacing you want. This is where you can add some personal style.
Installing Diagonal Bracing
To stop the doors from warping or sagging, add a diagonal brace. This is a piece of wood that runs from one corner of the frame to the opposite corner. It forms a triangle.
Cut a piece of wood to fit this diagonal. Attach it securely with glue and screws. This bracing adds significant strength and keeps the door square.
A diagonal brace is like a trust in engineering. It distributes the weight and stress across the door. This prevents the frame from bending.
For double doors, each door needs its own diagonal brace. Make sure the brace is on the inside of the door where it won’t be seen when the door is closed.
- Measure the distance from one corner of the frame to the opposite corner.
- Cut a piece of wood to this length. You might need to cut the ends at an angle to fit snugly.
- Attach the brace using wood glue and screws.
- Ensure the brace is firmly attached to the frame on both ends.
Hanging the Double Shed Doors
This is the exciting part where your doors come to life on the shed. Hanging doors correctly can be a little tricky, but we’ll make it simple. Getting them to open and close smoothly is the goal.
We will cover how to attach hinges and adjust the doors so they work perfectly.
Attaching Hinges to Doors
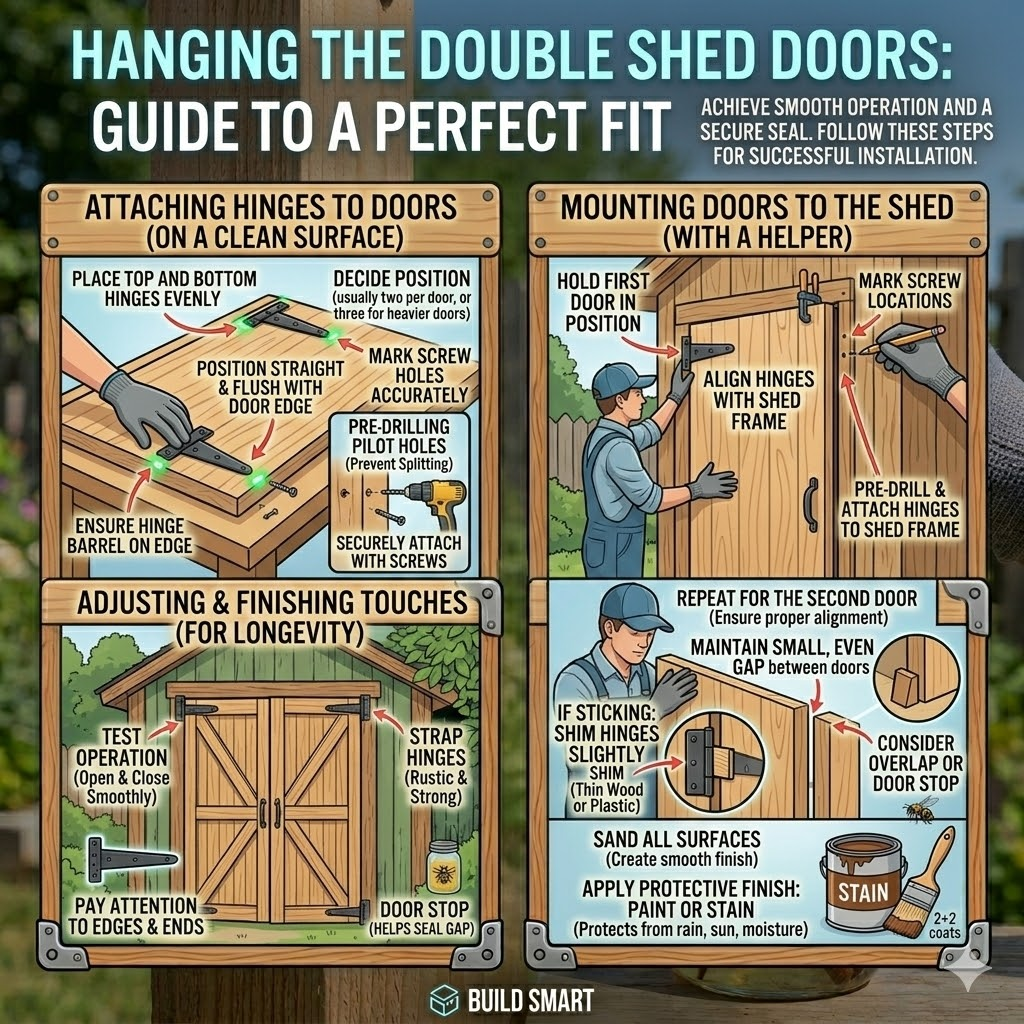
First, decide where your hinges will go. Usually, two hinges are placed on each door. One at the top and one at the bottom.
The third hinge, if needed for heavier doors, goes in the middle. Lay the door flat on a clean surface. Position the hinges where you want them.
Mark the screw holes. Pre-drill the holes and then screw the hinges onto the door. Make sure the hinges are straight and flush with the edge of the door.
The type of hinge you use can affect the look and function. Strap hinges are often used for shed doors as they are strong and have a rustic appearance. T-hinges are also a good option.
Make sure the hinge barrel (the part that rotates) is on the edge of the door. The leaves of the hinge will attach to the door and the shed frame.
- Position hinges carefully on the door edge. Ensure they are evenly spaced.
- Mark the screw locations accurately.
- Pre-drill pilot holes to make screwing easier and prevent wood splitting.
- Securely attach the hinges to the door with screws.
Mounting Doors to the Shed
Now, you need to attach the doors to the shed. It’s often easiest to have a helper for this. Hold one door in place against the shed opening.
Use temporary blocks or clamps to hold it steady. Align the hinges with the spot on the shed frame where they will attach. Mark the screw locations on the shed frame.
Pre-drill and then screw the hinges to the shed. Repeat for the second door. Make sure there is a small, even gap between the two doors and around the edges.
If you are building double doors, you will need to think about how they meet in the middle. There should be a slight overlap or a small gap between them so they don’t hit each other when opening or closing. You can also add a door stop to the frame to help seal the gap.
For the second door, align its hinges carefully with the first door’s position and the shed frame.
- Hold the first door in position against the shed opening.
- Align the hinges with the shed frame and mark screw holes.
- Pre-drill holes on the shed frame and attach the hinges.
- Repeat for the second door, ensuring proper alignment with the first door and the shed opening.
Adjusting and Finishing Touches
Once the doors are hung, test them to see how they open and close. You might need to make small adjustments. If a door is sticking, you might need to shim the hinges slightly.
Shims are thin pieces of wood or plastic that you can place behind the hinge leaf to move the door in or out. Sand down any rough edges on the doors and frame. Apply a coat of paint or sealant to protect the wood from weather.
This also gives your shed doors a nice finished look.
A good sealant will keep your doors looking good for years. It protects against rain, sun, and moisture. Choose a sealant or paint that is suitable for outdoor wood.
Two coats are often better than one. Pay attention to the edges and ends of the wood, as these areas can absorb moisture easily.
- Check that the doors open and close smoothly without rubbing.
- Make any necessary adjustments to the hinges.
- Sand all surfaces to create a smooth finish.
- Apply a protective finish like paint or stain.
Frequently Asked Questions
Question: How wide should the gap be between the two shed doors?
Answer: A good gap between the two shed doors is usually about 1/4 inch. This allows them to open and close freely without rubbing against each other.
Question: What kind of wood is best for shed doors?
Answer: Pine is a good, affordable option that’s easy to work with. For more durability and resistance to rot, cedar is an excellent choice, though it costs more.
Question: Do I need a helper to hang shed doors?
Answer: While you can hang shed doors by yourself with some creative bracing and tools, having a helper makes the process much easier and safer, especially when positioning heavy doors.
Question: How many hinges do I need for shed doors?
Answer: For standard-sized shed doors, two hinges per door are usually sufficient. For heavier or larger doors, you might consider three hinges per door for extra support.
Question: How can I make my shed doors more secure?
Answer: You can add a hasp and padlock, a bolt lock, or even a barrel bolt for added security. Ensure your hinges are also strong and securely fastened.
Wrap Up
You’ve learned How to Build Double Shed Doors Step-by-Step. From planning and measuring to cutting, assembling, and hanging, each stage is now clear. Building your own shed doors is a rewarding project that adds value and function to your outdoor space.
With these simple instructions, you can create sturdy and attractive doors that will serve you well.