How to Clean Wood Before Painting After Sanding
Cleaning wood after sanding can seem tricky, especially if you’re new to painting projects. You want that smooth, flawless finish, but dust and debris can easily get in the way. It’s common to wonder if you’ve done enough to prepare the surface.
Don’t worry! We’ll walk you through a super simple, step-by-step process to make sure your wood is perfectly clean and ready for paint. This guide will show you exactly what to do next.
Why Proper Cleaning After Sanding Is Key
When you sand wood, you create a lot of fine dust. This dust clings to everything, including the wood surface you just worked so hard on. If you paint over this dust, it will create bumps and an uneven texture under your new paint job.
You might also get spots where the paint doesn’t stick well. Proper cleaning ensures the paint adheres smoothly and lasts longer. It’s a vital step for a professional-looking finish.
Think about it like preparing a canvas. You wouldn’t paint on a dusty canvas and expect a masterpiece. The same applies to wood.
Even a tiny bit of dust can ruin the look of your freshly painted furniture or walls. Taking the time to clean correctly prevents you from having to re-sand and re-paint, saving you time and effort in the long run.
This section will explain why this step is so important. We’ll cover what happens if you skip it and why getting it right makes all the difference for your painting project. You’ll learn the basic principles behind preparing a surface for a beautiful, lasting paint finish.
The Impact of Leftover Dust
Dust particles are microscopic, but they are solid. When paint dries over them, the paint creates a film that bridges over the dust. This creates tiny peaks and valleys on the surface.
These imperfections are noticeable, especially in good light. They can make your paint job look unprofessional and unfinished.
Moreover, dust can contain oils or grease, especially if the wood has been handled a lot or is in a workshop environment. These contaminants can prevent paint from adhering properly. This is known as poor adhesion, and it can lead to peeling or chipping paint down the line.
A common issue beginners face is thinking that a quick wipe with a dry cloth is enough. While a dry cloth removes some larger dust particles, it often just pushes finer dust around. It might even embed the dust deeper into the wood grain.
This is why specific cleaning methods are recommended to truly get rid of all the dust.
Adhesion Issues Explained
Paint adhesion is how well the paint sticks to the surface. For good adhesion, the surface needs to be clean, dry, and free from anything that might act as a barrier. Dust, dirt, oils, and even old finishes can interfere with this bond.
When you paint over a dirty surface, the paint forms a bond with the dirt particles instead of the wood. As the paint dries and shrinks, it pulls away from these weak points, causing it to flake or peel. This is especially common on edges or corners where dust tends to accumulate.
For instance, if you’re painting an old wooden chair that was sanded, and you didn’t clean off all the sanding dust, the legs might start to chip after a few weeks of use. This happens because the paint is only stuck to the dust, not the wood itself. This is a frustrating outcome for any DIYer.
Visual Imperfections Under Paint
Dust particles create a rough texture. When light hits a painted surface, it reveals these bumps. They can look like small bumps, grit, or even tiny raised lines.
This is the opposite of the smooth, sleek finish most people aim for when painting.
Imagine painting a tabletop. If there’s dust, when you look at it from an angle, you’ll see little dots or specks under the paint. This can detract from the beauty of the wood and the paint color.
It makes the project look like it was done in a hurry or by someone without much experience.
One common mistake is to try and fix these imperfections by applying another coat of paint. However, this often just covers them up temporarily. The underlying dust is still there, and the imperfections might still show through, especially with lighter paint colors.
The best solution is to clean thoroughly before the first coat.
Choosing the Right Cleaning Tools
Having the right tools makes the job much easier and more effective. You don’t need fancy equipment. Simple items you likely already have or can get easily at any hardware store are perfect.
The key is to use tools that effectively lift dust without just moving it around.
For example, a simple shop vacuum with a brush attachment is incredibly useful. It sucks up dust efficiently. After vacuuming, you’ll use cloths.
But not just any cloths! Tack cloths are specifically designed for this job and are a game-changer for picking up those last bits of fine dust.
This part of the guide will help you gather your supplies. We’ll explain what each item does and why it’s essential for getting your wood surface as clean as possible. This will set you up for success before you even pick up a paintbrush.
The Mighty Shop Vacuum
A shop vacuum, also known as a wet/dry vac, is your first line of defense against sanding dust. Its powerful suction can remove the bulk of the dust from the surface, crevices, and surrounding areas. It’s important to use a brush attachment with soft bristles.
A soft brush attachment prevents scratching the wood surface, which is crucial if you want a smooth finish. As you vacuum, move the brush attachment gently over the wood. Pay attention to corners, edges, and any carved details where dust can hide.
Go in the direction of the wood grain whenever possible.
Using a vacuum is far more effective than dry sweeping or using a regular household vacuum cleaner. Household vacuums can sometimes blow fine dust back into the air, which then settles back onto your surface. A shop vac is designed to capture dust effectively.
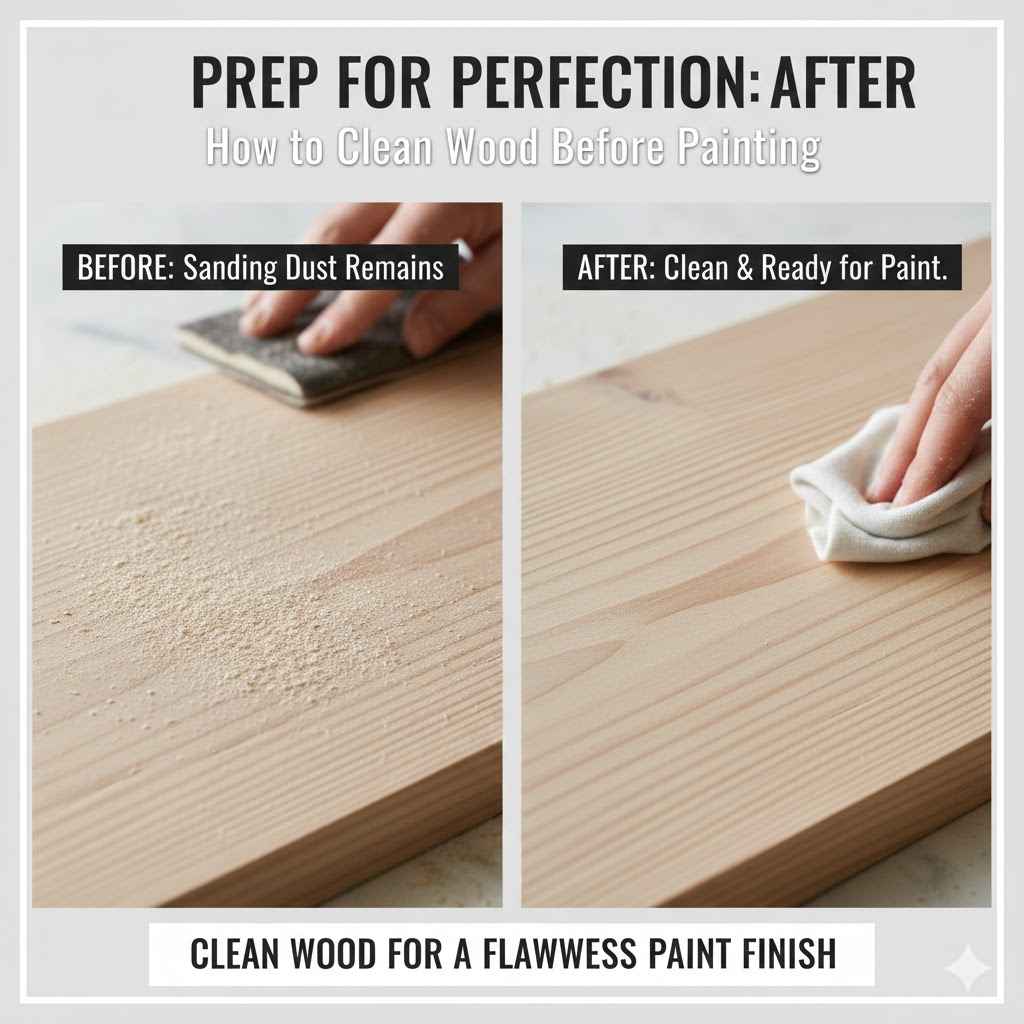
The Magic of Tack Cloths
Tack cloths are special cloths that have a slightly sticky or tacky surface. They are made from a woven material that is impregnated with a sticky substance. When you wipe the wood surface with a tack cloth, it grabs and lifts even the finest dust particles that the vacuum might have missed.
It’s important to use tack cloths gently. Don’t press too hard, as this can leave a sticky residue behind. Just a light, sweeping motion is all that’s needed.
Fold the cloth as you go to expose a clean, sticky surface. Once one side is covered in dust, fold it to a fresh section.
Tack cloths are particularly useful for removing the very last traces of dust. They ensure that your surface is truly clean and ready for priming or painting. Many people find that using a tack cloth after vacuuming makes a significant difference in the final painted finish.
Other Helpful Items
Besides a shop vacuum and tack cloths, a few other items can be very useful. Soft brushes are great for getting dust out of tight spots before vacuuming or wiping. These can be anything from a paintbrush you don’t mind getting dirty to a dedicated dusting brush.
Clean, lint-free cloths are also important. While tack cloths do the heavy lifting for dust, sometimes a light wipe with a damp (not wet) cloth can help remove any remaining residue. Make sure these cloths are truly lint-free, or you’ll just be adding more fibers to the surface.
You might also consider wearing a dust mask. Sanding creates airborne dust, and while we’re focusing on cleaning the wood, it’s good practice to protect your lungs. A simple disposable dust mask will do the job.

Step-by-Step Guide How to Clean Wood After Sanding Before Painting
Now that you have your tools, let’s get to the actual cleaning process. This method is designed to be thorough yet simple. Following these steps will give you a perfectly prepped surface for painting.
It’s all about removing every speck of dust to achieve a smooth and durable finish.
We’ll break down the process into easy-to-follow stages. Each stage builds on the last, ensuring that no dust is left behind. This systematic approach guarantees you won’t miss any spots.
Let’s get your wood project ready for its new coat of paint.
Step 1 Vacuum Thoroughly
Begin by using your shop vacuum with a soft brush attachment. Work your way over the entire surface of the wood. Move slowly and deliberately, ensuring the brush lifts dust while the vacuum sucks it away.
Don’t forget to vacuum all the nooks, crannies, edges, and corners. Dust loves to hide in these areas. If you’re working on furniture with intricate details, use the crevice tool attachment of your vacuum to get into those tight spots.
After vacuuming the main surfaces, gently brush with the vacuum attachment along the direction of the wood grain. This helps to dislodge any dust that might be embedded. You might be surprised at how much dust a good vacuuming can remove, even after you thought you had cleaned up.
Vacuuming Tips for Best Results
Always start with the highest surfaces and work your way down. This way, dust that might fall won’t land on areas you’ve already cleaned. If you are working on a large piece of furniture, such as a dresser, vacuum the top first, then the sides, and finally the legs or base.
When using the brush attachment, tilt it slightly so the bristles engage the surface without pressing too hard. The suction does the work, not the pressure. Make sure your vacuum bag or canister is not full; a full vacuum has reduced suction power.
A quick tip: if you’ve just finished sanding a large area, consider vacuuming the floor and surrounding walls as well. This prevents airborne dust from settling back onto your project.
Step 2 Wipe with a Damp Cloth
After vacuuming, you might still see some very fine dust or feel a slight film. The next step is to use a slightly damp, lint-free cloth. The cloth should be barely moist, not wet.
Wring it out very well so no water drips.
Gently wipe down the entire wood surface. This helps to pick up any remaining dust particles and any oils or residue that might be present. Again, work in the direction of the wood grain.
This damp wipe is especially helpful for wood with open pores, as it can help to lift out dust that may have settled into the grain. Be sure to let the surface dry completely before proceeding to the next step. Moisture can affect how paint adheres.
Using Damp Cloths Effectively
Use a clean cloth for each section you wipe. If the cloth starts to look dirty, switch to a clean one. This prevents you from spreading dust around rather than removing it.
The type of cloth matters. Microfiber cloths are excellent because they are very absorbent and leave little to no lint. Avoid using paper towels, as they can break down and leave paper fibers behind.
Make sure the wood surface dries completely before moving on. You can speed this up with a gentle fan, but avoid using heat guns or direct heat, which can warp the wood.
Step 3 The Final Dust Removal with a Tack Cloth
This is the most critical step for achieving a perfectly smooth finish. Take your tack cloth and unfold it. Gently wipe the entire surface of the wood.
You’ll feel a slight tackiness as it picks up the remaining fine dust.
As the tack cloth collects dust, fold it over to expose a clean, sticky surface. Continue this process until the entire piece of wood is clean. If the tack cloth becomes saturated with dust and loses its tackiness, get a new one.
Don’t press too hard. A light touch is all that’s needed. Overworking the tack cloth can sometimes leave a slight residue, although this is rare if used correctly.
This final wipe ensures that your surface is dust-free and ready for paint.
When to Use Multiple Tack Cloths
For larger projects or very dusty sanding jobs, you might need several tack cloths. It’s better to use two or three clean tack cloths than to try and use one that has become too dirty. A dirty tack cloth will not pick up dust effectively and could even smear it.
Always inspect the wood surface after using the tack cloth. Hold it up to the light to see if any dust particles are visible. If you see any, give it another light pass with a clean section of the tack cloth.
Once you’ve finished with the tack cloth, resist the urge to touch the wood surface with your bare hands. Your skin has natural oils that can transfer to the wood and create adhesion issues. Always handle the wood by its edges or wear clean gloves if you must touch the surface.
Step 4 Inspect and Prepare for Priming
Before you move on to priming or painting, take a final look at the wood. Hold your work under good lighting. Look for any missed spots, dust bunnies, or imperfections.
A flashlight can be very helpful here, as it highlights dust and inconsistencies.
If you find any dust, give it a gentle wipe with a clean section of your tack cloth. Once you are completely satisfied that the surface is dust-free, you are ready to prime. Priming is a crucial step that helps paint adhere better and provides a uniform base color.
This careful inspection ensures that all your hard work in cleaning isn’t undone by a missed speck of dust. It’s the last chance to ensure a perfect canvas for your paint. The smoothness of your final paint job depends on this level of attention.
Common Mistakes to Avoid
One of the biggest mistakes is not vacuuming enough. People often underestimate the amount of fine dust generated by sanding. Another mistake is using a dirty or old tack cloth.
Always use a fresh tack cloth for the final wipe-down.
Touching the clean surface with bare hands is another common error. This introduces oils and can ruin your efforts. Lastly, rushing the drying time after damp wiping can lead to paint adhesion problems.
Always take your time and be thorough. Patience at this stage will pay off with a beautiful, smooth paint finish that you can be proud of. It’s about quality preparation for a quality result.
Advanced Techniques and Troubleshooting
While the basic steps cover most situations, sometimes you encounter specific challenges. Whether it’s dealing with very stubborn dust, specific wood types, or particular finishes, there are advanced methods and troubleshooting tips to help.
These techniques are for those who want to ensure the absolute best results or are working on challenging projects. We’ll explore ways to handle sticky residues and ensure that your cleaning efforts are truly effective, even in difficult circumstances. This section will equip you with solutions for common problems.
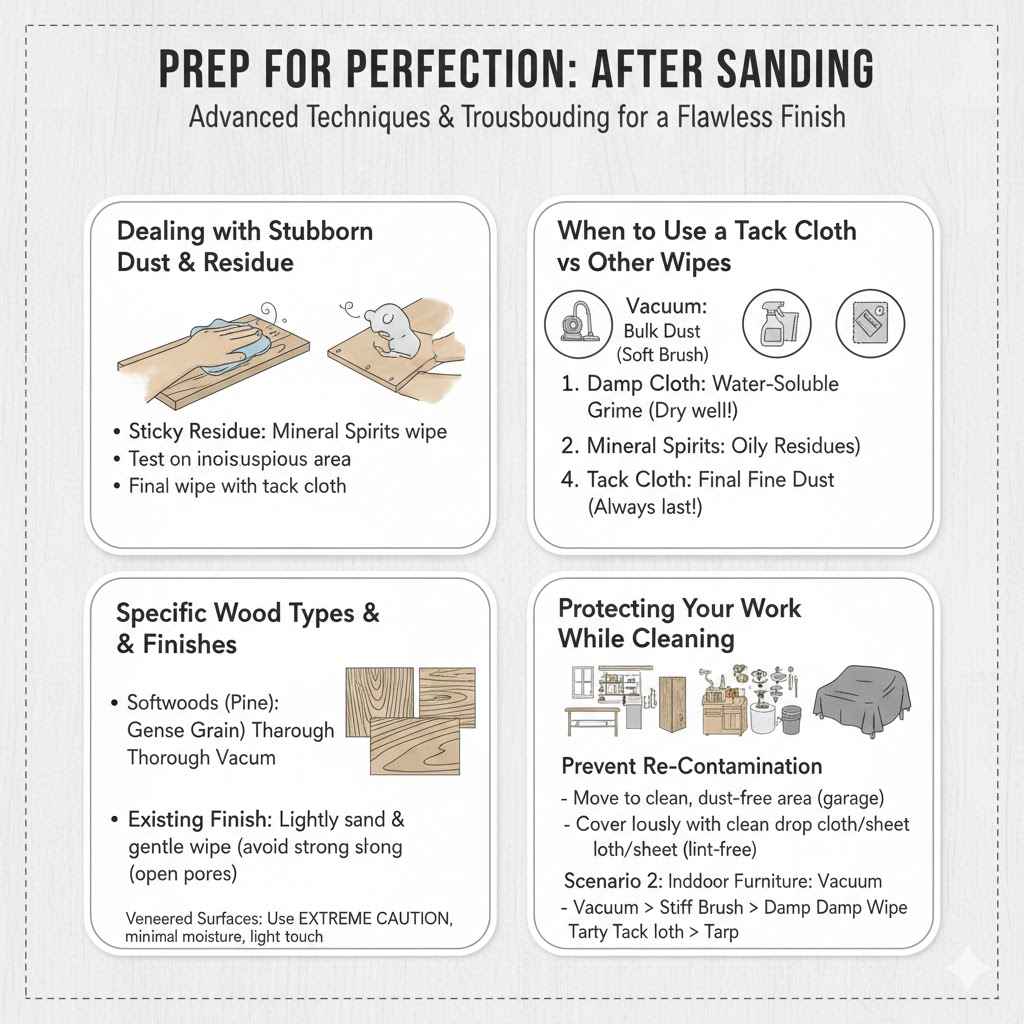
Dealing with Stubborn Dust and Residue
Sometimes, even after vacuuming and tack-cloth wiping, you might notice a slight stickiness on the wood. This can happen if the sanding process created heat, or if there are natural oils in the wood that have been brought to the surface.
If a tack cloth isn’t fully removing a sticky feeling, you can try a solution of mineral spirits on a clean, lint-free cloth. Lightly dampen the cloth with mineral spirits and wipe the surface. Mineral spirits are a solvent that can break down oils and residues without damaging most finished wood surfaces.
Always test mineral spirits on an inconspicuous area first. After using mineral spirits, you’ll likely need to let the wood dry thoroughly. Once dry, a final wipe with a clean tack cloth is essential to remove any solvent residue and remaining dust.
When to Use a Tack Cloth vs. Other Wipes
Tack cloths are specifically designed for picking up fine dust. They are the best tool for the final stage of dust removal. Other wipes, like damp cloths or mineral spirit wipes, are for removing different types of contaminants.
A damp cloth is good for removing dust and some water-soluble grime. A mineral spirit wipe is best for oily residues or stubborn grime that dust-cleaning methods can’t touch. The order matters: vacuum first, then damp wipe if needed, then mineral spirits if needed, and finally, the tack cloth is always the last step for dust.
Using a damp cloth after vacuuming is often sufficient for most projects. However, if you are working with wood known for being oily, like some hardwoods, or if the surface feels tacky, the mineral spirits step becomes more important. Always ensure the wood is completely dry after using any liquid.
Specific Wood Types and Finishes
Different wood types might react differently to sanding and cleaning. For instance, softwoods like pine can be prone to damage from overly aggressive cleaning methods. Hardwoods might have denser grains, meaning dust can be more embedded.
If you are working on a piece with an existing finish that you’ve only lightly sanded, you need to be careful not to remove too much of the old finish. In such cases, a very gentle tack cloth wipe after vacuuming might be all that’s needed. Avoid strong solvents unless you’re sure they won’t harm the underlying finish.
For raw, unfinished wood, the cleaning process is generally more straightforward. The main goal is simply to remove all sanding dust. The pores of raw wood can be more open, so a thorough vacuuming and then a tack cloth wipe are usually very effective.
Cleaning Veneered Surfaces
Veneer is a thin layer of wood glued to a core material. It’s delicate and can lift or peel if exposed to too much moisture or aggressive scrubbing.
When cleaning veneered surfaces after sanding, be extra gentle. Vacuuming is essential. Instead of a damp cloth, consider using a dry, lint-free cloth for a light wipe.
If you must use a damp cloth, it should be extremely dry, and you should only use it very sparingly.
Always use a tack cloth with a very light touch on veneer. Avoid pressing down, as this could potentially damage the veneer or the glue bond. If there are any signs of lifting veneer, stop and consider a wood glue repair before proceeding.
Protecting Your Work While Cleaning
Once your wood is perfectly clean, it’s essential to keep it that way until you’re ready to paint. Dust is everywhere, and it can settle back onto your project very quickly.
If possible, move your project to a clean, dust-free environment for priming and painting. A garage with the door closed or a room that has been recently cleaned and has good ventilation is ideal.
If you can’t move the project, cover it loosely with a clean drop cloth or sheet. Ensure the covering doesn’t touch the surface if possible, or use a material that won’t shed lint. The goal is to create a barrier against airborne dust.
Scenario 1 Working on Furniture in a Home
You’ve just finished sanding a wooden table in your living room. The room is generally clean, but there’s still ambient dust in the air. You want to prepare it for painting.
Follow these steps:
- Vacuum all surfaces of the table thoroughly with a shop vacuum and soft brush attachment.
- Wipe down the table with a barely damp, lint-free cloth, working in the direction of the grain.
- Allow the table to dry completely.
- Gently wipe the entire table with a tack cloth, folding it as it collects dust.
- Inspect under good light. If any dust remains, use a clean section of the tack cloth.
- Avoid touching the table surface until you are ready to prime and paint.
This method ensures minimal dust contamination in a living space.
Scenario 2 Refinishing Outdoor Furniture
You’re sanding an old wooden patio chair. You’ve done this outside, but there’s still pollen, dirt, and dust from the sanding process. You want it ready for outdoor paint.
- Start with a shop vacuum to remove the bulk of the sanding dust and any loose debris.
- Use a stiff brush (if the wood can handle it) in combination with the vacuum to get into crevices.
- Wipe down the chair with a damp cloth to remove any remaining fine dust or pollen.
- Allow the chair to dry completely in the sun.
- Finish with a tack cloth wipe-down, ensuring all surfaces are smooth.
- Consider covering the chair with a tarp if it will be a while before painting to protect it from further dust and elements.
This approach handles outdoor elements more effectively.
Frequently Asked Questions
Question: How long should I wait after damp wiping before using a tack cloth?
Answer: You should wait until the wood surface is completely dry. This could take anywhere from 30 minutes to a couple of hours, depending on humidity and airflow. If you use a tack cloth on a damp surface, it might leave a sticky residue.
Question: Can I use a regular household vacuum cleaner?
Answer: It’s not ideal. Household vacuums can sometimes blow fine dust back into the air, defeating the purpose. A shop vacuum is designed to capture dust more effectively.
If you must use a household vacuum, use a brush attachment and be aware of potential dust dispersal.
Question: What if my tack cloth isn’t sticky enough anymore?
Answer: This means it has picked up too much dust. Fold it to expose a fresh, sticky surface. If the entire cloth is saturated and no longer sticky, it’s time to get a new one.
Using a dirty tack cloth is ineffective.
Question: Can I skip the damp wipe and just use a tack cloth after vacuuming?
Answer: For most projects, vacuuming followed by a tack cloth is sufficient. However, a damp wipe can help remove any oils or unseen residue that vacuuming might miss. If you’re unsure, a light damp wipe is a good safety measure.
Question: How often should I replace my tack cloth during a project?
Answer: Replace or refold your tack cloth as soon as it starts to lose its tackiness or appears visibly dirty. For large projects, you might use several tack cloths. It’s better to use multiple clean cloths than one dirty one.
Summary
Cleaning wood after sanding is essential for a smooth, lasting paint finish. Start by thoroughly vacuuming with a shop vac and brush attachment. Next, gently wipe with a barely damp, lint-free cloth.
Always finish with a light pass using a tack cloth to capture the finest dust particles. Inspect carefully under good light. Proper cleaning prevents bumps, peeling, and ensures paint adheres well.