How to Install a Door Threshold the Right Way
Many folks find installing a door threshold a bit tricky. You want it to look good and, more importantly, keep drafts out. Getting it wrong can lead to uneven floors or gaps.
But don’t worry! We’ll walk you through How to Install a Door Threshold the Right Way step-by-step. It’s simpler than you might think.
Follow along, and you’ll have a great-looking, functional threshold in no time.
Preparing for Your Door Threshold Installation
This section is all about getting ready. Proper preparation makes the actual installation smooth and successful. We’ll cover what tools you need, how to measure correctly, and what to do with your old threshold.
Having everything in place beforehand saves a lot of frustration later. Think of this as setting the stage for a perfect finish.
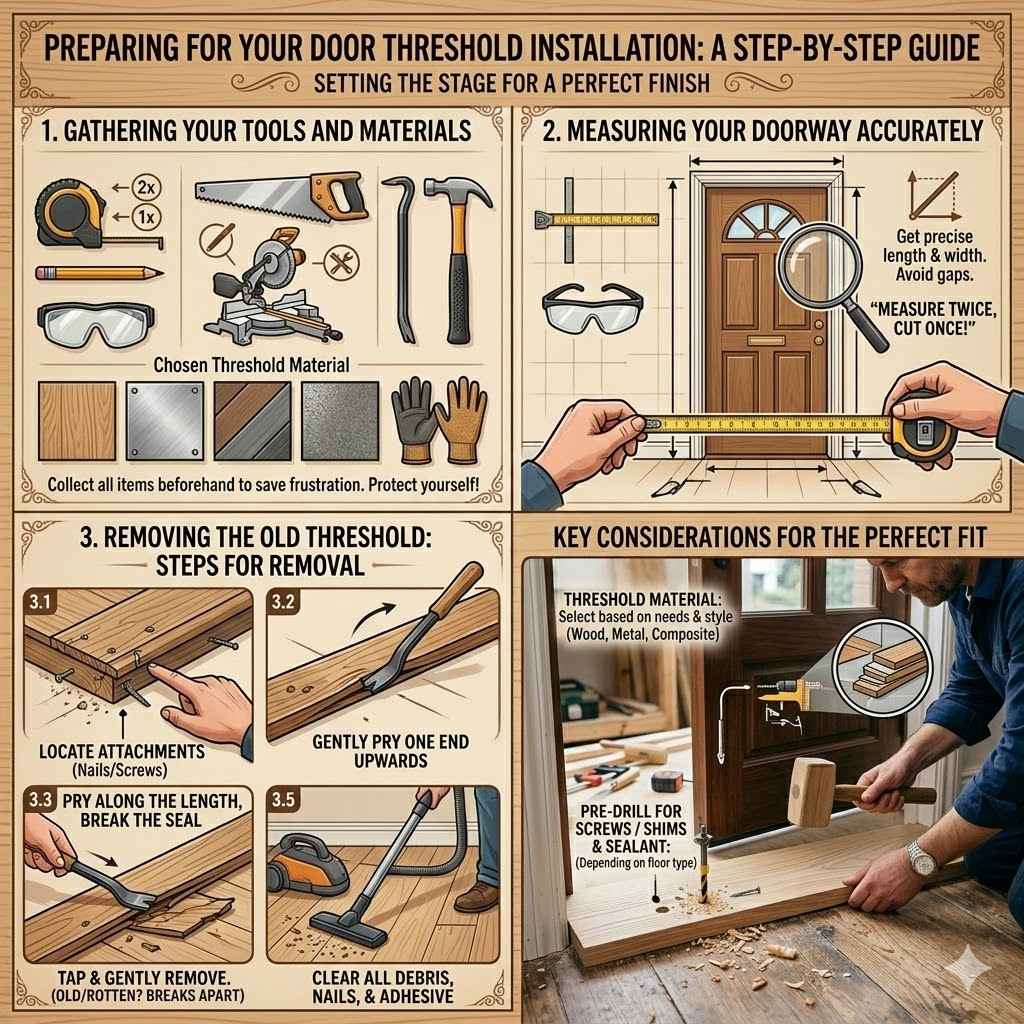
Gathering Your Tools and Materials
Before you start, make sure you have all the necessary items. This prevents interruptions and keeps your project moving forward. You’ll need a tape measure, a pencil, a saw (like a handsaw or a miter saw), a pry bar, a hammer, safety glasses, and gloves.
For the new threshold, you’ll want your chosen threshold material, and possibly shims or sealant depending on your floor type. Having these handy means you can tackle the job efficiently.
Tape Measure: Essential for accurate measurements. This ensures your new threshold fits perfectly.
A tape measure is your best friend for any DIY project involving cuts or fitting. Measure twice, cut once is the golden rule. Get precise lengths and widths to avoid wasting materials.
Pencil: For marking cuts and placement. A sharp pencil makes clear lines easy to see.
Marking where to cut or where the threshold will sit helps guide your work. Clear marks are crucial, especially when dealing with detailed cuts or alignment.
Saw: To cut the threshold to size. A handsaw works, but a miter saw offers cleaner, more precise cuts.
The type of saw you use depends on your comfort level and the material of the threshold. For wood, a handsaw is fine. For harder materials or if you want a professional finish, a power saw is a good investment.
Pry Bar and Hammer: To remove the old threshold. Gently prying helps avoid damaging the surrounding floor.
These tools are for demolition. You want to take off the old threshold without causing extra repair work to your door frame or floor. Take your time and be deliberate.
Safety Gear: Safety glasses and gloves are a must. Protect your eyes and hands from dust and sharp edges.
Safety first! Always wear eye protection when cutting or hammering. Gloves help prevent splinters and cuts.
New Threshold Material: Choose wood, metal, or composite based on your needs and style.
The threshold itself is the main event. Consider durability, appearance, and how it will match your flooring. Wood is common for interior doors, while metal or composite might be better for exterior doors.
Measuring Your Doorway Accurately
Getting the measurements right is key to a successful threshold installation. A threshold that’s too short will leave gaps, and one that’s too long won’t fit.
Removing the Old Door Threshold
Before putting in a new threshold, you have to remove the old one. This usually involves a bit of prying and careful work to avoid damaging the floor or door frame.
Steps for Removal
Locate where the old threshold is attached. It’s typically nailed or screwed into the subfloor.
Look for visible nails or screws along the edges of the threshold. These are your points of leverage.
Insert the pry bar under one end of the threshold. Gently lift upwards to loosen it.
Work slowly and steadily. If it feels stuck, try a different spot or tap the pry bar lightly with a hammer.
Continue prying along the length of the threshold. If needed, use a hammer to tap the pry bar further under.
This helps break the seal between the old threshold and the subfloor. Be mindful of any flooring around the threshold.
Once loose, use the hammer to gently tap the threshold out of place.
If the threshold is old or rotten, it might break apart. Just remove all pieces carefully.
Clear away any nails, debris, or old adhesive from the doorway.
A clean surface is essential for installing the new threshold properly. Sweep or vacuum the area thoroughly.
Preparing the Doorway for the New Threshold
Once the old threshold is out, the doorway might not be ready for its replacement. This part is about making sure the surface is clean, level, and ready to accept the new threshold. A little extra work here prevents future problems like squeaks or unevenness.
Cleaning the Subfloor and Framing
You need a clean slate for the new threshold. Any old glue, nails, or dirt can prevent the new threshold from sitting flush.
Sweep and vacuum the area thoroughly. Remove all dust and debris.
This is a critical step to ensure a good fit. Dust can prevent adhesive from sticking or cause the threshold to sit unevenly.
Inspect the subfloor and door jambs for any damage. Repair if necessary.
Small holes or cracks can be filled with wood filler. Larger issues might need more involved repairs to ensure a solid base.
Ensure the subfloor is completely dry, especially if you used any cleaning solutions.
Moisture can lead to problems like mold or wood rot. Let the area air out completely before proceeding.
Checking for Gaps and Levelness
A threshold needs to sit perfectly flat. If there are gaps, it won’t seal well and can be a tripping hazard.
Use a level to check if the subfloor in the doorway is flat.
A bubble level is the best tool here. Place it across the doorway to see if it’s perfectly even.
If there are minor low spots, you might need to use thin shims to fill them.
Shims are small, wedge-shaped pieces of wood. They help raise low spots to create a level surface.
Ensure there are no large gaps between the subfloor and the bottom of the door jambs.
These gaps can allow drafts to come through. You might need to add small wood pieces or use caulk to seal them.
Preparing the New Threshold for Installation
Now, it’s time to get the new threshold ready. This involves measuring, marking, and cutting the material to fit your specific doorway.
Measuring and Marking the Threshold
This is where accuracy really matters. You need the threshold to be the exact length of your doorway opening.
Measure the width of the doorway opening from inside the door jambs.
Measure at the bottom where the threshold will sit. This is usually the narrowest point.
Transfer this measurement to your new threshold material.
Use a pencil to mark the exact spot where you need to cut. Make sure the mark is clear.
Consider the thickness of your door jambs and the desired overhang.
Sometimes, you want the threshold to slightly overlap the jambs for a cleaner look or better seal.
Double-check your measurements before making any cuts.
It’s always better to measure again than to have to recut or buy new material.
Cutting the Threshold to Size
With your marks in place, it’s time to make the cut. Use the appropriate saw for the material you’re working with.
Carefully align your saw blade with the marked cutting line.
Ensure the saw is stable and you have a good grip.
Cut smoothly and steadily through the material.
If using a handsaw, use long, even strokes. For power saws, let the tool do the work.
Test fit the cut threshold in the doorway.
It should fit snugly without needing to be forced.
If the fit isn’t perfect, make small adjustments by sanding or carefully trimming.
Small adjustments can make a big difference in how well the threshold seals and looks.
Installing the New Door Threshold
This is the main event – getting the new threshold in place. The way you secure it depends on the type of threshold and your flooring. We’ll cover common methods to ensure a secure and lasting fit.
Securing the Threshold to the Subfloor
A well-secured threshold won’t shift or squeak. There are a few common ways to attach it.
Nailing or Screwing the Threshold
This is a very common and effective method for wooden thresholds.
Position the threshold in the doorway. Ensure it sits flush on the subfloor.
It should fit snugly against the door jambs.
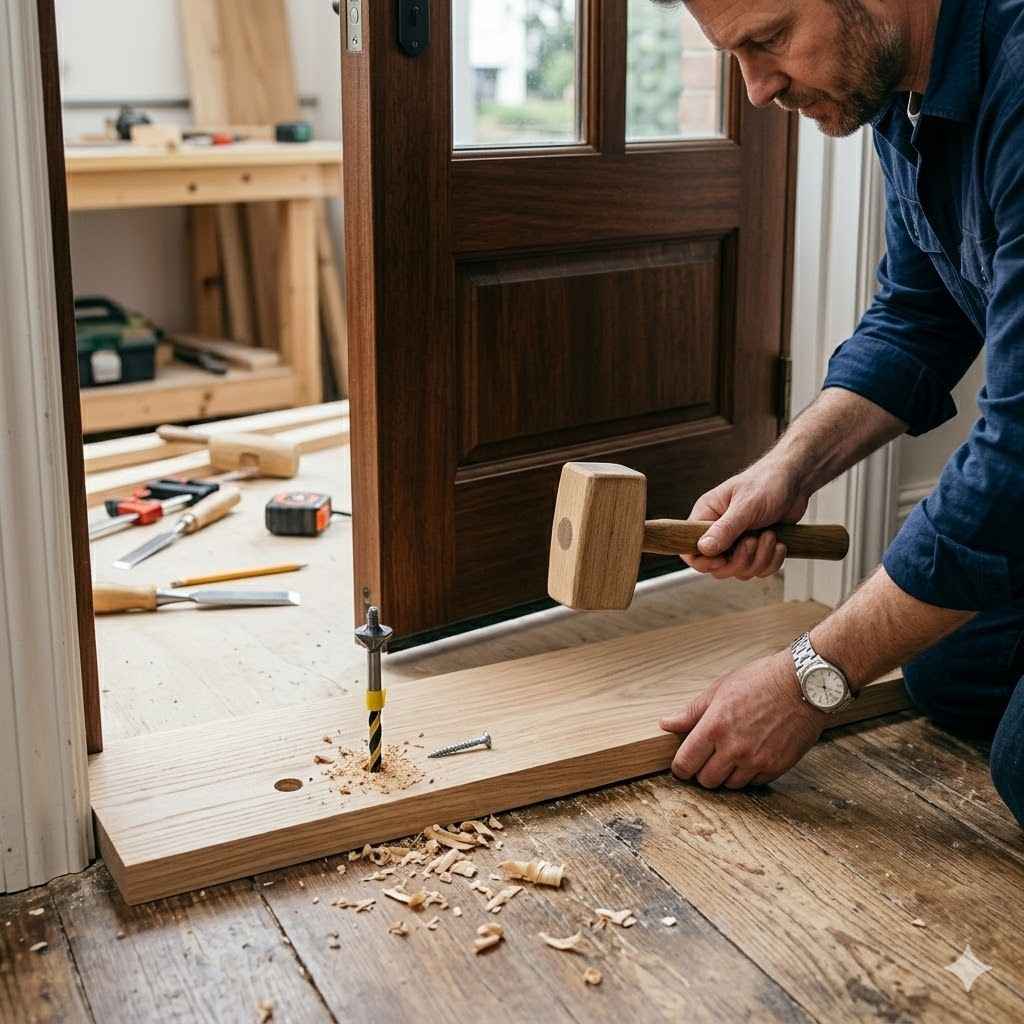
Mark the locations where you will drive nails or screws. Space them about every 12-18 inches.
This ensures even support across the entire threshold.
Pre-drill pilot holes if you are using screws, especially in hardwood.
Pilot holes prevent the wood from splitting. Make sure the drill bit is slightly smaller than the screw.
Carefully hammer nails or drive screws through the threshold into the subfloor.
Tap nails gently to avoid damaging the threshold’s surface. Drive screws until they are flush with the surface.
If using finish nails, you can countersink them slightly and fill the holes with wood putty.
This creates a smooth, finished look.
Using Adhesive and Fasteners
For some materials or to add extra security, adhesive can be used in conjunction with fasteners.
Apply a bead of construction adhesive along the bottom of the threshold.
This creates a strong bond with the subfloor.
Carefully place the threshold into the doorway, pressing down firmly.
Make sure it is aligned correctly before the adhesive begins to set.
Supplement with nails or screws as described above for added stability.
This provides immediate holding power while the adhesive cures.
Wipe away any excess adhesive that squeezes out immediately.
It’s much harder to remove once it dries.
Sealing the Edges
Sealing is important for preventing drafts and moisture from getting under the threshold.
Use a good quality caulk or sealant around the perimeter of the threshold.
This fills any small gaps between the threshold and the door jambs or subfloor.
Apply the caulk in a smooth, continuous bead.
Use a caulking gun for best results.
Smooth the caulk with your finger or a damp cloth to create a clean line.
This ensures a neat and professional finish.
Allow the caulk to dry completely according to the manufacturer’s instructions.
This protects against drafts and moisture.
Installing Specific Threshold Types
Different threshold materials and designs might have slightly different installation needs.
Standard Wood Thresholds
These are most commonly nailed or screwed in place after being cut to size.
Metal or Aluminum Thresholds
These often have a lip that fits into a groove in the door frame or subfloor. They might be secured with screws driven through pre-drilled holes.
Interlocking or Rubber Thresholds
These are often designed for easier installation, sometimes just slotting into place or requiring adhesive.
Ensuring a Tight Seal Against Drafts
A good threshold stops drafts. This means ensuring there are no gaps where air can sneak through.
Check the fit against the bottom of the door. There should be minimal gap.
If the gap is too large, the door may need adjusting or a different type of threshold might be needed.
Seal any gaps along the sides where the threshold meets the door jambs.
Caulking is very effective here.
Inspect the underside of the threshold for any contact with the subfloor.
Any unevenness can create small air pockets.
Final Touches and Maintenance
Once the threshold is installed, there are a few final steps to make it look great and last a long time. Regular care will keep it looking new.
Finishing and Protecting the Threshold
If you installed a wooden threshold, finishing it is important for both appearance and durability.
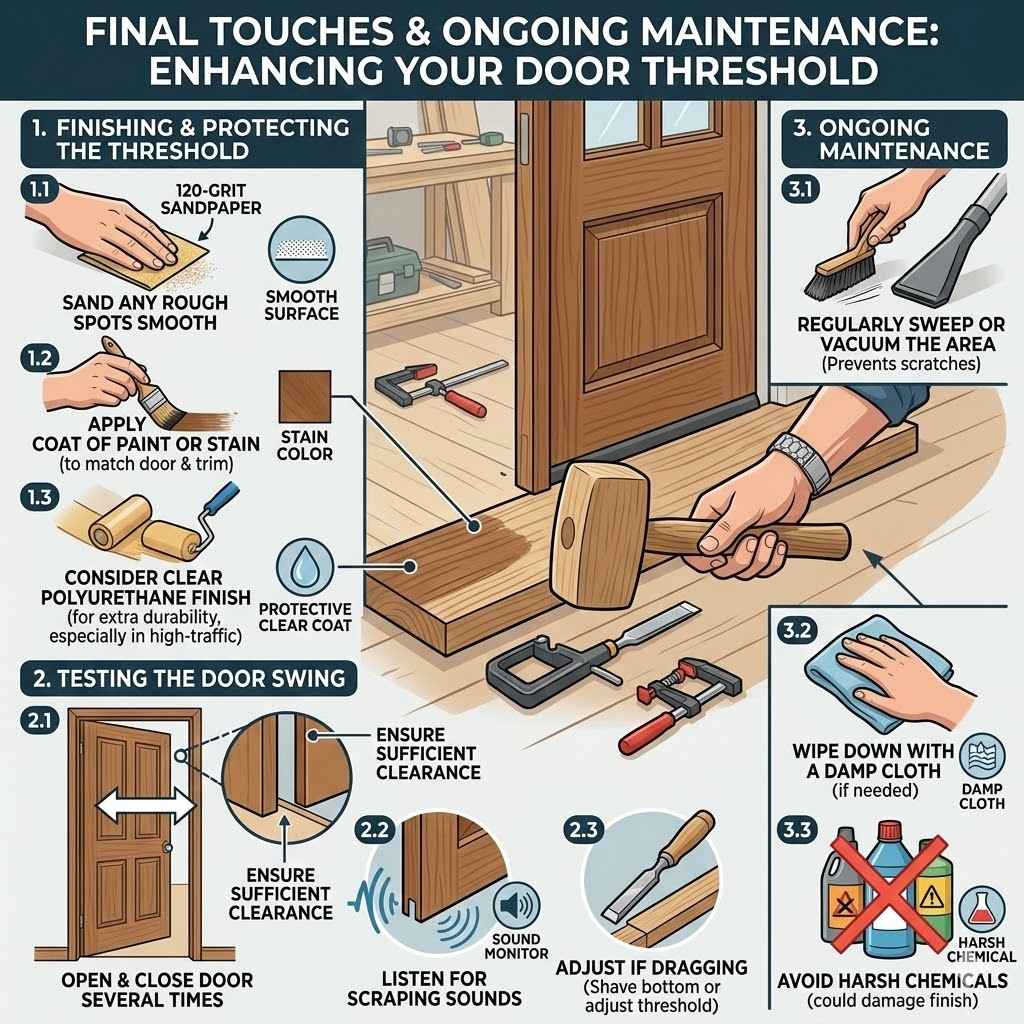
Sand any rough spots smooth with fine-grit sandpaper.
This creates a nice surface for painting or staining.
Apply a coat of paint or stain to match your door and trim.
This protects the wood from moisture and wear.
Consider applying a clear protective finish, like polyurethane, for extra durability.
This is especially important for high-traffic areas.
Testing the Door Swing
After installation, always check if your door opens and closes smoothly without hitting the new threshold.
Open and close the door several times.
Listen for any scraping sounds.
Ensure there is sufficient clearance between the bottom of the door and the threshold.
If the door drags, you may need to shave a little off the bottom of the door or adjust the threshold.
Ongoing Maintenance
Keeping your threshold in good shape is simple.
Regularly sweep or vacuum the area around the threshold.
This prevents dirt and debris from scratching the surface.
Wipe down with a damp cloth if needed.
Avoid harsh chemicals that could damage the finish.
Frequently Asked Questions
Question: What is the best material for a door threshold?
Answer: The best material depends on where the door is located. For interior doors, wood is common and easy to work with. For exterior doors, metal or composite materials offer better durability and weather resistance.
Question: How much gap should there be between the door and the threshold?
Answer: Ideally, there should be a very small gap, about the thickness of a piece of paper, between the bottom of the door and the threshold to allow for smooth operation without drafts.
Question: Can I install a door threshold myself?
Answer: Yes, absolutely. With basic tools and careful measurement, anyone can learn How to Install a Door Threshold the Right Way. Our guide breaks it down into simple steps.
Question: What if my subfloor is uneven?
Answer: If your subfloor has minor low spots, you can use thin wood shims to level the area before installing the threshold. For significant unevenness, you might need to level the entire subfloor first.
Question: How often should I replace my door threshold?
Answer: A well-installed and maintained threshold can last for many years, often 10-15 years or more. Replacement is usually only needed if it becomes damaged, rotten, or no longer seals properly.
Summary
Installing a door threshold the right way ensures a secure, draft-free, and attractive entryway. By following these steps for preparation, measurement, cutting, installation, and finishing, you can achieve professional results. Take your time with each stage, and you’ll have a solid, functional threshold that enhances your home.