How to Seal Under an Exterior Door Threshold and Stop Drafts
Stopping drafts under your exterior door might seem tricky at first. Many people find it a challenge, especially if they’ve never done it before. It’s a common home maintenance task, so you’re not alone! Don’t worry, though. This guide makes it super easy. We’ll explore exactly How to Seal Under an Exterior Door Threshold in simple steps, so you can fix that draft and save energy. Let’s get started and make your home cozier.
What Causes Drafts Under Your Door?
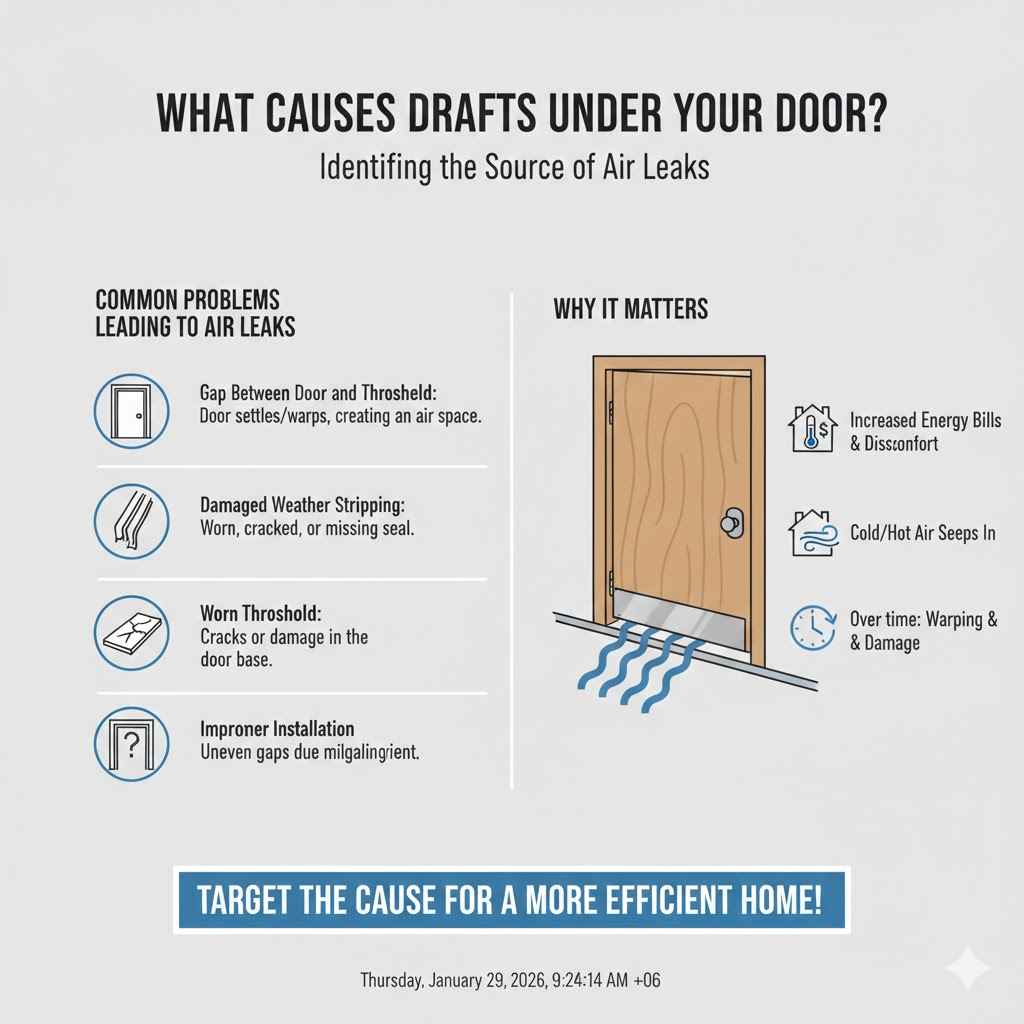
Drafts under your exterior door are annoying, and understanding the source of these unwanted breezes is the first step toward a solution. Many factors contribute to these air leaks, ranging from simple wear and tear to improper installation. A gap between the door and the threshold is the most common culprit. This gap allows cold air from outside to seep in during winter and hot air to enter during summer, leading to increased energy bills and discomfort. Weather changes can warp doors and thresholds, further widening these gaps.
Moreover, the materials used to build your door and threshold can play a significant role. Older doors, especially those made of wood, can shrink and expand with the weather, creating inconsistencies in the seal. The threshold itself, if not properly sealed or maintained, can develop cracks or become loose over time. Even the smallest opening can make a big difference in how your home feels and how much it costs to heat or cool.
Common Problems Leading to Air Leaks
Identifying the specific issue causing drafts is essential. Several problems frequently contribute to air leaks, and each requires a different approach. Recognizing these common issues empowers you to choose the most effective solutions and minimize wasted energy.
- Gap Between Door and Threshold: This is the most prevalent cause. Over time, the door may settle or warp, leaving a space where air can flow freely. A simple visual inspection is usually enough to spot this problem.
- Damaged Weather Stripping: Weather stripping seals the gap between the door and the frame. If it’s worn, cracked, or missing, it won’t effectively block drafts. Check the edges of your door for signs of damage or deterioration.
- Worn Threshold: The threshold itself can deteriorate. Cracks or damage can compromise its ability to seal the bottom of the door. Inspect the threshold for wear and tear, and look for any areas where the seal might be compromised.
- Improper Installation: If the door wasn’t installed correctly, there may be uneven gaps around the frame. This is more common with DIY installations. Check the door frame for any obvious misalignment.
By assessing these common causes, you can take a more targeted approach to resolve air leaks. The next section will discuss the tools and materials you’ll need.
Tools and Supplies You’ll Need
Before you begin, gathering the correct tools and supplies is essential for successfully sealing under your door. Having everything ready saves time and ensures a smoother process. This section details the necessary items and offers advice on choosing the right materials for the job. You don’t need a vast collection of tools to tackle this project. In fact, a few key items will suffice.
Investing in quality materials is also important. Cheaper options may not last long and could require you to repeat the process. Selecting appropriate materials ensures the fix is both effective and long-lasting.
Essential Tools and Materials
Here’s a detailed list of what you’ll require to seal under your door:
- Measuring Tape: Used to measure the gap under the door and the width of the door itself. Accurate measurements are key to selecting the right size of weatherstripping.
- Screwdriver: Needed for removing and replacing screws. You may need a Phillips head or a flathead, depending on the type of screws used to secure the door and threshold.
- Utility Knife or Scissors: Useful for cutting weather stripping to the correct size.
- Caulk and Caulk Gun: Caulk seals small gaps and prevents air infiltration. The caulk gun helps to apply the caulk smoothly. Choose an exterior-grade caulk.
- Weather Stripping: The primary defense against drafts. Several types are available, including felt, foam, and rubber. Consider the specific gap size and your door’s material when choosing.
- Hammer and Nails (Optional): If you are installing a new threshold.
- Safety Glasses and Gloves: Protect yourself during the work.
It’s always a good idea to have some extra supplies on hand. Having extra caulk or weather stripping is a good strategy in case you make a mistake or need more than you initially estimated. Now you’re ready to proceed to the actual steps.
Step-by-Step Guide to How to Seal Under an Exterior Door Threshold
Now that you have your tools and materials ready, let’s explore how to seal under your exterior door threshold. This section breaks down the process into easy-to-follow steps, from preparing the door to installing the weather stripping. Even if you’re new to home improvement projects, these instructions will help you achieve a tight seal and minimize those pesky drafts.
Remember to work carefully and slowly. Rushing can lead to mistakes or poor seals. Take your time, and double-check your work as you go. You’ll be glad you did.
Step 1: Inspect the Door and Threshold
Before beginning any work, carefully inspect the door and threshold for any issues. This step helps identify the problem areas and helps you choose the best solutions. It’s an easy but important step.
- Examine the Door: Open and close the door several times. Look for any visible gaps, especially along the bottom. Use a flashlight to make gaps more apparent.
- Check the Weather Stripping: Inspect the existing weather stripping around the door frame. Look for cracks, tears, or compression. Worn or damaged weather stripping will not provide an effective seal.
- Assess the Threshold: Look at the threshold for damage. Are there cracks or splits? Ensure it is securely attached to the floor. A loose or damaged threshold won’t seal properly.
- Clean the Area: Clear away any dirt, debris, or old caulk from the door and threshold. This will help the new materials adhere correctly. A clean surface is essential for proper sealing.
By carefully assessing your door and threshold, you lay the foundation for a successful repair.
Step 2: Measure the Gap
Knowing the precise gap size is crucial for choosing the right weather stripping. Measuring correctly ensures a snug fit and optimal draft protection. Different types of weather stripping are designed to fill various-sized gaps, so accurate measurement is essential.
- Close the Door: Make sure the door is closed and the latch is engaged. This ensures you’re measuring the gap as it normally exists.
- Use a Measuring Tape: Place the measuring tape at the lowest point of the door and measure the distance between the bottom of the door and the threshold. This is the gap you’ll be sealing.
- Record the Measurement: Write down the measurement. This number will guide your weather stripping choice.
- Consider Any Irregularities: If the gap varies along the width of the door, note the largest gap. Also, note any unevenness in the threshold. This might influence your weather stripping choice.
Precise measurements save you time and ensure a more effective seal.
Step 3: Choose and Install Weather Stripping
The correct weather stripping can make all the difference in keeping drafts at bay. Several types of weather stripping are available, and the best choice depends on the gap size and your door type. This section will guide you through selecting and installing weather stripping.
- Select the Right Type: Choose weather stripping based on your measured gap. Options include foam tape, felt, rubber, and door sweeps. Foam and felt are simple to apply and suitable for small gaps. Rubber is more durable. Door sweeps are best when the gap is large.
- Prepare the Weather Stripping: Cut the weather stripping to the correct length. If you are using adhesive-backed tape, peel off the backing slowly. If using a door sweep, cut it to the width of the door.
- Apply the Weather Stripping: Position the weather stripping so that it sits against the door when closed. For foam or felt, stick it directly to the door or the frame. For a door sweep, attach it to the bottom of the door.
- Test the Seal: Close the door to ensure the weather stripping compresses against the threshold and the door frame. The seal should feel snug, but the door should still close easily.
Properly installed weather stripping is a cost-effective method to stop drafts and improve energy efficiency.
Step 4: Caulk the Perimeter (Optional)
Caulking provides an extra layer of protection against drafts, and it can seal small gaps around the door frame. While not always necessary, it’s a good practice, especially if you live in an area with harsh weather conditions. Exterior-grade caulk is designed to withstand the elements.
- Clean the Area: Make sure the door frame is clean. Remove any loose debris or old caulk. This ensures the new caulk adheres correctly.
- Load the Caulk Gun: Insert the caulk tube into the caulk gun and cut the tip. Puncture the seal.
- Apply the Caulk: Apply a smooth bead of caulk around the door frame. Run the bead along the edges where the frame meets the wall. Aim to fill any visible gaps.
- Smooth the Caulk: Using a wet finger or a caulk smoothing tool, smooth the caulk to ensure a tight seal. Remove any excess caulk.
- Let It Dry: Allow the caulk to dry completely according to the manufacturer’s instructions. This usually takes several hours.
Caulking can significantly improve the door’s ability to seal out drafts. This step is a small investment that offers large benefits in terms of energy savings and comfort.
Step 5: Inspect and Adjust (If Necessary)
After completing the installation, it’s important to inspect your work and make any necessary adjustments. This helps to ensure the seal is effective and that the door operates smoothly. A quick inspection can reveal areas that need additional attention.
- Check the Seal: Close the door and feel around the edges for any drafts. If you feel air leaks, you might need to add more weather stripping or caulk.
- Operate the Door: Open and close the door a few times to ensure it still moves freely. The weather stripping should provide a good seal without making the door difficult to operate.
- Make Adjustments: If the door is hard to close, the weather stripping might be too thick. If there are drafts, the weather stripping may need to be adjusted or replaced.
- Look for Gaps: Examine the entire perimeter of the door, looking for gaps that might have been missed. Seal these gaps with caulk or additional weather stripping.
A final inspection guarantees that your sealing efforts are effective. This simple process can save you money.
Advanced Techniques and Additional Tips
While the basic steps will address most common draft issues, some situations call for more advanced techniques. This section presents additional tips and suggestions to improve the seal around your exterior door. These advanced techniques can help solve trickier draft problems and ensure maximum energy efficiency.
Applying these advanced techniques requires a bit more expertise. But, they are useful when the more simple approaches aren’t enough.
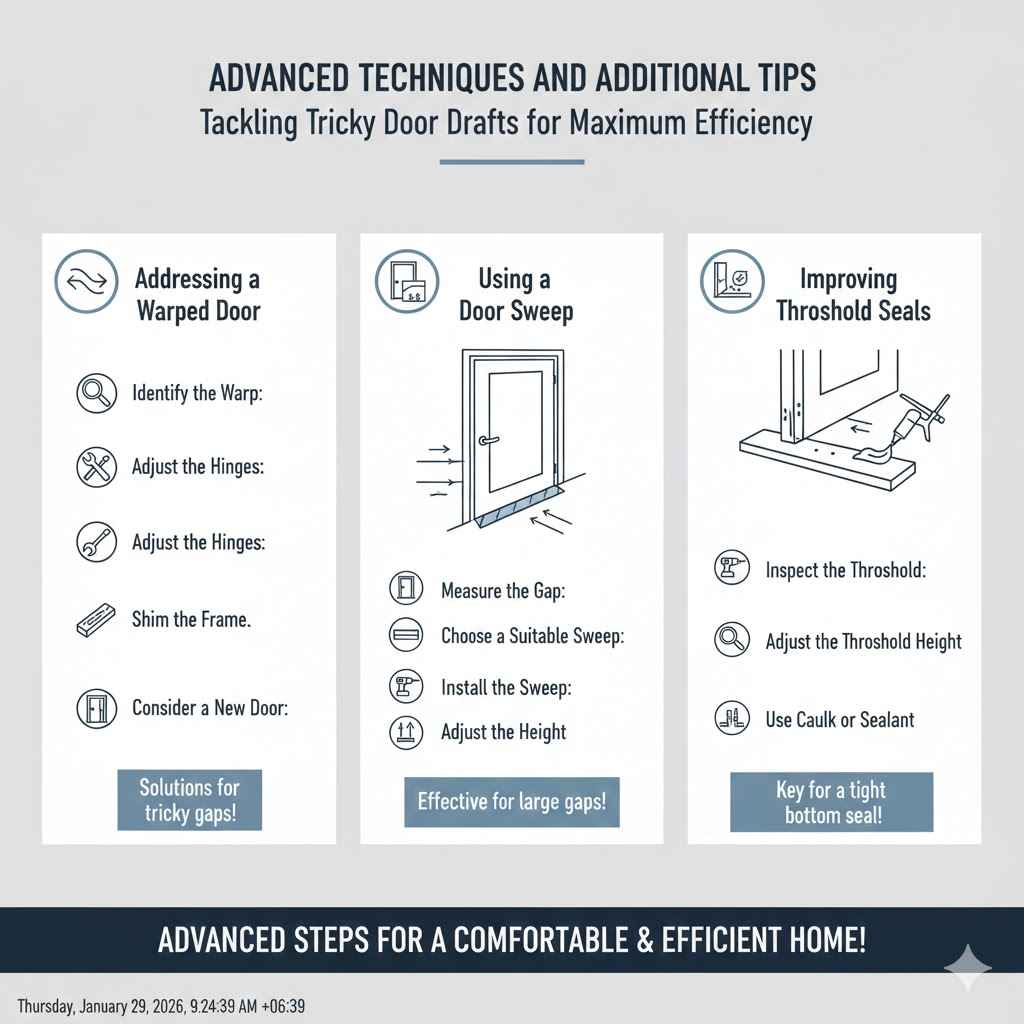
Addressing a Warped Door
A warped door can be especially difficult to seal, as the gaps change as the door moves. Addressing this issue can include more than just applying weatherstripping.
- Identify the Warp: Close the door and examine it carefully. Note where the gaps are largest.
- Shim the Frame: If the frame is the problem, you may need to add shims behind the door frame to make it square. This requires removing trim, inserting shims, and reinstalling the trim.
- Adjust the Hinges: Sometimes, adjusting the hinges can bring a warped door closer to the frame. Loosen the screws of the hinges and reposition the door. Tighten the screws.
- Consider a New Door: In severe cases, replacing the door may be the most practical solution. A new door provides a flat, even surface for a better seal.
Using a Door Sweep
Door sweeps are particularly effective for larger gaps at the bottom of the door. They create a strong seal against the threshold and can be adjusted.
- Measure the Gap: Measure the distance between the bottom of the door and the threshold to determine the length.
- Choose a Suitable Sweep: Select a door sweep that is the correct length and made of durable materials. Look for adjustable options.
- Install the Sweep: Attach the door sweep to the bottom of the door. Use screws or adhesive, depending on the design.
- Adjust the Height: Close the door and adjust the sweep to contact the threshold firmly. The seal should be tight enough to block drafts.
Improving Threshold Seals
The threshold plays a key role in sealing the bottom of your door. Addressing any issues here is often essential for preventing drafts.
- Inspect the Threshold: Look for cracks, damage, or gaps. Repair or replace the threshold if needed.
- Adjust the Threshold Height: If the threshold is too low, add shims underneath it to raise the door. Ensure a good seal.
- Use Caulk or Sealant: Caulk the edges of the threshold to seal any gaps between it and the floor. This stops air infiltration.
Sample Scenarios
- Scenario 1: The customer has an older home with a wooden door that warps seasonally. The solution would include adjusting the hinges to accommodate the warp in the warmer months and adding a door sweep during the colder months to keep drafts out.
- Scenario 2: A homeowner
These advanced techniques expand your ability to solve difficult draft problems. Applying these steps will ensure a comfortable home environment.
Frequently Asked Questions
Question: What’s the best type of weather stripping for my door?
Answer: The best type depends on the gap size and your needs. Foam tape is easy to apply for small gaps, while rubber or door sweeps are better for larger gaps. Consider the door’s material and your local climate.
Question: Can I use regular caulk around my door?
Answer: For exterior doors, always use exterior-grade caulk. This type is designed to withstand the weather conditions and won’t crack or shrink as easily as interior caulk.
Question: How long will weather stripping last?
Answer: The lifespan of weather stripping varies. Foam tape may last 1–2 years, while rubber or door sweeps can last 5–10 years. Inspect your weather stripping annually and replace it when it shows signs of wear or damage.
Question: How often should I inspect my door seals?
Answer: It’s a good idea to inspect your door seals at least twice a year, ideally at the beginning of the heating and cooling seasons. This helps you catch any issues before they cause significant energy loss.
Question: What if my threshold is damaged?
Answer: If your threshold is damaged, you may need to replace it. This is usually a straightforward task, but if you’re not comfortable doing it, consider hiring a professional to ensure it’s installed correctly and sealed properly.
Final Thoughts
Stopping drafts by How to Seal Under an Exterior Door Threshold is an achievable DIY task that can significantly improve your home’s comfort and energy efficiency. By following these simple steps, you can eliminate unwanted drafts and create a more comfortable living space. From recognizing the sources of air leaks to choosing the right materials and installing weather stripping, you now have the tools needed to accomplish this project. Your home will become more energy-efficient and cozier. Proper sealing helps reduce your energy costs.
Don’t put off this task any longer. Grab your tools, measure your door, and get started today. You’ll be surprised at how much difference it makes. Don’t hesitate to ask for help from a professional if needed. A well-sealed door will contribute to a more comfortable and cost-effective home. You’ve got this!