Which Way Does a Door Latch Face? Installation Guide
Figuring out which way a door latch should face can be a little tricky when you’re new to home projects. It seems simple, but getting it wrong can make your door not work right. Don’t worry!
This guide will show you exactly what you need to know. We’ll walk through it step-by-step so you can feel confident. Let’s get your door latch installed correctly the first time, making your home more secure and functional.
You’ll soon see that Which Way Does a Door Latch Face? Easy Installation Guide isn’t as hard as it sounds.
Understanding Door Latch Directions
The direction a door latch faces is a fundamental aspect of its installation and function. It determines how the latch engages with the strike plate on the door frame, ensuring the door closes and secures properly. For anyone doing DIY home repairs or installations, this detail is crucial for a well-working door.
Incorrect placement can lead to doors that don’t latch, are difficult to open, or even damage to the door and frame. This section breaks down the basics of latch directionality.
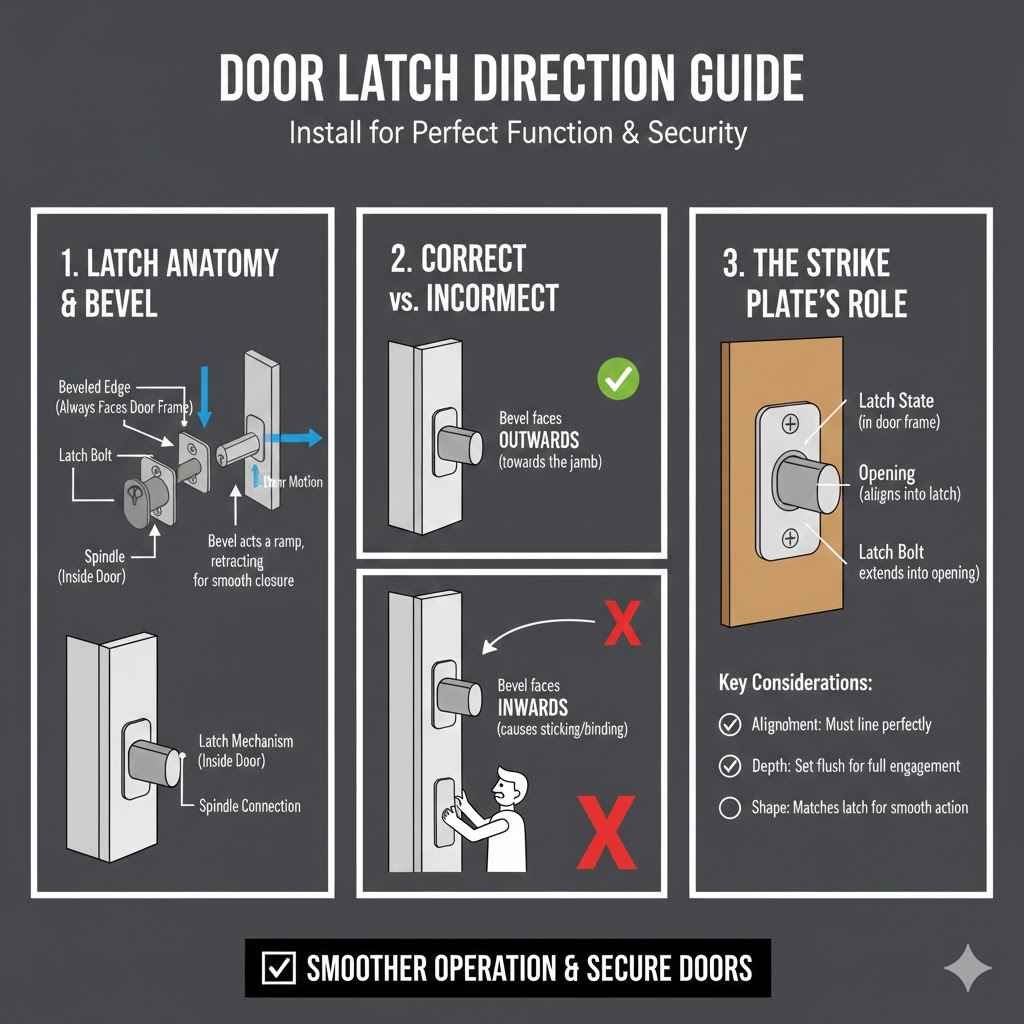
The Anatomy of a Door Latch
A door latch is a simple yet vital piece of hardware. It consists of a mechanism that extends from the edge of the door into a corresponding hole in the door frame. This mechanism is typically spring-loaded and has a beveled or angled surface on the outward-facing side.
This angle is what allows the latch to slide back when the door is pushed closed against the strike plate. When the door is fully closed, the latch extends into the strike plate’s opening, holding the door shut. The opposite end of the latch is connected to the doorknob or lever mechanism, which retracts the latch when operated.
Understanding these parts helps visualize why direction matters. The beveled edge is designed to interact with the strike plate in a specific way. This interaction is key to the smooth operation of the door.
Without the correct bevel orientation, the latch won’t slide in or out properly. It’s like trying to fit a square peg into a round hole; the shape simply isn’t designed for that orientation.
Bevel Direction and Its Purpose
The beveled edge of the latch is the most important feature when determining its orientation. The bevel is an angled cut on the face of the latch bolt. Its purpose is to facilitate the closing of the door.
When you push a door shut, the beveled side of the latch hits the strike plate first. This angled surface pushes the latch bolt back into the door, allowing the door to close all the way. Once the door is fully closed and the latch is no longer pressed against the strike plate, a spring mechanism pushes the latch bolt back out into the strike plate, securing the door.
Imagine a ramp. The bevel acts like a small ramp for the latch. As the door moves towards the frame, the ramp on the latch rides up and over the edge of the strike plate opening.
This action compresses the latch spring. When the door is fully in, the ramp clears the opening, and the spring extends the latch into the secure position. This mechanical principle is what makes the automatic latching possible.
Real-Life Example: A Sticking Door
Consider a scenario where a homeowner installs a new door knob. They notice that the door doesn’t close smoothly. It feels like it’s catching on something, and they have to push quite hard to get it to latch.
Upon inspection, they realize the latch bolt is installed with the bevel facing inwards instead of outwards. This means that instead of the bevel guiding the latch back as the door closes, the flat side of the latch is hitting the strike plate. The latch can’t retract properly, causing the door to bind.
Correcting the latch orientation solved the problem instantly.
The Role of the Strike Plate
The strike plate is a metal plate installed on the door frame. It has a precisely shaped opening designed to receive the latch bolt. This plate is critical for the latching mechanism to work.
The opening in the strike plate is typically shaped to match the latch bolt, often with a slight recess to accommodate the beveled edge. When the door is closed, the latch bolt extends through this opening and into the strike plate, effectively locking the door.
The position and alignment of the strike plate are just as important as the latch’s direction. If the strike plate is misaligned with the latch, even with the correct bevel, the latch may not fully engage. This can result in a door that feels loose or doesn’t stay closed securely.
Many strike plates have a lip or flange that extends slightly beyond the main opening. This lip helps to guide the latch bolt into the opening, providing a margin of error for slight misalignments.
Key Considerations for Strike Plates
- Alignment: The strike plate opening must align perfectly with the latch bolt when the door is closed. Even a slight offset can prevent proper latching.
- Depth: The strike plate needs to be set into the door frame at the correct depth to allow the latch bolt to fully extend and secure the door.
- Shape: The opening’s shape is designed to accept the latch bolt smoothly. Any burrs or damage to the opening can impede the latch’s movement.
These points highlight that the strike plate is not just a passive component; it actively participates in the door’s security. A well-fitted strike plate ensures that the latch does its job effectively. Without it, the latch has nothing to grab onto, rendering the door unsecured.
Determining the Correct Latch Direction
Knowing which way a door latch faces is essential for a functioning door. The direction depends on whether the door opens inward or outward, and which side of the door the doorknob or lever is on. This section provides clear guidelines to help you determine the correct orientation for your specific door setup.
Inward Opening Doors
For doors that swing inward (into a room or house), the latch’s beveled edge typically faces the direction the door swings. When you push the door to close it, the bevel should hit the strike plate first. This allows the latch to retract and the door to shut.
Once the door is fully closed, the latch extends into the strike plate.
Think about a standard interior door in your home that opens into a bedroom. As you close the bedroom door from the hallway, you push it into the room. The latch on the door edge needs to be positioned so its angled side is facing the hallway side of the door frame when the door is open.
This way, as you push it closed, the bevel slides against the strike plate.
Sample Scenario: Closing a Bedroom Door
- You are standing in the hallway, about to enter the bedroom.
- You pull the door open towards you (away from the bedroom). The latch retracts.
- You push the door closed from the hallway side.
- As the door moves towards the frame, the beveled side of the latch hits the strike plate.
- The bevel causes the latch to slide back into the door.
- The door closes fully.
- The latch spring pushes the latch bolt out into the strike plate, securing the door.
If the bevel were facing the other way (into the bedroom), it would catch on the strike plate as you try to close it from the hallway, preventing the door from closing properly.
Outward Opening Doors
For doors that swing outward (away from a room or house, like an exterior door that opens to the outside), the bevel usually faces the direction the door will swing. When you close an outward-swinging door, the beveled side of the latch meets the strike plate, allowing it to retract and the door to close. This is similar to inward-opening doors, but the context of the swing direction is reversed.
Consider a closet door that opens outward into a hallway. As you pull it open, the latch retracts. When you push it closed, the beveled edge of the latch needs to make contact with the strike plate on the frame.
This requires the bevel to be oriented in a specific way relative to the door frame.
Determining Bevel for Outward Doors
To be absolutely sure, stand on the side from which you will close the door. Imagine closing it. The bevel on the latch should be facing away from you, towards the frame it will enter.
This allows the angled surface to slide against the strike plate.
A common mistake is to assume all latches are the same. However, the simple angled cut on the latch is designed for interaction with the frame. When the door is closed, the bevel should lead into the strike plate.
This principle holds true whether the door opens in or out, but the orientation changes based on the swing direction.
Left-Handed vs. Right-Handed Doors
Doors are often described as left-handed or right-handed based on the location of the hinges and the direction the door swings. This classification is crucial for determining latch direction. A right-handed door typically swings away from you to the right when viewed from the side with the hinges on the right.
A left-handed door swings away from you to the left, with hinges on the left.
The terms “left-handed” and “right-handed” for doors can sometimes be confusing because they refer to the perspective from which you are viewing the door. A common way to determine is to stand outside the door and look at the hinges. If the hinges are on your left and the door opens away from you to the left, it’s a left-handed door.
If the hinges are on your right and the door opens away from you to the right, it’s a right-handed door.
Hinge and Latch Orientation
- Right-Handed Door (Outward Swing): If the hinges are on the right and the door swings outward to the right, the bevel on the latch typically faces the right side of the strike plate opening.
- Left-Handed Door (Outward Swing): If the hinges are on the left and the door swings outward to the left, the bevel on the latch typically faces the left side of the strike plate opening.
- Inward Swing Doors: For inward-swinging doors, the bevel generally faces the side from which you will push the door shut.
These are general guidelines. Always visualize the closing action to confirm. The goal is always for the bevel to guide the latch backward into the door as it closes against the frame.
The “Push to Close” Rule
A simple, effective rule of thumb is the “push to close” rule. When you are on the side of the door where you will push it to close it, the beveled side of the latch should be facing you. This means that as you push the door, the bevel will encounter the strike plate and slide back, allowing the door to shut.
Once the door is shut, the spring pushes the latch back out into the strike plate.
Let’s revisit the bedroom door example. You are in the hallway (outside the bedroom). You push the door to close it.
Therefore, the beveled side of the latch should be facing you in the hallway. This aligns with the previous explanation for inward-opening doors.
Applying the “Push to Close” Rule
- Identify the side from which you will be pushing the door to close it.
- Imagine pushing the door shut.
- The latch bolt on the edge of the door should have its angled (beveled) side facing you on that closing side.
- If the latch bolt is flat on the side you push, it is installed incorrectly.
This rule is incredibly useful because it bypasses complex hinge discussions and focuses on the direct action of closing the door.
Installation Steps and Best Practices
Correctly installing a door latch involves more than just deciding which way the bevel faces. It requires careful measurement, precise alignment, and proper use of tools. Following these steps ensures that your door latch is installed securely and functions flawlessly, contributing to the overall safety and usability of your doors.
Removing the Old Latch and Hardware
Before installing a new latch, you’ll likely need to remove the old one. This usually starts with unscrewing the doorknob or lever handles. Then, you’ll access the latch mechanism itself.
Most latches are held in place by two screws on the edge of the door. Removing these screws allows the latch assembly to slide out of its mortise (the rectangular cutout in the door edge).
If you’re replacing hardware, ensure you have the right tools. A Phillips head screwdriver is most common for doorknob screws and latch screws. For some older or heavier-duty hardware, you might need a flathead screwdriver or even a small pry bar for stubborn components.
Be gentle when removing parts to avoid damaging the door or frame.
Steps for Removal
- Unscrew and remove the doorknob or lever handles from both sides of the door.
- Locate and unscrew the two screws on the edge of the door that hold the latch plate in place.
- Gently pull the latch assembly straight out of the mortise. If it’s stuck, a few light taps with a rubber mallet on the side of the door near the latch might help loosen it.
- Remove any old strike plate hardware from the door frame if you are replacing the entire mechanism.
Keep all screws and parts organized. It’s easy to lose small pieces, so a small container or tray is helpful.
Preparing the Door and Frame
Ensure the mortise (the cutout in the door edge for the latch) is clean and free of debris. If you’re installing a new latch into an existing cutout, it should fit snugly. If it’s a bit loose, you might need to use shims or a bit of wood filler to secure it properly.
For the strike plate, the opening in the frame must be clear and the plate positioned correctly.
When installing a new strike plate, you might need to chisel out a recess in the door frame if one doesn’t already exist, or if the existing one is too shallow or misaligned. The depth of the recess is crucial so the latch can fully extend and retract without hitting the frame or being too loose.
Key Preparatory Tasks
- Clean Mortise: Remove any wood shavings, old paint, or debris from the latch mortise.
- Test Fit Latch: Insert the new latch assembly into the mortise to ensure a snug fit. Make any minor adjustments needed.
- Mark Strike Plate Location: With the door in place and the latch extended, mark the precise location for the strike plate on the door frame.
- Prepare Strike Plate Recess: If necessary, carefully mark and chisel out the door frame for the strike plate, ensuring the correct depth and alignment.
Proper preparation prevents installation headaches and ensures the latch works as intended. This stage is fundamental to a successful installation.
Installing the Latch Assembly
Slide the new latch assembly into the mortise on the edge of the door. Make sure the beveled side is facing the correct direction as determined earlier. Align the screw holes on the latch plate with the holes in the door.
Insert the screws and tighten them firmly, but avoid overtightening, which can strip the wood or damage the latch mechanism. The latch should move smoothly when you press on it.
The direction of the bevel is paramount here. If the latch has a distinct bevel, its angled face should be oriented according to the “push to close” rule or the specific door handing. If the latch is symmetrical, direction may not be an issue, but most standard latches have a bevel for smooth operation.
Step-by-Step Latch Installation
- Orient the latch assembly correctly within the mortise.
- Ensure the beveled edge is facing the correct way (typically towards the direction you’ll push to close the door).
- Align the screw holes and insert the screws.
- Tighten screws until the latch plate is flush with the door edge.
- Test the latch by operating the doorknob or lever. It should retract and extend smoothly.
This step requires precision. A poorly installed latch will not function correctly, regardless of its orientation. Smooth operation is the key indicator of proper installation.
Mounting the Strike Plate
Position the strike plate on the door frame so that the latch bolt aligns perfectly with the opening when the door is closed. Mark the outline of the strike plate and the screw hole locations. If needed, use a chisel to create a recess for the strike plate.
Once the recess is prepared, place the strike plate in position and mark the screw hole locations. Drill pilot holes for the screws to prevent the wood from splitting, especially in hardwood frames. Attach the strike plate securely with its screws.
The alignment of the strike plate is absolutely critical. If it’s even slightly off, the latch won’t engage properly. You might need to adjust the strike plate’s position or slightly enlarge the opening to achieve a perfect fit.
Sometimes, a “shim” of cardboard behind the strike plate can help adjust alignment if the door has sagged.
Strike Plate Installation Tips
- Precise Alignment: Close the door gently and watch the latch bolt align with the strike plate opening. Adjust the strike plate position as needed.
- Pilot Holes: Always drill pilot holes for strike plate screws to prevent splitting the wood.
- Secure Fastening: Ensure the strike plate is screwed in tightly to withstand repeated latching.
- Lubrication: A small amount of lubricant inside the strike plate opening can ensure smoother latch operation.
A well-installed strike plate is the silent partner of the latch, ensuring security and smooth function. Without it, the latch has no purpose.
Testing and Adjusting
After installing both the latch and the strike plate, it’s time for thorough testing. Close the door gently and see if the latch engages with the strike plate. Operate the doorknob or lever to ensure the latch retracts and extends smoothly.
If the door is hard to close, or the latch doesn’t engage fully, you may need to adjust the strike plate position or slightly enlarge the opening. Sometimes, minor adjustments to the latch itself or the door’s hanging might be necessary.
If the latch sticks, the bevel might be facing the wrong way, or the strike plate is misaligned. Check the latch’s movement when the door is open. It should be springy and extend fully.
If it’s sluggish, there might be an issue with the latch mechanism or the mortise. Don’t hesitate to loosen screws and make small adjustments; this is a normal part of the process.
Troubleshooting Common Issues
- Latch Doesn’t Engage: Check strike plate alignment. It might need to be moved slightly up, down, or sideways. Ensure the latch is fully extending.
- Door is Hard to Close: The strike plate might be too far out, or the latch bevel is incorrect. The door might also be sagging, requiring hinge adjustment.
- Latch Sticks: Ensure the latch moves freely in its mortise. The strike plate opening might be too tight for the latch.
- Doorknob Feels Loose: Re-tighten the screws holding the doorknob assembly. Ensure all internal components are seated correctly.
These troubleshooting steps are designed to help you resolve minor issues that can arise. Patience and careful observation are key to a perfect result. The satisfaction of a smoothly working door is worth the effort.
Types of Door Latches and Their Orientations
While the basic principles of latch direction apply broadly, different types of door latches have specific considerations. Understanding these variations can help ensure you’re installing the right latch for the right job and orienting it correctly.
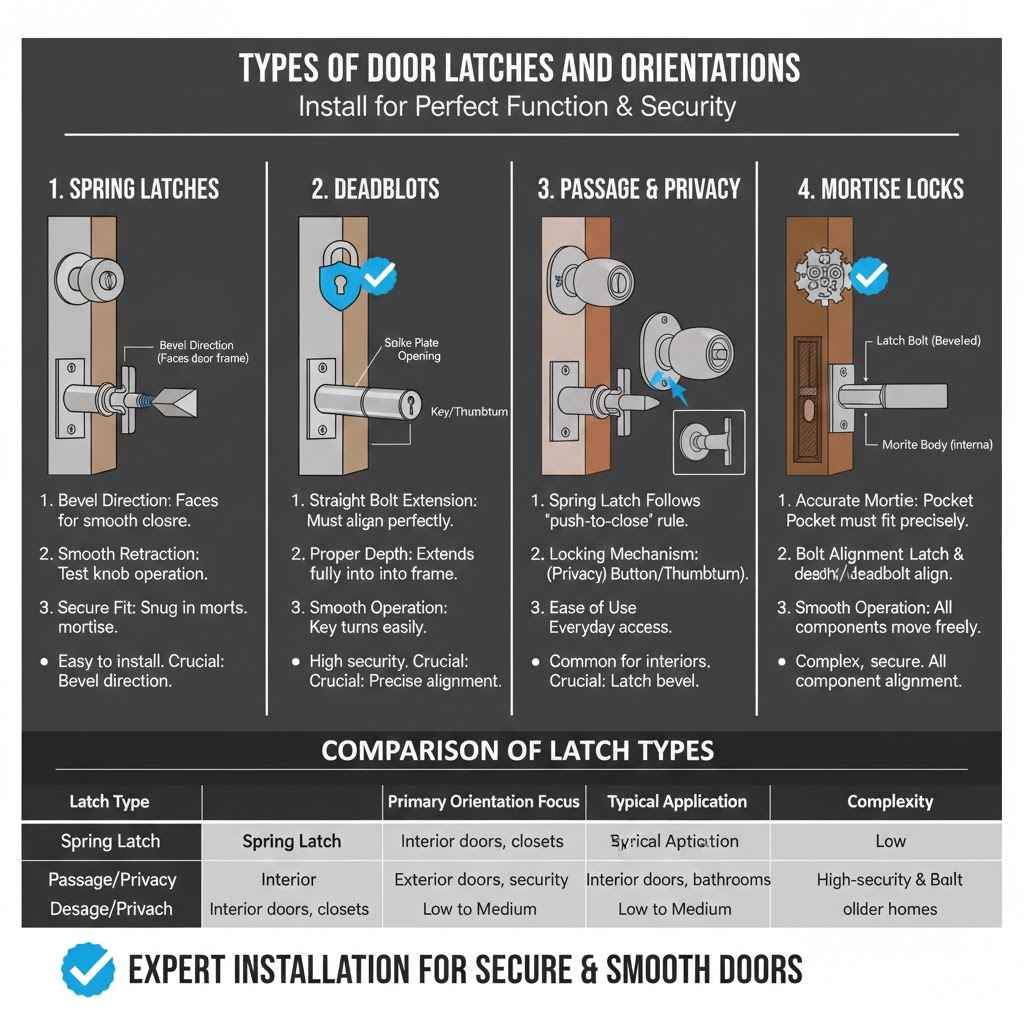
Spring Latches
Spring latches are the most common type found on interior doors. They feature a spring-loaded bolt with a beveled edge that retracts when pressure is applied. The direction of the bevel is critical for these latches, as described in the “push to close” rule.
They are straightforward to install, with the primary concern being the bevel’s orientation relative to the door’s swing and closing direction.
These latches are designed for convenience and ease of use. Their spring mechanism provides the resistance needed to keep the door shut until the knob is turned. The bevel ensures that this closing action is smooth and requires minimal force.
When this bevel is facing the wrong way, the latch will bind against the strike plate, preventing the door from closing.
Spring Latch Installation Focus
- Bevel Direction: Always ensure the beveled edge of the spring latch faces the direction from which you will push the door to close it.
- Smooth Retraction: Test that the latch retracts and extends fully and smoothly when the knob is operated.
- Secure Fit: The latch assembly should fit snugly into its mortise without rattling.
The simplicity of spring latches makes them a popular choice, but correct orientation of the bevel is non-negotiable for proper function.
Deadbolts
Deadbolt locks provide enhanced security and do not rely on a spring mechanism for locking. Instead, they have a solid metal bolt that extends into the strike plate. While deadbolts themselves don’t have a “bevel” in the same sense as spring latches, the orientation of the entire mechanism and how it interfaces with the strike plate still matters for secure locking and smooth operation.
The bolt is typically a cylinder, and its engagement with the strike plate is more direct.
When installing a deadbolt, the primary concern is alignment. The deadbolt cylinder needs to extend straight into the strike plate opening without binding. Misalignment can make the deadbolt difficult to lock or unlock, or it can prevent it from locking at all.
The installation instructions provided with the deadbolt are usually very specific about orientation and alignment.
Deadbolt Considerations
- Straight Bolt Extension: Ensure the deadbolt extends straight into the strike plate opening without any sideways pressure.
- Proper Depth: The deadbolt should extend fully into the strike plate, providing maximum security.
- Smooth Operation: The key or thumbturn should operate the deadbolt smoothly without resistance.
While not about bevel direction, the precise alignment for deadbolts is crucial for security. A binding deadbolt is a weak deadbolt.
Passage and Privacy Knobs/Levers
Passage knobs and levers are used for doors that don’t require locking, like interior closet doors. They primarily use a spring latch mechanism. Privacy knobs and levers, often used for bathrooms and bedrooms, also use a spring latch but include a locking mechanism operated by a button or a key from the outside, and a thumbturn from the inside.
For both, the same “push to close” rule applies to the spring latch’s bevel orientation.
The internal workings of these knobs and levers are designed to retract the spring latch. The locking feature on privacy sets is an additional component. When installing these, you’re essentially installing a spring latch with an added locking function.
The spring latch part requires the same attention to bevel direction as any other spring latch.
Common Features
- Spring Latch: Both types typically use a spring latch for closing the door.
- Locking Mechanism: Privacy sets have an integrated lock for security.
- Ease of Use: Designed for everyday access and convenience.
The orientation of the spring latch, which is the part that actually goes into the strike plate, remains the most critical aspect for proper function.
Mortise Locks
Mortise locks are more complex and are installed within a deep pocket (mortise) cut into the edge of the door. They often incorporate both a latch bolt and a deadbolt mechanism, along with intricate internal workings. The orientation of the latch bolt on a mortise lock follows the same bevel rules as other spring latches.
However, the overall installation of a mortise lock is more involved and requires precise fitting into the larger mortise.
Mortise locks are known for their durability and security. Because they are housed within the door, they are less prone to wear and tear compared to surface-mounted hardware. When installing, ensuring the latch bolt and deadbolt are correctly oriented to mate with their respective strike plates is paramount.
Mortise Lock Installation Notes
- Accurate Mortise: The pocket cut into the door must be precisely sized for the mortise lock body.
- Bolt Alignment: Both the latch bolt and deadbolt must align perfectly with their corresponding strike plate openings.
- Smooth Operation: All components, from the knob to the deadbolt, should operate smoothly without binding.
The complexity of mortise locks means following manufacturer instructions very carefully is essential. Even with these, the basic principle of the latch bolt’s bevel remains a key factor.
| Latch Type | Primary Orientation Focus | Typical Application | Complexity |
|---|---|---|---|
| Spring Latch | Bevel direction on latch bolt | Interior doors, closets | Low |
| Deadbolt | Bolt alignment with strike plate | Exterior doors, security doors | Medium |
| Passage/Privacy Knobs | Bevel direction on spring latch | Interior doors, bathrooms, bedrooms | Low to Medium |
| Mortise Lock | Latch bolt bevel & deadbolt alignment | High-security doors, older homes | High |
This table summarizes that while the type of lock varies, the consideration for how the latch bolt interacts with the strike plate is a common thread, with the bevel being the most frequent point of orientation for many latch types.
Frequently Asked Questions
Question: What happens if I install the door latch with the bevel facing the wrong way?
Answer: If the bevel faces the wrong way, the door will likely not close properly. The flat side of the latch will hit the strike plate instead of the angled side guiding it in. This can cause the door to stick or prevent it from latching at all, compromising security and usability.
Question: Does the direction of the door’s swing (inward or outward) change the latch direction?
Answer: Yes, it does. While the principle of the bevel is the same, its orientation relative to the frame changes. For inward-swinging doors, the bevel usually faces the side you push from.
For outward-swinging doors, it also faces the side you push from into the frame.
Question: How can I tell if my door is left-handed or right-handed?
Answer: Stand outside the door and look at the hinges. If the hinges are on your left and the door opens away from you to the left, it’s a left-handed door. If the hinges are on your right and the door opens away from you to the right, it’s a right-handed door.
Question: Can I install a latch without a bevel?
Answer: Most standard spring latches have a beveled edge specifically to help them slide into the strike plate. If your latch doesn’t have a discernible bevel, ensure it is installed so the part that extends from the door edge is oriented to engage smoothly with the strike plate opening when the door closes.
Question: What if the latch bolt is sticking and not retracting smoothly?
Answer: This could be due to a few things. The latch might be installed incorrectly, the strike plate alignment could be off, or there could be debris in the latch mechanism or mortise. Check the alignment and ensure the latch moves freely by hand.
Conclusion
Figuring out which way a door latch faces is a key step for any door installation. By understanding the bevel’s role and applying the simple “push to close” rule, you can ensure your doors latch correctly. This guide breaks down the process, making it easy to get right.