

For nearly every standard residential toilet drain in the United States, the required pipe size is 3 inches (3″). While 4-inch pipes are sometimes used for main sewer lines, 3-inch is the universal standard for the branch line connecting the toilet directly to the system, ensuring proper waste flow and preventing clogs.
Hello there! I’m Md Meraj, and if you’re staring at your bathroom renovation plans wondering about pipes, you are definitely not alone. Choosing the right drain pipe size for your toilet can feel like solving a plumbing puzzle. Get it wrong, and you’re looking at frustrating, smelly clogs down the road! But don’t worry one bit. We are going to break this down simply. It is easier than you think. We’ll walk through the exact size you need, why that size works best, and how to make sure your new drain setup handles everything smoothly. Let’s get those pipes sized correctly so you can enjoy a worry-free bathroom!
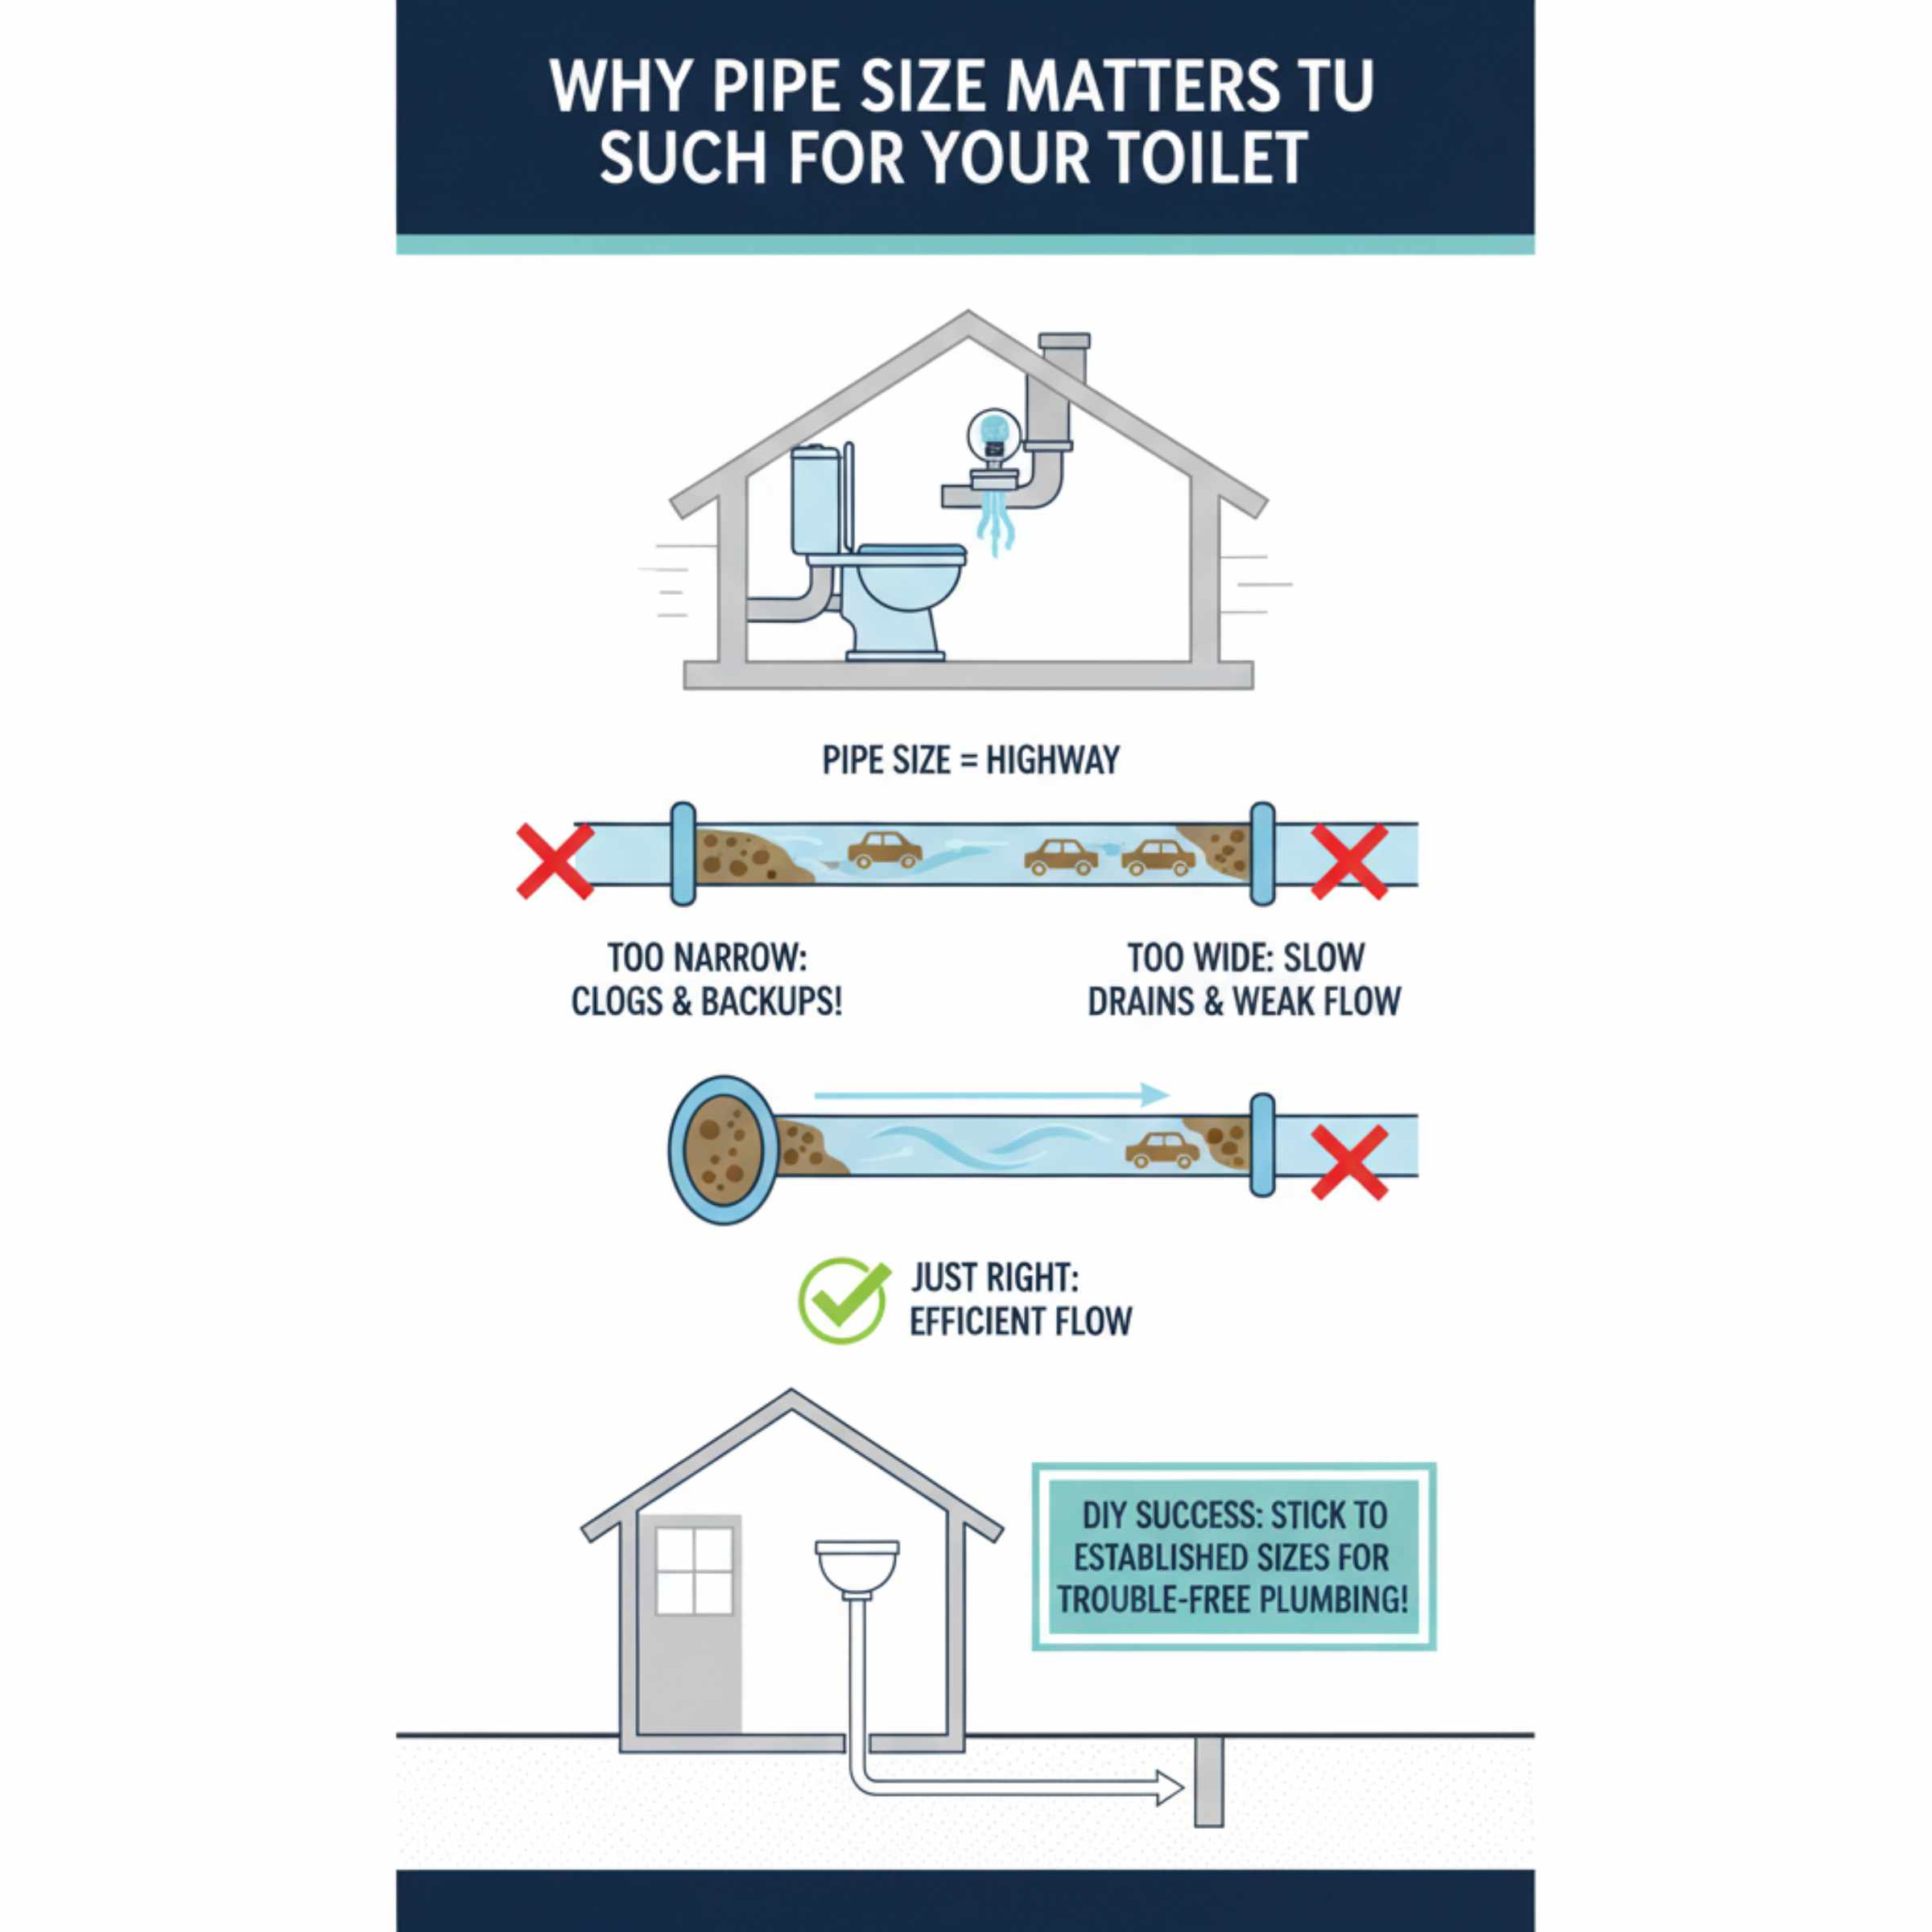
Why Pipe Size Matters So Much for Your Toilet
Think of your toilet drain pipe like a busy highway for waste. If the highway is too narrow (too small a pipe), traffic backs up, leading to clogs. If it’s too wide, the water might not have enough force to carry the waste all the way out of the house, causing slow drains or needing excessive flushing.
Plumbing codes exist for a very good reason: safety and function. Following these codes ensures that your home’s wastewater system moves efficiently away from your house, preventing backups and protecting your investment. For DIYers, this means sticking to established sizes is the key to long-lasting, trouble-free plumbing.
Understanding Drainage Basics: What’s Flowing Down There?
When you flush a toilet, you are dealing with more than just water. You are moving solids and liquids. The pipe must be large enough to handle the largest expected volume of waste in one go.
The material of the pipe also plays a role in how smoothly things flow. Today, most new installations use PVC (Polyvinyl Chloride) because it is smooth on the inside, affordable, and easy to work with. Older homes might have cast iron or ABS, but the size standard usually remains the same.
The Essential Answer: What Size Pipe for a Toilet Drain?
This is the moment we get to the heart of the matter. When dealing with standard residential plumbing, the answer is remarkably consistent across almost all local building codes in North America.
The Golden Rule: 3 Inches is the Standard
For the branch line—that specific section of pipe that runs directly from the toilet flange (where the toilet sits) into the main soil stack or main drain line—the required size is 3 inches (3″).
This 3-inch pipe size is codified because it offers the perfect balance:
1. Adequate Capacity: It easily handles the full contents of a toilet flush.
2. Sufficient Slope Velocity: When installed with the correct downward slope (we’ll talk about slope later!), the water moves fast enough to scour the pipe clean without being overly wide.
It’s important to note that while 3-inch pipe is standard for the toilet branch, the main vertical drain pipe (the “soil stack”) that all the plumbing connects to is often sized larger, usually 4 inches, especially in modern construction or main sewer lines leaving the house.
When Might You See a 4-Inch Toilet Drain Pipe?
While 3 inches is the norm, you might occasionally encounter or plan for a 4-inch pipe connected to a toilet. When does this happen?
1. Main Sewer Stacks
If you are running a new main drain line through your basement or outside, that larger pipe will often be 4 inches. The 3-inch toilet line will connect into this 4-inch main line, usually using a special fitting called a “T” or “Wye” fitting.
2. Commercial or High-Use Bathrooms
In places like restaurants or public restrooms that experience very high volumes of flushing, plumbers might upsizing to 4 inches to handle the extreme load. For your home bathroom, this is rarely necessary.
3. Older Plumbing Systems
In some very old construction, toilets might have been connected to 4-inch lines, especially if the plumber used a standard size for everything to keep inventory simple. However, retrofitting or adding a new toilet usually calls for adhering to the modern 3-inch standard for the branch.
Pipe Sizing Comparison Table
To keep things clear, here is a quick comparison showing common drain pipe sizes and what they are typically used for in a home.
| Nominal Pipe Size | Common Use | Why It’s Used |
|---|---|---|
| 1 1/2 inches | Bathroom sinks, small laundry tubs | Handles smaller volumes of greywater. |
| 2 inches | Showers, bathtubs, laundry tubs | Handles larger volumes of greywater requiring more flow. |
| 3 inches | Toilet Drain Branch Line (Standard) | Perfect size for water and solid waste transport from a single toilet. |
| 4 inches | Main Sewer Line, Soil Stacks | Handles combined waste flow from multiple fixtures. |
The Critical Role of Pipe Slope (Grade)
Knowing the pipe size is only half the battle. If your 3-inch pipe isn’t angled correctly, it won’t matter how big it is—it will still clog! This angle is called the “slope” or “grade.”
Slope ensures gravity does the heavy lifting.
What is the Correct Slope for a Toilet Drain?
For a 3-inch drain line carrying toilet waste (sometimes called “black water”), the standard minimum slope required by plumbing codes is:
* 1/4 inch of vertical drop for every 1 foot of horizontal run.
This translates to roughly a 2% slope. For example, if your toilet drain pipe runs 6 feet horizontally before it hits the main stack, it must drop 1.5 inches over those 6 feet (6 feet x 0.25 inches/foot = 1.5 inches).
Pro Tip from Meraj: When working with PVC, it’s easier to measure the slope by looking at the pipe diameter. A 3-inch pipe running at the correct 1/4″ per foot slope will appear to drop perfectly across the diameter of the pipe as you look down its length. Always check the International Plumbing Code (IPC) or your local amendments for the final say on slope, as some areas might require slightly steeper slopes for 3-inch lines.
For more detailed guidance on plumbing codes and flow dynamics, resources like those from the International Association of Plumbing and Mechanical Officials (IAPMO) often provide excellent technical context, though we’ll keep our language simple here!
Step-by-Step: Installing or Replacing Your 3-Inch Toilet Drain
If you are replacing an old toilet drain or adding a new one, here is a simplified overview of the process, focusing on getting that essential 3-inch pipe installed correctly.
Tools You Will Need
Before cutting any pipe, gather your tools. Having everything ready makes the job much smoother and safer.
- Safety Glasses and Gloves (Non-negotiable!)
- Tape Measure
- Level (A 4-foot level is best for checking slope)
- PVC Cutter or a fine-toothed handsaw
- Pipe Deburring Tool or Utility Knife (to clean edges)
- Primer and PVC Cement (The glue that seals the joints)
- The Correct Fittings (3-inch PVC pipe, 3-inch T-fittings, 3-inch 90-degree or 45-degree elbows, and couplings)
Installation Steps for the 3-Inch Branch Line
Follow these steps carefully to ensure your new 3-inch drain line is perfect.
- Locate and Mark the New Position: Determine exactly where the new toilet flange needs to sit. Remember, the toilet flange must sit slightly above the finished floor level—usually about 1/4 inch to 1/2 inch above the tile or finished flooring.
- Calculate the Run and Drop: Measure the exact horizontal distance from where the new 3-inch toilet line will meet the existing main stack (or the new soil pipe). Use the 1/4″ per foot rule to calculate the total required vertical drop.
- Cut the Main Connection: If connecting to an existing drain line, you will carefully cut out a section of the existing pipe to fit your connection fitting. For a toilet connection, you will almost always use a 3-inch by 3-inch by 3-inch Wye fitting (a Y-shape) or a T-fitting if running parallel to the main stack.
- Dry Fit Everything: Before applying any glue, assemble all the new 3-inch pieces, fittings, and the toilet flange assembly. Ensure everything fits snugly and that your slope is correct when checked with the level. Adjust cuts if needed.
- Clean and Prime the Joints: Disassemble the dry-fit pieces. For PVC, cleaning is crucial for a strong bond. Use a clean rag to wipe off dust or burrs. Apply PVC primer (usually purple) liberally to the outside end of the pipe and the inside of the fitting socket. Let it sit for 10–15 seconds until it looks dull.
- Cement the Joints: Immediately after priming, apply an even coat of PVC cement over the primed areas. Work quickly! Push the pipe fully into the fitting while giving it a slight quarter-turn twist to spread the cement evenly. Hold firmly for 30 seconds so the chemical weld can begin.
- Install the Toilet Flange: Ensure the 3-inch flange connects securely to the newly installed pipe section. The final flange ring should be firmly secured to the subfloor (not the finished floor) using brass screws when you install the toilet itself.
- Allow Curing Time: Check the label on your PVC cement, but generally, let the joints cure for at least a few hours before testing them with water.
Understanding Drainage Fittings and Angles
The type of fitting you use when transitioning to the main drain line affects flow. Using the wrong angle can create turbulence and encourage clogs in your new 3-inch line.
Fittings to Use vs Fittings to Avoid
| Fitting Type | Purpose for Toilet Drain | Verdict |
|---|---|---|
| Wye Fitting (Y-shape) | Connecting the 3″ toilet line into the main 4″ stack at an angle. | Use This. Provides a smooth, gravity-assisted entry. |
| Tee Fitting | Connecting the 3″ toilet line directly across the top of the main stack. | Avoid (Unless Code Allows). Creates a harsh 90-degree turn, risking backups. |
| Sanitary Tee (Sweep) | Used for fixtures like sinks connecting to vertical lines. | Acceptable for sinks, but Wye is preferred for toilets on horizontal runs. |
| Standard 90-Degree Elbow | Changing direction on the 3″ run. | Avoid on horizontal runs. Too sharp; use two 45-degree elbows instead. |
When connecting your 3-inch toilet drain pipe horizontally to a vertical stack, always try to use a combination of fittings that create a smooth, gradual change in direction, like a long-sweep elbow or a wye fitting angled at 45 degrees. This keeps the velocity of the water high and prevents solids from settling.
Material Choices for Your 3-Inch Drain
While we mostly discussed PVC, it’s good to know what else is out there, especially if you are working in an older home where you might be tying into existing lines.
- PVC (Polyvinyl Chloride): The modern champion. Lightweight, inexpensive, easy to cut, and the solvent cement creates very strong, waterproof bonds. Perfect for DIYers.
- ABS (Acrylonitrile Butadiene Styrene): Looks similar to PVC (it’s all black), but uses a different type of solvent cement. It is slightly more flexible than PVC. Generally, use ABS only if you are tying into an existing ABS line.
- Cast Iron: Heavy, durable, and quiet, but very difficult for beginners. It requires special rubber couplings (like Fernco couplings) or hubless connectors to join sections, which can be tricky to seal perfectly.
When purchasing pipe for a new toilet installation, stick with Schedule 40 PVC. It is robust enough for drainage applications and widely available at any home center.
Code Compliance and Permits: Don’t Skip This Step!
As a DIY enthusiast, the most important step often feels like the most boring one: checking local codes. Plumbing is heavily regulated for public health reasons.
Why Check Local Plumbing Codes?
Plumbing codes dictate everything from pipe size (3″ for toilets) to slope (1/4″ per foot) and venting requirements. While we have given you the national standard, your local jurisdiction—city or county—has the final say.
Contacting your local building department before you start cutting is vital. They will tell you:
- If a permit is required for drain work (it usually is).
- The exact minimum slope requirement for 3-inch lines in your area.
- If special venting (like an Air Admittance Valve or AAV) is allowed in place of a traditional roof vent.
Getting an inspection signed off ensures that when you sell your home later, the work meets safety standards. It gives you tremendous confidence that your 3-inch pipe will function perfectly for decades.

Frequently Asked Questions (FAQ) About Toilet Drains
Here are some common sticking points homeowners run into when dealing with toilet drain pipes.
Q1: Can I use a 4-inch pipe for a toilet drain just to be extra safe?
A: While you technically can, it’s generally not recommended unless required by a local inspector or if you are tying into an existing 4-inch main line. A 4-inch pipe requires a much steeper slope (usually 1/8″ per foot) to maintain enough velocity to move waste effectively. If you use a 4-inch pipe with the standard 1/4″ slope intended for 3-inch pipe, the waste will likely settle and clog. Stick to 3 inches.
Q2: What is the exact measurement of a 3-inch PVC pipe?
A: This is confusing for beginners! Plumbing pipes are sized by their “nominal” (name) size. A “3-inch” PVC pipe usually has an Outside Diameter (OD) of about 3.5 inches. Always measure the inside opening or refer to the packaging, but when buying fittings, ask for “3-inch” parts; they are designed to fit together based on the nominal size designation.
Q3: Do I need to vent the toilet drain pipe?
A: Yes, absolutely. All plumbing fixtures, including toilets, must be vented. The vent pipe allows air into the drain system to break the vacuum created by rushing water. Without a vent, the toilet will gurgle, flush weakly, or the water level in the bowl will fluctuate constantly. This is usually handled by tying the 3-inch toilet branch into the main vent stack that goes up through the roof.
Q4: How far can a toilet drain pipe run horizontally before it needs to connect to the main stack?
A: Code limitations vary, but generally, a 3-inch branch line connected to a main stack using a standard Wye fitting should not run too far horizontally without adequate venting. Most codes allow a few feet (often 3 to 6 feet) before a vent must be introduced or the line must transition to a larger size. Always verify this with your local building code office.
Conclusion: Getting the Right Pipe Size Means a Trouble-Free Toilet
Choosing the correct pipe size for a toilet drain doesn’t have to be complicated. For almost every residential home in the U.S., a 3-inch drain pipe is the proven, code-approved standard for toilet branch lines—and for good reason. It provides the ideal balance of flow capacity and velocity, allowing waste to move efficiently while minimizing the risk of clogs, slow drains, and costly repairs.
As you’ve learned, pipe size works hand-in-hand with proper slope, correct fittings, adequate venting, and code compliance. Even the best materials won’t perform well if the drain isn’t angled correctly or if sharp fittings disrupt the flow. By sticking with a 3-inch Schedule 40 PVC pipe, maintaining a 1/4-inch-per-foot slope, and using smooth, gravity-friendly fittings like wyes and long sweeps, you set your plumbing system up for long-term success.
Whether you’re planning a full bathroom renovation or simply replacing an old toilet drain, following these standards gives you confidence that your system will work reliably for decades. When in doubt, always check local plumbing codes or consult a licensed plumber—but in most cases, 3 inches is exactly the size you need for a worry-free toilet drain.
With the right pipe, the right slope, and the right approach, your bathroom plumbing will quietly do its job—just the way it should!