Can You Apply Drywall Mud Over Painted Drywall
Many homeowners wonder Can You Apply Drywall Mud Over Painted Drywall? It sounds like a shortcut, right? But sometimes, shortcuts can lead to more work later. Beginners often find this question tricky because they’re not sure if the new mud will stick properly or if the paint will cause problems.
Don’t worry, it’s not as complicated as it might seem! We’ll walk you through it step by step to make sure your repairs look smooth and last a long time. Get ready to learn how to get that perfect finish.
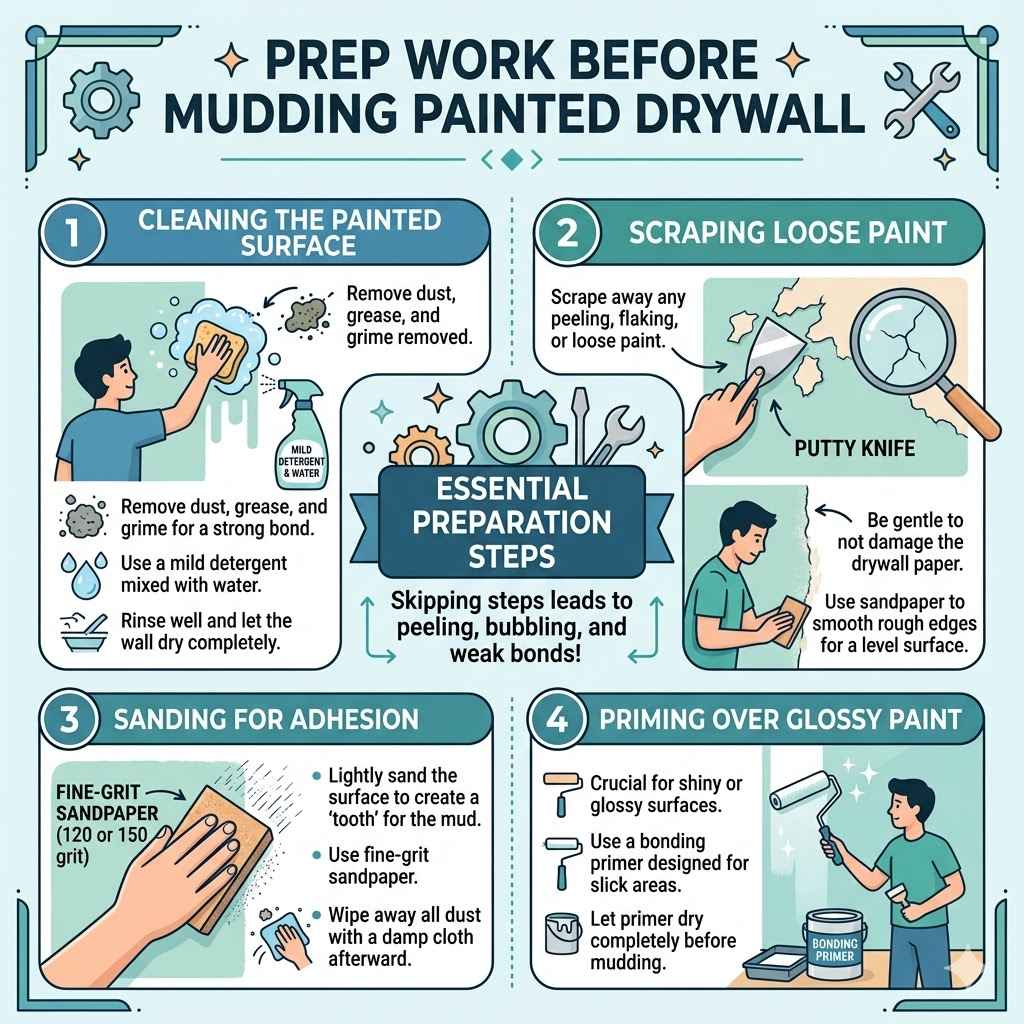
Prep Work Before Mudding Painted Drywall
Getting ready is super important. It’s the key to making sure your drywall mud sticks well to the painted surface. Think of it like preparing a canvas before you paint; you want a clean, smooth area to work on.
If you skip these steps, your mud might peel or bubble later, and that’s a headache you don’t want. This section covers what you need to do to get your painted wall ready for some patching.
Cleaning the Painted Surface
The first thing you must do is clean the painted wall thoroughly. Dust, grease, and grime can prevent the drywall mud from sticking properly. A clean surface is essential for a strong bond.
Use a mild detergent mixed with water. Wipe down the entire area where you plan to apply the mud. Rinse it well with clean water to remove any soap residue.
Make sure the wall is completely dry before moving on. This simple step makes a huge difference in how well your patch holds up over time.
Scraping Loose Paint
If there are any areas where the paint is peeling or flaking, you need to scrape them away. Loose paint will not provide a good base for the mud. You want a solid surface underneath.
Use a putty knife or a scraper to gently remove all loose paint chips. Be careful not to damage the drywall paper underneath. Once you’ve scraped, smooth out any rough edges with sandpaper.
This creates a level surface for the mud.
Sanding for Adhesion
Even if the paint looks smooth, a light sanding can improve adhesion. This creates tiny scratches that the mud can grip onto. It’s like giving the paint a little ‘tooth’ so the mud sticks better.
Use fine-grit sandpaper, like 120 or 150 grit. Sand the area where you will be applying mud. You don’t need to remove the paint, just scuff it up a bit.
Wipe away all the dust created by sanding with a damp cloth. Make sure the surface is dry again.
Priming Over Glossy Paint
Shiny or glossy paint can be particularly tricky. Mud doesn’t stick well to super smooth, slick surfaces. If your paint has a high sheen, you’ll likely need a special primer.
Use a bonding primer or a stain-blocking primer designed for slick surfaces. Apply one or two thin coats, following the product instructions. Let the primer dry completely.
This step is crucial for painted surfaces with a glossy finish. It acts like a bridge between the slick paint and the new mud.
Can You Apply Drywall Mud Over Painted Drywall Directly
This is the big question. So, Can You Apply Drywall Mud Over Painted Drywall? The short answer is yes, but with important conditions. You can’t just slap mud on any painted surface and expect a perfect result.
The condition of the paint and the type of paint matter a lot. If the paint is well-adhered and not glossy, you might get away with just cleaning and light sanding. However, for the best results, especially with repairs or when covering larger areas, proper preparation is key.
Skipping prep work is where most problems start. We’ve discussed some of these prep steps already, which are vital for any successful mudding job over paint.
When Direct Application Might Work
In some very specific situations, you might be able to apply drywall mud directly over painted drywall without extensive priming or sanding. This typically applies to minor imperfections or small patch jobs where the existing paint is in excellent condition.
The paint must be fully adhered to the drywall, with no signs of peeling, blistering, or bubbling. It should also be a matte or eggshell finish. High-gloss or satin finishes are much more challenging.
Even then, a light scuff sand and thorough cleaning are still highly recommended to ensure good adhesion. For anything more significant, proceed with caution.
Potential Problems with Direct Application
Applying mud directly onto painted surfaces, especially without proper prep, can lead to several issues. The most common problem is poor adhesion. The mud might not bond well to the slick paint surface, leading to cracks, peeling, or the mud separating from the wall.
Another issue is that the paint might absorb moisture from the mud unevenly. This can cause the paint to blister or bubble. Also, if the paint is too glossy, the mud may not adhere at all.
This can result in the mud sloughing off during application or drying.
Surface Preparation is Paramount
No matter if you’re patching a small hole or resurfacing a whole wall, surface preparation is the most critical step when working over paint. Think of it as the foundation of your repair. Without a solid, properly prepared base, your new mud will likely fail.
This involves cleaning away any dirt, grease, or contaminants. It also means scraping off any loose paint. For slick surfaces, you might need to create a rougher texture by sanding or using a special primer.
This ensures the mud has something to grip onto.
Applying Drywall Mud Over Painted Walls
Once your painted surface is prepped and ready, it’s time to apply the drywall mud. This process is similar to mudding unpainted drywall, but you need to be mindful of the surface you’re working on. We’ll go through the steps to apply the mud smoothly for a seamless finish.
Choosing the Right Drywall Mud
There are different types of drywall mud, and choosing the right one is important. For most repairs over painted surfaces, a lightweight all-purpose joint compound is a good choice.
All-purpose compounds are easy to sand and dry relatively quickly. They are suitable for filling small holes and cracks. For larger repairs or skim coating, you might consider a setting-type compound, which hardens chemically and is stronger.
However, setting-type compounds are harder to sand.
All-Purpose Joint Compound
- This is a ready-mixed compound that is thick and creamy.
- It is ideal for filling nail pops, small cracks, and minor dents.
- It is easy to spread and sand, making it forgiving for beginners.
- It requires multiple coats for deeper fills and can shrink as it dries.
Lightweight All-Purpose Compound
- This is a lighter version of the all-purpose compound.
- It offers easier sanding and less shrinkage.
- It is a popular choice for skim coating and general repairs.
Setting-Type Joint Compound (Hot Mud)
- This type of compound comes as a powder that you mix with water.
- It hardens through a chemical reaction, making it very strong and fast-drying.
- It is excellent for filling larger holes or for areas that need to be finished quickly.
- It can be harder to sand than all-purpose compounds.
Applying the First Coat
Start with a thin layer of mud. Use a drywall knife, typically 4 or 6 inches wide, to apply the mud. Spread it evenly over the repaired area, feathering the edges out onto the surrounding paint.
This means making the edges of the mud layer very thin so they blend into the wall.
The goal of the first coat is to fill the imperfections and provide a base for subsequent coats. Don’t try to make it perfectly smooth at this stage. You’re just building up the material.
Allowing for Drying
It is crucial to let each coat of mud dry completely before applying the next. Drying times vary depending on the humidity, temperature, and thickness of the mud. Rushing this process can lead to cracking or peeling.
You can speed up drying slightly by using a fan or opening windows, but avoid extreme heat. Check that the mud is completely dry and has turned a uniform light color before sanding or applying another coat.
Sanding Between Coats
Once the first coat is dry, you’ll need to sand it smooth. Use fine-grit sandpaper (100-150 grit) for this. The goal is to remove any high spots or ridges and create a smooth surface for the next layer of mud.
Lightly sand, and then wipe away all dust with a damp cloth.
This sanding step is vital. It ensures that each layer is smooth, making the final finish look professional. A smooth surface for each coat prevents lumps and bumps from appearing in your final repair.
Applying Subsequent Coats
You will likely need two or three coats of mud to achieve a smooth, seamless finish. Apply each coat thinner than the last, feathering the edges further out. This gradual build-up helps create a smooth transition between the patched area and the surrounding wall.
After each coat dries, sand it smooth and wipe away the dust. The final coat should be very thin and smooth, creating a surface that is ready for primer and paint. Patience is key here; don’t rush the drying and sanding.
Common Issues and Solutions When Mudding Over Paint
Working over painted surfaces can sometimes bring unexpected challenges. Understanding these common issues and knowing how to fix them can save you a lot of frustration. From peeling to cracking, we’ll cover what can go wrong and how to get it right.
Peeling or Bubbling Mud
This often happens when the paint surface is not properly cleaned or prepared. Grease, dust, or a very glossy surface can prevent the mud from adhering. The paint itself might also be failing.
Solution: Scrape away all loose mud and paint. Re-clean the area thoroughly. If the paint is glossy, sand it well or apply a bonding primer.
For minor issues, a good quality bonding primer can often solve the problem. If the paint itself is peeling, you’ll need to scrape until you reach solid paint or bare drywall.
Cracking in the Mud Layers
Cracking can occur if the mud is applied too thickly in one coat, if it’s drying too quickly, or if the underlying surface is unstable. It can also happen if you don’t let each coat dry completely.
Solution: Scrape out the cracks. Apply new mud in thin layers, allowing each coat to dry completely. Feather the edges of the mud to blend it into the wall.
If cracks persist, check the underlying cause. Sometimes, a reinforcing mesh tape might be needed for larger cracks before applying mud.
Sanding Difficulties
Sometimes, the mud can be harder to sand than expected, especially if you used a setting-type compound or if it’s applied too thickly. It can become gummy or clog your sandpaper.
Solution: Ensure you are using the correct grit sandpaper. For most all-purpose compounds, 120-150 grit is good for initial sanding, and 220 grit for final smoothing. If the mud is gummy, it might still be too wet.
Try waiting longer. For very hard-to-sand areas, you can try using a damp sponge to smooth the mud slightly before it fully hardens, though this requires practice.
Uneven Texture After Mudding
An uneven texture can result from inconsistent mud application or poor sanding. You might see ridges, low spots, or areas that don’t match the surrounding wall’s texture.
Solution: This often requires additional thin coats of mud to level out the surface. Sand carefully after each thin coat. If the wall has a specific texture (like orange peel or knockdown), you may need to reapply that texture after your mudding and priming are complete.
Practice texturing on a scrap board first.
Case Study Example
Sarah wanted to patch a few nail holes in her living room. The walls were painted a satin finish. She cleaned the wall, but skipped the sanding step.
She applied two coats of all-purpose mud. When it came time to sand, the mud peeled off in some spots, taking the paint with it. She realized she should have sanded the satin paint first to give the mud something to grip.
After scraping, cleaning, and light sanding, her second attempt was successful.
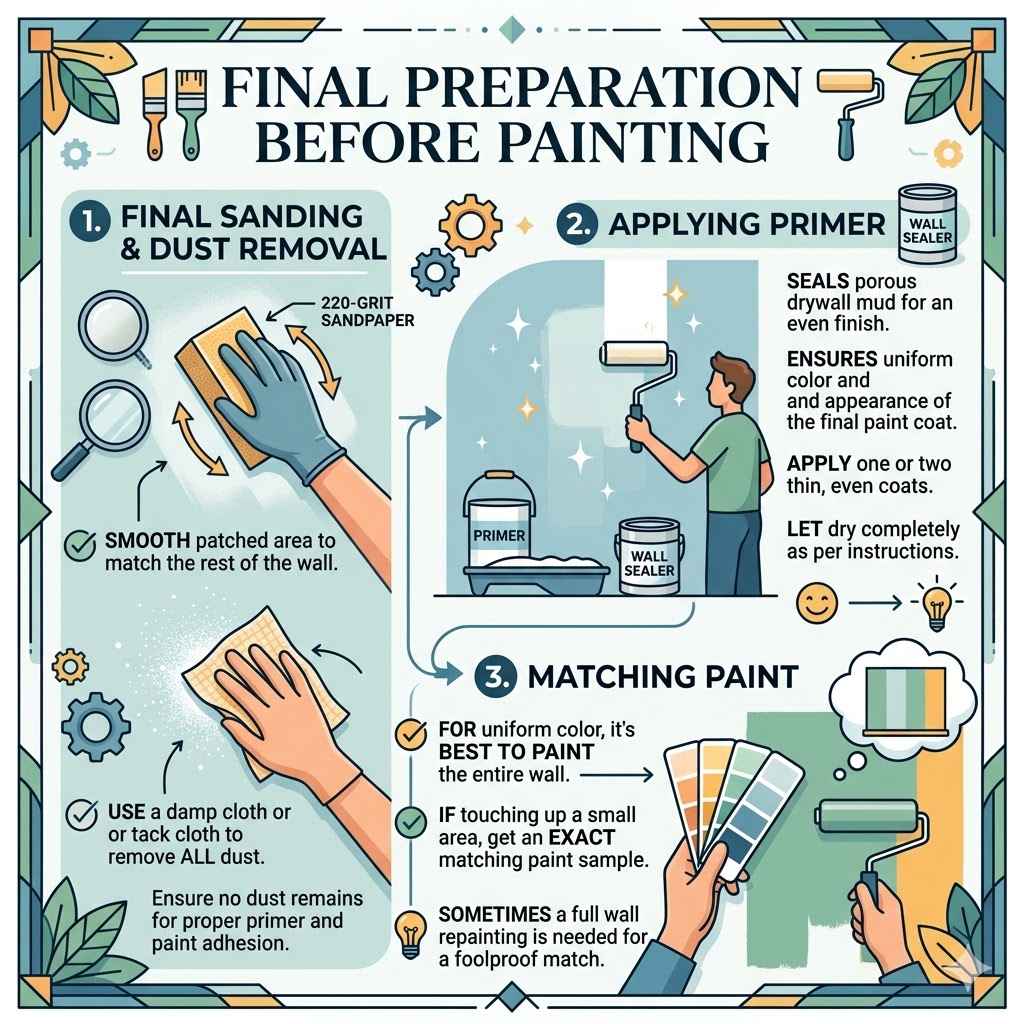
Final Preparation Before Painting
Once all your mudding and sanding are done, there’s one last critical step before you pick up a paintbrush. This final preparation ensures that your repairs blend seamlessly with the rest of the wall and that your new paint job looks professional and smooth.
Final Sanding and Dust Removal
After the final coat of drywall mud has dried completely, it’s time for a final sanding. Use a very fine-grit sandpaper (220 grit) to smooth out any remaining imperfections. You want the patched area to feel as smooth as the rest of the wall to the touch.
This step is crucial for a professional finish. Any roughness left behind will be highly visible once you paint. After sanding, use a damp cloth or a tack cloth to wipe down the entire area.
Ensure absolutely no dust remains. Dust will prevent the primer and paint from adhering properly and can leave a rough texture.
Applying Primer
Primer is your best friend when painting over repairs. It seals the drywall mud, which is porous and will soak up paint differently than the existing painted surface. This ensures an even color and finish across the entire wall.
Use a good quality primer, preferably one designed for drywall or covering repaired areas. Apply one or two thin coats, depending on the coverage. Allow the primer to dry completely according to the manufacturer’s instructions.
Priming also helps reveal any missed imperfections that you can then lightly sand and touch up.
Matching Paint
If you’re painting over an existing wall color, you’ll need to match it. It’s often best to paint the entire wall, not just the patched area. This ensures a uniform color and prevents the patched section from standing out.
If you’re only touching up a small area, try to get a paint sample that exactly matches your existing wall color. Even then, the sheen might look slightly different. Painting the whole wall is usually the most foolproof way to get a perfect match.
Frequently Asked Questions
Question: Can I mud over old, peeling paint?
Answer: No, you should not apply drywall mud over old, peeling paint. All loose paint must be scraped away until you reach solid, adhered paint or bare drywall. Applying mud over peeling paint will cause the mud to fail and peel off with the loose paint.
Question: What is the best type of sandpaper for smoothing drywall mud over paint?
Answer: For smoothing drywall mud over painted surfaces, start with medium-grit sandpaper (around 100-120 grit) for initial leveling and then move to fine-grit sandpaper (150-220 grit) for final smoothing. Always sand lightly and check your progress frequently.
Question: Do I need to prime the entire wall after patching painted drywall?
Answer: While you can spot prime the patched area, it is often recommended to prime the entire wall. This ensures a uniform color and sheen, preventing the patched section from looking different from the rest of the wall after painting.
Question: How long should I wait between mudding and painting?
Answer: After your final mud coat has dried and been sanded smooth, you must apply primer and let it dry completely. Wait at least 24 hours after the final primer coat before applying your topcoat of paint to ensure the best adhesion and finish.
Question: Will the mud crack if the paint is flexible?
Answer: If the paint is flexible and well-adhered, it generally won’t cause the mud to crack. However, if the underlying surface is unstable or the mud is applied too thickly, cracking can still occur regardless of the paint’s flexibility. Proper prep and thin coats are key.
Summary
Yes, you can apply drywall mud over painted drywall if you prepare the surface correctly. Clean the paint thoroughly, scrape away loose bits, and sand for adhesion. Use a bonding primer if the paint is glossy.
Apply mud in thin coats, letting each dry and sanding between layers. Finish by priming the repaired area for a seamless paint job. Proper prep is the key to success.