How Long To Soak Faucet In Vinegar: Essential Guide
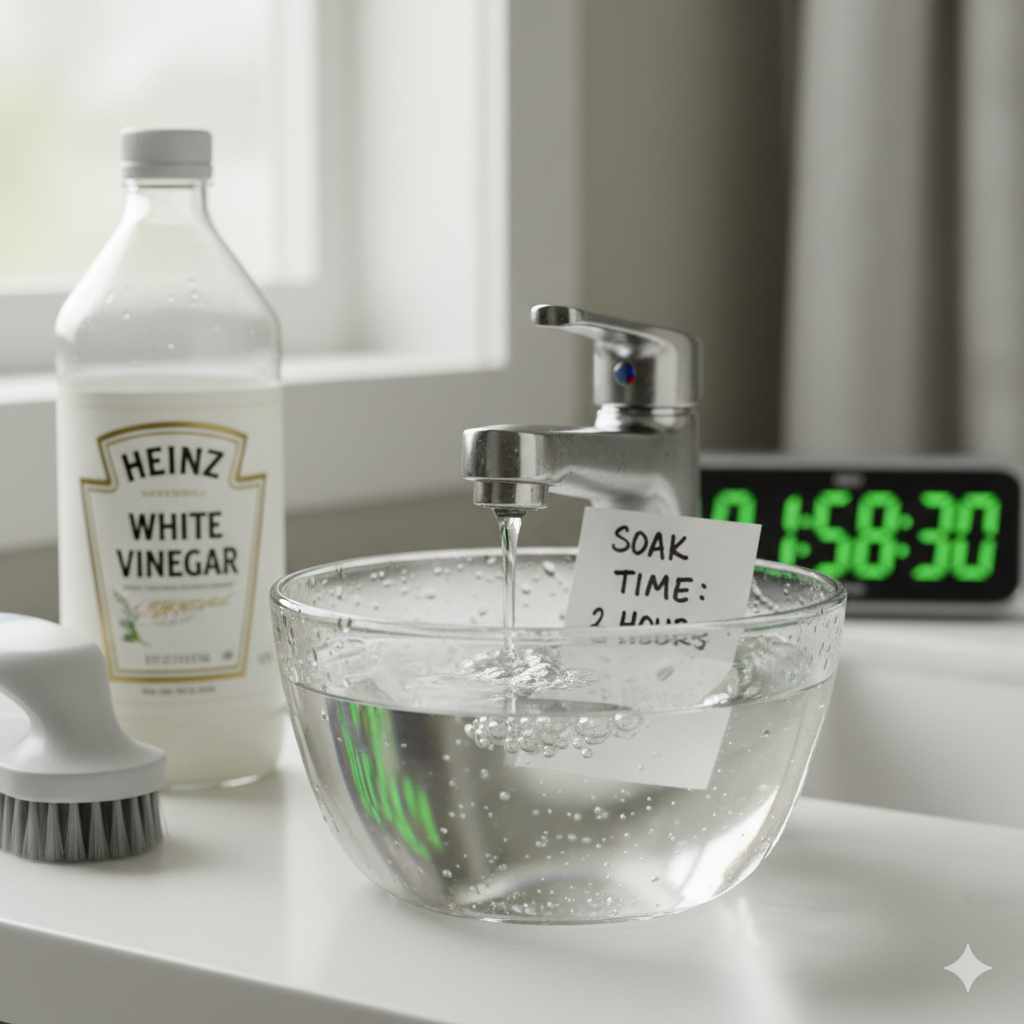
For general limescale removal on a faucet, soaking the components in white vinegar for 3 to 4 hours is usually sufficient. For very heavy, tough mineral deposits, you might extend the soak to overnight (up to 8 hours), but always check frequently to ensure the vinegar does not damage rubber or metal finishes.
Hello there! I’m Md Meraj, and if you’ve ever tried to turn on a faucet only to be met with a sad trickle, you know how frustrating mineral buildup can be. Hard water leaves behind crusty white or greenish deposits (limescale) that clog up aerators and valves. The good news is that a simple bottle of white vinegar—something you probably already have—is a fantastic, cheap, and safe cleaning solution. You just need to know how long to let it work its magic. Don’t worry; we’ll walk through the exact soaking times needed so you can get that water flowing strong again, without needing expensive tools or harsh chemicals. Ready to restore that shine? Let’s dive into the perfect vinegar soak time!
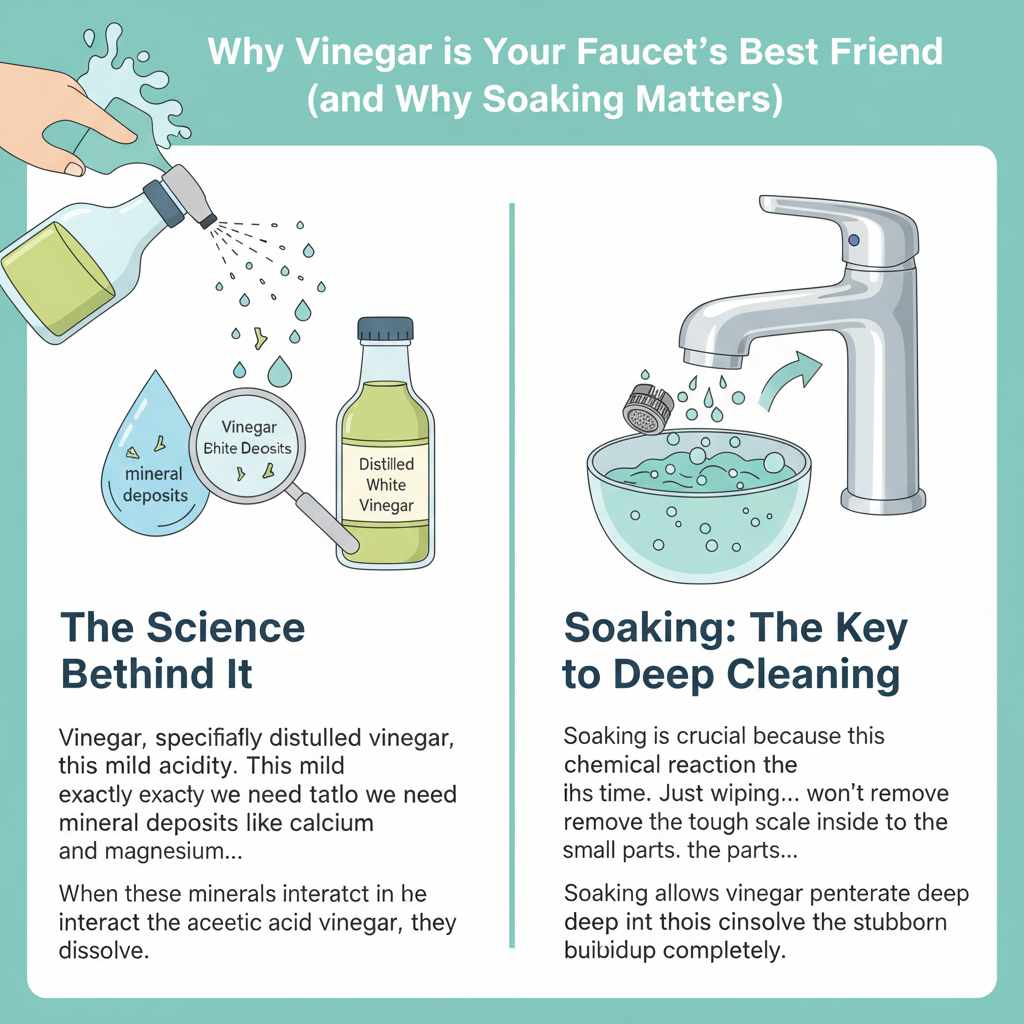
Why Vinegar is Your Faucet’s Best Friend (and Why Soaking Matters)
Vinegar, specifically distilled white vinegar, is acidic. This mild acidity is exactly what we need to tackle mineral deposits like calcium and magnesium, which are the main culprits in hard water buildup. When these minerals interact with the acetic acid in vinegar, they dissolve.
Soaking is crucial because this chemical reaction takes time. Just wiping the surface won’t remove the tough scale inside the small parts, like the faucet aerator. Giving the parts a good soak allows the vinegar to penetrate deep into those tiny crevices and dissolve the stubborn buildup completely.
Understanding Limescale and Corrosion
Limescale isn’t just ugly; it reduces water pressure and can sometimes introduce unwanted tastes or odors into your water. While vinegar is highly effective against minerals, we must be mindful of the material your faucet is made from.
For most modern plumbing fixtures made of chrome or stainless steel, vinegar is perfectly safe for short soaks. However, if you have older brass, bronze, or specialty finishes, prolonged exposure can cause dulling or even etching. That’s why timing is everything! Always check the manufacturer’s recommendations if you have specialty finishes, though for standard chrome, a few hours is generally safe. You can find helpful general guidelines on home maintenance from organizations like the EPA regarding water quality and household cleaning safety.
Gathering Your Arsenal: Tools for the Vinegar Soak
Before we start the clock, let’s make sure we have everything handy. This project is simple and requires very few specialized tools.
Essential Tools Checklist
Here’s what you’ll need to get ready for the vinegar treatment:
- Distilled White Vinegar (the standard 5% acidity kind works best)
- Small bowl, jar, or sturdy plastic container (big enough to fully submerge the parts)
- Old toothbrush or small scrubbing brush (for light scrubbing after soaking)
- Rubber gloves (to protect your hands)
- Soft cloth or microfiber towel (for drying and polishing)
- Small wrench or adjustable pliers (only needed if removing the aerator)
- Small plastic baggie (if you need to soak the aerator while still attached to the spout)
Safety First: A Quick Note on Preparation
While vinegar is a natural cleaner, remember to always work in a well-ventilated area, especially if you are working near a sink. Also, never mix vinegar with chlorine bleach—this creates toxic chlorine gas. Since we are only using vinegar here, we are safe, but it’s a good habit to remember when cleaning around the house!
Step-by-Step Guide: How Long to Soak Faucet Components
The exact soaking time depends heavily on which part of the faucet you are cleaning and how severe the buildup is. We will break this down into two common scenarios: cleaning the faucet head (aerator) and cleaning the entire removable handle or spout end.
Scenario 1: Cleaning the Faucet Aerator (The Most Common Fix)
The aerator is the small screen tip where the water comes out. It’s the number one spot for limescale blockage, causing low pressure or spray pattern issues.
Step 1: Removing the Aerator
Most aerators unscrew counter-clockwise. You might be able to do this by hand. If it’s stuck, wrap the aerator housing gently with a cloth to prevent scratching the finish, then use adjustable pliers or a small wrench to turn it slowly.
Step 2: The Vinegar Soak Time for Aerators
This is where timing matters most for that screen mesh:
| Level of Buildup | Recommended Soak Time | Notes |
|---|---|---|
| Light/Recent Scale | 30 minutes to 1 hour | Quick refresh, usually for monthly maintenance. |
| Moderate Scale | 3 to 4 hours | The sweet spot for most household clogs. |
| Heavy/Caked-On Scale | 6 to 8 hours (Overnight) | Use only if the flow is extremely restricted. Check after 4 hours. |
Step 3: Post-Soak Cleaning and Rinsing
After the recommended time, remove the aerator. The deposits should be softened or dissolved. Use an old toothbrush to gently scrub away any remaining bits, paying close attention to the mesh screen. Rinse all parts thoroughly under strong, running tap water. Reinstall the aerator securely.
Scenario 2: Soaking Removable Faucet Handles or Spouts
If you have a slow leak, or if the handle action is stiff, the issue might be deeper inside the cartridge or valve assembly. If you feel comfortable removing a handle or the entire spout housing (always turn off the water supply first!), you can soak these larger pieces.
Warning for Larger Parts: Time is Critical
Because faucet bodies often have plastic washers, rubber gaskets, and various metal finishes (like oil-rubbed bronze or polished nickel), the soak time must be much shorter than for a simple brass aerator.
General Rule for Fixtures: Never soak metal faucet bodies or handles in vinegar for more than 4 hours. For finishes other than standard chrome, limit the soak to 1 to 2 hours maximum.
If you are dealing with a whole cartridge, try soaking it for 2 hours. If that doesn’t clear it, repeat the process rather than extending the single soak past 4 hours.
The “No Removal” Vinegar Sock Method (For the Faucet Head)
If you can’t or don’t want to remove the aerator, you can perform an external soak. This is less effective for deep cleaning but great for surface scale removal on the spout tip.
- Prepare the Bag: Take a sturdy plastic baggie (like a sandwich bag) large enough to cover the faucet spout.
- Fill and Secure: Fill the bag about halfway with white vinegar. Submerge the very end of the faucet spout into the vinegar.
- Seal It Up: Use a strong rubber band, twist tie, or even a hair tie to secure the bag tightly around the faucet neck so that the vinegar stays in contact with the mineral deposits.
- Soak Time: For this method, 3 to 6 hours is usually enough. Since the vinegar isn’t fully saturating the inside components as well as a full submersion, you can afford a slightly longer passive soak time.
- Rinse: Remove the bag carefully (it might drip!), run the hot water for a minute to flush out any loosened debris, and wipe the outside clean.
Optimizing the Soak: Tips for Better Results
Sometimes, simply waiting isn’t enough. You can enhance the power of your vinegar bath to tackle truly stubborn buildup.
Heat and Concentration Adjustments
Vinegar works better when it’s warm, but be careful not to use boiling hot vinegar, especially near plastic parts.
- Slight Warming: Gently warm your white vinegar on the stovetop until it is warm to the touch (not hot). This increases the chemical reaction speed.
- Adding Salt (Caution): For extremely tough scale, some folks add a tablespoon of table salt to the vinegar bath. The salt acts as a mild abrasive when scrubbing later and can slightly boost the acidity. This is generally safe for metal aerators but use caution.
- The Baking Soda Rinse: After any vinegar soak, always rinse thoroughly. To neutralize any remaining acid residue on sensitive components, you can follow up with a quick 10-minute soak in a solution of one part water to one part baking soda, then rinse again with fresh water. This is great for cartridges.
When Vinegar Isn’t Enough: When to Call a Pro or Use a Different Cleaner
While vinegar is amazing, it has limits. If you soak your faucet parts for 8 hours overnight and still have low pressure, the clog might not be mineral scale.
Potential Non-Scale Issues:
- Debris: Small bits of pipe solder, sealant, or sediment might be stuck further up the supply line.
- Worn Cartridge: If you have a cartridge faucet (common in modern single-handle sinks), the internal rubber seals might be cracked or worn, requiring replacement rather than cleaning.
- Main Shutoff Valve: The primary shutoff valve under the sink might be partially closed, restricting flow to the entire fixture.
If you suspect internal mechanical failure, it might be time to consult a plumbing resource or look into replacing the faucet cartridge itself. For more complex plumbing repairs, understanding the basics of valve replacement can be helpful; resources like The Home Depot Foundation often provide useful DIY repair tutorials that cover when a component needs replacing versus cleaning.
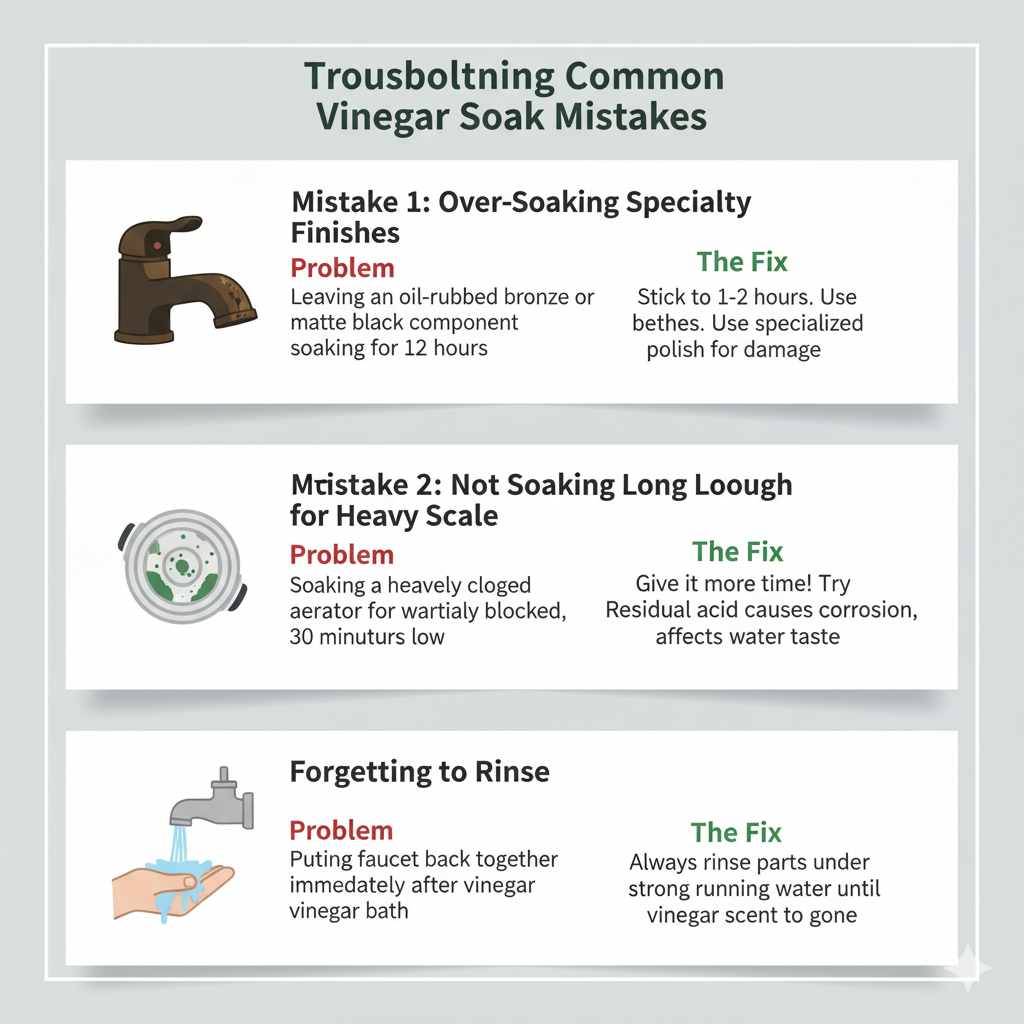
Troubleshooting Common Vinegar Soak Mistakes
As a beginner, it’s easy to make small timing errors. Here are the most common mistakes people make when soaking faucets in vinegar and how to fix them.
Mistake 1: Over-Soaking Specialty Finishes
The Problem: Leaving an oil-rubbed bronze or matte black faucet component soaking for 12 hours.
The Result: The finish becomes dull, etched, or patchy because the acid eats away at the protective coating or patina.
The Fix: Next time, stick strictly to the 1-2 hour rule for these finishes. If damage occurs, you may need a specialized metal polish designed for that specific finish to restore the look, though often the damage is permanent.
Mistake 2: Not Soaking Long Enough for Heavy Scale
The Problem: Soaking a heavily clogged aerator for only 30 minutes.
The Result: The outside might look clean, but the inside remains partially blocked, and the water pressure barely improves.
The Fix: Don’t scrub hard! If it’s not dissolving, give it more time. Try the slightly warmed vinegar method and let it sit for the full 4 hours, checking progress periodically.
Mistake 3: Forgetting to Rinse
The Problem: Putting the faucet back together immediately after pulling it out of the vinegar bath.
The Result: Residual acid can cause faster future corrosion or potentially affect water taste temporarily.
The Fix: Always rinse every single part under strong running water until you can no longer smell the sharp scent of vinegar. A quick final rinse in clean water helps immensely.
Understanding Faucet Material Compatibility with Vinegar
Not all faucet materials react the same way to acid. Knowing what your faucet is made of helps you set the correct soak time and avoid damage.
| Faucet Material | Vinegar Compatibility (Standard 5% Acidity) | Maximum Recommended Soak Time |
|---|---|---|
| Chrome Plated Brass/Stainless Steel | Excellent | Up to 8 hours (for aerators); 4 hours (for bodies) |
| Plastic/Rubber Components | Good (but watch temperature) | 4 hours maximum |
| Polished Nickel / Antique Brass | Fair to Poor | 1 to 2 hours maximum (Inspect often) |
| Cast Iron or Certain Alloys | Use Caution | Keep it brief—under 1 hour if possible, or use lemon juice instead. |
If you are unsure of your faucet material, always err on the side of caution and use the shortest soak time recommended (3 hours) for the initial attempt.
Frequently Asked Questions (FAQ) About Vinegar Faucet Soaks
Here are some common questions new DIYers have when tackling this easy fix.
Q1: Can I use vinegar if I have PEX plumbing lines?
A: Yes, vinegar is perfectly safe for PEX (cross-linked polyethylene) plumbing lines. The concern with acids is usually focused on the metal fixtures themselves, not the standard PEX tubing used within the walls.
Q2: Do I need to turn off the water supply before cleaning the aerator?
A: No, you only need to turn off the main water supply if you are disassembling the faucet handle or the internal valve/cartridge. For cleaning just the aerator tip, simply ensure the faucet is turned off.
Q3: Is it better to use warm vinegar or room temperature vinegar?
A: Slightly warm vinegar speeds up the chemical reaction, allowing you to clean faster. However, do not use boiling vinegar, as extreme heat can warp plastic parts or damage rubber seals within the aerator or cartridge.
Q4: How often should I soak my faucet aerator in vinegar?
A: If you have very hard water, performing a quick 1-hour soak once every 1 to 2 months can prevent heavy buildup from ever forming, keeping your water pressure consistently high.
Q5: Can I use apple cider vinegar instead of white distilled vinegar?
A: You can, but distilled white vinegar is preferred. Apple cider vinegar contains sugars and colorants that might leave a slight residue or stain if not rinsed perfectly. Stick to clear white vinegar for the best results.
Q6: What should I do if the vinegar soak doesn’t remove all the buildup?
A: If the scale is still present after the recommended soak time, try gently scrubbing the part with a non-scratch scour pad or an old toothbrush while rinsing under running water. If scrubbing fails, you may need to use a stronger, commercially available limescale remover specifically rated safe for your faucet finish, or consider replacing the part.
Conclusion: Confidence in Your Clean Faucet
You’ve done it! You now have the expert knowledge on exactly how long to soak your faucet components in vinegar—whether it’s a quick 30 minutes for a light cleaning or an overnight session for a serious clog. Remember the key takeaway: standard chrome aerators can handle 3 to 4 hours easily, but delicate finishes require vigilance and shorter soaking times. By approaching this task methodically, using simple household items, and respecting the material of your fixtures, you’ve saved yourself a call to the plumber and restored full water pressure to your sink. Give yourself a pat on the back; tackling small home maintenance issues like this builds real DIY confidence. Go enjoy that perfect, strong stream of water!