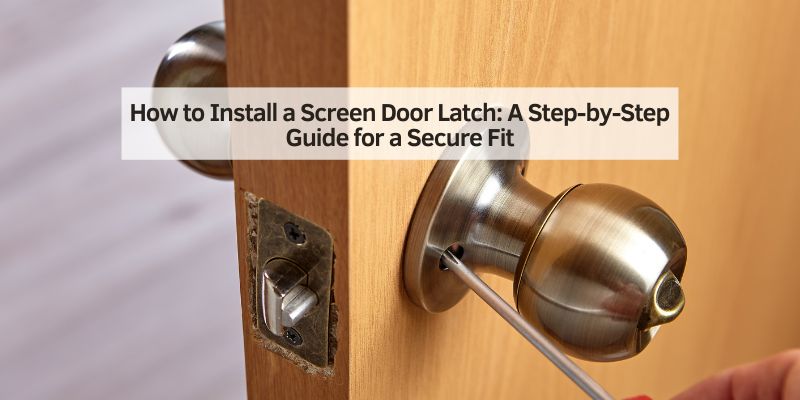
How to Install a Screen Door Latch: A Step-by-Step Guide for a Secure Fit
Hey there! So, you’re ready to tackle how to install a screen door latch? That’s awesome! A screen door latch is one of those small but mighty upgrades that can make your home feel safer and more functional. I remember the first time I installed one on my back porch—it was a game-changer for keeping the door secure while letting in that fresh breeze. Over the years, I’ve installed latches on several screen doors, helped friends with theirs, and learned all the tricks to make the process smooth.
Whether you’re replacing a wobbly old latch or adding a new one to a shiny screen door, I’m here to walk you through every step in a way that’s easy to follow. No matter if you’re a DIY newbie or a seasoned pro, you’ll have that latch installed in no time. Let’s dive in and get your screen door locked tight!
Why Install a Screen Door Latch?
Before we get to the how-to, let’s talk about why a screen door latch is worth your time. A good latch keeps your screen door closed securely, so it doesn’t swing open in the wind or let bugs sneak in. I had a screen door that kept flapping open until I added a latch, and it made such a difference, especially during summer barbecues! A latch also adds a layer of security, especially for exterior doors, keeping unwanted critters (or even intruders) out. Plus, it’s a simple way to make your screen door feel more polished and functional. Whether it’s for your front porch, back patio, or garage entry, a latch is a small project with big rewards.
Types of Screen Door Latches
Not all latches are the same, and I’ve learned that picking the right one depends on your door and needs. Here’s a quick rundown of the most common types I’ve come across:
Knob or Handle Latches
These are the classic latches you twist or push to open. They’re simple and reliable, and I’ve used them on my patio door. They often come with a lock for extra security, which is great for exterior doors.
Slide Bolt Latches
These slide a metal bolt into a catch to lock the door. I put one on a screen door in my garage because it’s sturdy and easy to use. They’re great for heavy-duty doors but might not look as sleek.
Magnetic Latches
Magnetic latches use a magnet to hold the door closed. I helped a friend install one, and it was super smooth—no loud clicking! They’re low-maintenance but might not be as secure for high-traffic areas.
Hook and Eye Latches
These are super basic—just a hook that catches an eye loop. I used one on a lightweight screen door, and it’s cheap and effective for low-security needs, like a backyard shed.
Each type has its vibe, so think about your door’s purpose and style before choosing. I’ll focus on knob latches since they’re the most common, but the steps work for most types with small tweaks.
Tools and Supplies You’ll Need
I love that you don’t need a ton of fancy tools for this job. Here’s what I keep handy when installing a screen door latch:
| Tool/Item | Why You Need It |
|---|---|
| Screwdriver (Phillips) | Tightens screws to secure the latch. Most latches use Phillips screws. |
| Drill and drill bits | Makes pilot holes for screws or cuts a hole for the latch mechanism. |
| Measuring tape | Ensures the latch and strike plate are aligned properly. |
| Pencil | Marks where to drill or screw for precise placement. |
| Level | Keeps the latch straight for a professional look. |
| Chisel (optional) | Carves out a recess for the latch or strike plate if needed. |
| Safety glasses | Protects your eyes when drilling or chiseling. |
| New latch kit | Includes the latch, strike plate, screws, and sometimes a template. |
You can grab a latch kit at any hardware store or online for $10–$30, depending on the style. I got a nice brushed nickel knob latch for my porch for about $15, and it’s held up great.
Choosing the Right Latch for Your Screen Door
Picking the perfect latch is key to a smooth install. Here’s what I consider when shopping for one:
Match Your Door Material
Screen doors are usually aluminum, wood, or vinyl. Most latches work with all types, but check the packaging to be sure. I once bought a latch that was too heavy for a lightweight aluminum door, and it felt clunky. Look for a latch designed for your door’s thickness—standard is about 1–1.5 inches.
Consider Security Needs
If your screen door is an exterior entry, go for a latch with a lock, like a knob or slide bolt. For a backyard or patio door, a simple magnetic or hook latch might be enough. I chose a locking knob latch for my front screen door since it’s the main entry.
Style and Finish
Latches come in finishes like brushed nickel, black, brass, or white. I love brushed nickel because it looks modern and resists rust. Pick a finish that matches your door handle or hinges for a cohesive look. My patio door has all black hardware, so I went with a black latch to tie it together.
Ease of Installation
Some latches come with templates or pre-drilled holes, which make life easier. I always check reviews to see if other DIYers found the latch easy to install. A good kit will include clear instructions and all the screws you need.
Step-by-Step Guide to Installing a Screen Door Latch
Alright, let’s get to the good stuff—how to install that latch! I’ve done this a few times, and this process works like a charm. Follow these steps, and you’ll have a secure, functional latch in no time.
Step 1: Prep Your Workspace
Clear the area around the door so you can move freely. I always make sure the door is closed and stable—prop it with a doorstop if it swings. Gather your tools and open the latch kit to check that all parts are there. I once started a project only to find a missing screw, and it was such a hassle to pause and run to the store.
Step 2: Measure and Mark the Placement
Most latches go about 36–42 inches from the bottom of the door, at a comfortable handle height. I use a measuring tape to find this spot on the door’s edge, then mark it with a pencil. If your kit includes a template, tape it to the door and mark the spots for screws and the latch hole. I learned to double-check measurements after drilling a hole too high once—measure twice, drill once!
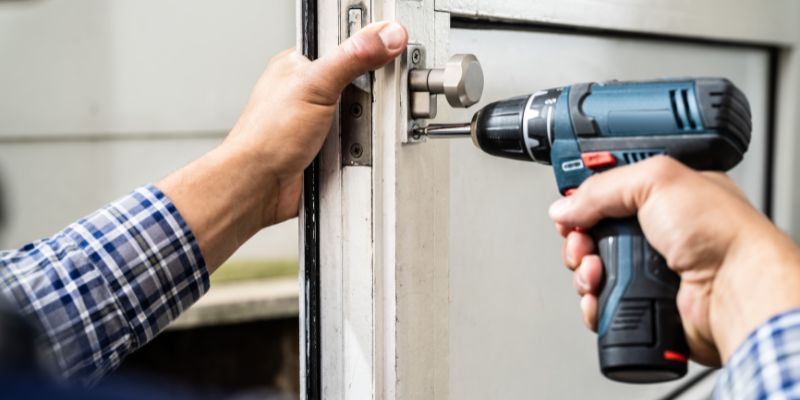
Step 3: Drill Pilot Holes
Using a drill bit slightly smaller than your screws, drill pilot holes where you marked. This prevents the wood or metal from splitting. For a knob latch, you’ll also need to drill a larger hole for the latch mechanism—check the kit’s instructions for the right bit size. I use a 1-inch spade bit for most knob latches. Go slow to avoid splintering, and wear safety glasses to keep dust out of your eyes.
Step 4: Install the Latch Mechanism
Insert the latch mechanism into the hole you drilled on the door’s edge. For a knob latch, this is the part that slides into the strike plate to lock the door. Secure it with the screws provided, using your screwdriver. I always make sure it’s flush with the door’s edge—use a chisel to carve out a small recess if needed. My first install wasn’t flush, and the door wouldn’t close smoothly until I fixed it.
Step 5: Attach the Knob or Handle
Now, attach the interior and exterior parts of the latch (like the knobs or handles). Line them up with the latch mechanism and screw them in place. I find it helps to hold the door steady while tightening to keep everything aligned. Test the knob to make sure it moves the latch smoothly. I had a latch that felt stiff until I loosened the screws slightly and adjusted it.
Step 6: Install the Strike Plate
The strike plate goes on the door frame, where the latch catches to keep the door closed. Close the door and mark where the latch hits the frame. Use a pencil to trace the strike plate’s outline, then drill pilot holes for the screws. If the strike plate needs to sit flush, chisel out a shallow recess. I’ve found that a level helps keep the strike plate straight for a clean look. Screw it in, then test the door to ensure the latch catches securely.
Step 7: Test and Adjust
Close the door and test the latch a few times. Does it lock smoothly? Does the door stay closed without rattling? I had to tweak a strike plate once because the latch wasn’t catching right—a quick adjustment with a screwdriver fixed it. If the latch is loose or sticky, check the screws or realign the strike plate.
Tips for a Smooth Installation
I’ve hit a few bumps along the way, so here are some tricks to make your install easier:
- Use a Template: If your latch kit comes with a paper template, use it. It saves time and ensures accurate holes.
- Go Slow with Drilling: Rushing can lead to crooked holes or splintered wood. I take my time to get it right.
- Lubricate Moving Parts: If the latch feels stiff, a drop of WD-40 on the mechanism helps it glide.
- Check Alignment: Make sure the latch and strike plate line up perfectly. I’ve had to shim a strike plate with cardboard to get the fit just right.
- Keep Screws Organized: Put screws in a small container so they don’t roll away. I lost a screw once and had to make an extra hardware store trip.
Handling Different Screen Door Materials
Screen doors come in different materials, and I’ve learned each one needs a slightly different approach.
Aluminum Doors
Most modern screen doors are aluminum—lightweight but sturdy. Use a metal drill bit for pilot holes, and go slow to avoid bending the frame. I installed a latch on an aluminum door, and it was quick once I got the right bit.
Wooden Doors
Wooden screen doors are heavier and prone to splintering. Drill pilot holes carefully, and use a chisel for a clean recess if needed. I love the classic look of wood, but it takes a bit more care.
Vinyl Doors
Vinyl doors are similar to aluminum but can be softer. Use a light touch when drilling to avoid cracking. I helped a neighbor with a vinyl door latch, and we had to be extra gentle with the screws.
Maintaining Your Screen Door Latch
Once your latch is installed, a little maintenance keeps it working smoothly. I wipe mine down with a damp cloth every few months to remove dust or grime. If the latch gets sticky, a quick spray of WD-40 does the trick. Check the screws periodically to make sure they’re tight—vibration from opening and closing can loosen them. I had a latch start rattling after a year, and a quick tighten fixed it right up.
Common Mistakes to Avoid
I’ve made my share of goofs, so here’s what to watch out for:
- Wrong Measurements: Double-check your marks before drilling. A misaligned latch won’t catch properly.
- Over-Tightening Screws: This can strip the holes or damage the door. I’ve done this and had to fill holes with wood filler—not fun.
- Skipping Pilot Holes: Always drill pilot holes, especially in wood or vinyl, to prevent splitting.
- Ignoring the Frame: Make sure the door frame is sturdy. I once installed a latch only to find the frame was wobbly, which made the latch less secure.
When to Call a Professional
Most latch installations are DIY-friendly, but sometimes you need a pro. If your door frame is damaged, the door is warped, or you’re dealing with a custom latch system, a locksmith or handyman can help. I called a pro once when I couldn’t get a high-security latch to align—it was worth the cost to get it perfect.
My Personal Experience with Screen Door Latches
I’ll never forget the first time I installed a screen door latch. My old porch door kept swinging open, letting in flies and driving me crazy. I grabbed a basic knob latch from the hardware store, watched a quick tutorial, and got to work. It took about 30 minutes, and I felt like a DIY rockstar when it clicked shut perfectly. Since then, I’ve installed latches on friends’ doors and even upgraded my own to a locking model for extra security. Each time, I’ve learned something new, like how a level makes all the difference or how a little lubricant saves the day. It’s one of those projects that’s simple but makes your home feel so much better.
Conclusion: Secure Your Screen Door with Confidence
There you have it—everything I’ve learned about how to install a screen door latch. From picking the right latch to drilling precise holes and securing the strike plate, it’s a project anyone can tackle with the right tools and a bit of patience. I love the feeling of a screen door that closes with a satisfying click, keeping the breeze in and the bugs out.
Whether you’re upgrading an old door or adding a latch to a new one, this guide has you covered. So grab your screwdriver, pick out a stylish latch, and get to work—you’ll have a secure, functional screen door in no time! Got more questions? Check out the FAQs below for quick answers.
FAQs
What’s the easiest type of screen door latch to install?
Knob latches are usually the easiest because they come with clear instructions and templates. Magnetic latches are simple, too, but might not be as secure.
Can I install a latch on any screen door?
Most screen doors work with standard latches, but check the door’s thickness and material. Aluminum, wood, or vinyl doors might need specific drill bits or screws.
How long does it take to install a screen door latch?
It usually takes 20–30 minutes if you have the right tools. Tricky doors or rusty frames might add a bit more time.
Do I need a drill to install a screen door latch?
Yes, a drill is key for pilot holes and the latch mechanism. It makes the job faster and prevents damage to the door.
Can I add a lock to my screen door latch?
Many knob latches come with a built-in lock. For extra security, choose a locking model or add a separate deadbolt.
What do I do if the latch doesn’t catch properly?
Check the alignment of the latch and strike plate. You might need to adjust the strike plate or shim it with cardboard for a snug fit.