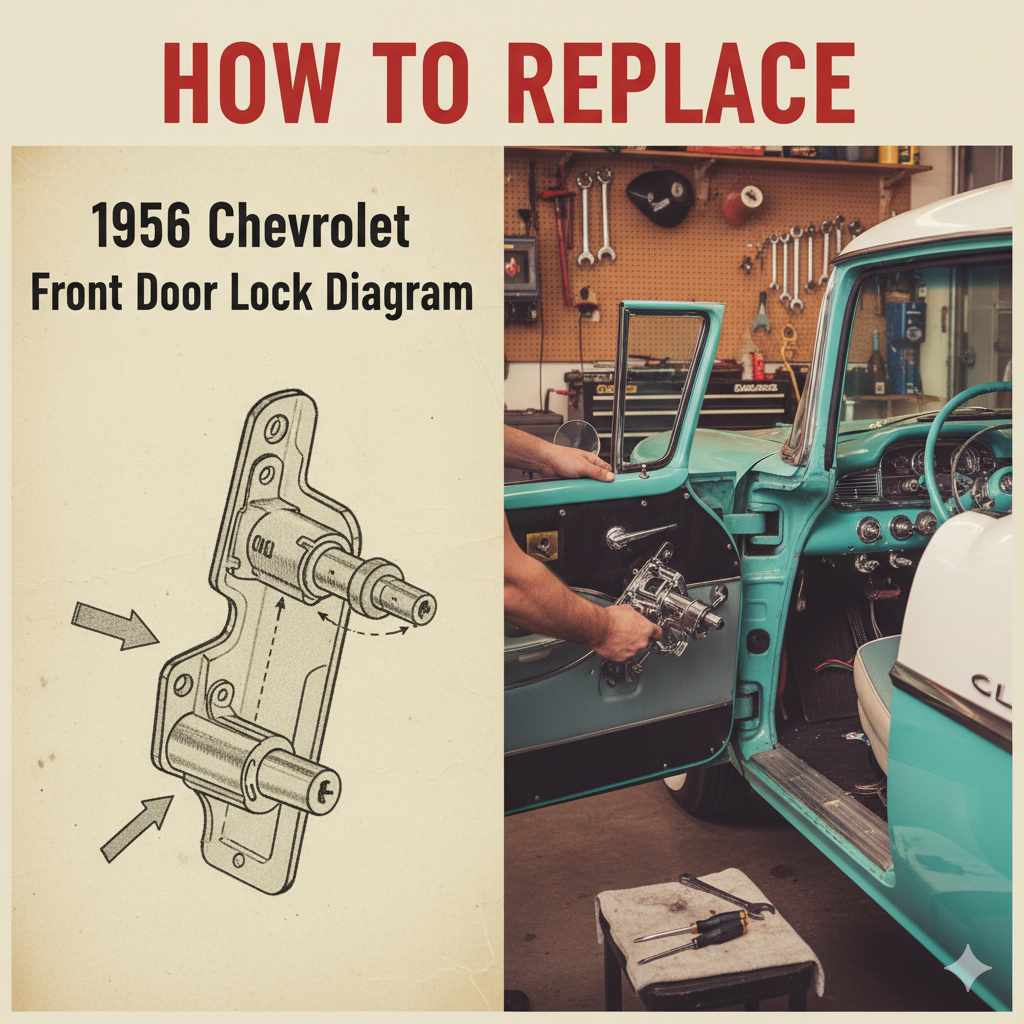
How To Replace 1956 Chevrolet Front Door Lock Diagram: Essential Guide
Quick Summary: Replacing your 1956 Chevrolet’s front door lock is achievable with a clear diagram and careful steps. This guide breaks down the process, showing you how to identify parts and reassemble them correctly for a secure, functional door lock.
Hey there, fellow home improvers and classic car fans! Ever find yourself wrestling with a stubborn door lock on your beautiful 1956 Chevrolet? It’s a common little snag, and honestly, it can be pretty frustrating when a door just won’t cooperate. But don’t you worry! With a little patience and the right guidance, you can get that lock working like new again. Think of me as your friendly neighbor, here to walk you through it, step by simple step. We’ll make sure you understand exactly what’s going on inside that door panel. Get ready to feel confident and capable as we tackle this project together, ensuring your classic Chevy stays in top shape!
Understanding Your 1956 Chevrolet Front Door Lock System
Before we dive into replacing anything, let’s get a good look at how the door lock system in a 1956 Chevrolet works. These classic cars have a mechanical system that, while ingenious for its time, can be a bit fiddly. It relies on rods, levers, and springs to connect the exterior and interior door handles to the actual latch mechanism. Understanding this interplay is key to a successful repair. We’re not dealing with complex electronics here, which is great news for DIYers!
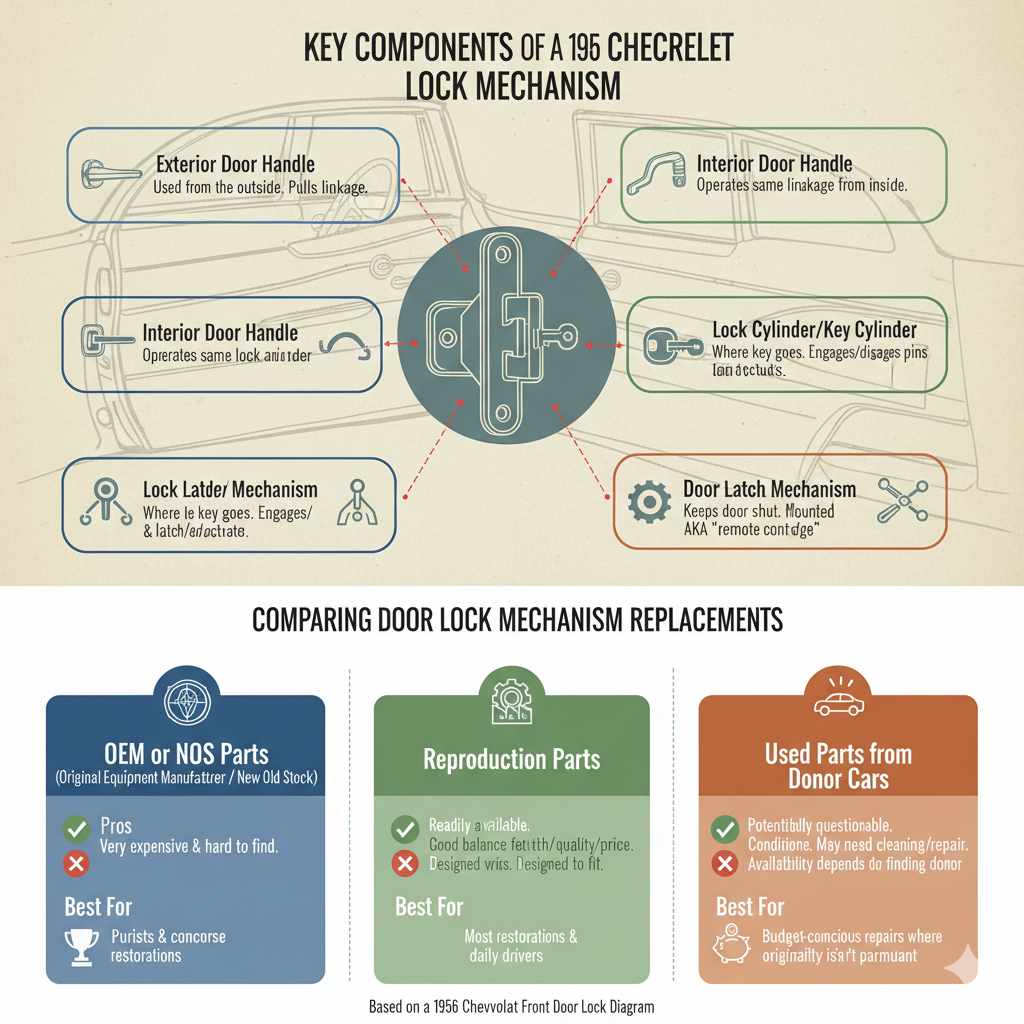
Key Components of the Door Lock Mechanism
Let’s break down the main players you’ll encounter when you open up that door panel. Having a visual reference, like a 1956 Chevrolet front door lock diagram image, is super helpful. You can often find these in factory service manuals or online archives dedicated to classic Chevys.
- Exterior Door Handle: This is what you use from the outside. It’s connected to a linkage that pulls on the lock mechanism.
- Interior Door Handle: Similar to the exterior handle, this operates the same linkage from inside the car.
- Lock Rod: This is the metal rod that runs from the interior door handle and the lock cylinder (where you insert the key) to the actuator or latch.
- Lock Cylinder/Key Cylinder: This is where your key goes. Turning the key moves pins that either engage or disengage the locking mechanism.
- Door Latch Mechanism: This is the heart of the operation, mounted to the edge of the door. It’s responsible for keeping the door shut and is controlled by the linkage from the handles and lock cylinder.
- Actuator: Sometimes referred to as a “remote control” or “tripod,” this part connects the lock rod to the latch mechanism.
- Springs and Clips: These small but vital parts hold everything together and ensure smooth operation.
Having a clear 1956 Chevrolet front door lock diagram to refer to is like having a map for your repair journey. It shows how all these pieces connect and move. You can often find detailed diagrams in resources like the Chevy Depot Technical Library, which often has diagrams and manuals for classic models.
Why Might Your 1956 Chevrolet Door Lock Need Replacing?
Over the years, these mechanisms can wear out or get damaged. Here are some common culprits:
- Worn Parts: Springs can lose tension, rods can bend, and the latch mechanism itself can develop play.
- Rust and Corrosion: Exposure to moisture can cause parts to seize up or break.
- Broken Linkages: Rods can snap, or the clips holding them can fail.
- Sticking Lock Cylinder: The key cylinder can become difficult to turn due to dirt, wear, or lack of lubrication.
- Previous Improper Repairs: Sometimes, a previous attempt at fixing the lock might have introduced new problems.
Whatever the reason, a faulty lock not only affects security but also the overall experience of driving a classic car. We want everything to work smoothly!
Tools and Materials You’ll Need
Gathering your tools before you start is a pro move! It saves time and frustration. Here’s a list of what you’ll likely need for this job:
Essential Tools:
- Screwdriver Set: You’ll need Phillips head and flathead screwdrivers of various sizes.
- Socket Set or Wrenches: Some bolts might require these.
- Pliers: Needle-nose pliers are particularly useful for manipulating small clips and rods.
- Trim Removal Tools: These plastic tools are invaluable for safely prying off door panels without damaging paint or trim. You can find good sets online or at auto parts stores.
- Penetrating Oil (like WD-40): For loosening stubborn screws or freeing up sticky linkages.
- Gloves: To protect your hands.
- Safety Glasses: Always protect your eyes!
- Container for Parts: Small boxes, magnetic trays, or even an ice cube tray can help keep track of tiny screws and clips.
- Shop Towels or Rags: For cleaning up.
Potential Replacement Parts:
Depending on what you find when you disassemble, you might need:
- Lock Rod Clips: These small plastic or metal clips are notorious for breaking.
- Lock Rods: If a rod is bent or broken.
- Lock Actuator Assembly: If the main mechanism is damaged.
- New Lock Cylinder: If yours is seized or you’ve lost the key.
- Door Handle Assembly: If either handle is broken.
It’s often best to get your hands in there first to see exactly what needs replacing before ordering parts. However, if you know your lock cylinder is completely shot, you might want to have a new one ready.
Step-by-Step Guide: Replacing Your 1956 Chevrolet Front Door Lock
Alright, let’s get down to business! Remember to work methodically and take your time. This isn’t a race.
Step 1: Prepare the Door and Gather Your Diagram
First things first, open the door you’re working on. Make sure you have your 1956 Chevrolet front door lock diagram handy. You might want to print it out or have it on a tablet nearby. Clear the area around the door and lay out your tools.
Step 2: Remove the Interior Door Panel
This is often the most intimidating part for beginners, but it’s usually straightforward. The door panel is typically held on by screws and clips.
- Locate Screws: Look for screws around the edges of the door panel, near the armrest, and often behind the interior door handle trim. Your diagram might even show screw locations.
- Remove Trim Pieces: Carefully pry off any trim pieces, like around the interior door handle or window crank (if applicable). Use your trim removal tools to avoid damage.
- Remove the Door Panel: Once all screws are out, gently pull the door panel away from the door frame. It’s usually held on with clips that pop out. Start at the bottom and work your way up. If it feels stuck, double-check for any missed screws or clips.
- Disconnect Wires (if any): If you have power windows or locks (though less common on a ’56), you’ll need to disconnect any electrical connectors attached to the panel.
Once the panel is off, set it aside in a safe place. You’ll now have access to the inner workings of the door.
Step 3: Access the Lock Mechanism and Linkages
With the door panel removed, you’ll see a maze of metal rods, wires, and the main door latch assembly. Your 1956 Chevrolet front door lock diagram is crucial here. It will help you trace the rods from the exterior handle, interior handle, and lock cylinder to the latch.
You might have a metal or cardboard cover plate blocking access to some parts. This usually has a few screws or bolts holding it in place. Remove this to get a clearer view and better access.
Step 4: Identify the Faulty Component
This is where you’ll use your diagram to trace the operation. Operate the interior and exterior handles and the lock cylinder. Watch which rods move and which ones don’t. Look for:
- Bent or disconnected rods.
- Broken or missing clips.
- Stiff or seized linkages.
- Damage to the lock actuator or latch mechanism itself.
If a rod is bent, you might be able to carefully straighten it. If a clip is broken, you’ll need to replace it. If the entire actuator assembly looks worn out or damaged, that’s likely what needs replacing.
Step 5: Disconnect and Remove the Faulty Part
Once you’ve identified the part to be replaced, you need to disconnect it from the rest of the system. This typically involves:
- Unclipping Rods: Most connections are made with small metal or plastic clips. Use your needle-nose pliers to carefully squeeze and remove these clips. Keep them safe!
- Removing Mounting Bolts/Screws: The actuator or latch mechanism will be bolted to the door. Unscrew these.
- Carefully Maneuvering: Sometimes, you need to wiggle the part free. Refer to your diagram to ensure you’re not forcing anything that’s still connected.
Step 6: Install the New Part
This is the reverse of removal, but with your new part!
- Position the New Part: Place the new actuator, rod, or cylinder into position.
- Reattach Mounting Hardware: Secure it with the bolts or screws you removed earlier.
- Reconnect Linkages: This is where patience really pays off. Carefully reattach the rods to the new part using new clips if the old ones were damaged. Make sure each rod is connected to the correct point, as shown on your diagram.
Tip: It can be helpful to have someone operate the handles from the outside and inside while you connect the rods to ensure they are aligned correctly.
Step 7: Test the Lock Mechanism
Before you put the door panel back on, test everything thoroughly!
- Operate the interior handle. Does it open the door smoothly?
- Operate the exterior handle. Does it open the door?
- Insert the key into the lock cylinder and turn it. Does it lock and unlock the door?
- Check that both handles work when the door is locked and unlocked.
If something isn’t working right, don’t panic. Go back to your diagram, re-check your connections, and ensure all clips are secure. Sometimes a rod might be slightly out of alignment.
Step 8: Reinstall the Interior Door Panel
Once you’re confident the lock mechanism is working perfectly, it’s time to put the door panel back on.
- Align Panel: Carefully align the door panel with the door frame.
- Reconnect Wires (if applicable): If you disconnected any electrical connectors, plug them back in now.
- Engage Clips: Gently push the panel back into place, ensuring the clips snap into their retainers. Work from the top down.
- Reinstall Screws and Trim: Replace all screws and any trim pieces you removed.
And voilà! You’ve just replaced your 1956 Chevrolet front door lock.
Troubleshooting Common Issues
Even with a good diagram, sometimes things don’t go perfectly. Here are a few common hiccups and how to fix them:
- Door Won’t Open: Double-check all rod connections. A rod might be slightly bent or a clip might have popped off. Ensure the latch mechanism itself isn’t jammed.
- Lock Cylinder is Stiff: Try a graphite-based lubricant designed for locks. Avoid oil-based lubricants as they can attract dirt. If it’s still stiff, the cylinder itself might be worn out and need replacement.
- Handles Feel Loose: This usually means the linkage is not securely attached at one or more points, or the clips holding them are worn.
- Door Panel Doesn’t Fit Back Correctly: Ensure no wires or extra components are caught between the panel and the door frame. Make sure all clips are properly engaged.
For more in-depth troubleshooting and specific diagrams, resources like the Jalopy Journal Technical Forum can be incredibly helpful, as experienced owners often share solutions to tricky problems.
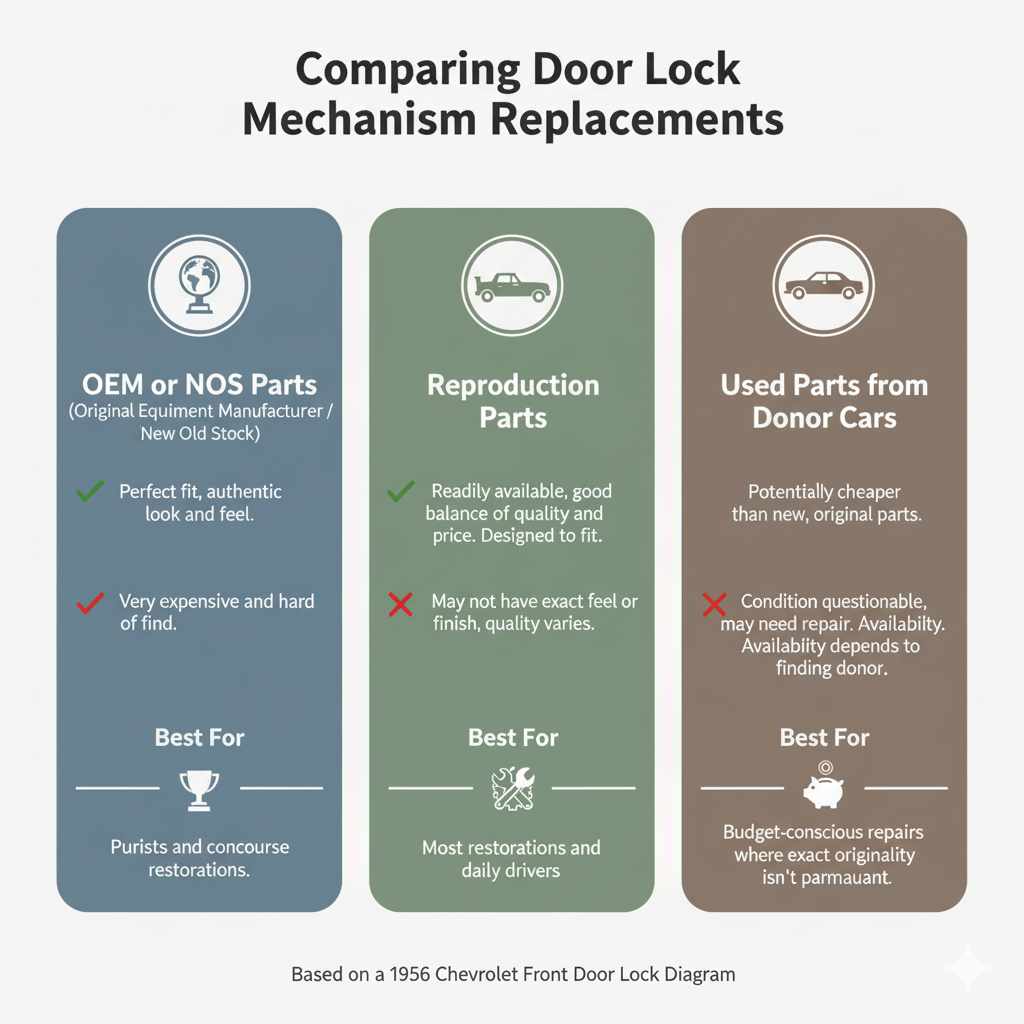
Comparing Lock Mechanism Replacements
When it comes to replacing parts, you have a few options:
| Option | Pros | Cons | Best For |
|---|---|---|---|
|
OEM or NOS Parts (Original Equipment Manufacturer / New Old Stock) |
Perfect fit, authentic look and feel. | Can be very expensive and hard to find. | Purists and concourse restorations. |
| Reproduction Parts | Readily available, often a good balance of quality and price. Designed to fit. | May not have the exact feel or finish of original parts. Quality can vary by manufacturer. | Most restorations and daily drivers. |
| Used Parts from Donor Cars | Potentially cheaper than new, original parts. | Condition can be questionable; may need cleaning or repair. Availability depends on finding a suitable donor. | Budget-conscious repairs where exact originality isn’t paramount. |
For a 1956 Chevrolet, reproduction parts are often the most practical choice for a DIY repair. They are designed to work and are generally more accessible.
Frequently Asked Questions (FAQ)
Q1: How long does it typically take to replace a 1956 Chevrolet front door lock?
A: For a beginner, expect it to take anywhere from 2 to 4 hours per door. If you’re experienced, it can be done in about an hour.
Q2: Do I need a special 1956 Chevrolet front door lock diagram?
A: While a general diagram of a classic car door lock system can help, a specific diagram for your 1956 Chevrolet model is ideal. These can be found in factory service manuals or online.
Q3: Can I lubricate my door lock instead of replacing it?
A: Yes, for stiff or sticky mechanisms, lubrication can help. Use a graphite-based spray lubricant designed for locks. However, if parts are broken or severely worn, replacement is necessary.
Q4: What if I lose a small clip during the process?
A: Small clips are essential! It’s best to buy a general assortment of automotive clips if you don’t have spares. You can find them at auto parts stores or online.
Q5: Can I replace the lock cylinder without replacing the whole mechanism?
A: Yes, often the lock cylinder can be replaced independently. It usually involves removing a retaining clip or nut to slide the old cylinder out and install the new one.
Q6: Is it safe to drive my car with a faulty door lock?
A: It’s not ideal for security or safety. A faulty lock could potentially come open unexpectedly or prevent you from securing your vehicle. It’s best to fix it as soon as possible.
Conclusion
Taking on a project like replacing your 1956 Chevrolet’s front door lock might seem daunting at first, but with the right approach and a good 1956 Chevrolet front door lock diagram, it’s a perfectly manageable DIY task. Remember to work patiently, keep your parts organized, and don’t hesitate to consult your diagram or online resources if you get stuck. By following these steps, you’ll not only restore the functionality of your door lock but also gain a deeper understanding and appreciation for the mechanics of your classic Chevy. Enjoy the satisfaction of a job well done, and happy motoring!