How to Replace a Door Threshold in Easy Steps
Some home improvement tasks can seem a bit tricky, especially when you’re new to DIY. Learning how to
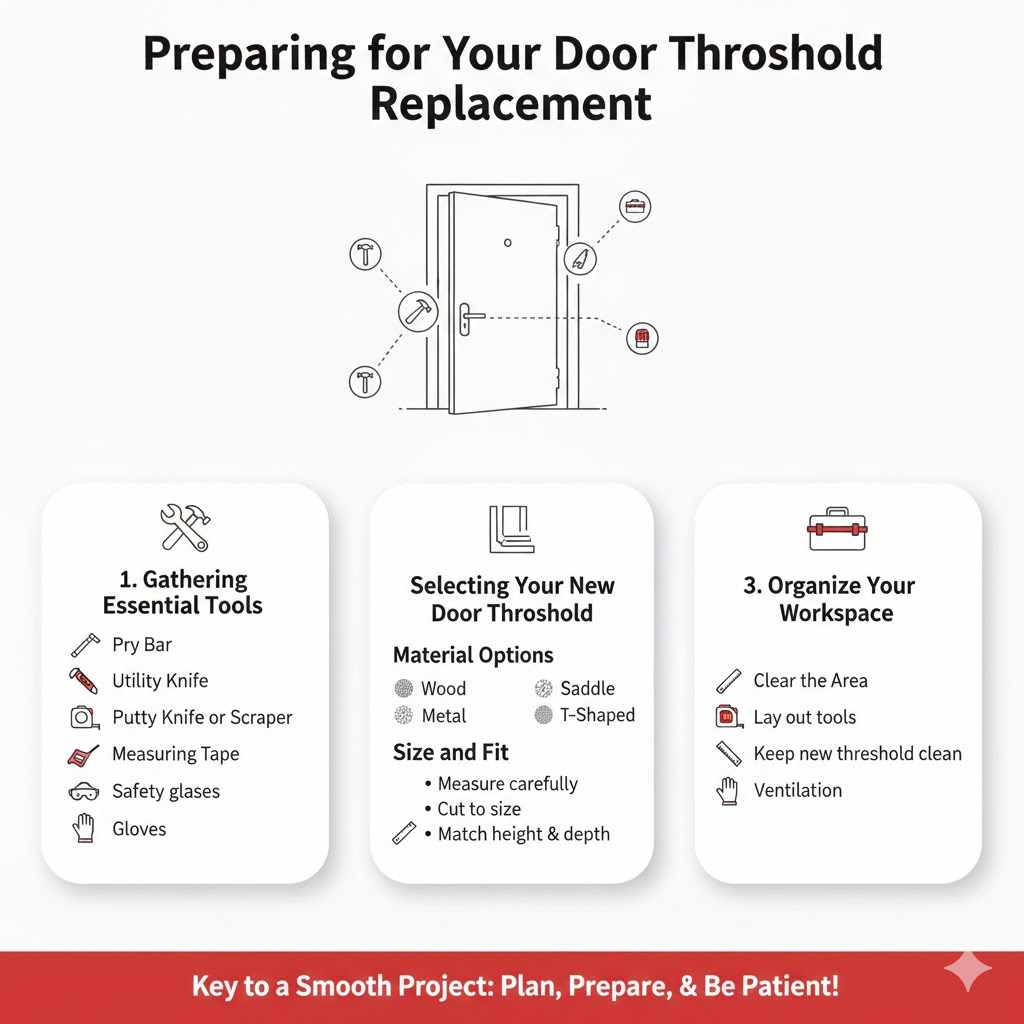
Preparing for Your Door Threshold Replacement
Getting ready is the first big step in successfully replacing your door threshold. This part involves making sure you have all the right tools and materials before you even touch the old threshold. It’s like packing for a trip; you don’t want to be halfway there and realize you forgot something important.
Taking the time to plan and gather everything upfront will save you a lot of hassle and make the actual replacement much smoother. This section will cover what you need to look for and how to organize your supplies.
Gathering Essential Tools
Having the right tools makes any DIY project significantly easier and safer. For replacing a door threshold, you’ll need a few key items. Don’t worry if you don’t have them all; many can be borrowed or are common in a basic toolkit.
Think of these as your allies in this project.
- Pry Bar This is your main tool for gently lifting and removing the old threshold. It gives you leverage without damaging the surrounding door frame. A good pry bar has a flat end, which is perfect for getting under the threshold and prying it up.
- Hammer You’ll use the hammer for a few things, like tapping the pry bar to loosen stubborn sections and for driving in new nails or screws. A standard claw hammer works well for this project.
- Utility Knife A sharp utility knife is useful for scoring the seal around the threshold, which helps to break any old adhesive or caulk holding it in place. It can also be used to trim any excess caulk later.
- Putty Knife or Scraper This tool helps to clean away old caulk, adhesive, or any loose debris from the subfloor and the bottom of the door frame. A clean surface is essential for a good fit of the new threshold.
- Measuring Tape Accurate measurements are critical for ensuring your new threshold fits perfectly. Measure the width of the doorway where the old threshold sits.
- Saw (Optional but Recommended) If your new threshold isn’t the exact size, or if you need to cut it to fit, a handsaw or a power saw like a miter saw will be necessary. Make sure you have a fine-tooth blade for cleaner cuts on wood.
- Safety Glasses Always protect your eyes when working with tools and materials that could create dust or debris.
- Gloves These can protect your hands from splinters and keep them clean.
These tools are your basic setup. If you’re unsure about any of them, a quick look online or a visit to a hardware store can give you a better idea of what to buy or rent. Proper preparation means fewer interruptions and a more successful outcome when you learn how to replace a door threshold in easy steps.
Selecting Your New Door Threshold
Choosing the right new threshold is just as important as having the right tools. The material and style of your new threshold can impact its durability, appearance, and how easy it is to install. Most interior and exterior doors use a threshold made of wood, metal, or composite materials.
For interior doors, wood is common, while exterior doors might have metal or specialized composite thresholds designed for weather resistance.
- Material Options Wood thresholds are popular because they are easy to cut and paint or stain to match your flooring and trim. Aluminum and bronze are durable metal options, often used for exterior doors to withstand weather. Composite thresholds offer a good balance of durability and ease of installation, and they resist rot and warping.
- Type of Threshold Consider whether you need a saddle threshold (a single piece that spans the entire doorway) or a T-shaped threshold (which has a central strip and wings that fit into routed grooves in the jambs). Most DIY replacements involve saddle thresholds for simplicity.
- Size and Fit Measure the width of your doorway carefully. New thresholds are often sold in standard lengths and can be cut down to size. Make sure the height and depth also match your existing setup to avoid issues with door clearance.
Think about the area where the threshold will be installed. If it’s an exterior door, you’ll need a threshold that can handle moisture and temperature changes. For an interior door, aesthetics and how well it transitions to the flooring are key.
Selecting wisely now prevents problems later and is a vital part of learning how to replace a door threshold in easy steps.
Removing the Old Door Threshold
Once you have your tools and new threshold ready, it’s time to tackle the removal of the old one. This step involves carefully prying out the existing threshold without causing damage to your door frame or floor. Patience here is key; rushing can lead to unnecessary repairs.
We’ll go through the process step by step.
Securing and Preparing the Area
Before you start prying, it’s a good idea to make sure the door is stable and that you have enough room to work. You might want to prop the door open so it doesn’t swing shut unexpectedly. If you are working on an exterior door, consider the weather.
If it’s raining, you might want to delay the project or find a way to protect the opening from the elements. Clearing the immediate area of any rugs or mats will give you a clearer workspace and prevent them from getting damaged.
It’s also wise to have a trash bin or a tarp ready to catch any debris that comes loose. Old caulk, wood chips, or dust can make a mess. Preparing the area well ensures that the removal process is as clean and efficient as possible.
Prying Out the Old Threshold
Start by inspecting the old threshold. It might be held in place with nails, screws, or adhesive, or a combination of these. Look for any visible nail heads or screw heads.
If you find them, you might need to pry off any trim or wood pieces covering them first.
Use your utility knife to carefully score the sealant or caulk around the edges of the threshold. This will help break the seal and make it easier to pry. Then, take your pry bar and slide the flat end underneath the edge of the threshold.
Gently start to lever it upwards.
Work your way along the length of the threshold, applying steady pressure. You might hear some creaking or groaning as the old adhesive or nails release. If it’s very stubborn, you can try tapping the pry bar with your hammer to help it gain purchase and break free.
Be careful not to apply too much force in one spot, as this could damage the door frame. If there are nails, you can use the claw of your hammer to help pull them out as you pry.
Continue this process until the entire threshold is loose and can be lifted out. Once it’s out, inspect the area underneath for any remaining debris or old fasteners. Clean this space thoroughly.
Cleaning the Subfloor and Jambs
After the old threshold is removed, the area where it sat will likely have debris, old caulk, and possibly some rough spots. It’s very important to clean this thoroughly. Use your putty knife or scraper to remove any remaining caulk, glue, or splinters.
A clean, smooth surface is essential for the new threshold to sit flat and securely.
Sweep or vacuum up all the loose dust and debris. If the subfloor is damaged, you might need to do some minor repairs, like filling small holes with wood filler, before installing the new threshold. A smooth, clean base ensures a better seal and prevents future issues like drafts or unevenness.
For exterior doors, pay special attention to sealing the new threshold properly to prevent water from seeping underneath. This cleaning step is a critical part of learning how to replace a door threshold in easy steps, as it sets the stage for a perfect fit.
Installing The New Door Threshold
With the old threshold out and the area clean, you’re ready for the installation of the new one. This is where your new threshold will take its place, creating a solid and finished look for your doorway. Following these steps will help ensure a secure and professional-looking finish.
Preparing the New Threshold
If your new threshold is too long, this is where you’ll need to cut it to size. Measure the width of your doorway opening precisely. Transfer this measurement to your new threshold.
If you are using a wood threshold, mark your cut line clearly. Use a fine-tooth saw for a clean cut that won’t splinter the wood. If you are using a metal or composite threshold, follow the manufacturer’s instructions, as some may require different cutting tools.
After cutting, you might want to lightly sand the cut edges of a wood threshold to make them smooth. This helps prevent splinters and creates a cleaner look. If your threshold requires any pre-drilling for screws, do that now as well, following the manufacturer’s guide.
Ensure the threshold is dry and clean before proceeding. Any dust or debris on the new threshold can prevent it from seating properly. This preparation ensures that when you learn how to replace a door threshold in easy steps, each step flows smoothly.
Positioning and Securing The New Threshold
Carefully place the new threshold into the doorway opening. It should fit snugly. If it’s a tight fit, you may need to gently tap it into place with a rubber mallet or a hammer and a block of wood to avoid damaging the threshold itself.
Ensure the threshold is level and that it sits flush with the floor on both sides of the opening.
Once the threshold is properly positioned, you will secure it. For wood thresholds, you will typically use wood screws or finishing nails. Pre-drill pilot holes through the threshold and into the subfloor and the bottom of the door jambs.
This prevents the wood from splitting. Space the fasteners evenly along the length of the threshold, typically every 6 to 12 inches.
If you are using screws, drive them in so they are slightly countersunk below the surface of the threshold. This allows you to fill the holes later for a cleaner finish. For nails, use a nail set to drive them flush or slightly below the surface.
For exterior doors, it’s also important to apply a bead of high-quality exterior caulk or sealant along the underside of the threshold and where it meets the jambs and the subfloor. This is crucial for preventing water infiltration and drafts. Ensure the caulk is smooth and seals the gaps effectively.
Finishing Touches and Door Adjustment
Once the new threshold is securely in place, take a moment to admire your work. If you used screws or nails, you can now fill the holes. For wood thresholds, use wood filler or putty that matches the wood color, or a paintable filler if you plan to paint.
Smooth the filler once it dries.
If you are painting or staining a wood threshold, do so now. Apply a few thin coats, allowing them to dry completely between applications. This protects the wood and gives it a finished look.
Finally, test the door. Open and close it a few times to make sure it doesn’t catch on the new threshold. If the door is too low and hits the threshold, you might need to make minor adjustments to the door hinges or the strike plate.
However, if you measured correctly and installed the threshold properly, this should be a rare issue.
A well-installed threshold not only looks good but also improves energy efficiency by sealing out drafts. This completes the process of how to
Maintaining Your New Door Threshold
Once your new door threshold is installed, a little ongoing care will ensure it looks good and functions well for years to come. Proper maintenance is simple and straightforward, helping to preserve your work and prevent future issues. Thinking about the long-term care from the start is a smart move.
- Regular Cleaning For most thresholds, a simple sweep or vacuum is enough to keep them clean. For wood thresholds, you can wipe them down with a damp cloth. Avoid using harsh chemicals or abrasive cleaners, as these can damage the finish over time, especially on wood or painted surfaces.
- Checking Seals Periodically inspect the seals around the threshold, especially for exterior doors. If you notice any gaps forming or signs of wear, reapply a bead of appropriate sealant or caulk. This is a key step in preventing water damage and drafts.
- Addressing Wear and Tear Over time, foot traffic can cause wear. For wood thresholds, you can touch up any scuffs or scratches with paint or stain. Metal thresholds are generally very durable, but if they get scratched, some can be polished.
These maintenance tips help ensure your door threshold remains a functional and attractive part of your home. It’s all about simple habits that contribute to the longevity of your DIY project.

Frequently Asked Questions
Question: How long does it typically take to replace a door threshold?
Answer: For someone with basic DIY skills, replacing a door threshold can take anywhere from 1 to 3 hours. This includes preparation, removal of the old threshold, cleaning the area, and installing the new one. Factors like the condition of the old threshold and the type of new one can affect the time.
Question: Do I need to seal an interior door threshold?
Answer: While not as critical as with exterior doors, sealing an interior door threshold can help prevent drafts and dust from migrating between rooms. It also adds a finished look. A bead of caulk or wood glue can be sufficient for interior applications.
Question: What if my new threshold is too wide?
Answer: If your new threshold is slightly too wide, you will need to trim it down to fit your doorway. Use a saw with a fine-tooth blade for a clean cut. Measure carefully and mark your cut line before sawing.
Question: Can I use a door sweep if my threshold is worn instead of replacing it?
Answer: A door sweep can help reduce drafts and improve energy efficiency, but it’s a temporary fix for a worn threshold. It doesn’t address the underlying issue of a damaged or deteriorated threshold, which might still allow water or pests in.
Question: How do I choose the right height for my new threshold?
Answer: The new threshold should ideally be the same height as your old one or match the manufacturer’s specifications for your door type. It needs to be low enough for the door to swing freely without catching but high enough to create a good seal against drafts and moisture.
Wrap Up
Learning how to replace a door threshold in easy steps empowers you to tackle a common home improvement task. By preparing your tools and materials, carefully removing the old threshold, and then precisely installing the new one, you create a durable and functional entryway. Remember to clean thoroughly at each stage for the best fit.
Enjoy your newly improved doorway.