How to Replace a Toyota Camry Door Handle
It can be a bit tricky when a door handle on your Toyota Camry breaks or stops working right. This is a common problem that many car owners face, and sometimes it seems like a big job for someone who doesn’t work on cars much. But don’t worry! Fixing it yourself is totally doable. This guide will show you exactly How to
How to Replace Toyota Camry Door Handle
This guide walks you through the whole process of replacing a door handle on your Toyota Camry. We cover what you need to get started, how to take the old handle off, and how to put the new one on. It’s all broken down into simple steps so anyone can do it.
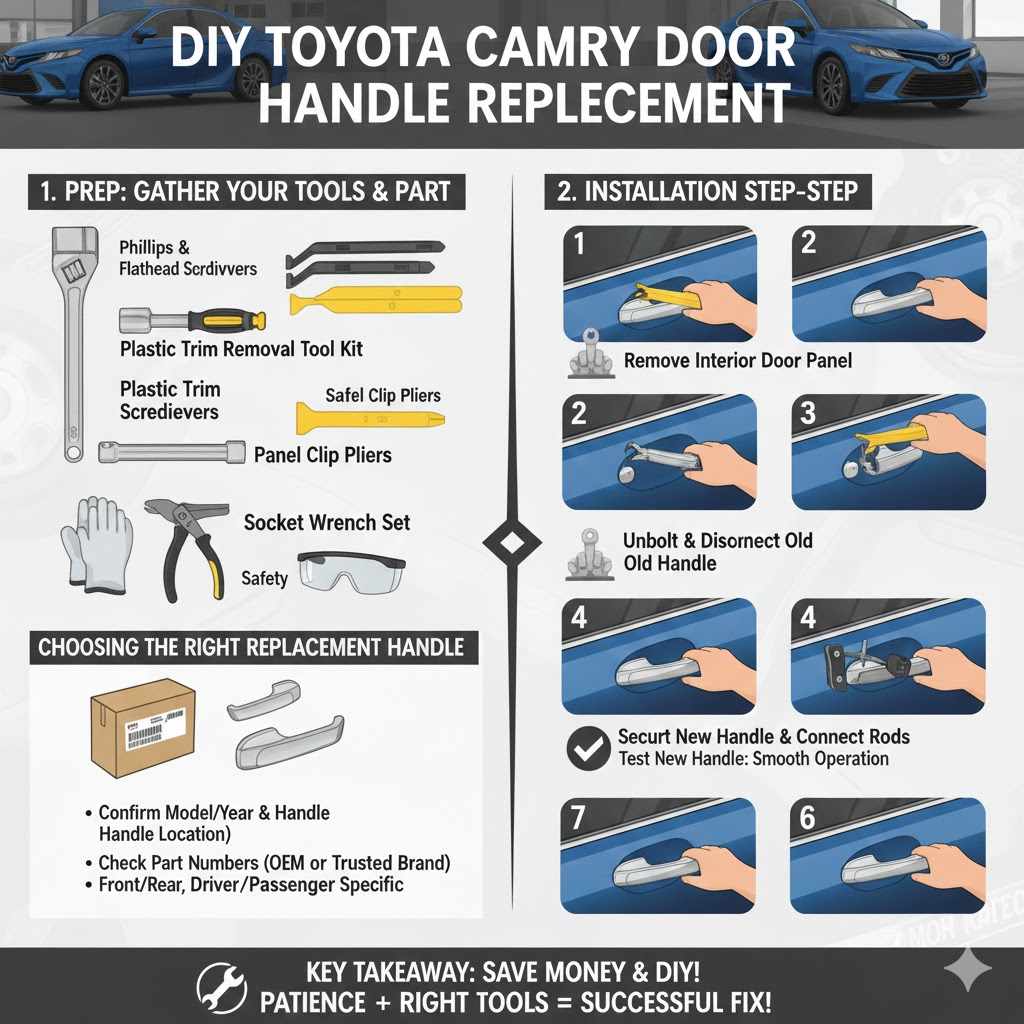
What You Need to Get Started
Before you begin the actual work, having the right tools and parts makes everything go much smoother. Think of it like preparing for a recipe; you need all your ingredients and utensils ready. Gathering these items upfront will save you time and frustration later.
Gathering Your Tools
You won’t need a whole professional garage for this job. Most of the tools are things you might already have or can easily find at an auto parts store.
A set of screwdrivers, including Phillips head and flathead sizes. You’ll use these for removing screws inside the door panel.
Screwdrivers are essential for taking apart the interior door panel. You’ll need various sizes to fit different screws. Make sure they are in good condition so they don’t strip the screw heads.
A trim removal tool kit. These plastic tools are designed to gently pry off door panel clips and trim pieces without damaging your car’s interior.
Plastic trim tools are your best friend for this job. They prevent scratches and dents on your door panel that metal tools could easily cause. Using your hands or a metal tool is a recipe for damage.
A socket wrench set with various common socket sizes. Some bolts might require a socket to loosen or tighten.
Socket wrenches give you good leverage for stubborn bolts. Having a set ensures you have the right size for any bolt you encounter.
A panel clip pliers. These special pliers help you safely remove and reinstall the small plastic clips that hold the door panel in place.
Panel clip pliers are very useful for grabbing and pulling out the small, often stubborn, clips. They make the removal process cleaner.
Gloves. These protect your hands from dirt, grease, and any sharp edges.
Wearing gloves keeps your hands clean and protected. It’s a simple step that makes the whole experience more comfortable.
Safety glasses. It’s always a good idea to protect your eyes when working on cars, especially when dealing with small parts or potential dust.
Eye protection is non-negotiable when working on vehicles. Small pieces of trim or debris can fly off unexpectedly.
Choosing the Right Replacement Handle
Getting the correct replacement door handle is critical. An ill-fitting part won’t work correctly and can lead to more problems.
Confirm Your Camry Model and Year. Door handles can vary significantly between different generations and even trim levels of the Toyota Camry.
Knowing your car’s exact model and year is the first step. This information is usually found on a sticker inside the driver’s side door jamb or in your owner’s manual. For example, a 2015 Camry handle might not fit a 2020 Camry.
Identify the Specific Handle Needed. You need to know if you’re replacing a front or rear, driver or passenger side handle. They are not interchangeable.
There are typically four door handles on a car: front driver, front passenger, rear driver, and rear passenger. Each might have a slightly different design or mounting mechanism.
Source from Reputable Suppliers. Purchase from well-known auto parts stores, dealerships, or trusted online retailers.
Buying from a reliable source ensures you get a quality part. Cheap, generic parts might not last as long or fit as well.
Check Part Numbers. If possible, find the original part number from your old handle or your car’s manual to match it precisely.
Part numbers are unique identifiers. Matching them guarantees compatibility.
A broken door handle affects not only the appearance of your car but also its security and convenience. Replacing it yourself can be a rewarding DIY project.
How to Remove the Old Door Handle Assembly
Taking out the old handle involves carefully disassembling the door panel to access the handle mechanism. Patience is key here.
Accessing the Interior Door Panel
The first step is to remove the interior door panel to get to the inside of the door. This panel hides all the wiring and mechanisms.
Locate and remove any visible screws. These are often found around the armrest, door handle recess, and along the edges of the panel.
Screws are the main fasteners holding the panel. They might be hidden under small plastic caps that you can pry off with your trim tool.
Gently pry off the interior door handle trim piece. This often requires a trim tool to unclip it from the door frame.
The trim piece around the inside door pull needs to come off first. It usually has clips that release when you apply gentle pressure with a trim tool.
Work your trim tool along the edges of the door panel. You’ll hear and feel the clips releasing as you go.
Start from one corner and slowly move along the perimeter. Don’t yank or force it; if it feels stuck, there might be another screw or clip you missed.
Once all clips are released, lift the door panel up and away from the door frame. It might still be attached by wiring for the power windows and locks.
Be careful not to damage the wires. Disconnect the electrical connectors by pressing their release tabs.
Disconnecting the Handle Mechanism
With the panel off, you can see the internal components of the door. Now, it’s time to detach the old handle.
Locate the door handle rod or cable that connects to the back of the handle assembly.
This rod or cable is what actually pulls the latch mechanism when you operate the handle from the outside.
Carefully unclip or disconnect this rod or cable from the handle. It usually slides out of a plastic clip or sleeve.
Sometimes, the clip is simple to release with a flathead screwdriver. Other times, it might just slide out of place.
If the handle is secured by nuts or bolts from the inside, find and remove them.
These fasteners hold the handle assembly to the door frame. You’ll need the correct size socket wrench.
Once everything is disconnected, you should be able to pull the old door handle assembly out from the exterior of the door.
Gently wiggle the old handle to see if it’s free. If it’s still stuck, double-check for any overlooked fasteners or clips.
This process requires patience and careful observation. Each car model can have slight variations, so taking your time is important.
How to Install the New Toyota Camry Door Handle
Putting the new handle in is essentially the reverse of taking the old one out. It’s about carefully reconnecting everything.
Connecting the New Handle Assembly
Now, you’ll fit the new handle into place and reattach its internal connections.
Insert the new door handle assembly into the opening from the outside. Make sure it sits correctly in its mounting points.
Align the new handle precisely with the opening in the door. It should fit snugly.
From the inside, reattach any nuts or bolts that secure the handle assembly to the door frame. Tighten them firmly but do not overtighten.
These fasteners are crucial for keeping the handle stable. Proper tightening prevents rattling later.
Reconnect the door handle rod or cable to the back of the new handle. Ensure it snaps or slides securely into its clip or sleeve.
This is a key step. Test the connection by gently pulling the rod to ensure it’s locked in place.
If your new handle has separate internal components, attach them according to the manufacturer’s instructions.
Some handles come in multiple pieces. Follow the specific diagrams provided with your new part.
Reattaching the Door Panel
Once the handle is secured internally, you can put the door panel back on.
Reconnect any electrical wiring harnesses for power windows, locks, or speakers that were disconnected earlier.
These connectors are usually keyed, so they only fit in one place. Ensure they click into place.
Carefully align the door panel with the door frame, making sure the clip holes line up with the clips on the door.
This step is easier with a second person to help hold the panel.
Press the panel firmly around the edges and at the clip points to snap the clips back into place. You’ll hear them engage.
Work your way around the panel, ensuring each clip is secured.
Reinstall any screws you removed earlier, and snap the trim pieces back into their original positions.
The final screws and trim pieces give the panel its finished look.
Testing the door handle after installation is the last vital step. Open and close the door a few times to make sure the handle operates smoothly and the latch engages correctly.
Troubleshooting Common Issues
Even with careful work, sometimes things don’t go perfectly the first time. Here are a few things to check if your new handle isn’t working right.
Handle Feels Loose or Wobbly
If your new handle feels loose, it usually means the fasteners holding it to the door are not tight enough.
Double-check all the nuts or bolts that secure the handle assembly from the inside of the door.
These fasteners are crucial. Tighten them securely, but avoid stripping the threads.
Ensure the rod or cable connecting to the handle is properly seated in its clip.
A dislodged rod will cause the handle to feel disconnected.
Door Not Latching Properly
This can happen if the rod or cable is not connected correctly or is the wrong length.
Verify that the rod or cable is fully engaged with the handle and the latch mechanism.
Sometimes, the connection needs to be just right for it to work.
Check for any obstructions inside the door that might be preventing the latch from moving freely.
A stray wire or piece of plastic could be in the way.
If you suspect the rod or cable itself is the issue, you might need to consult the part’s specifications or seek advice from the supplier.
The length and bend of these connections are often critical.
Interior Panel Not Fitting Flush
If the door panel doesn’t sit flush against the door, it’s usually because a clip is not properly engaged or something is blocking it.
Make sure all the plastic clips are properly aligned with their holes and are snapped in securely.
Push firmly on the panel around each clip location.
Check for any wires or cables that might be pinched between the panel and the door frame.
Wires can easily get in the way if not routed correctly.
Ensure no part of the new door handle assembly is sticking out and preventing the panel from seating properly.
Sometimes, a slightly different shape of the new handle can interfere.
When to Call a Professional
While this guide aims to make How to Replace Toyota Camry Door Handle manageable, there are times when professional help is the best option.
If you’ve tried these steps and are still experiencing problems, or if you encounter significant difficulty, it might be time to contact a qualified mechanic. Sometimes, more complex internal door mechanisms are involved, or specific tools are required.
A professional technician has the experience and specialized tools to diagnose and fix issues quickly and correctly, ensuring your car’s safety and functionality. They can also identify any underlying issues that might not be apparent during a DIY repair.

Frequently Asked Questions
Question: Can I
Answer: In most cases for a Toyota Camry, you will need to remove the interior door panel to access the fasteners and the connection rod or cable that secures the exterior handle. Trying to do it without removing the panel is usually not possible.
Question: How long does it typically take to replace a Toyota Camry door handle?
Answer: For someone with basic mechanical skills and the right tools, replacing a door handle can take anywhere from 1 to 3 hours. If it’s your first time, it might take a bit longer as you learn the steps.
Question: Where can I buy a replacement door handle for my Toyota Camry?
Answer: You can purchase replacement door handles from your local Toyota dealership, reputable auto parts stores (like AutoZone, O’Reilly Auto Parts, or Advance Auto Parts), or trusted online retailers such as Amazon, eBay, or specialized auto parts websites.
Question: Do I need special tools to replace a Toyota Camry door handle?
Answer: You’ll need common tools like screwdrivers and socket wrenches. However, a plastic trim removal tool kit is highly recommended to avoid damaging your car’s interior panels when removing them.
Question: What if my new door handle doesn’t fit perfectly?
Answer: If your new handle doesn’t fit, double-check that you ordered the correct part for your specific Toyota Camry year, make, and model. You may need to return it and get the correct one from the supplier.
Summary
Successfully tackling How to Replace Toyota Camry Door Handle is within your reach. By gathering the right tools and following these clear, step-by-step instructions, you can confidently remove the old part and install a new one. This DIY approach saves money and gives you a sense of accomplishment. Remember to work patiently and double-check your connections.