How To Tell If LED Driver Is Bad: Essential Guide
Quick Summary:
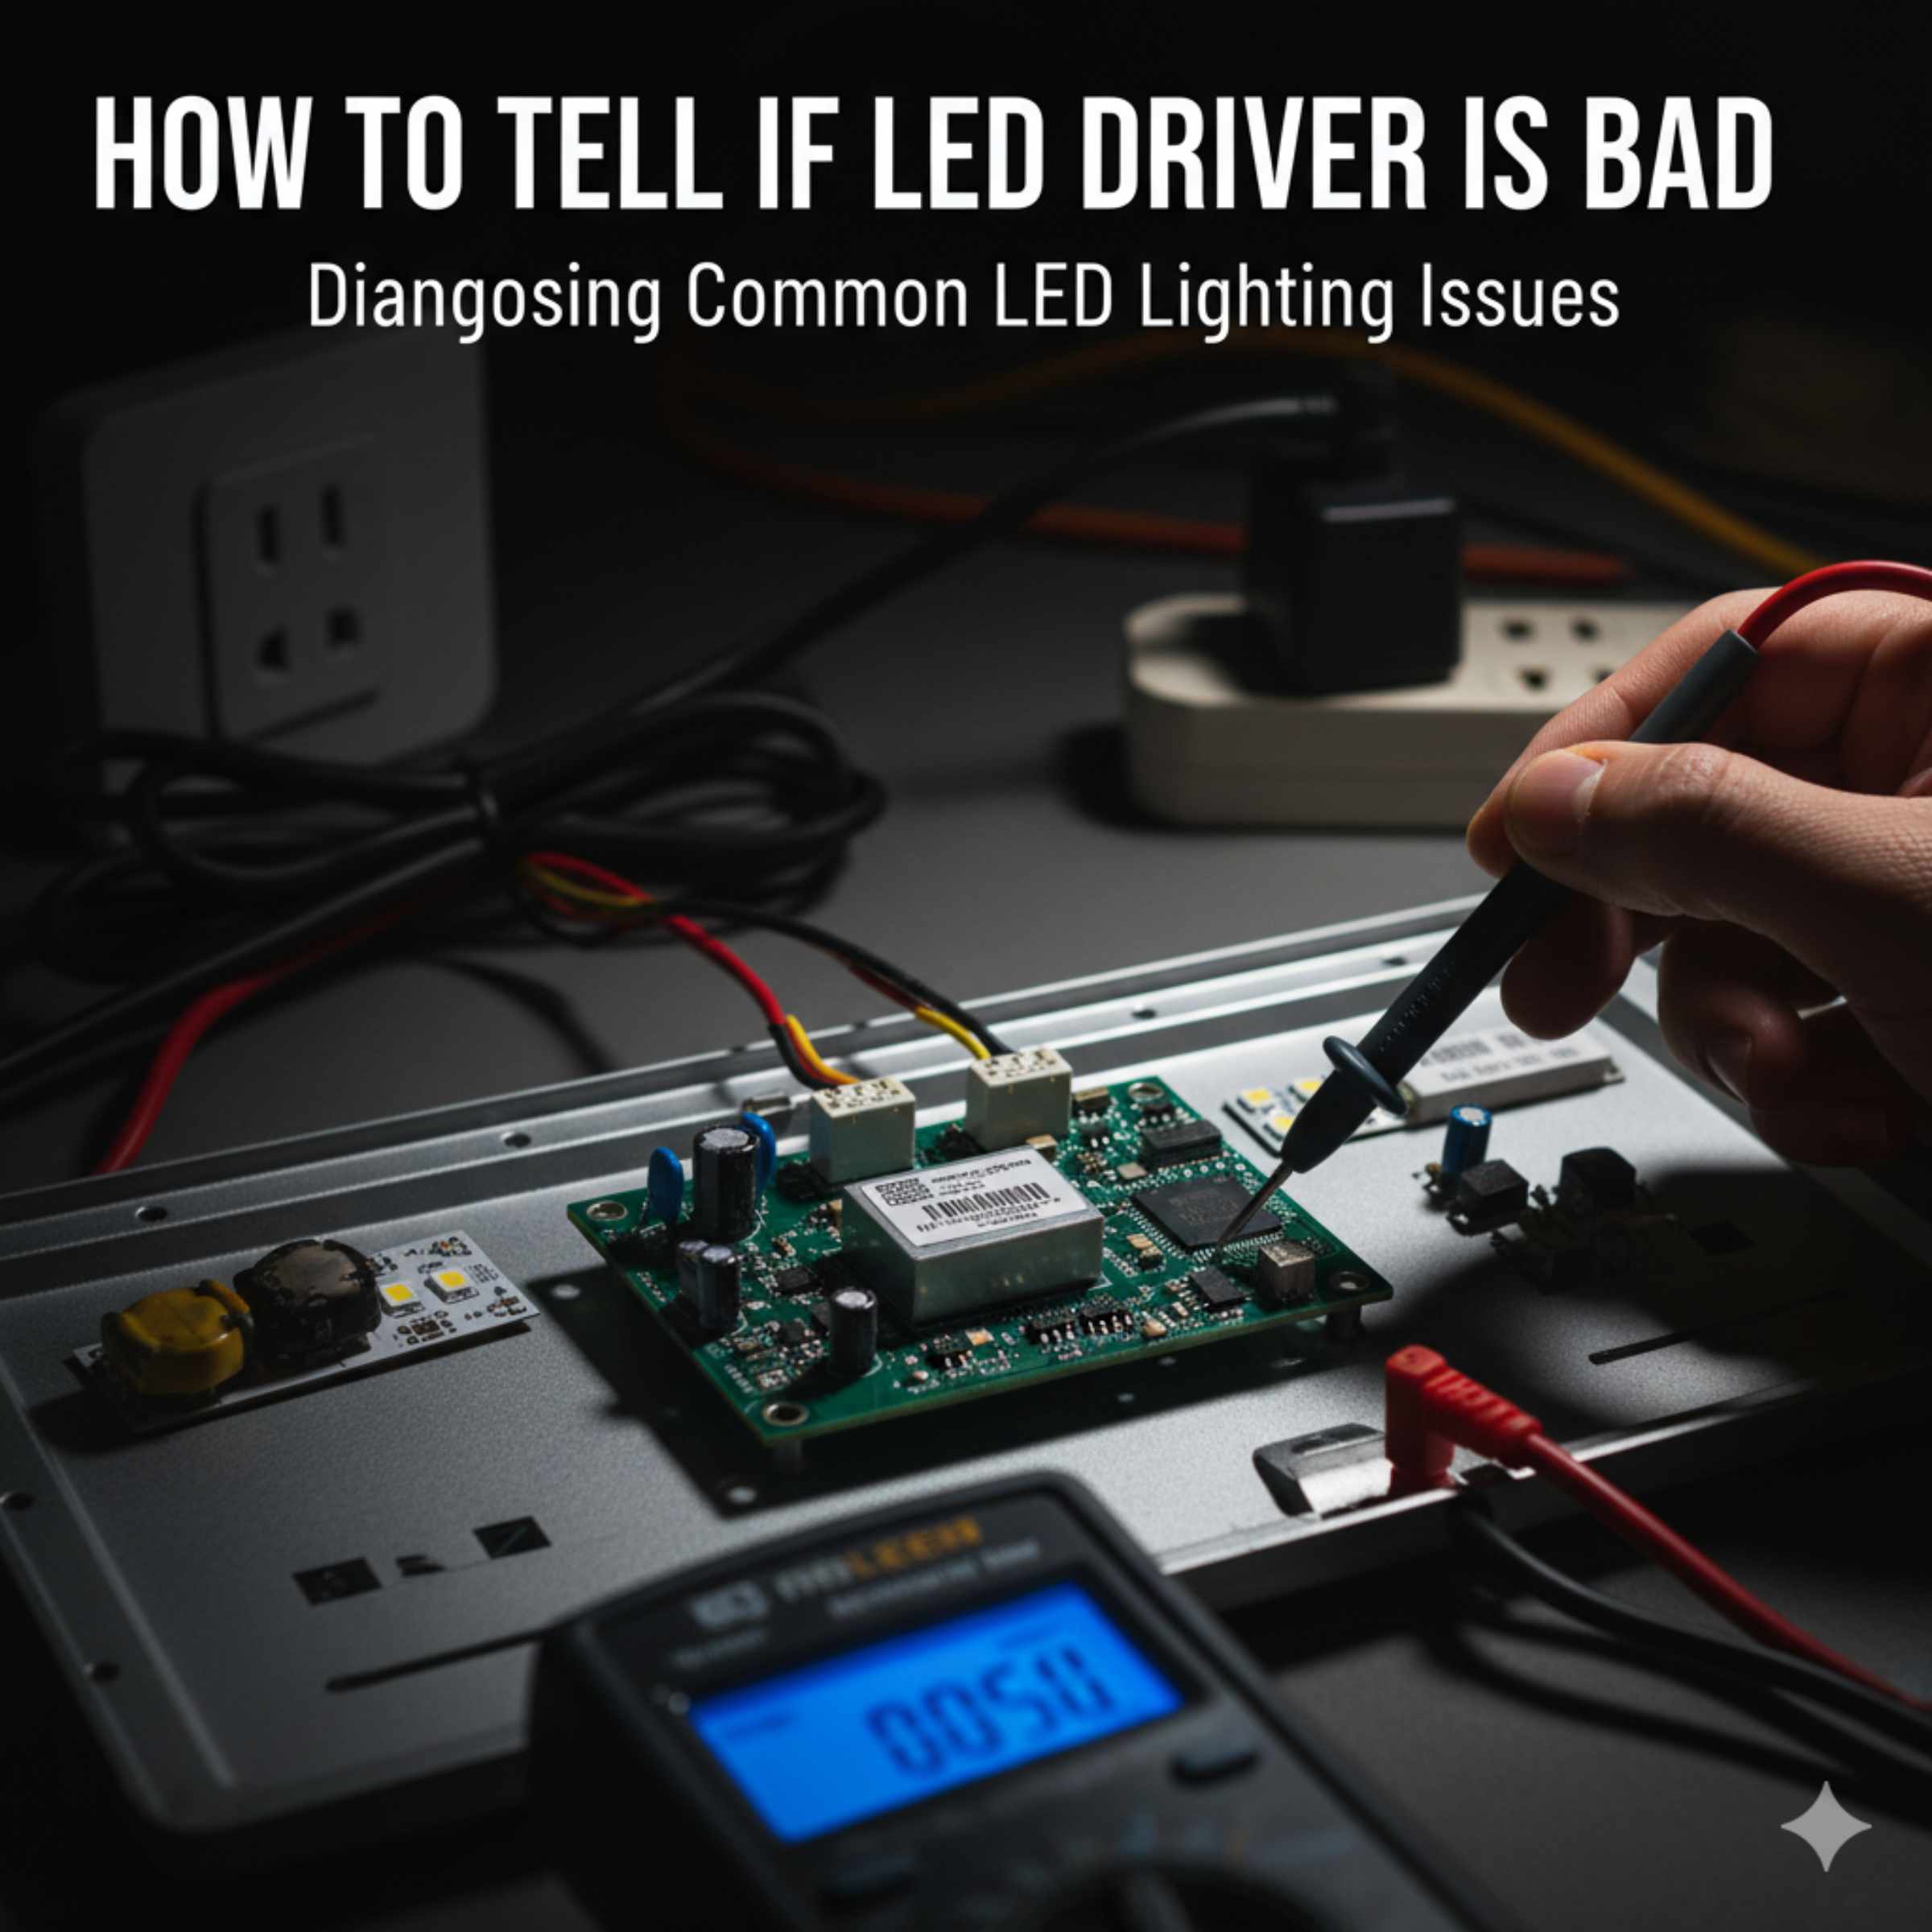
If your LED lights flicker, dim unexpectedly, or don’t turn on, the LED driver might be the culprit. This guide will walk you through simple, safe steps to test your LED driver and determine if it’s faulty, helping you fix your lighting issues.
Hey there, DIY enthusiasts and home improvers! Md Meraj here, ready to tackle another common household puzzle with you. Ever noticed your LED lights acting strange – flickering like a spooky movie, dimming without reason, or just refusing to light up at all? It can be really frustrating when your lighting isn’t cooperating, especially when you’re trying to create a cozy or functional space in your home. Often, the hidden hero (or sometimes the villain!) behind your LED lights is a small but mighty component called an LED driver. When it goes bad, your lights will definitely let you know. But don’t worry! Figuring out if your LED driver is the problem is usually a straightforward process. We’ll go through it step-by-step, just like we do with any good woodworking project, making sure you understand what’s happening and how to check it safely. Let’s get those lights shining bright again!
Why LED Drivers Matter
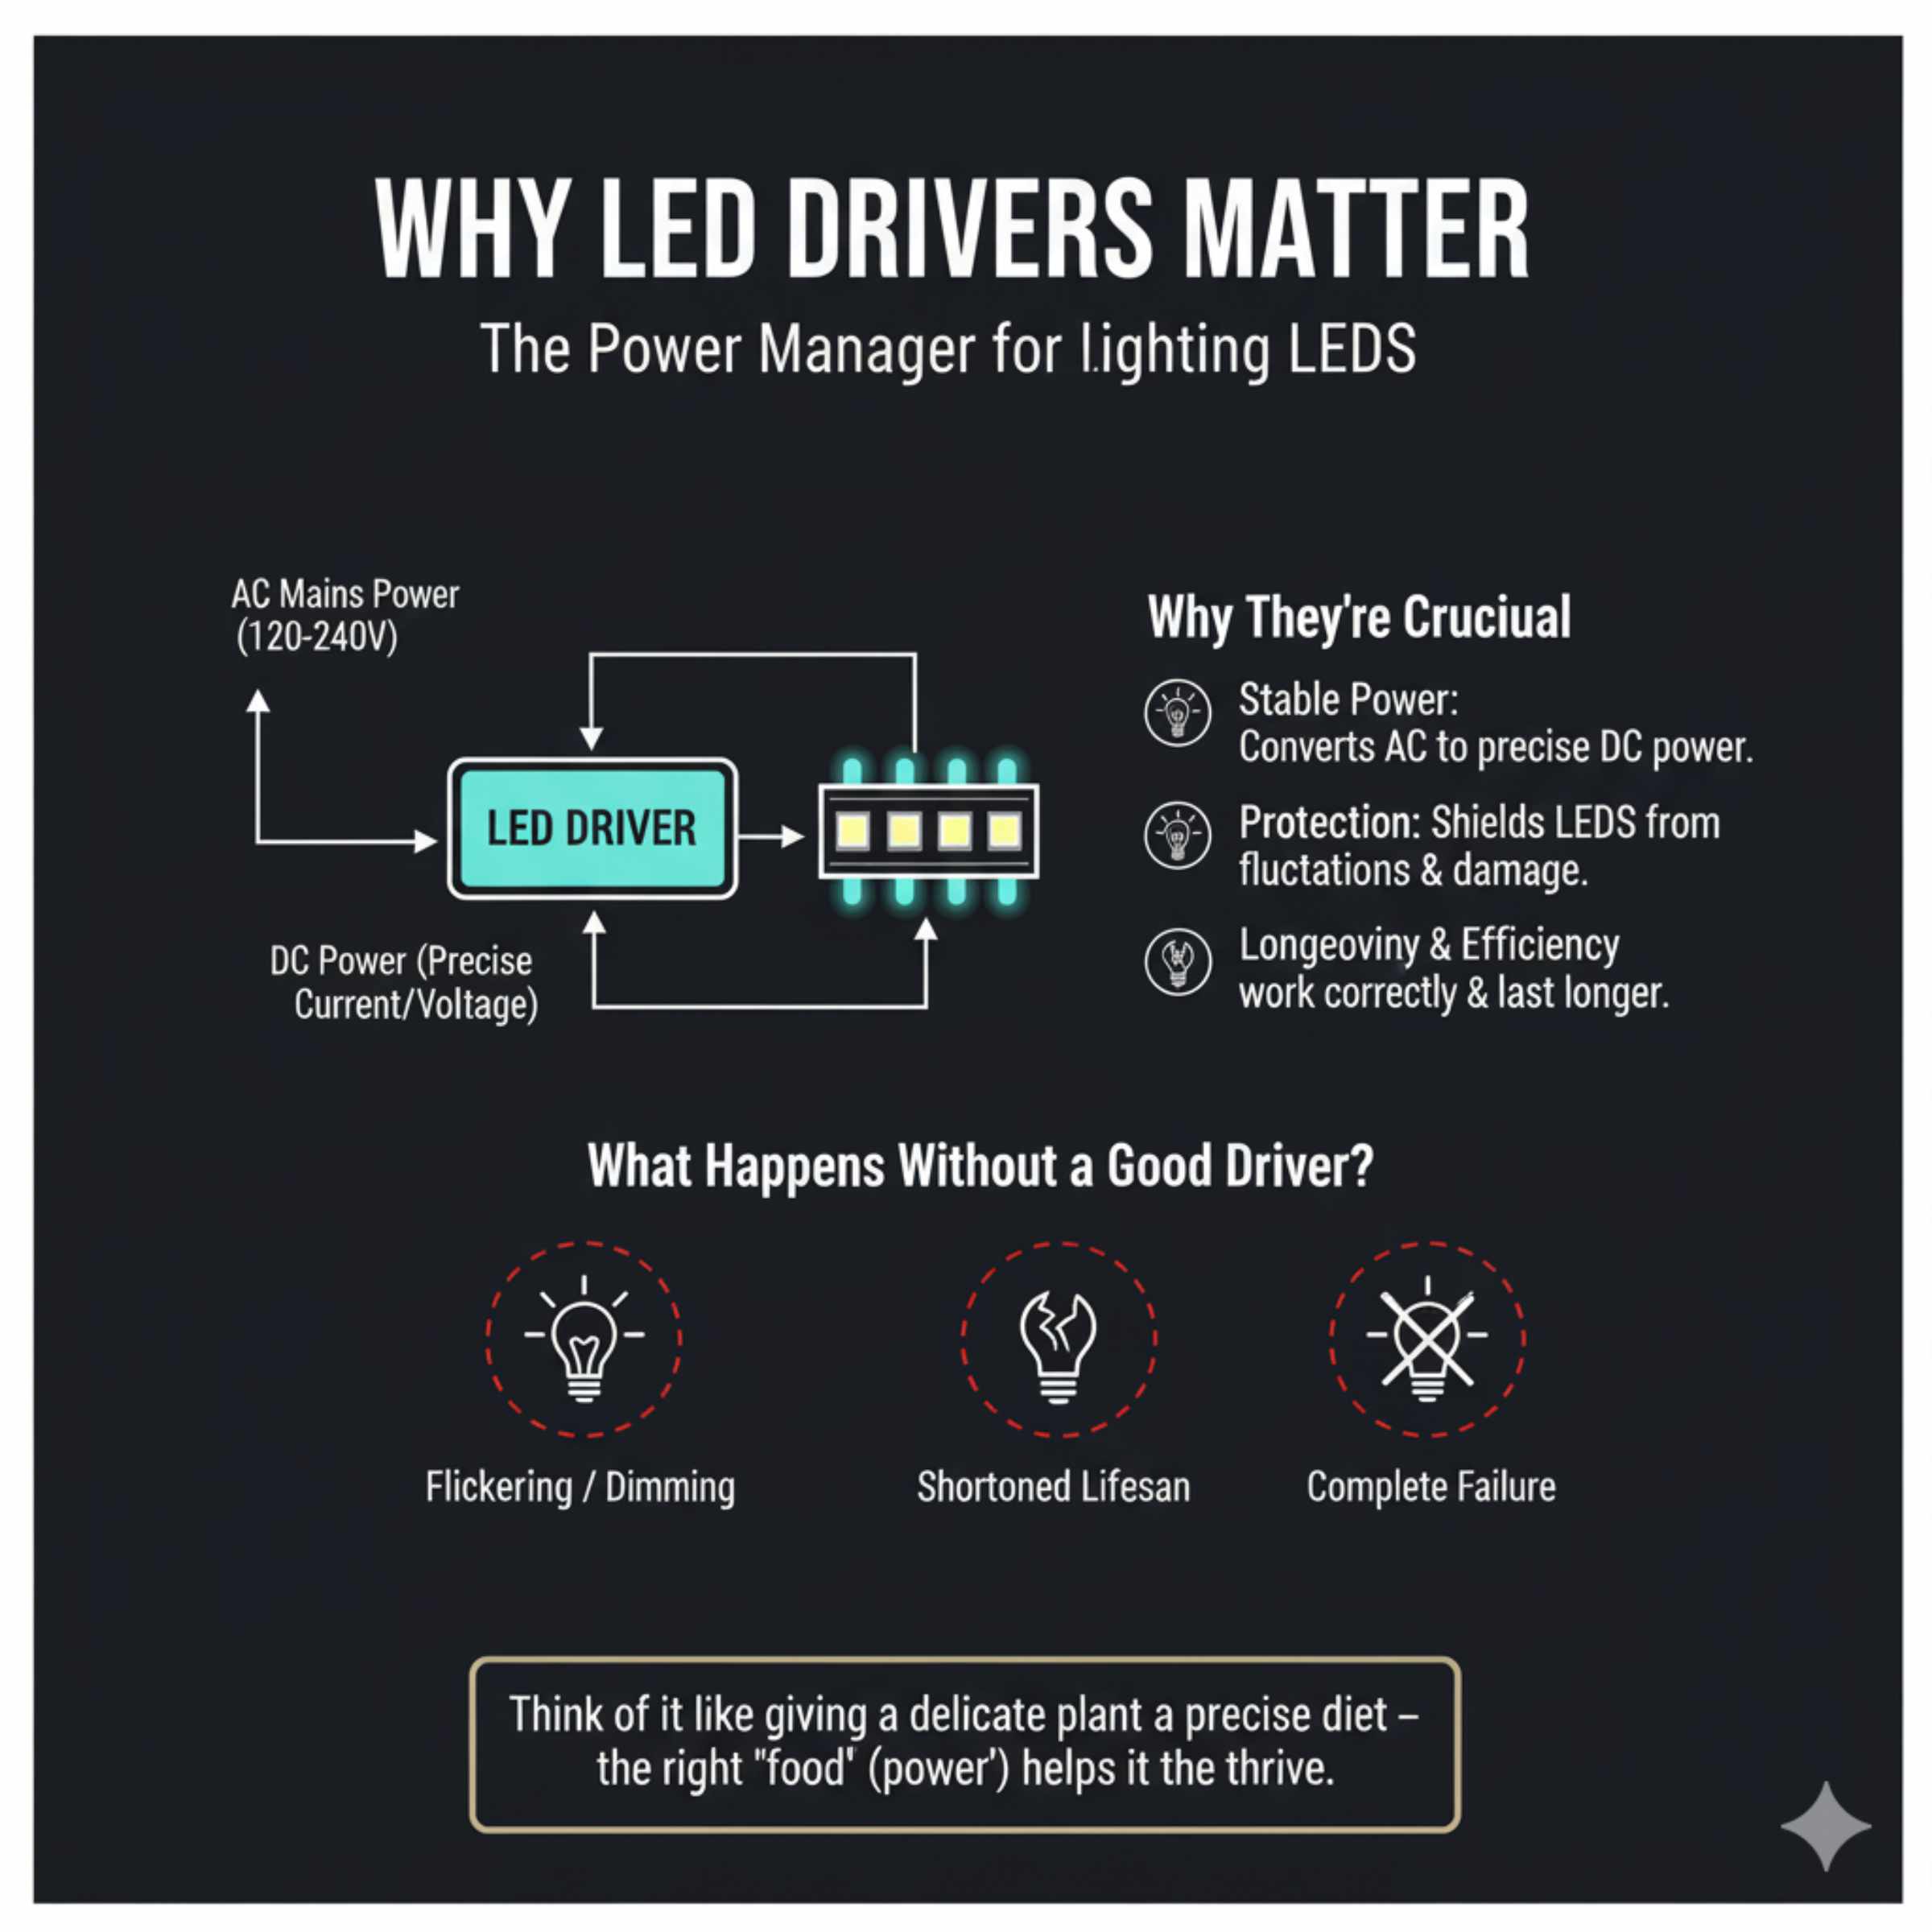
Think of an LED driver as the power manager for your LED lights. LEDs are a bit finicky with electricity. They need a very specific, stable amount of power – a constant current or voltage – to work correctly and last a long time. Unlike old incandescent bulbs that could handle a wider range of power fluctuations, LEDs are sensitive. The LED driver’s job is to take the AC power from your wall outlet and convert it into the precise DC power that your LED bulbs or strips need. It ensures they get just the right amount of juice to shine steadily and efficiently. Without a properly working driver, your LEDs can perform poorly, have a significantly shortened lifespan, or simply not work at all.
This component is crucial because it protects your LED lights from damage caused by unstable power. It’s like giving a precise diet to a delicate plant instead of just dousing it with water; the right “food” (power) helps it thrive. When this power management system fails, the symptoms are usually quite obvious, pointing directly to the driver as the source of the problem.
Common Signs of a Failing LED Driver
When an LED driver starts to go bad, it usually shows its age through a few distinct symptoms. Recognizing these signs is the first step in diagnosing the issue. It’s much like noticing a wobbly leg on a chair before it completely collapses – early detection can save you a lot of trouble.
Here are the most common indicators that your LED driver might be on its way out:
- Flickering Lights: This is perhaps the most common and annoying symptom. If your LED lights flicker intermittently, or seem to “strobe,” it’s a strong sign that the driver isn’t providing a stable current. The flickering can be rapid or slow, but any inconsistent light output is suspect.
- Dimming or Weak Light Output: If your LED lights are suddenly much dimmer than they used to be, even when they are new or should be at full brightness, the driver might not be supplying enough power. It’s like a battery running low; the performance drops.
- Lights Not Turning On At All: This is a more definitive sign. If you flip the switch and nothing happens, and you’ve confirmed the bulb itself isn’t the issue (by testing it elsewhere, if possible), the driver is a prime suspect. It might have completely failed and is no longer sending power to the LEDs.
- Buzzing or Humming Noises: While some electrical components can make faint noises, a loud buzzing or humming sound coming from the vicinity of the LED driver often indicates internal components are struggling or failing. This can sometimes be accompanied by a burning smell.
- Lights Turning On and Off Randomly: If your lights switch on and off by themselves without any input, this suggests the driver is unstable and likely malfunctioning.
- Reduced Lifespan of LED Bulbs: If you find yourself replacing LED bulbs much more frequently than you expect, it could be that a faulty driver is repeatedly “killing” them by providing inconsistent or damaging power.
- Visible Damage or Burn Marks: In some cases, a failing driver might show physical signs of damage. If you can safely access the driver, look for any signs of discoloration, burn marks, or bulging capacitors.
These symptoms can also sometimes be caused by issues with the LED bulb itself, the wiring, or the power switch. That’s why a systematic approach is important. But if multiple lights on the same driver exhibit these issues, the driver becomes the most likely culprit.
Understanding LED Drivers: Types and How They Work
Before we dive into testing, it’s helpful to know a little about the different types of LED drivers out there. This will help you identify what you’re dealing with in your home. The main function is the same – to provide the correct power – but they achieve this in different ways.
Constant Current Drivers
These are the most common type for LED strips and individual high-power LEDs. They are designed to maintain a consistent electrical current flowing through the LEDs, regardless of slight changes in voltage or temperature. This is ideal because LEDs are most sensitive to current variations. If the resistance of the LED changes (due to temperature, for example), the constant current driver adjusts the voltage to keep the current steady. This is crucial for preventing overheating and ensuring consistent brightness.
Constant Voltage Drivers
These drivers provide a steady, fixed voltage. They are often used when multiple LEDs are wired in parallel, as each LED in a parallel circuit typically has its own resistor or is designed to handle the given voltage. The brightness of the LEDs will then depend on the total resistance of the circuit. These are common for lower-power LED applications like decorative lighting or some LED panels.
AC vs. DC Drivers
AC (Alternating Current) Drivers: Some simpler LED systems might use a form of AC driver that takes mains AC power and rectifies it to a form closer to DC, but often without the tight regulation of a dedicated DC driver. These are less common in modern, high-quality LED systems.
DC (Direct Current) Drivers: Most LED systems use DC drivers. These take the AC power from your home, convert it to DC, and then regulate it to the specific constant current or constant voltage required by the LEDs. You’ll often find these connected to a standard AC plug or wired directly into your home’s electrical system.
Integrated vs. External Drivers
Integrated Drivers: In many modern LED fixtures (like integrated LED ceiling lights or light bars), the driver is built directly into the fixture itself. It’s often a compact unit hidden within the housing.
External Drivers: These are separate boxes or modules. You’ll commonly see them with LED strips, some spotlights, or under-cabinet lighting. They are often connected to the LED fixture via wires.
Knowing the type of driver you have can help you locate it and understand how it’s connected, which is essential for testing.
Safety First! What You Need Before You Start
Working with electrical components requires caution. Before you start troubleshooting, it’s vital to prioritize your safety. Electricity can be dangerous if not handled properly, and even low-voltage DC can cause shocks or damage components if mishandled. Always remember the golden rule: when in doubt, consult a qualified electrician.
Here’s what you’ll need and what safety precautions to take:
Essential Tools and Materials:
- Multimeter: This is your most important diagnostic tool. It measures voltage, current, and resistance. Ensure it’s set to the correct setting for your test (e.g., DC voltage).
- Screwdriver Set: You’ll likely need to open fixtures or access panels to reach the driver.
- Wire Strippers/Cutters: In case you need to disconnect or prepare wires for testing.
- Insulated Gloves: For an extra layer of protection, especially when working near live electrical connections (though we aim to de-energize first).
- Safety Glasses: To protect your eyes from any dust or debris.
- Non-Contact Voltage Tester: A useful tool to quickly check if a wire or component is live before touching it.
- Your LED Fixture/Strip Manual: If you have it, it can provide crucial information about the driver’s specifications (voltage, current).
- Replacement LED Driver (Optional): If you suspect the driver is bad, having a compatible replacement on hand can speed up the repair process.
Safety Precautions:
- Turn Off Power: ALWAYS disconnect the power to the circuit you are working on at the breaker box before touching any wires or components. Double-check with a non-contact voltage tester to ensure the power is indeed off.
- Understand Your System: Know whether you are dealing with low-voltage DC (common for LED strips) or mains voltage AC that feeds into the driver. Mains voltage is significantly more dangerous.
- Don’t Overload Your Multimeter: Ensure your multimeter is set to the correct range for the measurement you are taking. For example, don’t try to measure mains voltage (120V/240V AC) on a setting designed for low DC voltage.
- Work in a Well-Lit Area: Good lighting helps you see what you’re doing and avoid mistakes.
- Avoid Touching Exposed Wires: Even after turning off the breaker, it’s good practice to avoid touching exposed wire ends.
- If in Doubt, Stop: If at any point you feel unsure or uncomfortable, stop and call a qualified electrician. It’s not worth risking injury or further damage.
With safety covered, let’s move on to the actual testing methods.
How to Test an LED Driver: Step-by-Step Guide
Testing an LED driver involves a few key steps, primarily using a multimeter to check the input and output voltages. We’ll focus on the most common scenarios for DIYers.
Step 1: Identify the LED Driver and Its Connections
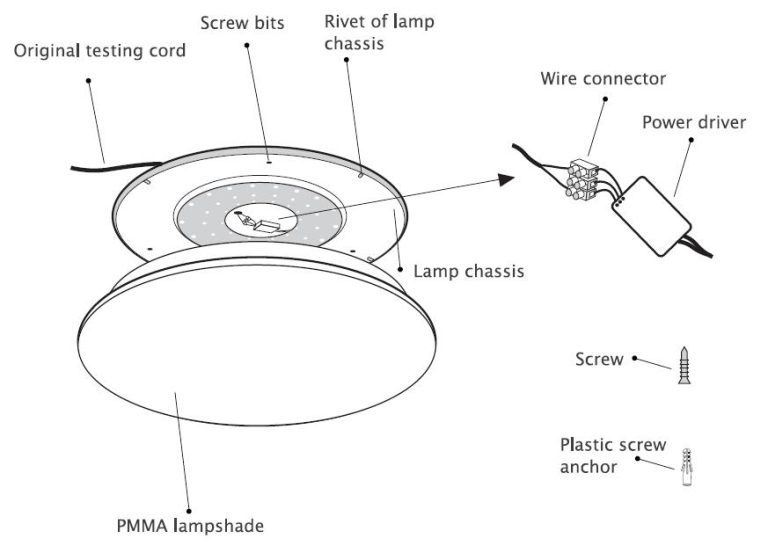
First, you need to locate the LED driver. It might be integrated into the fixture, or it could be a separate box. Look for a small metal or plastic enclosure connected to your LED light. It will have wires coming in (from the power source) and wires going out (to the LED light). The driver itself will usually have labels indicating its input voltage (e.g., 100-240V AC) and output voltage/current (e.g., 12V DC, 24V DC, or specific current ratings like 350mA, 700mA).
For integrated drivers: You might need to carefully remove the fixture cover to access the driver unit.
For external drivers: They are usually easier to find, often plugged into an outlet or wired directly. They might be a small black box with wires on either end.
Step 2: Safely Disconnect Power
This is the most critical step. Go to your home’s electrical panel (breaker box) and turn off the circuit breaker that controls the light fixture or area you’re working on. To be absolutely sure, use a non-contact voltage tester on the wires leading to the driver. If it indicates no power, you’re good to proceed.
Step 3: Check the Input Voltage (AC Side)
This test verifies that power is actually reaching the driver.
- Set your multimeter to measure AC voltage (V~ or ACV). Choose a range slightly higher than your home’s typical voltage (e.g., 200V or higher for a 120V circuit).
- Carefully expose the input wires where they connect to the driver. These are usually the wires coming from your wall outlet or junction box.
- With the power still OFF (you’re just checking for continuity of wires), you can ensure the wires are intact. However, to test the actual voltage reaching the driver, you will need to briefly restore power.
- Crucially, ensure no bare wires are touching each other or any metal surfaces.
- Briefly turn the circuit breaker back ON.
- Touch the multimeter probes to the input terminals or wires of the driver. One probe on each input wire.
- You should see a reading close to your mains voltage (e.g., 110-120V in North America, 220-240V in Europe).
- Immediately turn the circuit breaker back OFF after taking the reading.
What this tells you:
- Correct Voltage Reading: Power is reaching the driver. The problem likely lies within the driver’s output or the LED light itself.
- No Voltage Reading (or very low): The issue might be upstream – a faulty switch, loose wiring in the wall, or a tripped breaker further down the line. The driver itself might be fine, but it’s not receiving power.
Step 4: Check the Output Voltage (DC Side)
This is where you’ll check if the driver is converting and outputting the correct DC voltage or current to the LED light. This test is typically done with the power OFF, measuring the voltage across the output terminals, or by measuring current while the light is on. We’ll focus on voltage testing as it’s safer and more common for beginners.
Testing Output Voltage (for Constant Voltage Drivers):
- Ensure the power to the circuit is OFF at the breaker.
- Set your multimeter to measure DC voltage (V– or DCV). Select a range appropriate for the driver’s output specification (e.g., if it says 12V DC, set it to 20V DC).
- Identify the output wires from the driver that go to the LED light.
- Place the multimeter probes on the output terminals or wires. The positive probe should go to the positive output wire (often red or marked ‘+’), and the negative probe to the negative wire (often black or marked ‘-‘).
- Turn the circuit breaker back ON.
- Observe the multimeter reading.
What this tells you:
- Correct Voltage Reading: The driver is outputting the expected voltage. If the light still doesn’t work, the problem might be with the LED light itself, the wiring between the driver and the light, or a loose connection.
- Low or Zero Voltage Reading: The driver is likely faulty. It’s not converting or outputting the necessary DC power.
- Voltage Fluctuating Wildly: This indicates an unstable driver, which is also a sign of failure.
Testing Output Current (for Constant Current Drivers):
Testing current is a bit more involved and requires the driver to be connected to the LED load, and the circuit powered ON. This is often best left to those with more experience, as an incorrect setup can damage the multimeter or the driver.
To test current:
- Ensure the driver is connected to its intended LED load.
- Set your multimeter to measure DC current (A– or DCA). Choose a range appropriate for the driver’s output current (e.g., if it says 700mA, set it to 1A or 1000mA).
- Turn the circuit breaker ON.
- You will need to break the circuit in the output wires and insert the multimeter in series. This means disconnecting one of the output wires from the LED and connecting one multimeter probe to the end of that wire and the other probe to the output terminal on the driver where the wire was connected.
- Observe the reading.
What this tells you:
- Correct Current Reading: The driver is supplying the correct current. The issue is likely elsewhere.
- Low or Zero Current Reading: The driver is failing.
- Excessive Current Reading: This is dangerous and indicates a severe fault in the driver.
Note: For constant current drivers, you MUST have a load connected. Trying to measure current without a load can damage the driver. If you’re unsure, stick to voltage testing.
Step 5: Visual Inspection
While the power is off, take a close look at the driver itself. Are there any signs of overheating, such as discoloration on the casing? Do you see any bulging or leaking capacitors (they look like small metal cylinders)? Any burn marks or melted plastic are definitive signs of a failed driver.
Step 6: Test the LED Light Itself (If Possible)
If the driver seems to be outputting the correct voltage/current, the problem might be with the LED light itself. If it’s a separate LED bulb or strip, try testing it with a known-good, compatible power supply or driver. If it works with another power source, then your original driver was likely the issue. If it still doesn’t work, the LED light is probably faulty.
Troubleshooting Common Scenarios
Let’s walk through a few typical situations you might encounter:
Scenario 1: LED Strip Flickers and Dims
Symptoms: Your LED strip lights are flickering, and the brightness seems to be decreasing over time.
Troubleshooting Steps:
- Check Connections: Ensure all wire connections to the driver and the strip are secure. Loose connections can cause intermittent power.
- Test Input Voltage: Turn off power, then turn it back on briefly to test AC input voltage at the driver. Ensure it’s correct.
- Test Output Voltage: Turn power off. Set multimeter to DCV. Test the DC output voltage from the driver. If it’s significantly lower than specified, or fluctuating, the driver is likely bad.
- Visual Inspection: Look for any signs of damage on the driver.
Likely Cause: If input voltage is good, but output is low/fluctuating, the LED driver is probably failing.
Scenario 2: Recessed LED Light Won’t Turn On
Symptoms: A specific recessed LED light fixture suddenly stopped working.
Troubleshooting Steps:
- Confirm Power at Breaker: Ensure the breaker for that light hasn’t tripped.
- Access Driver: Carefully remove the trim and housing of the recessed light to access the integrated driver.
- Test Input Voltage: With power on briefly, test AC input to the driver. If correct, proceed. If not, check wiring or switch.
- Test Output Voltage: With power off, test DC output from the driver. If zero or very low, the driver is bad.
- Check LED Module: If the driver output is correct, the LED module itself might have failed.
Likely Cause: If input voltage is present but output is absent, the integrated LED driver is likely faulty.
Scenario 3: LED Panel Lights Buzzing and Flickering
Symptoms: An LED panel light is making a buzzing noise and flickering erratically.
Troubleshooting Steps:
- Isolate the Sound: Try to pinpoint where the buzzing is coming from. It’s likely the driver.
- Test Input Voltage: Confirm AC power is reaching the driver.
- Test Output Voltage: Check the DC output. A buzzing driver that is also showing incorrect output is almost certainly bad.
- Disconnect Load (Carefully): If the buzzing is very loud or concerning, you might consider disconnecting the LED panel from the driver (with power OFF) and testing the driver’s output voltage into an empty circuit. If it still buzzes and shows incorrect voltage, the driver is bad. If it stops buzzing and shows no voltage (as expected without a load), the problem might be with the panel itself or how it’s loading the driver.
Likely Cause: The buzzing sound, combined with flickering, strongly suggests the internal components of the LED driver are failing.
When to Replace the LED Driver
You’ve gone through the steps, and the evidence points to a faulty driver. Here’s when it’s time to replace it:
- Consistently low or zero output voltage/current when the input voltage is correct.
- Fluctuating or unstable output readings from your multimeter.
- Visible signs of damage such as burn marks, melted plastic, or bulging/leaking capacitors.
- Loud buzzing or humming noises coming from the driver, especially when combined with other symptoms.
- The LED light itself works fine when tested with a different, known-good driver.
Replacing an LED driver is often a more cost-effective solution than replacing the entire LED fixture, especially for larger or more expensive installations like LED panels or custom lighting setups. It’s a very achievable DIY repair.
Replacing an LED Driver: A Quick Overview
Replacing a driver is similar to testing it, but with the goal of swapping out the old unit for a new one.
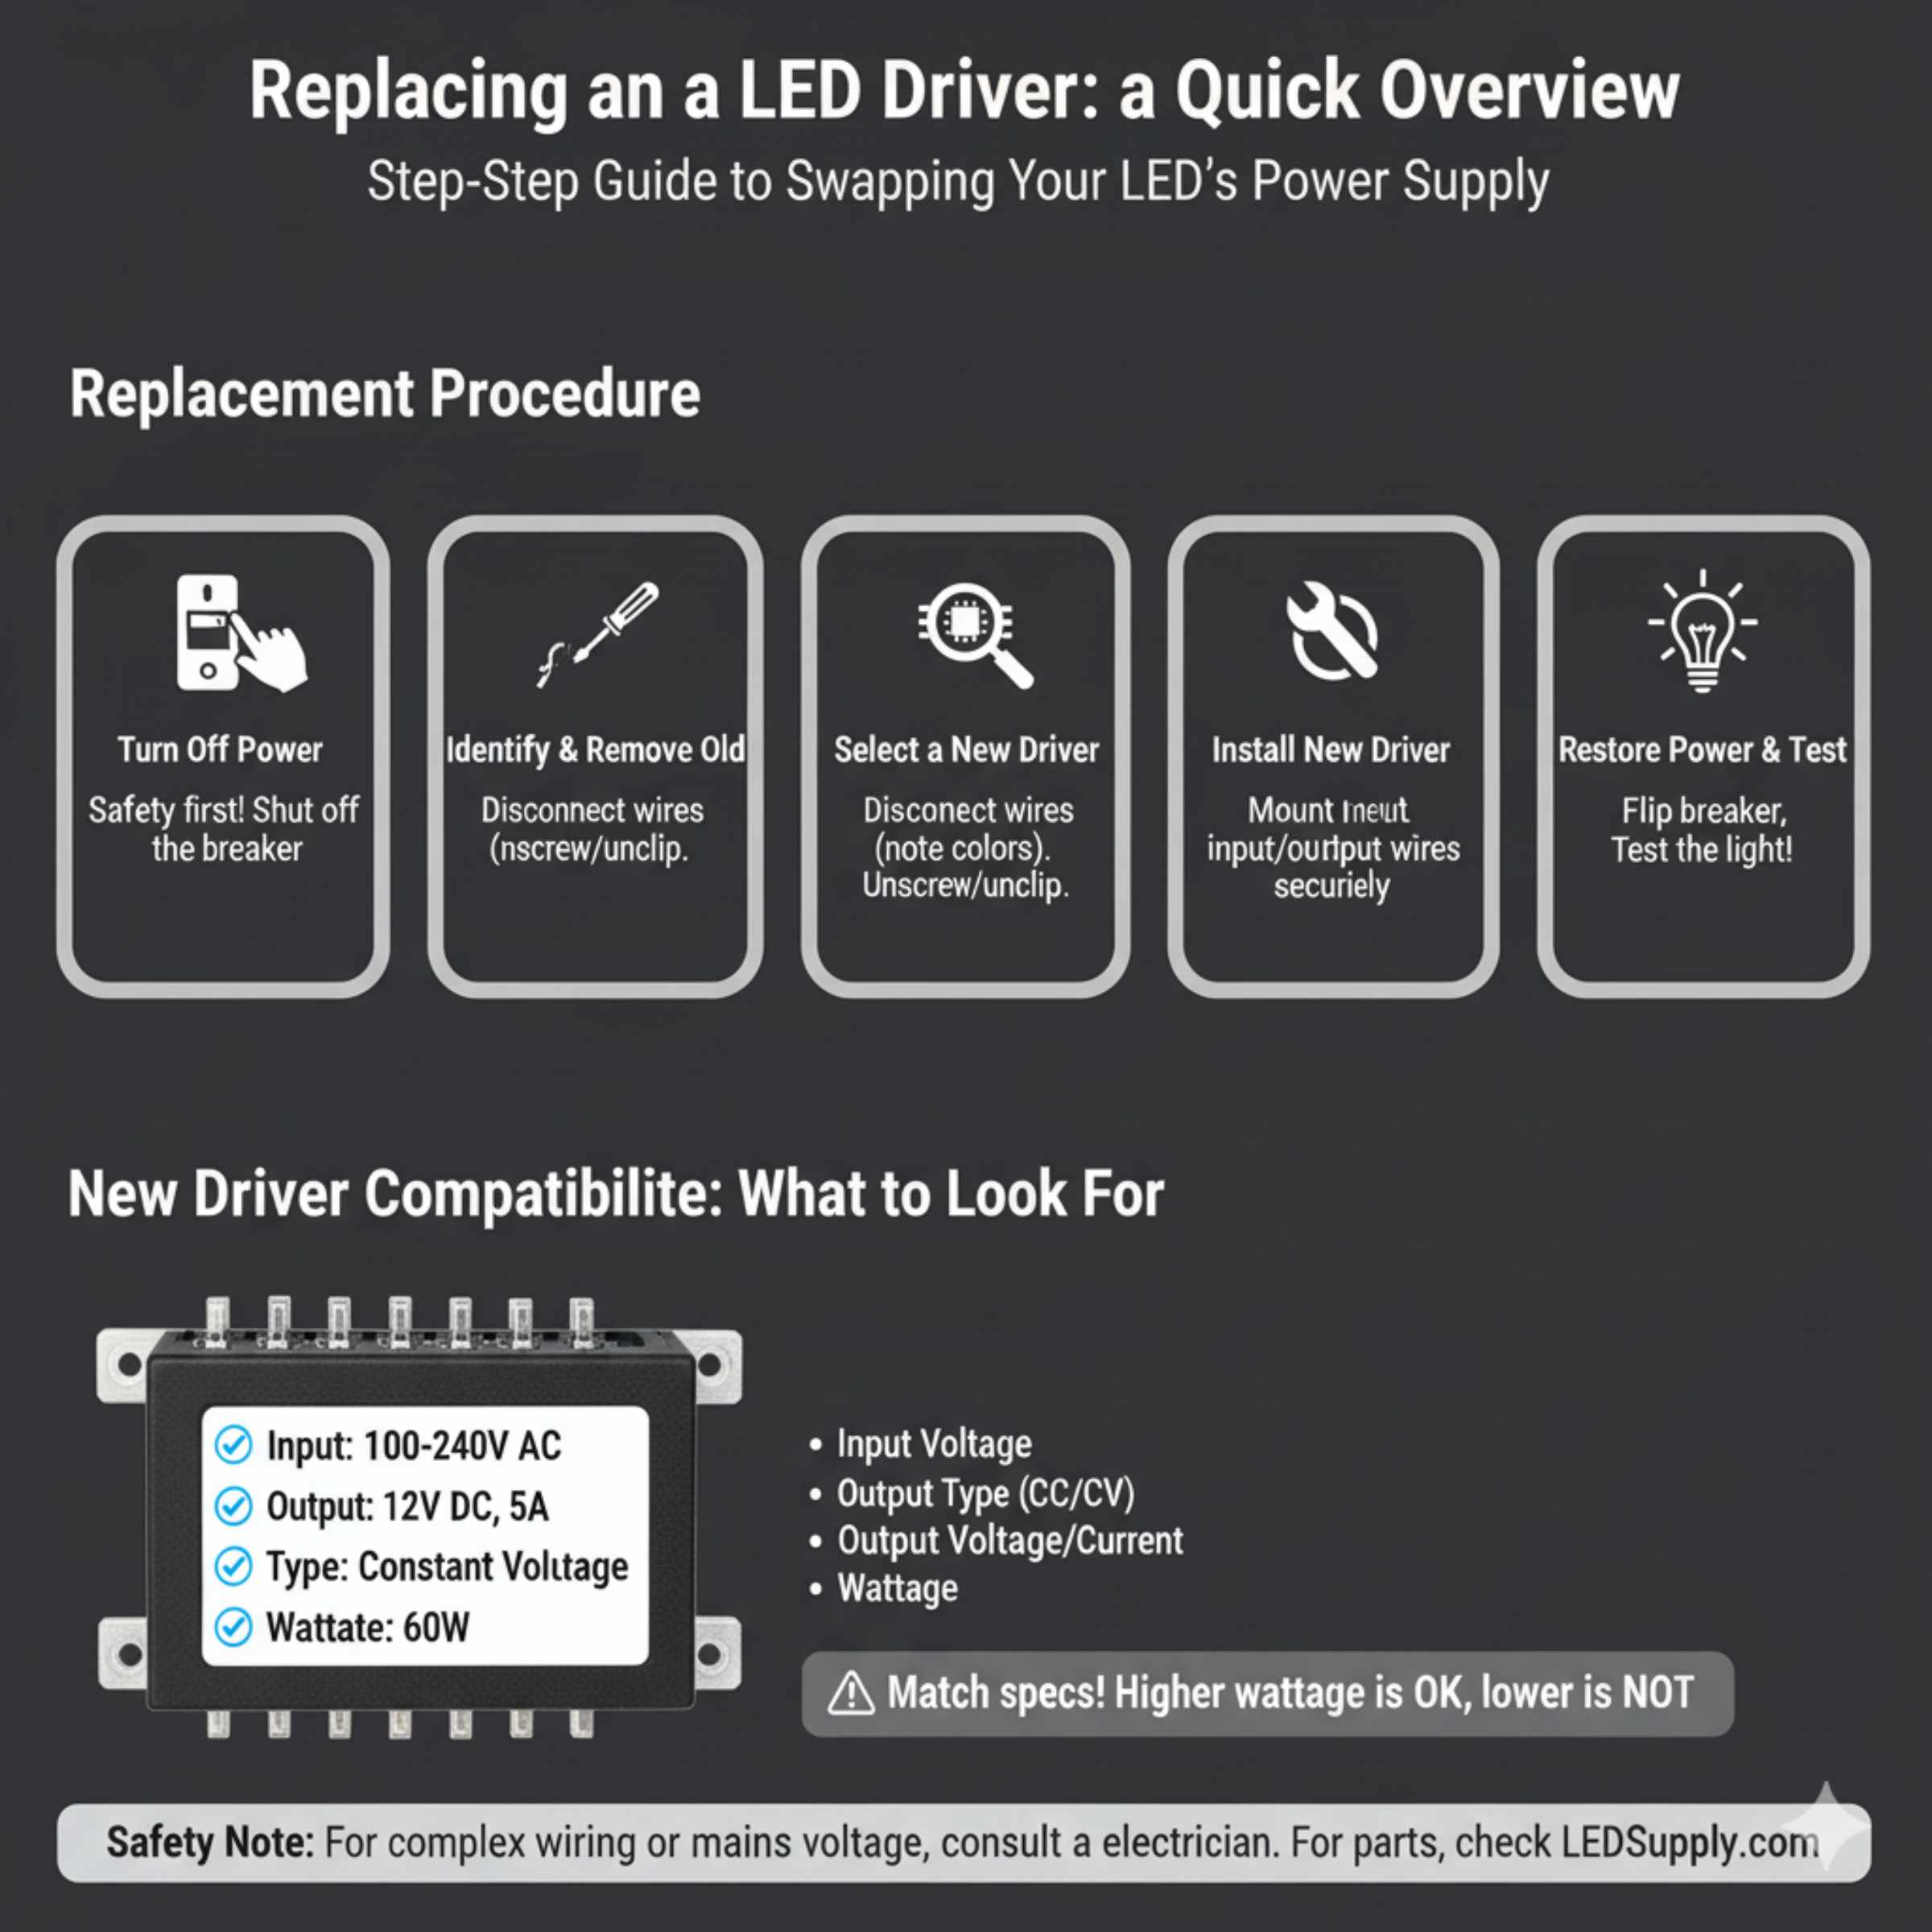
- Turn Off Power: Again, safety first! Shut off the breaker.
- Identify and Remove Old Driver: Carefully disconnect the wires from the old driver (note which wires go where – often marked input/output, or by color). Unscrew or unclip the old driver from its mounting location.
-
Select a New Driver: Ensure the new driver is compatible. It should have:
- The same input voltage range (e.g., 100-240V AC).
- The same output type (Constant Current or Constant Voltage).
- The same output voltage (e.g., 12V DC) OR a very similar voltage range.
- The same or slightly higher output current (for CC drivers) or wattage (for CV drivers). For example, if the old driver was 12V 50W, a 12V 60W driver is fine, but a 12V 40W driver might not be enough.
You can often find this information on the old driver’s label. If unsure, consult the LED fixture’s manual or manufacturer. Reputable sources for LED drivers include online electronics suppliers and specialized lighting component stores. For example, LEDSupply offers a wide range of high-quality LED drivers with detailed specifications.
- Install New Driver: Mount the new driver in the same location. Connect the input wires (from mains power) and output wires (to the LED light) according to the markings on the new driver and the wiring diagram. Ensure all connections are secure and insulated.
- Restore Power and Test: Turn the circuit breaker back on and test the LED light.
If you’re dealing with mains voltage, or if the wiring is complex, consider hiring an electrician to perform the replacement.
FAQ: Your LED Driver Questions Answered
Q1: Can I use any LED driver with my LED lights?
A1: No, not just any driver. You need to match the driver’s specifications to your LED lights. Key factors are the input voltage (what your house provides), output voltage (what the LEDs need), and whether it’s constant current (CC) or constant voltage (CV). Always check the labels on both your LEDs and the driver.
Q2: My LED lights are dim, is it always the driver?
A2: Dimming can be caused by a few things. It could be a failing driver that isn’t providing enough power. However, it could also be an issue with the LED bulb itself (if it’s a replaceable bulb), loose wiring, or even a dimmer switch that isn’t compatible with LEDs. Testing the driver’s output is a good first step.
Q3: How do I know if my driver is constant current (CC) or constant voltage (CV)?
A3: Check the label on the driver. It will explicitly state “Constant Current” or “Constant Voltage” and will list the output in Amps (A) for CC drivers (e.g., 350mA, 700mA) or Volts (V) for CV drivers (e.g., 12V, 24V).
Q4: My LED driver is buzzing. Is that dangerous?
A4: A buzzing sound often means the driver’s internal components are struggling and could be on the verge of failure. While it might not be immediately dangerous if the enclosure is intact, it’s a strong indicator that the driver needs to be replaced soon to prevent potential issues and ensure reliable lighting.
Q5: Can I just bypass the LED driver and connect the LEDs directly to power?
A5: Absolutely not. LEDs require precise voltage or current control. Connecting them directly to mains power will instantly destroy them and could create a fire hazard. The driver is a critical safety and performance component.
Q6: What happens if I use a driver with a higher wattage than my LEDs need?
A6: For Constant Voltage (CV) drivers, using one with a higher wattage rating than your LEDs is generally safe, and sometimes even beneficial, as it ensures the driver isn’t overloaded. For Constant Current (CC) drivers, you must match the current precisely. Using a higher voltage driver with LEDs designed for a lower voltage will likely damage the LEDs.
Q7: How long should an LED driver last?
A7: The lifespan of an LED driver varies greatly depending on its quality, how it’s used (e.g., running at its maximum capacity), and environmental factors like heat. High-quality drivers can last 50,000 hours or more, while cheaper ones might fail much sooner. Factors like poor ventilation or frequent power cycling can shorten their life.
Conclusion
Dealing with flickering, dim, or dead LED lights can be a head-scratcher, but understanding the role of the LED driver is key to solving the puzzle. By following the steps outlined in this guide, you can safely and effectively test your LED driver using a multimeter and visual inspection. Recognizing the common signs of failure – from annoying flickers to complete silence – empowers you to make an informed diagnosis. Remember, safety is paramount, so always ensure power is disconnected before you begin. Whether it’s a simple fix or a replacement job, knowing how to tell if your LED driver is bad puts you in the driver’s seat for restoring your home’s lighting. With a little patience and the right tools, you can confidently tackle this DIY task and get your lights shining as brightly as they should!