What Is Light The Night: Essential Guide
Bolded Quick Summary: Light The Night is a popular, often community-focused event, usually associated with fundraising for specific charities or causes, where participants gather after dark to symbolize hope and awareness. It is not a standardized product or construction term; instead, it is an organized public gathering concept.
What Is Light The Night: An Essential Guide for Homeowners and Community Members
Ever heard someone mention “Light The Night” and felt a little lost? You are not alone! This phrase pops up in many different contexts, and it rarely refers to a specific tool or woodworking trick. It’s often tied to community events, fundraising drives, or sometimes even unique lighting projects. If you are new to home projects or community involvement, terms like this can sound confusing. Don’t worry! We will clear up exactly what “Light The Night” usually means.
This guide is here to give you the straight facts, whether you are trying to understand a local event or perhaps looking for inspiration for your own safe, beautiful outdoor lighting setup. We’re breaking down the most common meanings, keeping things simple and friendly, just like tackling a manageable weekend DIY task. Let’s shed some light on this topic together!
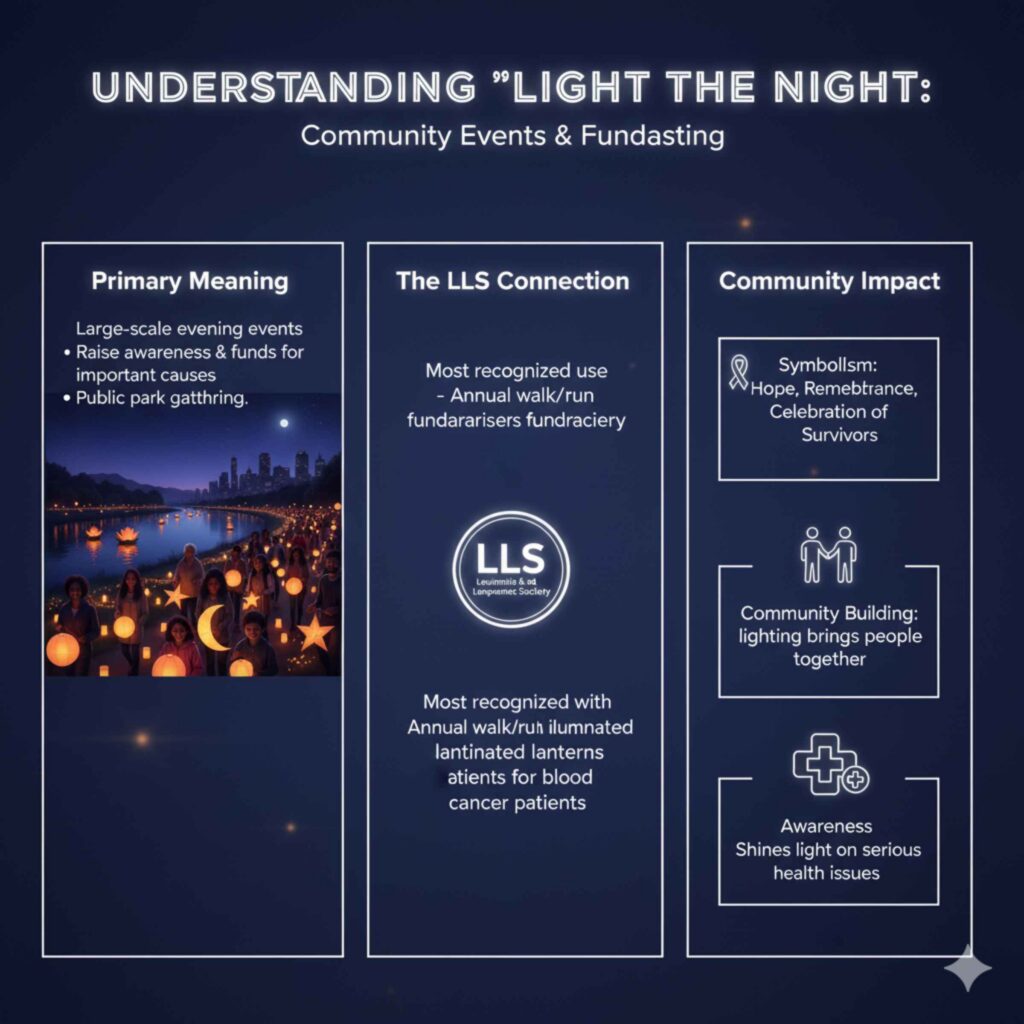
Understanding the Primary Meaning: Community Events and Fundraising
For most people, hearing “Light The Night” brings to mind a well-known, organized public activity. It’s usually a large-scale, evening event designed to raise awareness and funds for important causes.
The Leukemia & Lymphoma Society (LLS) Connection
The most recognized use of the phrase comes from The Leukemia & Lymphoma Society (LLS). Their annual “Light The Night” walk/run events are major national fundraisers.
These events are powerful visual statements. Participants gather at dusk, often carrying illuminated balloons or lanterns, to symbolize hope for those fighting blood cancers. It is a moving experience that brings communities together after the sun goes down.
Why These Events Matter to the Community
Even if you aren’t directly involved in the fundraising, understanding these events is helpful because they represent community spirit. They are often held in public parks or open spaces, areas that DIY enthusiasts and homeowners use all the time. They highlight the importance of using light intentionally to bring people together.
- Symbolism: The light represents hope, remembrance, and celebration of survivors.
- Community Building: These gatherings often involve temporary lighting setups, showcasing creative, large-scale use of illumination.
- Awareness: They draw attention to serious health issues in a positive, communal way.
Secondary Meanings: Lighting Projects and Home Decor
Sometimes, especially in the DIY and home improvement world, “Light The Night” might be used more loosely to describe creating specific, impactful nighttime lighting schemes for your property. This is where our hands-on expertise really shines!
Creating Your Own “Light The Night” Ambiance
If you are looking to enhance your home’s curb appeal or make your backyard safer after dark, you are essentially designing your own “Light The Night” experience. This involves smart landscape lighting—something any homeowner can tackle!
Key Elements of Successful Landscape Lighting
Good outdoor lighting isn’t just about flipping a switch; it’s about design. We want safety, beauty, and efficiency. When planning your own nighttime lighting, think about these three main zones:
- Path and Safety Lighting: Illuminating walkways, steps, and driveways. This is crucial for preventing trips and falls, especially around those DIY decks you built!
- Accent Lighting: Highlighting specific features, like a beautiful tree, a stone wall, or architectural details on your house.
- Ambient lighting: Softer, general light from porch fixtures or string lights to create a welcoming mood.
Tools and Gear for Your DIY Night Lighting
You don’t need an electrician to set up basic, beautiful outdoor lighting. Low-voltage systems are perfect for beginners. Here are the essential tools you’ll need for installation:
| Tool | Purpose | Beginner Tip |
|---|---|---|
| Low-Voltage Wire Stripper | To safely strip the insulation off the low-voltage wire. | Practice on scrap wire first to avoid nicking the copper strands. |
| Shovel or Trowel | For burying the main landscape wire (if burying). | Check local codes on wire depth—usually 6-12 inches deep. |
| Screwdriver/Wrench Set | To secure fixtures to stakes or mountings. | Use stainless steel or brass hardware to prevent rust outdoors. |
| Multimeter (Optional but helpful) | To test voltage flow through the system before final connections. | If the lights don’t work, test the connection right at the transformer first! |
Solar vs. Low-Voltage: Choosing Your Power Source
When you decide to “Light The Night” on your property, the first big choice is power. How will you run your lights? For DIY homeowners, the battle usually comes down to simple solar power versus low-voltage wired systems.
Solar Powered Lighting: Simple Setup
Solar lights are fantastic for instant results and minimal effort. They use a small panel to charge during the day and turn on automatically at night.
Pros and Cons of Solar
- Pros: No wires, no transformers, extremely easy installation (often just pushing a stake into the ground), and zero electricity cost.
- Cons: Performance heavily relies on sun exposure. Cloudy days mean dimmer nights. They often look less premium than wired systems.
Low-Voltage Wired Lighting: Reliability and Power
Low-voltage systems use a transformer plugged into a standard outlet. This transformer steps down the household voltage (120V) to a safer level (usually 12V). This is the route for professional-looking, consistent results.
For more detailed information on safe low-voltage outdoor wiring, you can always refer to resources provided by organizations focused on safe home electrical practices, such as guidelines published by local building code departments or reputable industry safety councils.
Pros and Cons of Low-Voltage
- Pros: Bright, consistent light output regardless of cloud cover. Long lifespan for bulbs (especially LEDs). Allows for complex design layouts.
- Cons: Requires running and burying (or concealing) low-voltage wire. Requires a transformer purchase. Initial setup takes more time.
Step-by-Step: Installing Beginner-Friendly Landscape Lighting
Let’s assume you want reliable, attractive path lighting. Here is how you can confidently install a simple, low-voltage system yourself. Remember, safety first—we are working with very low current, but always double-check connections.
Phase 1: Planning and Layout
A good plan saves you hours of digging later! Walk your yard in the evening with a flashlight to see where you need light the most.
- Map It Out: Draw a simple sketch of your house, paths, and features you want to highlight.
- Placement: Decide where each fixture will go. Keep path lights about 10–15 feet apart.
- Source Identification: Determine the best location for your transformer—close to an outdoor GFCI (Ground Fault Circuit Interrupter) outlet is ideal for safety and convenience.
- Wire Runs: Plan the route for your main wire line, aiming for the shortest path between the transformer and the furthest fixture.
Phase 2: Component Setup
Once you have your plan and purchased your kit (usually containing fixtures, wire, and a transformer), it is time to assemble.
- Connect the Transformer: Plug the transformer into the GFCI outlet. Do not turn it on yet!
- Run the Main Line: Lay your main low-voltage wire along the path you planned. If you are burying it, wait until you have tested the system! For now, just keep it tidy along the edge of the path.
- Attach Fixtures: For each light fixture, cut the wire. Use the provided connectors (often called piercers or taps) to attach the fixture’s wires to the main line. These connectors usually pierce the wire insulation, making a solid electrical connection without soldering.
- Position Lights: Place the fixtures in their designated spots.
Phase 3: Testing and Finishing
This is the exciting part—seeing your work pay off!
- Test Run: Plug in or switch on the transformer. Check every single light. If one is out, carefully check the connection point nearest to it. A common issue is a poor connection at the piercer.
- Adjust Aiming: Once everything is lit, adjust the heads of the spotlights or path lights to ensure you are illuminating what you intended—not shining light directly into a neighbor’s window!
- Conceal or Bury: If you are happy with the setup, conceal the wires. For safety and aesthetics, you can carefully dig a shallow trench (6 inches is often enough for low-voltage lines) and bury the wire, or cover it neatly with mulch or decorative stone.
Safety First: Illuminating Responsibly
As your guide, Md Meraj wants to stress that while DIY lighting is fun, safety cannot be overlooked, especially when dealing with electricity and outdoor environments.
Electrical Safety Tips for Low-Voltage Systems
Even low-voltage systems require careful handling:
- GFCI Protection: Always plug your transformer into a Ground Fault Circuit Interrupter (GFCI) protected outlet. This is vital for outdoor electrical safety, as it quickly cuts power if it detects a ground fault (like water getting into a connection).
- Wire Integrity: Never use damaged wire. Even small nicks in the insulation can expose the copper, which could cause shorts or corrosion over time.
- Check Local Codes: While low-voltage is generally forgiving, always check if your local municipality has specific rules regarding burying electrical lines, even low-voltage ones.
Light Pollution and Neighbors
When you “Light The Night,” you want to beautify your home, not annoy your neighbors. This is responsible DIYing!
The “Dark Sky” Principle: Aim your light downward. Lighting should illuminate the object (the tree, the path) and stop there. Avoid “uplighting” that casts excessive glare into the sky or directly into adjacent properties. This is often called light trespass, and it’s a common source of neighbor disputes.
The Impact of Smart Technology on Night Lighting
Modern technology has made creating stunning “Light The Night” displays easier and more flexible than ever before. Smart lighting systems are becoming standard for homeowners.
Integrating Timers and Smart Controls
Instead of relying on basic photocells (which turn lights on when it gets dark), smart systems offer unparalleled control.
| Feature | Benefit for Night Lighting | DIY Ease |
|---|---|---|
| Scheduling | Set lights to turn off at 11 PM, regardless of the sunset time. | Easy via smartphone app. |
| Dimming Control | Adjust brightness based on the season or activity (e.g., bright for security, dim for relaxing). | Simple slider in the app. |
| Color Tuning (RGBW) | Change the color temperature from warm white (for cozy evenings) to cool white (for task lighting). | Select colors from a digital wheel. |
If you are buying new LED fixtures for your low-voltage system, look specifically for options that integrate with Wi-Fi or Bluetooth hubs. This lets you control everything from your phone, giving you ultimate mastery over your nighttime aesthetic.
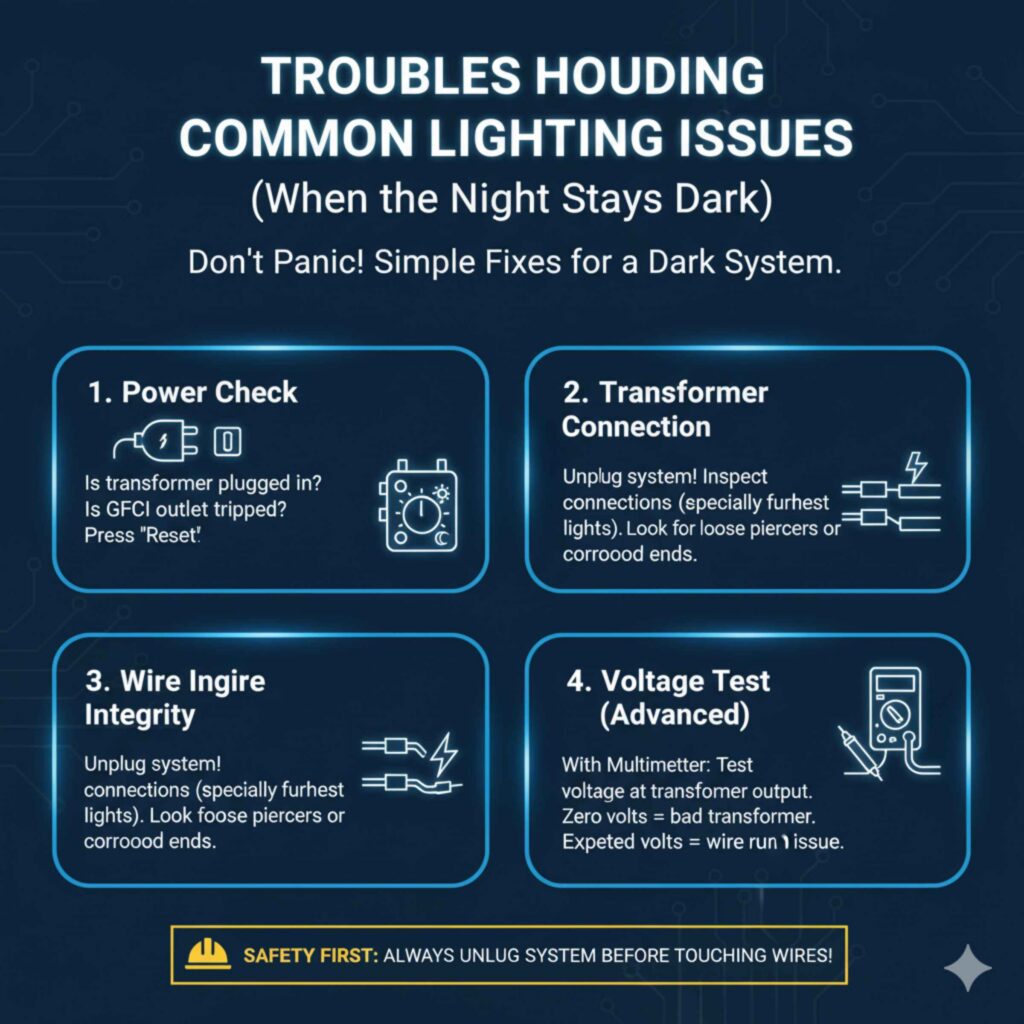
Troubleshooting Common Lighting Issues (When the Night Stays Dark)
If your DIY lighting system fails to activate or only some lights work, don’t panic! This is usually a simple fix, much like diagnosing a shaky table leg—it comes down to connection or power.
Checklist for Failure to Light
- Power Check: Is the transformer plugged in? Is the GFCI tripped? Press the “Reset” button on the GFCI outlet.
- Transformer Connection: If you are using a timer or photocell attached to the transformer, ensure it is set to “On” or that enough ambient light is present to trigger it correctly.
- Wire Integrity: Unplug the system. Carefully inspect the connections at the two lights furthest from the transformer. In a series circuit, if one connection fails, everything past that point goes dark. Look for loose piercer connectors or corroded wire ends.
- Voltage Test (If you have a multimeter): Test the voltage right at the transformer output. If you get the expected low voltage (e.g., 12V), the problem is in the wire run. If you get zero, the transformer may have failed.
Remember, when troubleshooting, always unplug the system before touching the wires. A little patience now saves you a lot of frustration later!
FAQs: Lighting Your Night Simply
Q1: Do I need an electrician to install low-voltage outdoor lights?
A: For standard low-voltage (12V) plug-in systems, usually no. These are designed for simple DIY installation. If you are modifying existing 120V hardwired fixtures or installing new main electrical lines, always hire a licensed electrician to ensure safety and code compliance.
Q2: How deep do I need to bury the low-voltage wire?
A: Most manufacturers recommend burying the wire 6 to 12 inches deep to protect it from shovels, rakes, and pests. However, if you are laying it under mulch or edging, simply ensuring it is completely covered and protected is the main goal.
Q3: What is the best bulb type for landscape lighting today?
A: LED (Light Emitting Diode) bulbs are the best choice. They use significantly less energy than older halogen bulbs, last for tens of thousands of hours, and produce very little heat, making them safer around plants and mulch.
Q4: How do I stop my new path lights from shining directly into my neighbor’s window?
A: This is called light trespass. The solution is proper aiming. Always point the light source downward toward the object you want to illuminate
Conclusion
“Light The Night” is best understood as a concept rather than a single product or technical term. Most commonly, it refers to meaningful community events—especially the Leukemia & Lymphoma Society’s walks—that use light as a symbol of hope, awareness, and togetherness. At the same time, the phrase has a practical, everyday meaning for homeowners and DIY enthusiasts: intentionally using outdoor lighting to make spaces safer, more welcoming, and visually appealing after dark.
Whether applied to a community fundraiser or a personal home project, the core idea is the same—light used thoughtfully can bring people together, improve safety, and create atmosphere. By choosing the right lighting type (solar or low-voltage), planning carefully, following safety best practices, and being considerate of neighbors, anyone can successfully “Light The Night” in a way that is responsible, beautiful, and impactful.