How to Install Pendant Lights: Brighten Your Space with Style
Hey there! Have you ever looked at your garage or showroom and thought it could use a little pizzazz? That’s exactly how I felt a few years ago when my workspace was lit by a boring old bulb. I decided to install pendant lights, and let me tell you, it transformed the place! If you’re wondering how to install pendant lights, you’re in for a treat. I’ve tackled this project a few times, from my home garage to a friend’s car detailing shop, and I’ve learned the ins and outs along the way. Let’s dive into this step-by-step guide to help you add some stylish lighting to your space. It’s easier than you think, and I’m excited to share what I’ve learned!
My First Pendant Light Project
Picture this: my garage was a dim, uninspiring space where I worked on my classic car. The single overhead light made it hard to see details, and it just wasn’t inviting. A friend suggested pendant lights for a modern, focused glow. I was nervous at first—I’m a car guy, not an electrician! But after some research and a trip to the hardware store, I installed my first set of pendant lights. The result? A brighter, more professional-looking garage that made working on my car way more enjoyable. Since then, I’ve installed pendant lights in other spaces, and I’m here to walk you through the process like we’re tackling it together.
What Are Pendant Lights?
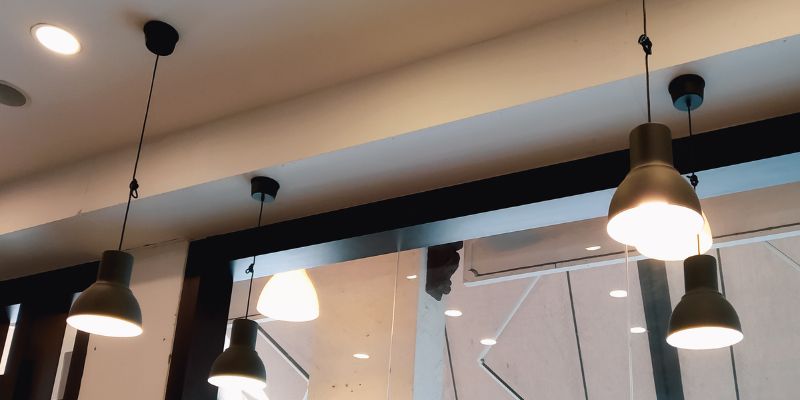
Pendant lights are fixtures that hang from the ceiling, usually by a cord, chain, or rod. They’re like chandeliers but simpler, with a single light or a small cluster. In automotive spaces, they’re perfect for adding focused lighting over workbenches, car bays, or display areas. They come in all sorts of styles—industrial, modern, vintage—so you can match them to your vibe.
I love pendant lights because they’re both functional and stylish. In my garage, they light up my workbench perfectly, and they make the space feel like a pro shop. Plus, they’re not as complicated to install as they look!
Why Install Pendant Lights in Your Automotive Space?
You might be wondering why pendant lights are worth the effort. Here’s why I’m a fan:
- Focused Lighting: They shine light exactly where you need it, like over a workbench or a car on display.
- Style Boost: Pendant lights add a sleek, professional look to any garage or showroom.
- Space-Saving: Unlike floor lamps, they hang from the ceiling, keeping your floor clear for tools or vehicles.
- Customizable: You can choose different heights, styles, and bulb types to fit your needs.
- Energy Efficiency: Many pendant lights use LED bulbs, which save energy and last forever.
When I installed pendants in my friend’s detailing shop, customers kept commenting on how sharp the place looked. It’s amazing what a little lighting can do!
Tools and Materials You’ll Need
Before we get started, let’s talk about what you’ll need. I’ve learned to gather everything upfront to avoid mid-project trips to the store. Here’s my go-to list:
- Pendant Light Kit: Includes the fixture, cord, and mounting hardware. I usually pick one that matches my space’s style.
- Screwdriver: A Phillips or flathead, depending on your kit’s screws.
- Wire Strippers: For preparing the electrical wires.
- Voltage Tester: To make sure the power is off—safety first!
- Ladder: To reach the ceiling safely.
- Drill and Bits: For making holes if you’re mounting to a new spot.
- Wire Nuts: To connect wires securely.
- Electrical Tape: For extra security on wire connections.
- Stud Finder: To locate ceiling joists for a sturdy mount.
- Light Bulb: Check your pendant’s specs for the right type (LED, incandescent, etc.).
I keep a toolbox with these items in my garage, so I’m always ready for projects like this. If you’re missing anything, your local hardware store will have it.
Safety First: Preparing for the Job
Working with electricity can be scary, but I’ve learned that a few simple precautions make it safe. Here’s how I prep:
- Turn Off the Power: Find your circuit breaker and switch off the power to the area you’re working on. I always double-check with a voltage tester to be sure.
- Clear the Area: Move cars, tools, or anything else under your work spot. I once tripped over a jack while holding a light fixture—not fun!
- Use a Sturdy Ladder: Make sure it’s stable and tall enough to reach the ceiling comfortably.
- Wear Safety Gear: I wear gloves and safety glasses to protect against dust or stray wires.
The first time I installed a pendant light, I forgot to test the wires with a voltage tester. Luckily, I had turned off the power, but it was a reminder to never skip that step.
Step-by-Step Guide to Installing Pendant Lights
Alright, let’s get to the fun part—installing the light! I’ll walk you through the process like we’re doing it together in your garage.
Step 1: Choose the Perfect Spot
Decide where you want your pendant light to hang. I usually pick a spot directly over my workbench or a car bay for focused light. Use a stud finder to locate a ceiling joist for a secure mount. If you’re replacing an existing fixture, you’re already set with a junction box.
Mark the spot with a pencil. I like to hold the pendant up to visualize how it’ll look before committing. If you’re installing multiple pendants, space them evenly—about 3 to 5 feet apart works well.
Step 2: Turn Off the Power
I can’t stress this enough—turn off the power at the circuit breaker. Use a voltage tester to confirm the wires in the ceiling are dead. I once thought the power was off, but got a tiny shock. Trust me, test every time!
Step 3: Prepare the Ceiling
If you’re installing in a new spot, you’ll need to mount a junction box. This is a metal or plastic box that holds the wiring safely. Use your drill to cut a hole in the ceiling, then secure the junction box to a joist with screws. If you’re replacing an old fixture, the junction box should already be there.
I had to install a new junction box in my garage, and it took about 15 minutes. Just make sure it’s flush with the ceiling for a clean look.
Step 4: Connect the Wires
Now, let’s hook up the pendant light. Most kits have three wires: black (hot), white (neutral), and green or copper (ground). Here’s how I do it:
- Strip the Wires: Use wire strippers to remove about ½ inch of insulation from the ends of the pendant’s wires.
- Match the Wires: Connect the black wire from the pendant to the black wire in the junction box, the white to the white, and the ground to the ground. I twist them together and secure with wire nuts.
- Wrap with Electrical Tape: For extra safety, I wrap each connection with electrical tape to prevent loosening.
This part felt tricky the first time, but once you match the colors, it’s like connecting puzzle pieces.
Step 5: Mount the Pendant
Attach the pendant’s mounting bracket to the junction box using the screws provided. Then, hang the pendant fixture on the bracket. Most kits have a canopy or cover that hides the wiring and gives it a polished look. I tighten everything with a screwdriver to make sure it’s secure.
When I installed my first pendant, I was amazed at how sturdy it felt once mounted. Just follow the kit’s instructions, and you’ll be fine.
Step 6: Install the Bulb and Shade
Screw in the light bulb—make sure it’s the right wattage for your fixture. Then, attach the shade or cover if your pendant has one. I love choosing shades that match my garage’s industrial vibe, like metal or glass ones.
Step 7: Test the Light
Turn the power back on at the circuit breaker. Flip the switch, and watch your new pendant light up! If it doesn’t work, double-check your wire connections. I had to redo a connection once because I didn’t tighten a wire nut enough.
Step 8: Adjust the Height
Most pendant lights let you adjust the cord or chain length. I like mine to hang about 30 inches above my workbench for perfect lighting. Trim the cord if needed, following the kit’s instructions, and secure any excess in the canopy.

Choosing the Right Pendant Light
Picking the perfect pendant light is half the fun. Here’s what I consider when shopping:
- Style: For automotive spaces, I lean toward industrial or modern designs. Metal or exposed-bulb pendants look awesome in a garage.
- Size: A single pendant should be 12-18 inches wide for a workbench. For larger spaces, I use multiple smaller pendants.
- Bulb Type: LED bulbs are my go-to—they’re bright, energy-efficient, and long-lasting. Check the wattage your fixture supports.
- Cord Length: Make sure the cord or chain is long enough to hang at the right height. Adjustable cords are the best.
- Durability: In a garage, dust and grease are real, so I choose fixtures with sturdy materials like metal or sealed glass.
I once bought a cheap pendant that rusted in my humid garage. Now, I stick to quality brands like Westinghouse or Progress Lighting.
Common Mistakes to Avoid
I’ve made a few blunders installing pendant lights, so let me save you some trouble:
- Skipping the Voltage Tester: Always confirm the power is off. It only takes a second and prevents shocks.
- Wrong Bulb: Using a bulb with too high wattage can damage the fixture. I fried a pendant once by using a 100-watt bulb in a 60-watt fixture.
- Poor Mounting: If the junction box isn’t secured to a joist, your light could fall. I learned this when a loose bracket wobbled in my shop.
- Ignoring Height: Hanging pendants too low can block your workspace. Measure carefully before mounting.
Where to Buy Pendant Lights
You can find pendant lights at hardware stores like Home Depot or Lowe’s, or online at Amazon, Wayfair, or lighting specialty stores. Prices range from $20 for basic models to $200 for high-end designs. I usually spend around $50 for a good-quality pendant that looks great and lasts.
When shopping online, I read reviews to check for durability and ease of installation. Local stores are great if you want to see the light in person before buying.
Tips for Maintaining Pendant Lights
To keep your pendant lights shining bright, here’s what I do:
- Clean Regularly: Dust and grease can build up in a garage. I wipe my pendants with a damp cloth every few months.
- Check Connections: If the light flickers, check the wire connections in the junction box. A loose wire nut is usually the culprit.
- Replace Bulbs Promptly: A burnt-out bulb can strain the fixture. I keep spare LED bulbs in my garage for quick swaps.
- Inspect Cords: Look for fraying or damage, especially in humid or dusty spaces. I replaced a cord once to avoid any risks.
Pendant Lights in Different Automotive Settings
Pendant lights work in all sorts of automotive spaces. Here’s how I’ve used them:
- Home Garage: I hung two pendants over my workbench for bright, focused light. It makes detailing my car so much easier.
- Auto Shop: My friend’s repair shop has a row of industrial pendants over each bay. It looks professional and helps mechanics see clearly.
- Showroom: In a car showroom, pendants can highlight display vehicles. I helped install sleek black pendants for a friend’s classic car display, and it drew tons of attention.
- Detailing Station: Pendant lights are perfect for spotting every speck of dust or swirl mark. I use a bright LED pendant for my polishing work.
My Favorite Pendant Light Story
Last year, I helped a buddy set up a car detailing business. His shop was dark and uninviting, so we installed three industrial-style pendant lights over the main work area. The difference was night and day—customers loved the vibe, and he said it made his work more precise. Those lights turned his shop into a place people wanted to visit, and I felt like a hero for helping out.
Wrapping It All Up
So, how do you install pendant lights? It’s a straightforward project that can make a huge difference in your automotive space. With the right tools, a bit of planning, and some safety know-how, you can hang a stylish, functional light in just a couple of hours. From choosing the perfect spot to wiring it up and adjusting the height, every step is manageable, even if you’re not an electrician. I’ve done it multiple times, and each project has made my workspace brighter and more inviting.
Pendant lights aren’t just about illumination—they add personality and professionalism to your garage, shop, or showroom. Whether you’re working on a car, displaying a classic, or running a business, these lights are a game-changer. So, grab a pendant light kit, follow these steps, and enjoy the glow of a job well done. You’ll love the results, and your space will thank you!
Frequently Asked Questions
Do I need to be an electrician to install pendant lights?
No, you don’t need to be an electrician, but you should be comfortable with basic wiring. If you’re unsure, hire a professional to stay safe.
What type of bulb is best for pendant lights in a garage?
LED bulbs are the best—they’re bright, energy-efficient, and long-lasting. Check your fixture’s wattage limit before buying.
Can I install a pendant light without a junction box?
No, you need a junction box to hold the wiring safely. If there isn’t one, you’ll need to install it or hire an electrician.
How high should pendant lights hang in a garage?
It depends on the space, but 30-36 inches above a workbench is ideal. Make sure it’s not so low that it gets in the way.
Are pendant lights safe for humid garages?
Yes, but choose fixtures rated for damp locations and check cords for damage regularly. I use sealed metal or glass pendants in my humid garage.