How Long To Let Minwax Stain Dry Before Poly Application
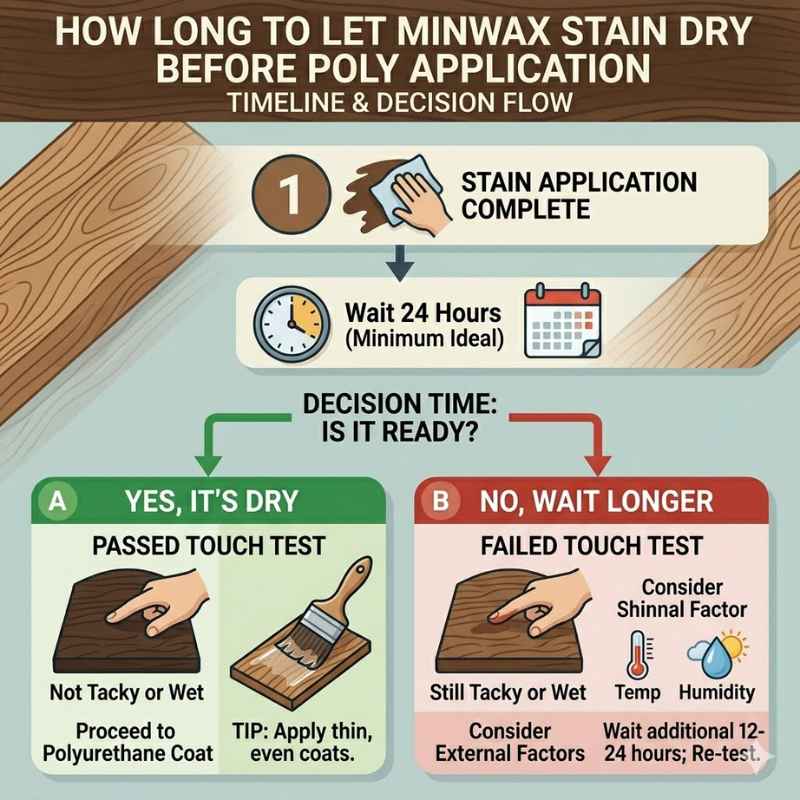
Generally, Minwax wood stain needs to dry for at least 8 to 24 hours before applying polyurethane. However, this can change based on humidity, temperature, and the specific type of stain used. Always check the product’s instructions and perform a simple touch test to be sure.
Understanding Minwax Stain Drying Times
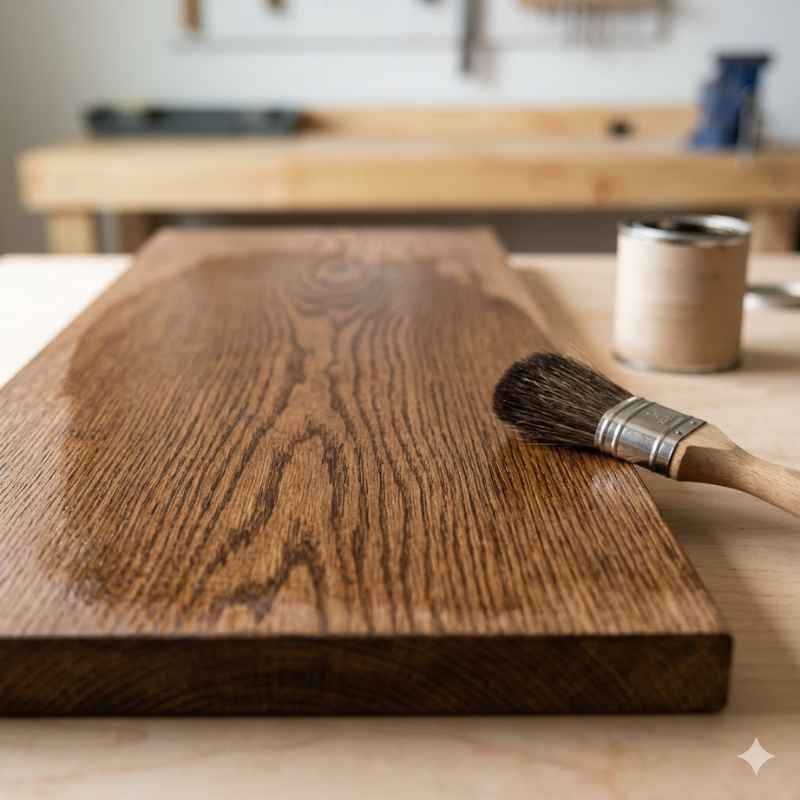
When you apply Minwax stain, it’s more than just color sitting on the surface. The stain soaks into the wood’s pores. This process needs time to complete.
Polyurethane creates a protective layer over the stain. If the stain isn’t fully dry, the polyurethane can trap moisture or chemicals from the stain.
This trapped moisture can cause cloudiness or uneven patches in your final finish. It’s a common problem, and it’s frustrating to see all your hard work get spoiled. Understanding the factors that affect drying is key to avoiding this.
Think of it like baking a cake. You can’t frost it too soon or it will melt and slide off.
Minwax offers many types of stains. Some are oil-based, and some are water-based. They dry at different speeds.
This is a big reason why there isn’t one single answer for everyone. Each product is designed a little differently. Knowing which one you’re using helps a lot.
Always look at the can for specific directions. That’s the best starting point.
Factors Affecting Drying Time
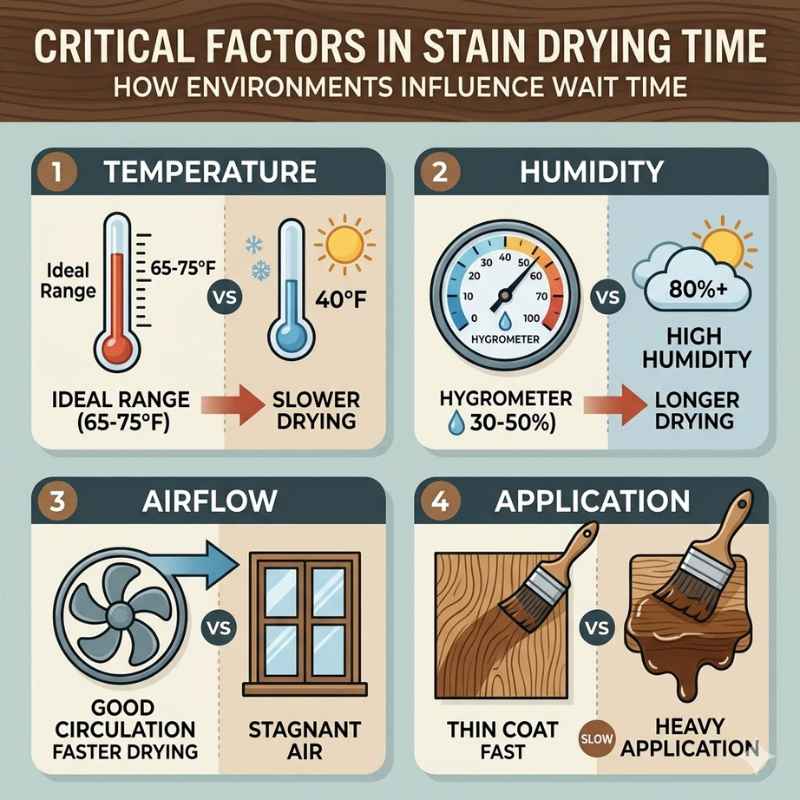
Several things can make your Minwax stain dry faster or slower. It’s not just about what the can says. The air around your project plays a huge role.
Humidity is a big one. When the air is very damp, water and oil in the stain evaporate much slower. This can add hours to the drying time.
Temperature also matters. Warmer temperatures help the solvents in the stain evaporate more quickly. Cooler temperatures slow this process down.
Most wood finishing products like to be used in a moderate temperature range. Avoid very cold or very hot spots. The ideal temperature is usually between 70°F and 75°F (21°C to 24°C).
Think about the room you’re working in. Is there good airflow? A gentle fan can help move the air around.
This speeds up evaporation. But don’t point a fan directly at the wet stain. That can cause an uneven dry or lift the stain.
Just a bit of air movement is usually enough.
The type of wood you are staining also makes a difference. Denser woods, like oak, can take longer for the stain to penetrate and dry. Softer woods, like pine, might absorb stain quickly but can also dry faster.
The condition of the wood surface matters too. If the wood is super smooth, the stain might sit on top longer.
Finally, how much stain you applied affects drying. A thin coat dries faster than a thick one. Minwax stains are designed to be wiped off excess.
Leaving too much on the surface creates a thicker layer. This layer will take much longer to dry. It’s a common mistake for beginners.
Oil-Based vs. Water-Based Minwax Stains
Oil-Based Stains: These are traditional. They use mineral spirits or similar solvents. They penetrate wood deeply.
They generally take longer to dry. You often wait 24 hours or more. Clean-up needs mineral spirits.
They offer rich color.
Water-Based Stains: These are newer. They dry much faster. You might be able to apply poly in just a few hours, sometimes as little as 1-2 hours.
Clean-up is with soap and water. They can offer a more natural look. They might not penetrate as deep as oil-based.
Key Takeaway: Always read the can. It tells you the estimated dry time for that specific product. This is the most reliable information.
The Minwax Drying Process Explained
When you wipe on Minwax stain, the liquid part, the solvent or carrier, starts to evaporate. This leaves the color pigments behind. These pigments soak into the wood.
For oil-based stains, the solvent is usually mineral spirits. For water-based stains, it’s water. Both need to escape into the air.
If you try to put polyurethane on too soon, the solvent is still in the wood. The polyurethane forms a barrier. This barrier traps the solvent.
The solvent can’t escape. This trapped solvent can soften the polyurethane layer. It can also interfere with the polyurethane curing properly.
This leads to a sticky surface that is difficult to fix.
The longer you wait, the more of the solvent evaporates. The stain becomes more stable. It forms a solid color within the wood.
Once most of the solvent is gone, the surface feels dry to the touch. But being dry to the touch doesn’t always mean it’s fully ready for a heavy topcoat like polyurethane.
There’s a difference between surface dry and fully cured. Surface dry means you can gently touch it without getting stain on your finger. Fully cured means all the solvents have left and the pigments are completely set.
For polyurethane, you want it to be well past surface dry. You want it to be stable.
This is why waiting the recommended time is so important. It ensures the stain has had a chance to really set. This prevents future problems with your finish.
It gives you a much better chance of a smooth, durable result. Patience here really pays off in the long run.
My First Staining Disaster: A Cautionary Tale
I remember my very first furniture refinishing project. It was a small end table. I was so excited to try out a new Minwax dark walnut stain.
I’d watched some videos, read a blog post, and felt pretty confident. I stained the whole table, admiring the deep color.
The can said, “Allow to dry for 8-24 hours before top coating.” I thought, “Well, it looks dry!” It was late, and I wanted to get the polyurethane on before bed. So, I gave it maybe 6 hours. It felt dry to the touch.
I brushed on a thin coat of polyurethane, feeling very proud.
The next morning, I woke up eager to see my handiwork. What I saw made my stomach drop. The polyurethane was tacky in spots.
In other places, it looked cloudy. It was like the stain and poly hadn’t mixed right. The surface felt sticky, not smooth.
Panic set in.
I had to sand the whole thing down again. It was hours of work I hadn’t planned for. That was my first hard lesson.
The stain looked dry, but it wasn’t ready. The humidity in my garage was high that night. I learned that “dry to the touch” is not the same as “ready for poly.”
Now, I’m much more patient. I always check the weather. I always wait longer than I think I need to.
It saves so much time and frustration in the end. That end table now has a perfect finish. But I’ll never forget that first sticky, cloudy mess.
It’s a mistake I only made once.
Quick Dry Time Check: The Paper Towel Test
How to Do It: Gently rub a clean paper towel on an inconspicuous spot of the stained wood. If any stain transfers to the paper towel, it is not dry enough.
What to Look For: The paper towel should come away completely clean. No color, no smudging.
Why it Works: This simple test shows if any loose stain pigments are still on the surface or if the solvents are still too active to be covered by polyurethane.
How Long to Wait: The Official Minwax Recommendations
Minwax provides specific guidelines on their product labels. These are developed through testing. They are your best resource for a successful finish.
For their oil-based wood stains, like the classic Wood Finish line, they generally recommend waiting at least 8 to 24 hours before applying a topcoat.
For some of their faster-drying products, or if you’re working in ideal conditions, you might be able to apply a topcoat sooner. However, it’s always safer to err on the side of caution. If the can says 24 hours, try to wait 24 hours.
If it says 8 hours, wait 8 hours and then do a touch test.
Water-based stains, like Minwax Water Based Wood Stain, dry much quicker. For these, you might only need to wait 1 to 2 hours before applying a topcoat. This is a significant difference.
Make sure you know which type of Minwax product you are using.
It’s also important to consider the type of polyurethane you are using. Some polyurethanes, especially water-based ones, are designed to go over stain more quickly. However, even with these, a fully dry stain is crucial.
The chemistry of the stain and the polyurethane needs to work together.
Minwax often recommends their own brand of polyurethane, like Polycrylic (water-based) or Polyshades (which can act as both stain and topcoat). Using products from the same brand can sometimes ensure better compatibility. But the drying time of the stain itself is still the primary concern.
Remember that these are minimum times. If you’re in doubt, wait longer. A few extra hours can prevent days of rework if something goes wrong.
The goal is a beautiful, lasting finish. That goal is best met with a little patience.
Testing for Dryness: More Than Just Touching
You’ve waited the recommended time. The surface feels dry. But how can you be absolutely sure it’s ready for polyurethane?
Here are a few ways to test your Minwax stain’s dryness. These go beyond a simple finger swipe.
The Paper Towel Test: As mentioned before, this is a great first step. Take a clean white paper towel and rub it gently over an area of the stained wood. If any color comes off, or if the paper towel feels even slightly sticky, the stain is not dry enough.
You’ll see the true color transfer if it’s not set.
The Fingernail Test: Gently try to scratch a tiny, inconspicuous spot with your fingernail. If the stain smudges or you can lift any color, it’s not dry. The stain should feel hard and unyielding, like the bare wood itself.
The Polyurethane “Test Patch”: This is a bit more involved but can be very telling. On a scrap piece of the same wood, stained at the same time and under the same conditions, apply a small amount of your polyurethane. Let it sit for a few minutes.
Then, try to wipe it off with a clean cloth. If it wipes off easily, it suggests the stain underneath might still be too wet and is interfering with the poly’s adhesion or cure.
The Smell Test: While not a definitive scientific measure, a strong, lingering solvent smell can indicate that the stain is still off-gassing. If you can still smell strong mineral spirits (for oil-based) or a pungent chemical odor, it’s likely still too wet. The smell should be very faint or gone completely when it’s ready.
The “Sticky Spot” Scan: Gently run the back of your hand over the entire surface. Your hand is sensitive. You can often feel subtle tackiness that a fingertip might miss.
You’re looking for a uniform feel. Any spot that feels different, even slightly sticky or grabby, means more drying time is needed.
These tests help you make an informed decision. They are crucial for ensuring the polyurethane will adhere properly and cure without issues. Don’t skip them, especially if you’re unsure or working in less-than-ideal conditions.
It’s your best defense against a finish failure.
When is Stain Fully Cured?
Surface Dry: This is when the liquid solvents have evaporated enough for the surface to feel dry to the touch. Usually takes a few hours.
Ready for Topcoat: This is when the stain pigments are stable and the surface is dry enough not to interfere with the topcoat. This is typically within the 8-24 hour window (or less for water-based).
Fully Cured: This is when all chemical reactions are complete and the stain is completely hardened within the wood pores. This can take days or even weeks. This is why you should be careful with heavy objects on a newly finished piece for a while.
For Polyurethane Application: You need the stain to be at least “Ready for Topcoat,” not just “Surface Dry.”
Real-World Scenarios & What to Expect
Let’s look at some common situations where you might be staining and applying poly. The environment where you work makes a huge difference. If you live in a humid area, like the Gulf Coast or the Pacific Northwest, expect longer dry times.
Humidity levels above 60% can significantly slow down the evaporation process.
In contrast, dry desert climates tend to have faster drying times. The air readily accepts the moisture and solvents. But be careful in extremely dry air.
Sometimes, if the air is too dry, oil-based stains can dry too fast on the surface before they’ve fully penetrated. This can lead to a blotchy appearance. A light mist of water can sometimes help these stains even out if applied quickly.
Working in a garage, basement, or unheated shed can also change things. These areas are often more humid and cooler than the rest of the house. This means you’ll likely need to wait the full 24 hours, or even longer, especially for oil-based stains.
Never assume the stain is dry just because you’ve waited the minimum time.
Consider the project itself. If you’re staining a large piece of furniture, like a dining table, the surface area is vast. This means more stain to dry.
If you’re staining small craft items, they might dry faster. The type of wood also plays a role, as mentioned earlier. Maple and birch are dense and can take longer.
If you’re using a pre-stain wood conditioner, this can affect how quickly the stain penetrates. It helps create a more even stain job, especially on soft woods like pine. But it can sometimes make the stain sit on the surface a bit more.
This might mean you still need to wait that full 8-24 hours for the stain to fully set, even if it absorbed quickly.
Always, always test the dryness. Don’t rely on guessing or hoping. The slight extra time spent testing is far less than the time spent fixing a failed finish.
This is where real-world experience teaches you the most. Every project is a learning opportunity.
Common Wood Types and Stain Behavior
Pine: Soft, porous wood. Absorbs stain quickly. Can be blotchy without a pre-stain conditioner.
Dries relatively fast.
Oak: Dense hardwood. Stain penetrates slowly. Shows grain very well.
Takes longer to dry fully.
Maple: Very dense. Stain can sit on the surface. Often needs a pre-stain conditioner for even color.
Dries moderately fast.
Cherry: Absorbs stain well. Dries at a moderate pace. Color can change significantly over time with light exposure.
Walnut: Rich, dark wood. Stain often enhances natural color. Dries at a moderate pace.
When is Stain Dry Enough for Polyurethane?
So, to put it simply, your Minwax stain is dry enough for polyurethane when it passes your chosen dryness tests. This means:
- The paper towel comes away clean.
- Your fingernail does not smudge or lift color.
- The surface feels uniformly smooth and not sticky or tacky.
- The strong chemical smell has faded significantly.
For oil-based Minwax Wood Finish, this typically means waiting at least 8 hours, but more often 12 to 24 hours, especially in humid or cool conditions. You’ll likely be able to see and feel the difference. The wood will feel like solid, dry wood, not like a surface with liquid still present.
For Minwax Water Based Wood Stain, you are looking at a much shorter window, usually 1 to 2 hours. This is one of the major advantages of water-based products for quick projects. But even then, perform the tests.
Ensure that the fast-drying stain has truly bonded and is not interfering with the topcoat.
Think of it as a safety margin. You want to ensure the stain has fully set and is stable. This stability is what allows the polyurethane to adhere and cure correctly.
Without it, the polyurethane can bubble, wrinkle, or remain tacky. These are all fixable, but it’s much easier to get it right the first time.
The actual curing process of the stain can take longer, even weeks. But for the application of polyurethane, we only need it to be dry enough not to interfere with the topcoat. This is the critical stage.
This is when the stain pigments are locked in place and the solvents have mostly evaporated.
Pay attention to the details. Read the specific product can. Check your room’s humidity and temperature.
Perform the simple tests. These steps will guide you to the correct drying time and help you achieve a beautiful, durable finish on your woodworking projects.
What If I Apply Poly Too Soon?
This is where things can get frustrating. Applying polyurethane before your Minwax stain is truly dry can cause several problems. Each one requires extra work to fix.
It’s a common mistake, and understanding what happens can help you avoid it.
Tacky or Sticky Surface: This is the most common issue. The solvents from the stain haven’t fully evaporated. The polyurethane can’t cure properly.
It remains soft and sticky to the touch. You might be able to fix this by waiting longer and applying another coat of poly, but sometimes it requires sanding.
Cloudy or Milky Finish (Blushing): High humidity or trapped moisture from wet stain can cause the polyurethane to turn cloudy. This is called “blushing.” It looks like a white haze. Oil-based polyurethanes are more prone to this than water-based ones.
It can often be fixed by applying more coats of polyurethane, but it’s not guaranteed.
Wrinkling or Peeling: In severe cases, the solvents in the stain can react with the polyurethane. This can cause the polyurethane to wrinkle or even peel away from the surface. This is a sign of a major incompatibility, and you’ll almost certainly need to sand down to the bare wood.
Poor Adhesion: The polyurethane may not stick well to the surface. When you try to test its durability later, it might scratch or peel off easily. This is because the stain layer underneath is still too active.
It prevents a strong bond between the wood and the topcoat.
Uneven Color: Sometimes, the wet stain can react with the polyurethane. This can cause the color to lighten or shift in certain areas. It can make your stain job look splotchy or uneven.
This is very hard to correct without sanding and restaining.
The best way to avoid these problems is to be patient. Always follow the drying time recommendations on the Minwax can. Perform the dryness tests.
It might mean waiting an extra day, but it’s worth it. A good finish takes time, and rushing the process is the quickest way to ruin it. If you do encounter these issues, don’t despair.
Most can be fixed with sanding and reapplication, but it’s extra work.
Fixing a Tacky Polyurethane Finish
Wait Longer: Sometimes, just waiting another 24 hours can allow the tackiness to disappear.
De-Tackifier: You can try a de-tackifier product. These are sometimes used in professional finishing. Follow product instructions carefully.
Light Sanding: Gently sand the sticky areas with very fine grit sandpaper (220 or higher). Then wipe clean and let it cure.
Re-coat: Once the tackiness is gone (or you’ve fixed it), apply another thin coat of polyurethane. Ensure the stain is fully dry first!
Full Sanding: If the tackiness is severe or widespread, you may need to sand off the polyurethane and potentially even the stain layer to start over.
Tips for Faster and Better Drying
While patience is key, there are ways to help your Minwax stain dry more efficiently. These methods ensure the solvents evaporate properly. They can help you move on to the polyurethane stage a bit sooner and with more confidence.
Optimize Room Temperature: Aim for a consistent temperature between 70°F and 75°F (21°C to 24°C). If your workspace is too cold, use a safe space heater. If it’s too hot, try to cool it down.
Avoid extreme temperatures, which can cause other finishing problems.
Improve Air Circulation: Use a fan to move air around the room, but do not point it directly at the wet stain. Gentle, indirect airflow helps carry away the evaporating solvents. Open windows if the weather permits and it’s not too humid.
Control Humidity: This is crucial. If your workspace is very humid, use a dehumidifier. Aim for a humidity level between 40% and 60%.
In very dry conditions, you might need a humidifier, especially for oil-based stains, though this is less common.
Apply Thin Coats of Stain: A thin coat of Minwax stain dries much faster than a thick one. Wipe off excess stain thoroughly. The goal is to get the color into the wood, not to leave a heavy layer on top.
This reduces the amount of solvent that needs to evaporate.
Proper Wood Preparation: Sanding the wood to the correct grit and using a pre-stain wood conditioner (if needed for your wood type) helps the stain penetrate evenly. This leads to a more uniform and potentially faster drying surface because there’s less excess sitting on top.
Ventilate Your Workspace: Ensure the area is well-ventilated. This helps the solvents escape into the air. If you’re working indoors, crack a window or use an exhaust fan.
Proper ventilation is also important for your health.
Use the Right Product: As discussed, water-based Minwax stains dry significantly faster than oil-based ones. If speed is a major factor, consider a water-based product. Just be sure it meets your aesthetic needs.
By managing these environmental factors and using good application techniques, you can help your Minwax stain dry effectively. This sets you up for success when it’s time to apply that protective polyurethane layer.
Infographic: Drying Time Factors Checklist
Temperature:
- Ideal: 70-75°F (21-24°C)
- Too Cold: Slows drying
- Too Hot: Can cause surface drying too fast
Humidity:
- Ideal: 40-60%
- Too High: Slows drying significantly
- Too Low: Can cause blotching with oil-based stains
Airflow:
- Gentle circulation helps
- Direct fans can cause issues
- Good ventilation is key
Stain Thickness:
- Thin coats dry faster
- Wipe off excess thoroughly
Wood Type:
- Dense woods take longer
- Soft woods can be blotchy if not prepped
Quick Fixes and Best Practices
Getting the timing right between staining and applying polyurethane is a fundamental skill in woodworking and furniture finishing. It’s not just about following a rule; it’s about understanding the process and how your materials behave. Here are some quick tips and best practices to ensure you get a great result every time.
Always Read the Can: This cannot be stressed enough. Minwax provides specific drying and recoating times for each of its products. These are your primary guidelines.
Don’t rely on general advice alone.
Perform Dryness Tests: Don’t skip the paper towel or fingernail test. These simple checks will tell you more than waiting a fixed number of hours. They confirm the actual state of the stain.
Err on the Side of Caution: If you’re unsure, wait longer. An extra 8, 12, or even 24 hours is a small price to pay for a perfect finish. Fixing mistakes takes far more time and effort than being patient.
Consider the “Full Cure” Timeline: While you only need the stain to be ready for topcoat, remember that the stain itself will continue to cure for days or weeks. Avoid placing heavy or sharp objects on the finished piece for at least 7 days, even if the finish feels hard.
Use Compatible Products: While not strictly necessary, using Minwax stains with Minwax topcoats can sometimes lead to better compatibility. If you’re using a different brand of polyurethane, research its recommendations for use over oil-based or water-based stains.
Proper Ventilation is Key: For your health and for the drying process, always work in a well-ventilated area. This helps the solvents from the stain and the finishes evaporate more quickly and safely.
Thin Coats are Best: Whether it’s stain or polyurethane, multiple thin coats are almost always better than one thick coat. Thin coats dry faster, adhere better, and build up a more durable finish over time.
Clean Up Properly: Make sure your brushes, rollers, and rags are cleaned immediately after use according to the product directions. This prevents them from drying out and becoming unusable, and it’s also a safety matter for rags soaked in solvent-based products.
By integrating these best practices into your workflow, you’ll find that your Minwax stain projects turn out better. You’ll achieve that smooth, durable finish you’re looking for, and avoid the common pitfalls that come with rushing the process. It’s all about giving the materials the time they need to work their magic.
Frequently Asked Questions About Minwax Stain Drying
How long does Minwax Oil-Based Stain take to dry before polyurethane?
Minwax Oil-Based Wood Finish generally needs to dry for at least 8 to 24 hours before you apply polyurethane. In humid or cool conditions, it might take the full 24 hours or even longer. Always test for dryness.
Can I apply polyurethane after only 4 hours if my Minwax stain feels dry?
While the stain might feel dry to the touch after 4 hours, it’s often not fully ready for a topcoat. The solvents may still be trapped. Applying polyurethane too soon can lead to a sticky or cloudy finish.
It’s best to wait the recommended minimum time (usually 8 hours for oil-based) and perform dryness tests.
Does the type of wood affect how long Minwax stain needs to dry?
Yes, the type of wood can affect drying time. Denser woods like oak may take longer for the stain to penetrate and dry fully compared to softer woods like pine. Always consider the wood type when estimating drying times.
What is the difference in drying time between Minwax oil-based and water-based stains?
Minwax water-based stains dry much faster than oil-based stains. Water-based stains might be ready for a topcoat in as little as 1 to 2 hours, whereas oil-based stains typically require 8 to 24 hours.
How do I know if my Minwax stain is truly dry and ready for polyurethane?
You can test for dryness by gently rubbing a clean paper towel on the surface. If color transfers or it feels sticky, it’s not dry. A fingernail test for smudging also works.
The surface should feel hard and uniform, with no tackiness.
What happens if I apply polyurethane over wet Minwax stain?
Applying polyurethane too soon can result in a sticky surface, cloudiness (blushing), wrinkling, peeling, or poor adhesion of the topcoat. This is because the polyurethane traps the solvents from the stain, preventing proper curing.
Can I speed up the drying time of Minwax stain?
You can help speed up drying by ensuring optimal conditions: moderate temperature (70-75°F), good air circulation (gentle fan), and controlled humidity (40-60%). Applying thin coats of stain also helps.
Conclusion
Waiting for your Minwax stain to dry before applying polyurethane is a critical step. It’s the bridge between a beautifully colored piece of wood and a durable, protected finish. By understanding the factors that influence drying, performing simple tests, and following product recommendations, you can avoid common mistakes.
Patience is truly a virtue in woodworking. The time spent waiting is an investment in the longevity and appearance of your project. So, let that stain breathe and set, and you’ll be rewarded with a finish that looks great and lasts for years to come.
Sponsored / affiliate links. As an Amazon Associate I earn from qualifying purchases. I may earn additional commission from eligible campaigns.