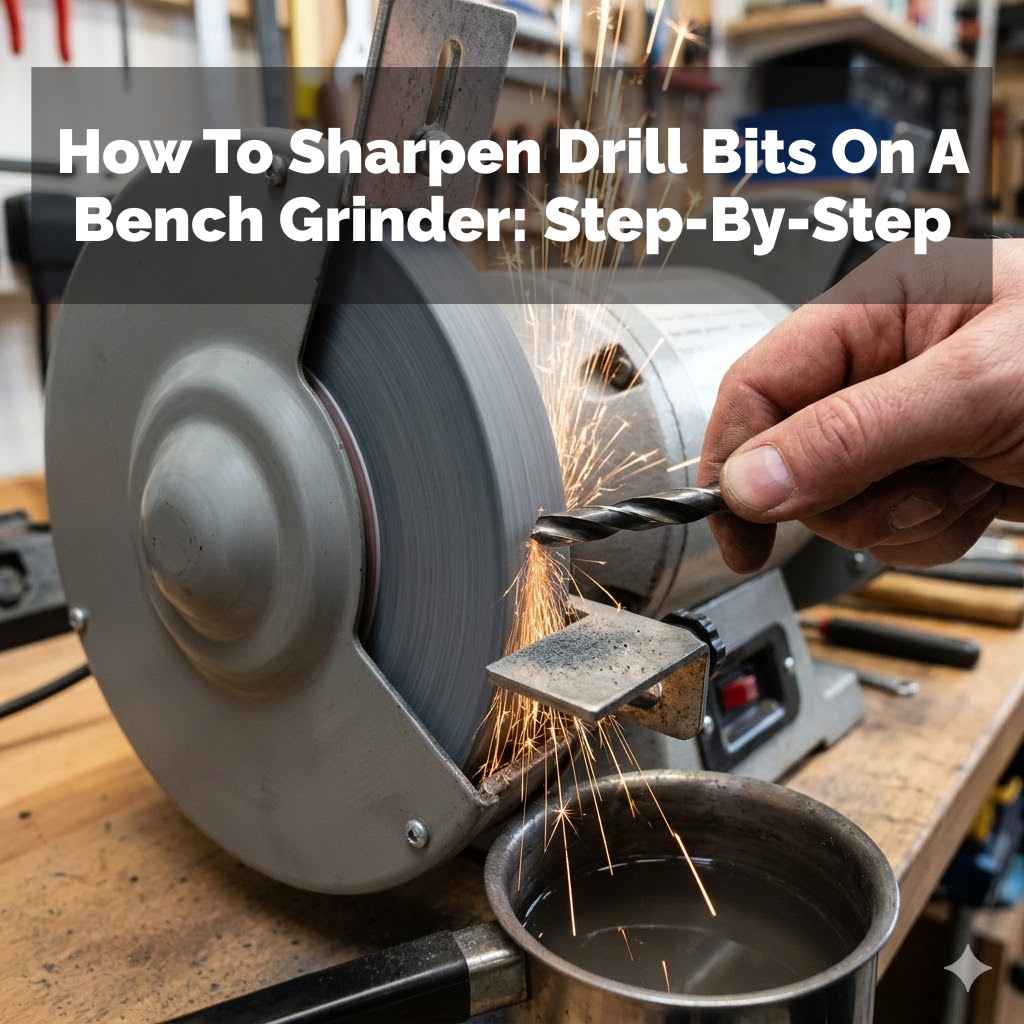
How To Sharpen Drill Bits On A Bench Grinder: Step-By-Step
You know that feeling. You grab a drill bit, ready to make a hole, and it just. spins.
It chews, it whines, but it doesn’t cut. It’s like trying to push a blunt knife through butter. Super frustrating, right?
Especially when you have a job to do. Good news! Sharpening your own drill bits on a bench grinder is totally doable.
It saves money and makes your tools work like new again. We’ll walk through it step by step.
Drill bits can be sharpened on a bench grinder using specific techniques to restore their cutting edges. This involves carefully grinding the relief angle and the cutting lip of the bit. Proper technique ensures the bit cuts effectively without overheating or damaging its temper.
The Magic of a Sharp Drill Bit
Why bother sharpening? A sharp drill bit cuts faster. It needs less pressure.
This means less strain on your drill motor and on you! You get cleaner holes. Plus, you avoid burning up your drill bit.
Or worse, burning up your workpiece. A dull bit often overheats. This can ruin the metal’s temper.
That makes it even harder to sharpen later. So, a sharp bit is not just about efficiency. It’s about tool longevity and better results.
Think about it. When a drill bit is sharp, the cutting edges are like tiny, precise knives. They slice through the material.
They don’t scrape or push. This slicing action is what makes drilling smooth and clean. A dull bit, on the other hand, has rounded edges.
These edges tend to rub and generate a lot of heat. That heat is the enemy of hardened steel. It can soften the bit’s cutting end.
This is called “drawing the temper.” Once the temper is drawn, the bit won’t hold a sharp edge anymore. It’s pretty much ruined.
So, sharpening is an investment. It’s an investment in your tools. It’s an investment in your projects.
And it’s an investment in making your DIY or professional work easier and more enjoyable. We’re going to break down how to do this with a common tool: the bench grinder. Many people have one in their garage or workshop.
They might use it for other tasks. But it’s a fantastic tool for bringing dull drill bits back to life.
Personal Experience: The Day My Drill Bit Gave Up
I remember one Saturday afternoon. I was building a simple bookshelf. I had a new piece of nice pine.
I needed to drill pilot holes for screws. I grabbed my trusty old drill and a standard 1/4-inch bit. I’d used it hundreds of times.
I pressed the trigger. The drill whirred. But the bit just sat there.
It spun and spun. It made a sad scraping noise. Then, a faint smell of hot wood.
Panic started to bubble up. I didn’t have another 1/4-inch bit handy. The hardware store was miles away.
I felt so defeated. My project was stalled. All because of a dumb, dull drill bit.
That was the day I decided I absolutely had to learn how to sharpen them myself.
I’d always thought drill bit sharpening was some kind of black magic. Something only machinists could do. I’d seen fancy drill sharpening jigs.
They looked complicated. But I was determined. I watched some videos.
I read some articles. And I found that using a bench grinder, with a bit of patience and the right technique, was totally achievable. It wasn’t about fancy machines.
It was about understanding the geometry of the bit. And using the grinder’s abrasive power carefully. The first time I tried it, I was nervous.
I held my breath. I moved the bit across the wheel. A tiny spark flew.
I kept the angle just right. Then, I held the freshly sharpened bit up to the light. It looked… pointy again!
I tried it on a scrap piece of wood. It cut like a dream. I felt so proud.
It was a small victory, but it felt huge. It’s a skill I’ve used ever since.
Drill Bit Anatomy: What We’re Sharpening
Before we grind, let’s know the parts. A drill bit has a shank (the part that goes into the drill chuck). Then the flutes (the spiral grooves).
These clear out chips. At the tip, you have the point. This is what cuts.
The critical parts for sharpening are the cutting lips. These are the edges at the very tip. We need to restore their sharp, angled shape.
We also need to ensure the clearance angle is correct behind the lip.
Understanding Drill Bit Geometry
This is key. A drill bit isn’t just a pointy stick. It has specific angles.
These angles let it cut and clear material. For standard twist drills, the main point angle is usually 118 degrees. Or sometimes 135 degrees for harder metals.
We aren’t trying to change this angle much. We’re trying to recreate the sharp edge on the existing angle. The most important thing is the lip relief angle.
This is the tiny angle behind the cutting lip. It lets the lip cut instead of drag. If this angle is too small, the bit won’t cut.
If it’s too large, the lip becomes weak. We want just the right amount of relief. It’s usually around 10-15 degrees.
When a drill bit is new, the factory grinds these angles precisely. Over time, drilling causes wear. The cutting lips get dull.
They can chip. The relief angle can also be ground away. Sharpening aims to restore these.
We use the bench grinder to carefully remove a small amount of metal. We do this from the back of the cutting lip. This re-establishes the sharp edge.
And the correct clearance. It sounds technical, but we can do it with practice. The goal is to grind only the minimum amount of metal needed.
Quick Scan: What You’ll Need
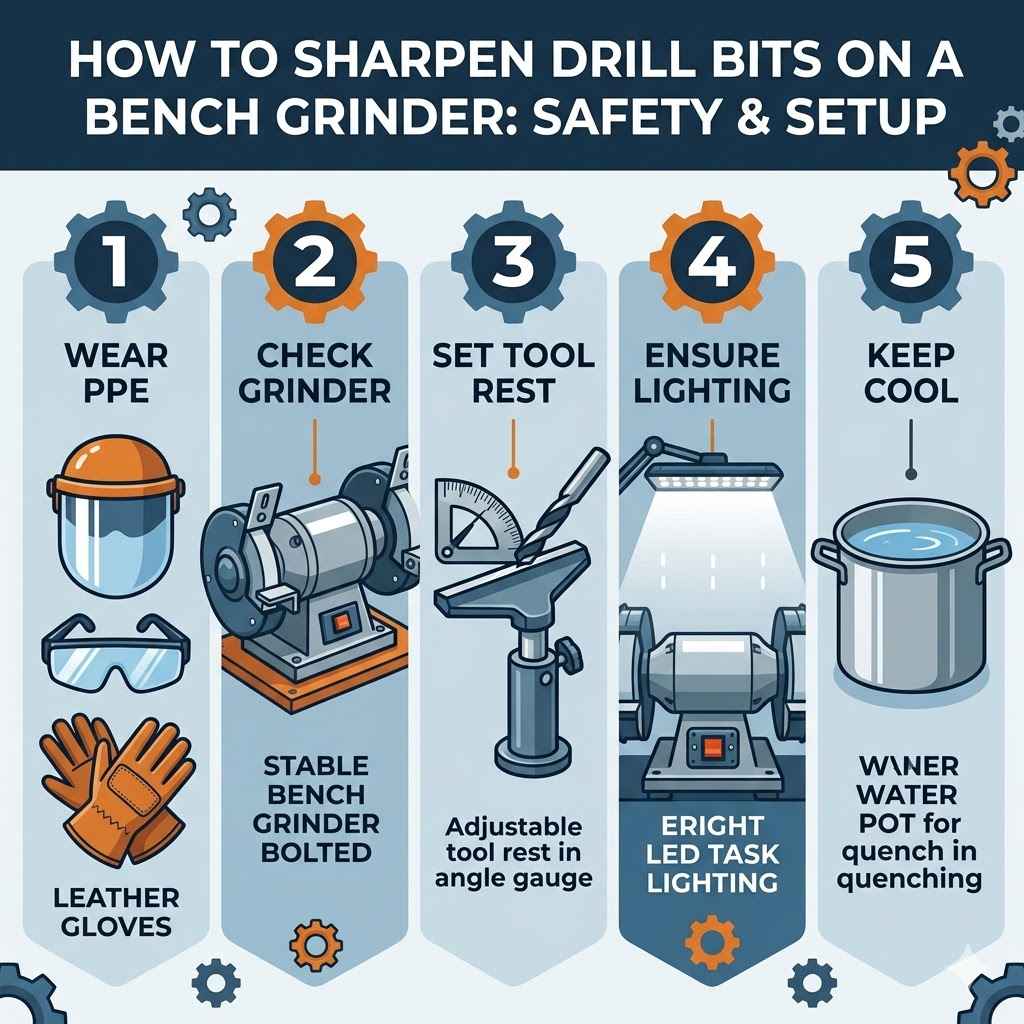
- Bench Grinder: With at least one fine-grit wheel (around 60-80 grit is good).
- Safety Glasses: Absolutely essential. Wear them always.
- Gloves: Protect your hands from heat and burrs.
- Tongs or Vise Grips: To hold the hot bit safely.
- Water Bucket: For cooling the drill bit.
- Marking Pen: To mark the bit.
- Adjustable Wrench: For changing grinder wheels if needed.
Preparing Your Bench Grinder
First things first: safety. Always wear safety glasses. Always.
A tiny metal shaving can cause serious eye injury. Gloves are also a good idea. They protect against heat.
Bench grinders spin fast. Make sure the grinder is on a stable surface. Check that the wheels are secure.
They shouldn’t be cracked or damaged. Ideally, use a fine-grit wheel. A coarse wheel removes metal too fast.
It’s harder to control. It can also overheat your bit quickly. If you only have coarse wheels, use them very gently.
It’s helpful to have a water bucket nearby. You’ll need to cool the drill bit often. Grinding generates heat.
Too much heat will ruin the bit’s temper. We don’t want that. If your grinder has adjustable tool rests, position them close to the wheel.
This gives you good support. You want the bit to rest against the rest. Then you grind the lip against the wheel.
This steady support is key to getting a consistent angle.
Some people prefer to use a drill bit grinding jig. These are great. They hold the bit at the correct angle.
But they aren’t strictly necessary. You can learn to do it freehand. It just takes practice.
We’re going to focus on the freehand method here. It’s more accessible. Just remember: slow and steady wins the race.
Don’t rush the process. Take your time. Get comfortable.
Then start grinding.
Myth vs. Reality: Sharpening Myths
Myth: You need a special machine to sharpen drill bits.
Reality: A standard bench grinder with a fine wheel can do the job. Patience and technique are more important than fancy tools.
Myth: Sharpening takes a lot of metal off the bit.
Reality: You only need to remove a tiny amount of metal to restore the cutting edge. Over-grinding wastes the bit.
Myth: All drill bits can be sharpened.
Reality: Most standard high-speed steel (HSS) bits can be sharpened. Very cheap or brittle bits might not be worth the effort. Specialty bits like cobalt or carbide often need specific methods.
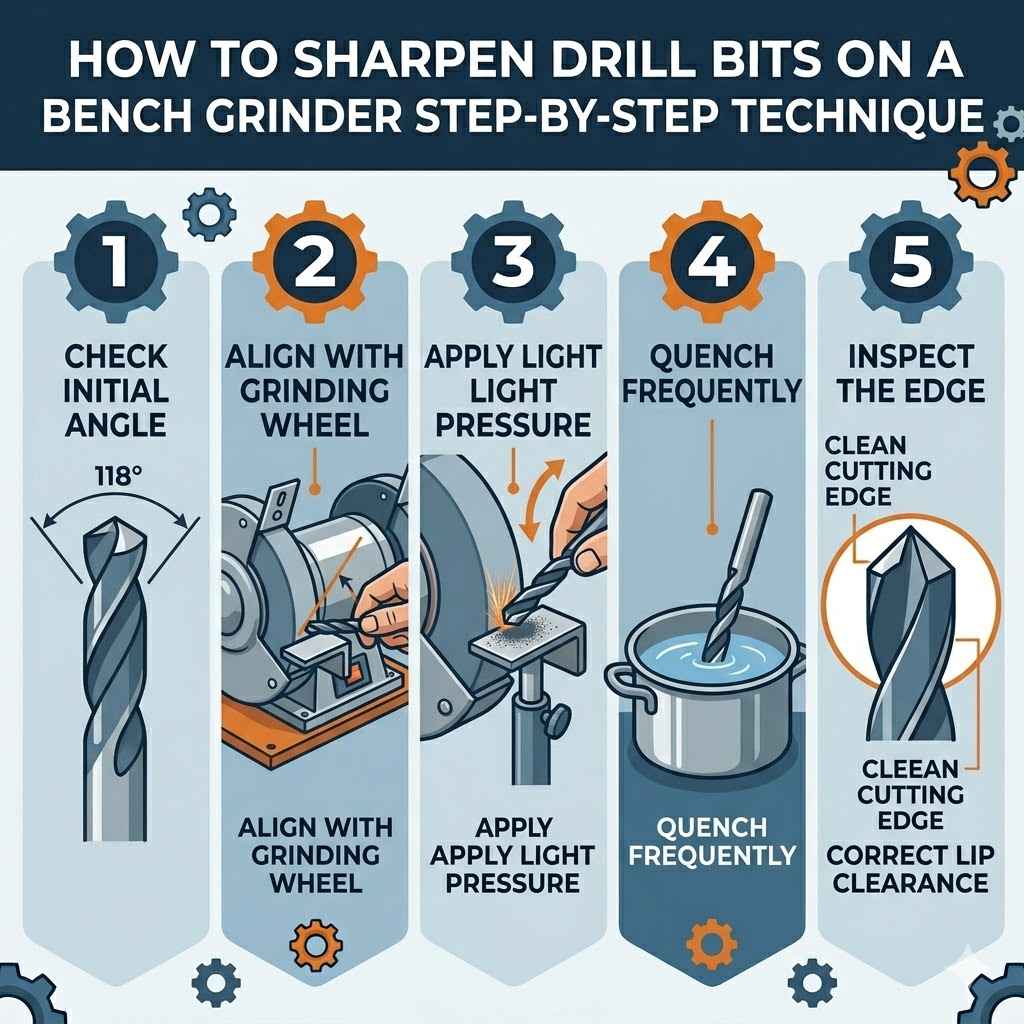
Step-by-Step: Freehand Sharpening Technique
This is the core of it. Grab your drill bit. Look at the tip.
You’ll see the two cutting lips. They should be roughly the same length. And they should meet at the center line.
Often, one lip is more worn than the other. We need to correct this. First, let’s get the grinder ready.
Turn it on. Let it reach full speed. Position your tool rest.
Make sure it’s close to the wheel.
Now, pick up the drill bit with your dominant hand. Use your other hand to guide it. For freehand sharpening, you’ll hold the bit at an angle.
This angle should match the clearance angle. Imagine a line extending from the center of the bit. The cutting lip needs to be slightly off this line.
You want the grinding wheel to touch the back edge of the lip. Not the very front cutting edge. Think of it like this: you’re grinding the “heel” of the cutting lip.
Hold the bit so the flute is angled upwards. At about a 30-45 degree angle relative to the grinder’s horizontal. Then, twist the bit slightly.
This twists the shank. This action makes the grinding wheel contact the lip at the correct clearance angle. You’ll be grinding on the side of the wheel.
Not the face. Bring the bit gently to the spinning wheel. Just a light touch.
You should hear a faint grinding sound. You’ll see tiny sparks. If you see big, bright orange sparks, you’re grinding too hard.
And probably overheating the bit.
Grind for a few seconds. Then pull the bit away. Dip it in the water.
Feel the temperature. It should be cool to the touch. Or at least lukewarm.
If it’s hot, you’ve gone too far or too fast. Repeat the grinding process. Grind the other lip.
Try to match the amount of metal removed. You want both lips to be the same length and shape. This is the trickiest part.
It takes practice to get them even.
As you grind, watch the tip. You’re looking for a shiny new edge to form. This new edge is your sharp cutting lip.
Keep grinding a little at a time. Cool often. Compare the two lips.
Use a marking pen to mark a lip. Grind it. Cool it.
Then mark the other. Grind it to match. You might need to grind away a bit more metal from the second lip to make them even.
It’s a back-and-forth process. The goal is a symmetrical point. With sharp edges on both sides.
Observational Flow: The Sharpening Process
- Safety First: Put on safety glasses and gloves.
- Prepare Grinder: Ensure a fine-grit wheel is mounted. Position tool rest close. Have water ready.
- Hold the Bit: Grip the bit firmly but not too tightly.
- Angle Correctly: Angle the bit shank up. About 30-45 degrees.
- Twist for Clearance: Twist the shank to grind the heel of the lip.
- Light Contact: Gently touch the wheel to the bit.
- Grind Briefly: Grind for a few seconds.
- Cool Down: Dip the bit in water. Check temperature.
- Repeat on Other Side: Match the angle and amount of metal removed.
- Check for Evenness: Compare both lips. Adjust as needed.
- Test (Carefully): Try on scrap wood.
Refining the Point and Clearance
Once you have two decent-looking lips, you might need to refine the point. Sometimes, the grinding process leaves a small burr. Or the very tip might not be perfectly centered.
Gently touch the tip of the bit to the wheel. You’re not grinding the lips now. You’re just lightly touching the apex of the point.
This can help center it. Do this very briefly. And cool immediately.
You don’t want to flatten the point.
The secondary clearance angle is also important. This is a slight angle ground behind the primary clearance. It reduces friction.
It helps the bit cut cleaner. For most bits, it’s almost imperceptible. You can achieve it by slightly changing the angle of the bit.
Just as you finish grinding the lip. You might tilt the bit a tiny bit more upwards. This grinds a small sliver of metal higher up on the lip.
Again, this takes practice. Don’t worry if you don’t get it perfect at first. A properly ground primary clearance is the most crucial part.
What does a well-sharpened bit look like? When you look at the tip, you should see two clean, sharp edges. They should meet at a clean point.
The angles should look symmetrical. It shouldn’t look rounded or chipped. The surface of the ground area should be smooth.
Not rough or burned. If you see blue or dark spots, that’s heat damage. It means you overheated the bit.
Try to avoid that by grinding lighter and cooling more often.
Contrast: Normal vs. Concerning Signs After Grinding
Normal:
- Shiny, sharp cutting edges.
- Slightly blunted tip from initial contact.
- Small, fine sparks during grinding.
- Bit feels cool or warm after dipping in water.
- Symmetrical point with even lip lengths.
Concerning:
- Rounded or dull cutting edges.
- Deep gouges or chips on the lip.
- Large, bright orange sparks during grinding.
- Bit feels very hot to the touch even after cooling.
- Blue or dark discoloration on the metal (heat damage).
- Uneven lip lengths or an off-center point.
Real-World Context: Different Materials
The technique we’ve described is for standard high-speed steel (HSS) drill bits. These are the most common type. For softer materials like wood and plastic, these bits work well.
They are also used for mild steel. If you’re drilling into harder metals like stainless steel or tool steel, you might have cobalt bits. Or carbide bits.
These require different approaches.
Cobalt bits are HSS with cobalt added. They are harder and hold an edge better at higher temperatures. However, they are also more brittle.
You need to be extra careful not to overheat them. Grinding them too aggressively can chip them. Carbide bits are even harder.
They are often used for masonry or very hard metals. Sharpening carbide is difficult. It usually requires a diamond grinding wheel.
Bench grinders typically don’t have these. So, focus on your common HSS bits first.
The type of material you are drilling also matters. For wood, you want a sharp point. For metal, the edge needs to be very clean and durable.
A bit that’s sharpened for wood might not perform as well in metal. But for general DIY use, a well-sharpened HSS bit on a bench grinder is very versatile. You can get good results across a range of common materials.
What This Means For You
So, when is your drill bit “sharpened enough”? After you’ve gone through the process, it’s time to test. Find a scrap piece of wood.
Or metal, if that’s what you usually drill. Try drilling a hole. Does it cut cleanly?
Does it start easily? Does it require less force than before? If the answer is yes to these, you’ve succeeded!
You’ve brought that bit back to life.
When should you worry? If the bit still feels dull after you’ve tried sharpening it. If it overheats very quickly.
If you see chips forming on the cutting edge. Or if you accidentally ground away too much metal and made the point uneven. Some bits are simply too far gone.
Or they were low quality to begin with. In those cases, it might be time to replace them. Don’t feel bad about it.
Even the best tools wear out eventually.
A simple check: After sharpening, try drilling a small hole in a piece of scrap wood. If it drills easily and makes a nice chip, your bit is likely sharp. If it scrapes, digs in hard, or wanders, it needs more work.
Or it might be time to reconsider its usability. Look closely at the tip. You should see two bright, sharp cutting edges.
These are the indicators of a good sharpening job.
Quick Fixes & Tips for Sharpening
Tip: Mark Your Progress
Use a permanent marker to color the cutting lip before grinding. As you grind, the marker will be removed. This shows you where you are grinding.
And helps you make them even.
Tip: Don’t Grind the Center Drill Point
Avoid grinding the very tip where the two lips meet. This point helps center the bit. Grinding it flat will make the bit wander.
Tip: Use a Gentle Touch
Let the grinder do the work. Don’t force the drill bit against the wheel. Light, steady pressure is best.
This prevents overheating and gives you better control.
Tip: Cool, Cool, Cool!
Never let the bit get too hot. A quick dip in water after every few seconds of grinding is essential. Feel the bit.
If it’s too hot to touch comfortably, it’s too hot for its temper.
Frequent Questions About Drill Bit Sharpening
Can I sharpen any drill bit on a bench grinder?
Generally, yes, you can sharpen standard high-speed steel (HSS) drill bits. Bits made of cobalt are also often sharpenable, but require more care due to brittleness. Carbide bits usually need specialized diamond wheels and are harder to sharpen at home.
Very cheap or very small bits might not be worth the effort.
How often should I sharpen my drill bits?
This depends on usage. If you drill a lot, especially through tough materials, you’ll need to sharpen them more often. If you only use them occasionally for light tasks, they might last a long time.
A good rule of thumb is to sharpen when you notice a significant drop in cutting performance or increased effort is needed.
What grit wheel is best for sharpening drill bits on a bench grinder?
A finer grit wheel is generally preferred. Around 60-80 grit is ideal. This removes metal more controllably.
It leaves a smoother finish on the cutting edge. Coarser wheels remove metal too quickly. This makes it easier to overheat the bit and harder to maintain a precise angle.
How do I know if I’ve overheated my drill bit?
The most common sign is a blue or dark discoloration on the metal near the cutting edge after grinding. You might also notice the bit feels unusually hot even after dipping it in water. Overheating draws the temper, making the steel soft and unable to hold a sharp edge.
My sharpened bit still doesn’t cut well. What did I do wrong?
Several things could be wrong. You might not have ground enough metal off to create a new sharp edge. The angle might be incorrect.
Or the two cutting lips might not be symmetrical. You could have also overheated the bit, ruining its temper. Sometimes, a bit is just too worn or damaged to be effectively sharpened.
Is it cheaper to sharpen drill bits or buy new ones?
For standard HSS drill bits, sharpening is almost always cheaper. A good quality drill bit can be sharpened many times. The cost of a new bit adds up.
Sharpening saves you money and also extends the life of your existing tools. For very small or inexpensive bits, replacement might be more practical.
Conclusion
Sharpening drill bits on a bench grinder is a practical skill. It brings old tools back to life. It saves you money.
And it makes your projects easier. Remember to prioritize safety. Always wear your glasses.
Take your time with the grinding. Cool the bit often. With a little practice, you’ll get the hang of it.
Soon, you’ll have a whole set of sharp bits ready for any job.