How to Install Schlage Door Knob: Essential Guide
Quick Summary
Installing a Schlage door knob is a straightforward DIY project. This guide provides simple, step-by-step instructions, tool recommendations, and helpful tips to ensure a secure and professional-looking installation for any homeowner.
Hey there, DIYers! Md Meraj here, your go-to guide for making home improvement projects feel less like a chore and more like a triumph. Ever found yourself staring at a new Schlage door knob, wondering if you can really tackle installing it yourself? The good news is, you absolutely can! Swapping out an old knob for a shiny new Schlage is a fantastic way to boost your home’s curb appeal and security without needing to call in a professional. It’s a common task, and sometimes, the frustration comes from not knowing where to start. But don’t worry, I’m here to walk you through it, step by simple step. We’ll cover everything you need, from the tools to the final turn, making this a project you’ll feel proud of completing.
Why Choose a Schlage Door Knob?
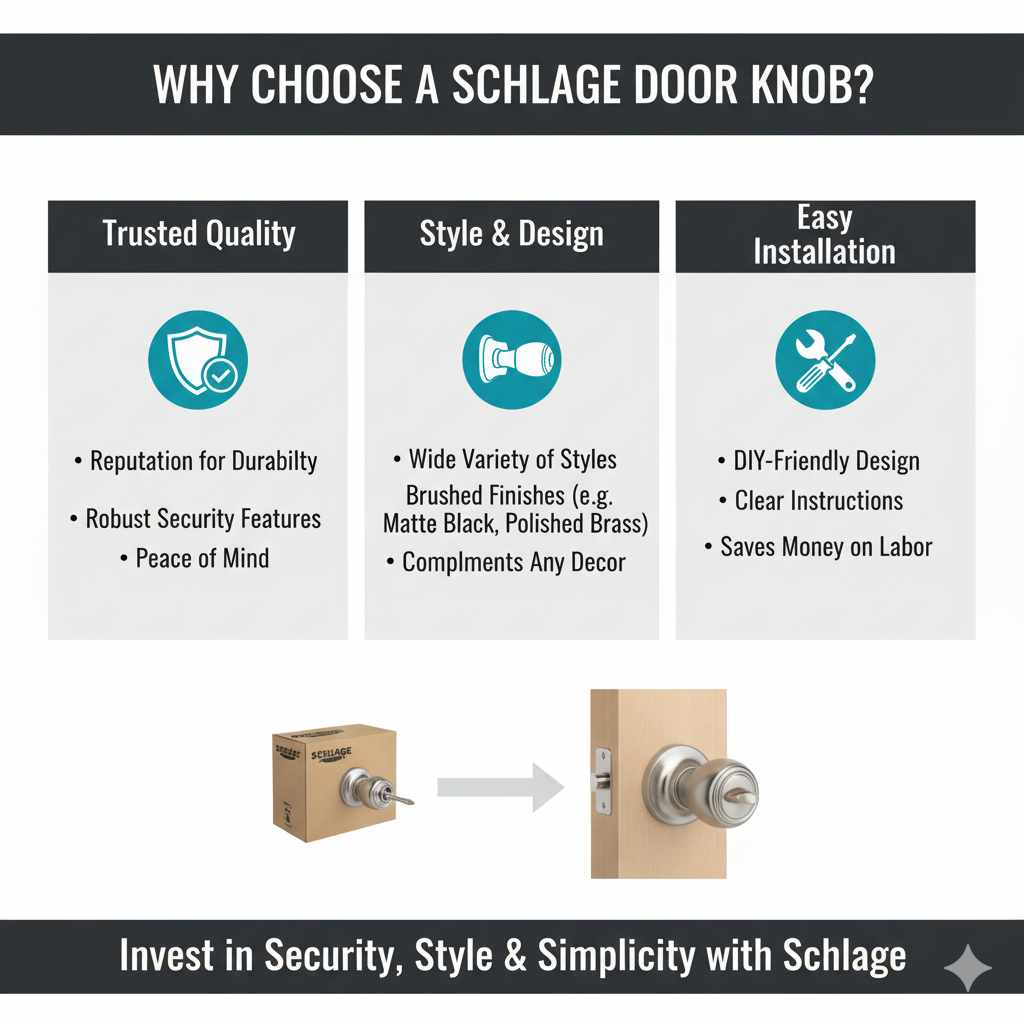
Schlage is a name many of us trust when it comes to home security and hardware. They’ve been around for a long time, building a reputation for quality, durability, and stylish designs. When you choose a Schlage door knob, you’re not just getting a functional piece of hardware; you’re investing in peace of mind. Their products are designed to be robust, resisting wear and tear from daily use, and offering reliable security for your home. Plus, with a wide variety of styles and finishes, you can easily find a Schlage knob that complements your home’s existing decor, whether you’re going for a modern look, a classic feel, or something in between.
Beyond aesthetics and security, Schlage knobs are engineered for straightforward installation. This means that with a few basic tools and clear instructions, most homeowners can successfully replace an old knob or install a new one without a hitch. This DIY-friendly approach saves you money on professional installation and gives you the satisfaction of completing a valuable home improvement task yourself. It’s a win-win situation!
What You’ll Need: Tools and Materials
Before we dive into the installation steps, let’s make sure you have everything ready. Having all your tools and materials on hand will make the process smooth and efficient. Think of this as your pre-flight checklist!
Essential Tools
- Phillips Head Screwdriver: This is your primary tool. Make sure it fits snugly into the screw heads to avoid stripping them. A medium-sized one is usually perfect.
- Flathead Screwdriver (Optional but Recommended): Sometimes, you might need a flathead to gently pry or loosen parts, especially if the old hardware is stubborn.
- Measuring Tape: While most Schlage knobs are designed for standard doors, having a measuring tape handy can be useful for confirming backset measurements if you’re unsure. The backset is the distance from the edge of the door to the center of the doorknob hole. Standard is 2-3/8 inches or 2-3/4 inches.
- Pencil: For marking any adjustments if needed, though usually not required for a standard replacement.
- Safety Glasses: Always a good idea when working with tools, just in case any small parts fly off.
- Work Gloves (Optional): To protect your hands, especially if dealing with older, rough hardware.
What’s in the Box (Your New Schlage Knob Kit)
When you open your new Schlage door knob package, you’ll typically find:
- Exterior Knob/Lever: This is the part you see from the outside.
- Interior Knob/Lever: This is the part you see from the inside.
- Latch Assembly: This is the mechanism that goes into the edge of the door and allows it to close properly. It includes the spring-loaded bolt and the strike plate that attaches to the door frame.
- Mounting Screws: These are used to connect the interior and exterior knobs and secure them to the door.
- Installation Instructions: Always good to have, though we’ll be covering the key steps here!
- Templates (Sometimes Included): For new installations where a hole doesn’t exist, templates can be helpful.
Step-by-Step Guide: How to Install a Schlage Door Knob
Alright, let’s get down to business! Installing a Schlage door knob is a very manageable DIY task. We’ll break it down into simple, easy-to-follow steps. This guide is designed for replacing an existing knob or installing one on a door that already has the necessary holes prepared.
Step 1: Remove the Old Door Knob
First things first, let’s get that old knob off. This is usually the trickiest part if the hardware is old or has been installed for a long time.
- Locate the Screws: Most older knobs have visible screws on the interior side of the knob. These are usually Phillips head screws.
- Unscrew: Using your Phillips head screwdriver, carefully unscrew these screws. Keep them in a safe place, like a small bowl or magnetic tray, so you don’t lose them.
- Separate the Knobs: Once the screws are out, the two halves of the knob (interior and exterior) should pull apart easily. If they seem stuck, gently wiggle them. Sometimes, there’s a hidden latch release button or slot on the neck of the knob. Look for a small hole on the side of the knob’s shaft; you might need to insert a small, thin tool (like a paperclip or a small screwdriver) into this hole to release the knob.
- Remove the Latch: Once the knobs are off, you’ll see the latch mechanism protruding from the edge of the door. There are two screws holding this in place. Unscrew these and pull the latch assembly straight out from the edge of the door.
Step 2: Prepare the Door for the New Latch
Now that the old latch is out, you’ll need to install the new one. Schlage latches are designed to fit standard door preparations.
- Identify the Backset: Check your Schlage latch. It’s usually adjustable or comes with a mechanism to fit either a 2-3/8 inch or 2-3/4 inch backset. If it’s adjustable, ensure it’s set to match your door’s backset. To measure your door’s backset, place a ruler on the edge of the door, from the edge to the center of the large hole.
- Insert the New Latch: Slide the new latch assembly into the hole on the edge of the door. Make sure the flat side of the latch bolt faces forward (away from the door frame). The “tongue” or bolt should slide smoothly.
- Secure the Latch: Use the two shorter screws provided with your Schlage kit to secure the latch plate to the door edge. Ensure the latch is straight and flush with the door edge.
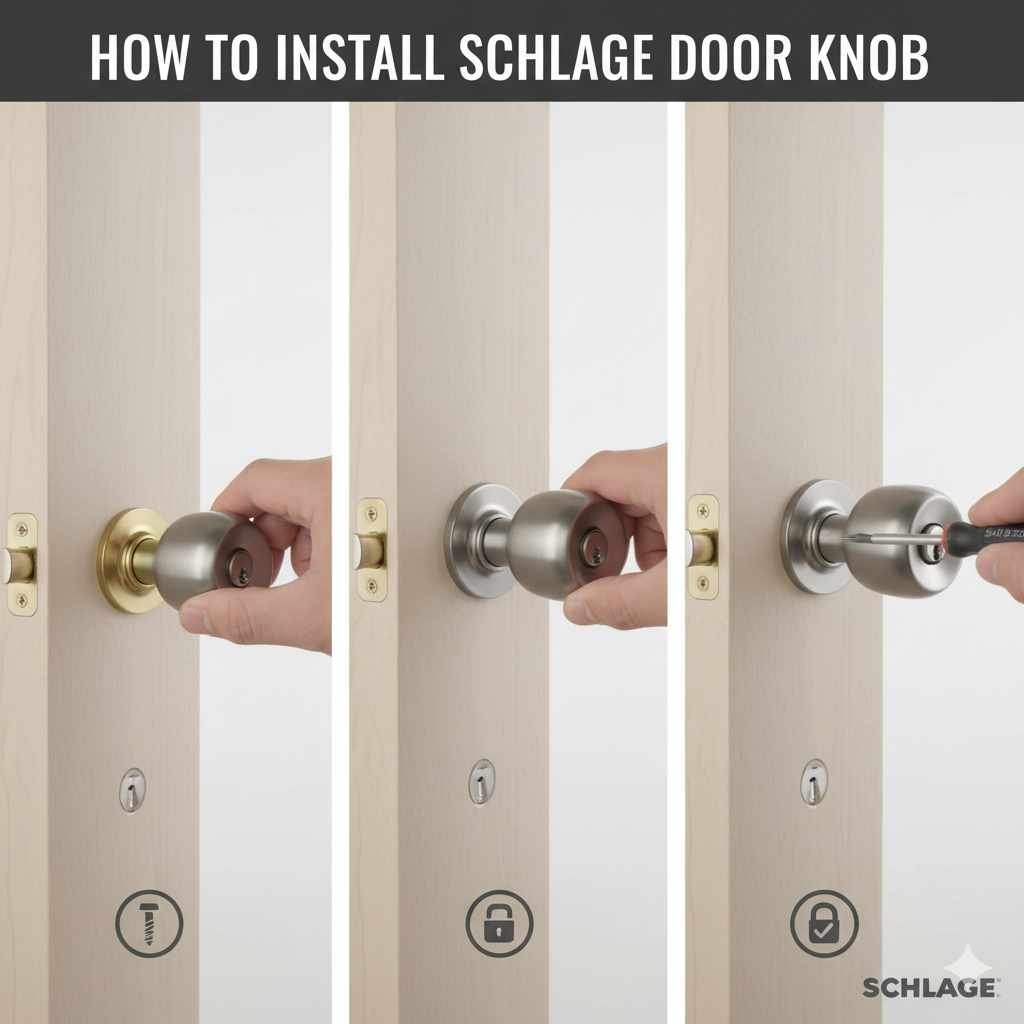
Step 3: Install the Exterior Knob/Lever
This is where the new hardware starts to take shape.
- Orient the Exterior Knob: Take the exterior knob (the one with the keyhole, if applicable) and position it so the spindle (the metal rod that goes through the door) aligns with the hole in the latch mechanism. The exterior knob should sit flush against the outside of the door.
- Feed the Spindle Through: Carefully feed the spindle through the latch mechanism. You might need to gently rotate the spindle to get it to pass through the opening in the latch.
Step 4: Install the Interior Knob/Lever
Now we connect the interior side.
- Align the Interior Knob: Take the interior knob. It usually has a mounting plate or a way to align with the exterior knob’s spindle and the latch mechanism.
- Connect the Two Halves: Fit the interior knob over the spindle and align it with the exterior knob. You should see screw holes on the interior knob that line up with corresponding holes or posts on the exterior knob.
- Secure with Screws: Insert the longer mounting screws provided with your Schlage kit through the interior knob and into the exterior knob. Start by hand-tightening them.
- Tighten the Screws: Once both screws are in place, use your Phillips head screwdriver to tighten them. Tighten them evenly, alternating between screws, until the knobs are snug and secure against the door. Don’t overtighten, as this can strip the screws or damage the knob.
Step 5: Install the Strike Plate and Bolt Receiver
This part attaches to your door frame and ensures the door closes securely.
- Align the Strike Plate: Close the door gently to see where the latch bolt hits the door frame. The new Schlage strike plate should align with the hole in the frame and the latch bolt.
- Secure the Strike Plate: If your door frame already has a pre-drilled hole and a strike plate, you might just need to swap it out. If not, use the screws provided with your Schlage kit to attach the new strike plate to the door frame. Make sure it’s positioned correctly so the latch bolt enters the hole smoothly.
Step 6: Test the New Door Knob
The moment of truth! Let’s make sure everything works perfectly.
- Test the Latch: Operate the knob. Does it retract and extend smoothly?
- Test the Door Closure: Close the door. Does the latch engage with the strike plate properly? Does the door feel secure?
- Test the Locking Mechanism: If your knob has a locking feature (a button or a keyhole), test it. Lock and unlock the knob several times from both sides to ensure it functions correctly.
- Check for Wobble: Give the knobs a gentle shake. They should feel solid and secure. If there’s any wobble, double-check that the mounting screws are tightened evenly.
If everything works smoothly, congratulations! You’ve successfully installed your new Schlage door knob. If something feels off, don’t hesitate to retrace your steps. Sometimes a small adjustment is all it takes.
Troubleshooting Common Issues
Even with the best instructions, you might run into a minor hiccup. Here are a few common issues and how to fix them:
- Knob is Loose or Wobbly: This is almost always due to the mounting screws not being tight enough. Open the knobs again and tighten the screws evenly. Make sure the knobs are pressed firmly against the door before tightening.
- Latch Doesn’t Retract Smoothly: The latch might be misaligned, or the door might be slightly warped. Ensure the latch is inserted straight into the door edge and that the screws are tight. Sometimes, a bit of lubrication (like graphite powder or a silicone-based spray) can help the mechanism move more freely.
- Door Doesn’t Latch Properly: The strike plate on the door frame might be misaligned. Try loosening the strike plate screws slightly, adjust its position so the latch bolt aligns perfectly with the hole, and then retighten. If the hole in the frame is too large, you might need to shim the strike plate or use a longer screw to get a better grip. For more details on strike plate installation and adjustment, resources like This Old House offer excellent visual guides.
- Key Won’t Turn or Lock: Ensure you are using the correct key and that it’s fully inserted. If the lock is new, it might just need a little breaking in. Sometimes, debris can get into the keyway. Try cleaning it out with compressed air. If it persists, double-check that the knob is installed correctly and the internal mechanism isn’t binding.
- Knob Sticks When Turning: This can happen if the spindle isn’t seated correctly or if the internal parts are binding. Ensure the spindle is straight and fully engaged. Check that the mounting screws aren’t overtightened, which can pinch the mechanism.
When to Call a Professional
While most Schlage knob installations are straightforward, there are times when it’s best to call in a pro:
- New Door Hole Installation: If your door doesn’t have any holes drilled for a doorknob, this requires precise measurements and the use of a drill with a hole saw and a latch boring tool. This can be tricky to get right without practice.
- Damaged Door Frame or Door: If the wood around the doorknob or strike plate is significantly damaged, rotten, or split, it may require repairs beyond a simple hardware swap.
- Complex Lock Mechanisms: If you’re installing a smart lock or a high-security lock that has more intricate wiring or programming, you might prefer professional assistance.
- Persistent Issues: If you’ve tried troubleshooting and the knob still isn’t working correctly, a locksmith or handyman can diagnose and fix the problem.
For general door hardware installation, resources from manufacturers like Schlage often provide detailed diagrams and support. You can find helpful installation manuals and videos on the Schlage Support website.
Schlage Door Knob Installation vs. Other Brands
Schlage is known for its user-friendly designs, and their installation process is generally quite standard across the industry. Most reputable brands, like Kwikset, Baldwin, or Yale, follow similar installation principles. The core steps of removing the old hardware, installing the latch, and securing the interior and exterior knobs remain consistent.
However, there can be minor differences:
- Spindle Design: The way the spindle connects the two knobs can vary slightly. Some use a direct screw-in method, while others might have clips or a different interlocking system.
- Latch Adjustment: While many latches are adjustable, the mechanism for adjustment might differ. Some slide, others have rotating collars.
- Set Screw Placement: The location of any small set screws used to hold the knob onto the spindle can vary.
- Templates and Instructions: The clarity and detail of the included instructions and templates can differ from brand to brand.
Schlage typically excels in providing clear, easy-to-understand instructions, making them a great choice for DIYers. The principles you learn installing a Schlage knob will apply to most other standard doorknobs.
Maintaining Your Schlage Door Knob
Once your new Schlage door knob is installed, a little bit of care will ensure it functions smoothly for years to come. Regular maintenance is simple and effective.
Regular Cleaning
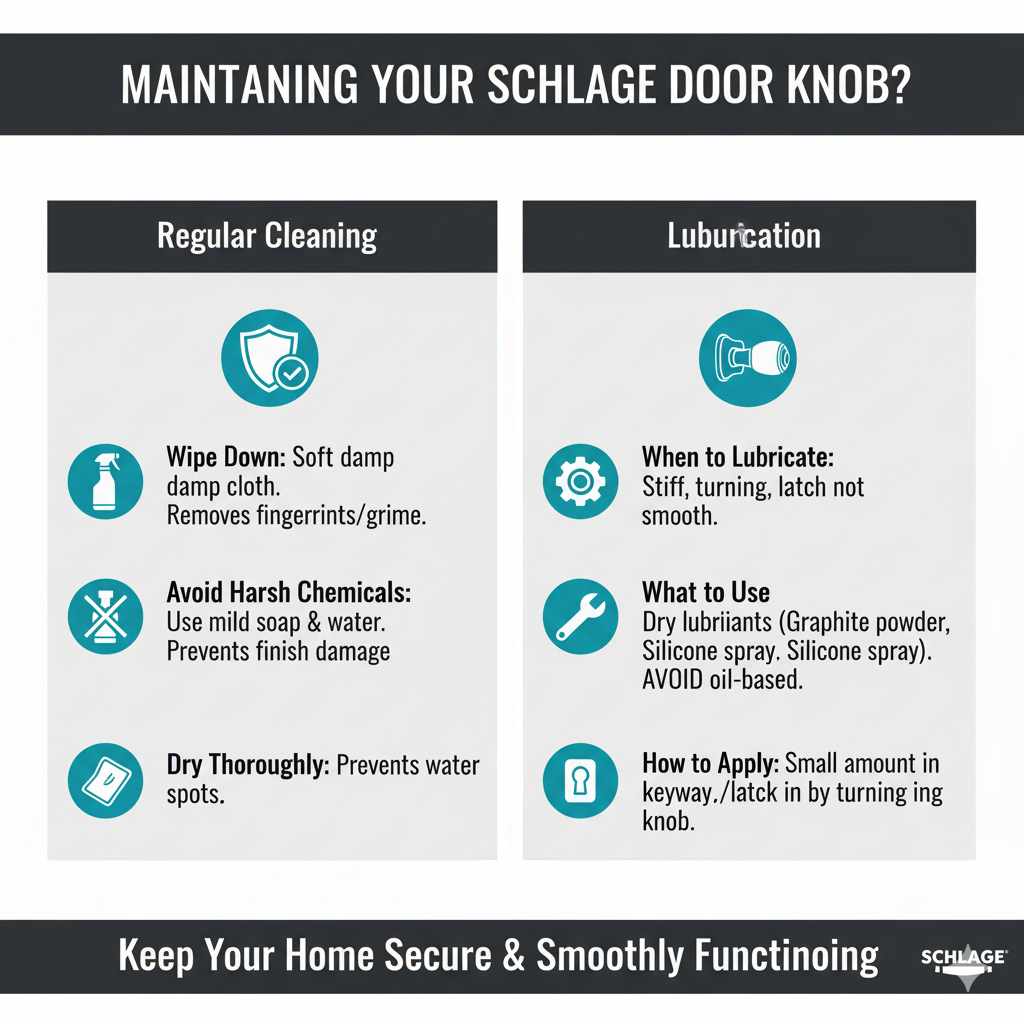
- Wipe Down: Use a soft, damp cloth to wipe down the knob regularly. This removes fingerprints, dust, and grime.
- Avoid Harsh Chemicals: For most finishes (like polished brass, brushed nickel, or oil-rubbed bronze), avoid abrasive cleaners or harsh chemicals, as they can damage the finish. Mild soap and water are usually sufficient.
- Dry Thoroughly: After cleaning, dry the knob with a clean, soft cloth to prevent water spots.
Lubrication
Over time, the internal mechanisms of the knob might become a little stiff.
- When to Lubricate: If you notice the knob feels harder to turn, or the latch doesn’t retract as smoothly, it’s time for lubrication.
- What to Use: The best lubricants for doorknobs are dry lubricants like graphite powder or silicone-based sprays. Avoid oil-based lubricants like WD-40, as they can attract dust and gunk up the mechanism over time.
- How to Apply: For graphite powder, puff a small amount into the keyway (if applicable) and the latch mechanism. For silicone spray, spray a short burst into the same areas. Operate the knob several times to work the lubricant in.
A well-maintained door knob not only looks better but also operates more reliably, providing continued security and ease of use for your home.
Frequently Asked Questions (FAQ)
Q1: Can I install a Schlage door knob on any door?
Yes, Schlage door knobs are designed to fit standard interior and exterior doors. Most doors come pre-drilled with the correct hole sizes. For new installations, you’ll need to drill the holes, which requires specific tools.
Q2: How do I know if my door has the correct backset for a Schlage knob?
The backset is the distance from the edge of the door to the center of the doorknob hole. Standard backsets are 2-3/8 inches or 2-3/4 inches. Most Schlage latches are adjustable to fit either. Measure your door’s backset to confirm.
Q3: Do I need a special drill bit to install a Schlage door knob?
For doors with existing holes, a Phillips head screwdriver is usually all you need. If you are drilling new holes, you will need a 2-1/8 inch hole saw for the main knob hole and a 1-inch spade bit or latch boring tool for the latch hole on the edge of the door. You can find these at any hardware store.
Q4: My new Schlage knob is loose. What should I do?
A loose knob typically means the mounting screws aren’t tight enough. Open the knob mechanism and re-tighten the screws evenly until snug. Ensure the knobs are flush against the door before fully tightening.
Q5: Can I install a Schlage door knob if I’m not handy?
Absolutely! Schlage door knobs are designed for easy DIY installation. This guide breaks down each step clearly, so even if you’re new to home improvement, you should be able to install it successfully.
Q6: What’s the difference between an interior and exterior Schlage knob?
The exterior knob typically has a keyhole (for keyed entry knobs) and faces the outside of the door. The interior knob faces the inside and usually has a push-button or turn-latch mechanism for locking. They are designed to connect through the door.
Q7: How do I fix a Schlage knob that sticks when I turn it?
A sticking knob might be due to misaligned parts or overtightened screws. Ensure the spindle is straight and the mounting screws are snug but not overly tight. Sometimes, a bit of dry lubricant can help. If problems persist, re-check the installation steps.
Conclusion
There you have it! Installing a Schlage door knob is a rewarding DIY project that enhances both the security and appearance of your home. We’ve covered everything from gathering your tools to the final test, ensuring you have a clear roadmap to success. Remember, taking your time, following these steps carefully, and not being afraid to re-check your work are key to a perfect installation. With a little effort, you can confidently tackle this task and enjoy the peace of mind that comes with a well-installed, reliable door knob. So go ahead, grab your screwdriver, and give your door the upgrade it deserves. Happy installing!