Where To Put Knobs On Bifold Doors: Essential Guide
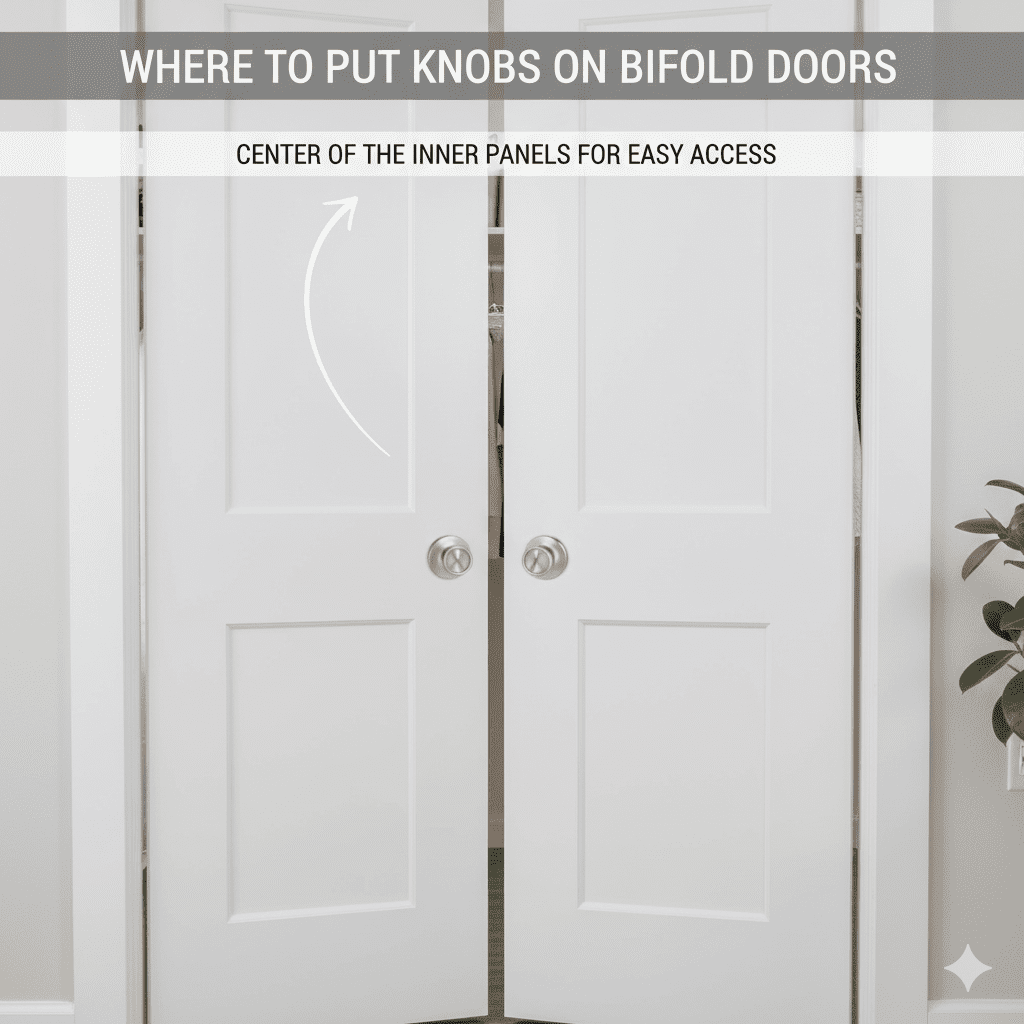
For a perfect knob placement on bifold doors, mount the handles or knobs centered vertically on the edge of the primary swinging panel, about 3 to 4 inches from the edge where the handle will naturally sit when the door is closed. This ensures easy grabbing and even tension distribution across the folding panels.
Bifold doors are wonderful space-savers, but adding hardware can feel tricky. You want them to look great and work smoothly, but where is the right spot for those knobs or pulls? Placing them too high, too low, or too close to the hinge side can make opening and closing a real struggle. If you’ve ever wrestled with a door that just won’t fold right, you know the frustration!
Don’t worry; this is a common DIY hurdle. We are going to walk through this together, step-by-step. We’ll cover measurements, tool needs, and placement secrets so your new hardware looks professional and functions flawlessly. Get ready to gain the confidence to tackle this project perfectly!
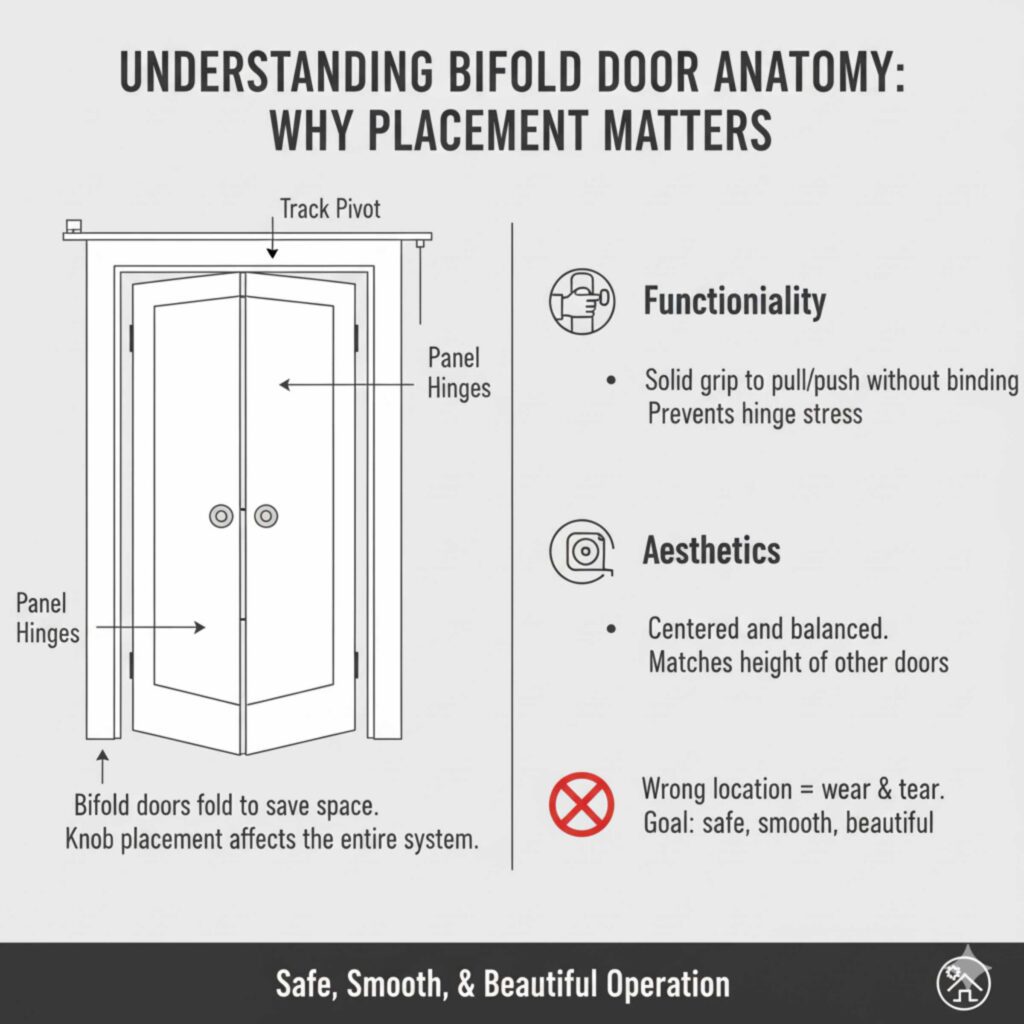
Understanding Bifold Door Anatomy: Why Placement Matters
Before we grab the drill, let’s quickly look at what makes a bifold door unique. Unlike a standard hinged door, a bifold door is made up of two or more panels connected by hinges, allowing them to fold in on themselves to save space. This folding action means the hardware you place on the main panel needs to work harmoniously with the entire system.
The placement of the knob or handle serves two main jobs:
- Functionality: It must give you a solid grip to pull the door open and push it closed without catching on the frame or other panels.
- Aesthetics: It needs to look centered and balanced, matching the height of any adjacent standard door hardware in your home.
Getting the location wrong can stress the hinges or cause the door to bind against the jamb, leading to premature wear and tear. Our goal is safe, smooth, and beautiful operation.
Essential Tools and Materials Checklist
Having the right tools makes any project easier and more accurate. For installing knobs on bifold doors, we need precision, especially with measuring. Here is what you should gather before you start drilling holes.
Tools Needed
- Tape Measure (A reliable, accurate one is key!)
- Pencil or Light Marker
- Speed Square or Combination Square (For ensuring straight vertical lines)
- Drill or Drill/Driver
- Appropriate Drill Bits (Often 1/8 inch for pilot holes, and a specific size paddle or Forstner bit if you are drilling through for a knob spindle—check your hardware instructions!)
- Chisels and Mallet (Only needed if you are mortising the hardware base, which is less common for basic knobs but necessary for some handles)
- Safety Glasses (Always protect those eyes!)
Materials to Check
- The Bifold Knobs or Handles you plan to install
- Screwdriver bits matching your hardware screws
- Template (If provided by the hardware manufacturer—these are incredibly helpful!)
Step-by-Step Guide: Where to Put Knobs on Bifold Doors
We will focus on the “active panel”—the main panel that you actually pull to open the door stack. This is usually the panel hinged to the frame or jamb.
Step 1: Determine the Swing Side and Handle Location
First, identify which side of the door you need the hardware on. For bifold doors, the handle must be placed on the edge that closes against the door jamb or the other stationary door panel. If the door opens to the right, the handle goes on the right edge of the active panel.
Step 2: Measure the Door Height and Find the Centerline
Standard door hardware is installed at a specific height for comfort and consistency across a home. While custom bifold doors can vary, adhering to standard heights is best for resale value and ease of use.
Standard Door Knob Height: In most residential settings, the center of a door knob is placed 36 to 38 inches up from the finished floor. We will aim for 37 inches as a great starting point.
- Measure the full height of the active bifold panel.
- Mark the vertical center of the door edge lightly with a pencil.
- Measure up from the bottom of the door frame (or threshold) to your desired handle height, typically 37 inches, and make a light mark.
- Use your speed square to draw a faint, perfectly vertical line through this mark, extending across the width of the door edge. This is your centerline for drilling.
Step 3: Positioning the Knob Horizontally (Depth Measurement)
This is the most crucial step for bifold function. You need enough space for your hand to grip comfortably, but not so much that the knob interferes with the door frame or the other folding panels.
The Rule of Thumb: For standard knobs, position the center of the knob about 2.5 to 4 inches away from the closing edge of the door.
For bifold doors, err on the side that allows for the least intrusion into the track or frame. A measurement of 3 inches from the edge is often a safe and comfortable spot.
- Measure 3 inches (or your chosen distance, between 2.5″ and 4″) perpendicular from the closing edge toward the center of the door, using your vertical centerline as a guide.
- Mark this intersection point clearly. This is where the center of your hardware will go.
Step 4: Marking and Drilling Pilot Holes
Never drill directly for the final screw size unless you are absolutely certain. Pilot holes prevent wood splitting and ensure clean entry for your screws.
- Hold your knob base plate (or the spindle guide if your hardware came with one) against the marked spot. Ensure it is perfectly perpendicular to the door face using your square.
- Mark the location of the screw holes through the base plate onto the wood.
- Select a drill bit slightly smaller than the diameter of your mounting screws (e.g., if screws are #8 gauge, use a 1/8-inch bit).
- Wearing your safety glasses, drill shallow pilot holes only as deep as the screw threads will go. If you drill too deep, the screw won’t tighten properly.
Step 5: Installing the Hardware
Follow your specific hardware instructions here, as mortising (cutting a shallow recess so the hardware sits flush) may be required for some decorative handles. Most standard knobs just screw directly into place.
- If required, use a sharp chisel to carefully remove a tiny amount of wood so the backplate sits flush. Start shallow; you can always remove more wood, but you cannot put it back!
- Align the knob or handle over the pilot holes.
- Insert the screws and tighten them. Be firm, but stop tightening as soon as you feel solid resistance. Over-tightening can strip the pilot hole or crack the door material, especially on hollow-core doors.
Special Considerations for Bifold Door Hardware
Bifold doors are often lighter or may have internal mechanisms that require different handling than standard doors. Keep these tips in mind.
Hollow Core vs Solid Core Doors
Most interior bifold doors are hollow core, meaning there is just thin wood veneer over a cardboard honeycomb or lightweight wood frame inside.
- Hollow Core Risk: Screws rely only on the thin veneer to bite. If you overtighten, the screw will spin freely, or worse, punch right through the face of the door.
- The Fix: Use shorter screws if possible, or use wood filler mixed with wood glue in the pilot hole before re-drilling if the first attempt fails. For heavy handles, consider adding small blocks of solid wood behind the veneer where you drill, accessible from the opposite side if possible.
Using Pulls vs Knobs on Bifold Stacks
On a multi-panel bifold stack, you typically only put hardware on the primary panel you grab to move the whole unit. If you have four panels that fold, hardware is usually only placed on the one panel that connects directly to the door jamb.
However, sometimes the second panel in a set needs a small handle to help pull it around the corner smoothly. If this is the case:
- Place the handle on the inside edge of the second panel.
- Ensure this handle placement does not interfere with the folding clearance of the first panel. Keep the handle measurement much smaller (e.g., only 1.5 inches from the edge) or use a very low-profile pull.
Aligning with Existing Door Hardware
Consistency looks professional. If you have 80-inch standard doors elsewhere in the room or hallway, measure their knob height. For example, if their knobs are centered at 38 inches, use 38 inches on your bifold door for perfect visual harmony. You can find general residential standards referenced by organizations like the U.S. Department of Housing and Urban Development (HUD) regarding accessibility, which often dictates minimum functional heights.
Visual Guide: Placement Diagram Summary
To make this absolutely clear, let’s summarize the ideal placement using a quick reference chart. Remember, all measurements are from the edge of the door panel toward the center.
| Measurement Aspect | Recommended Measurement | Why This Spot Works |
|---|---|---|
| Vertical Height (From Floor) | 36 to 38 inches (Aim for 37″) | Matches standard home ergonomics and visual flow. |
| Horizontal Placement (From Edge) | 3 inches (Range 2.5″ to 4″) | Allows a full grip without interfering with the frame or hinges. |
| Panel Location | The main, active swinging panel only. | This panel bears the load of opening the entire unit. |
Troubleshooting Common Bifold Knob Installation Issues
Even with careful measuring, things can sometimes go slightly wrong. Here are quick fixes for common beginner issues:
Problem 1: The Screw Won’t Tighten (Stripped Hole)
This usually happens on hollow core doors when the pilot hole was too big or you over-tightened.
The Fix: Remove the screw. Get a wooden toothpick or a thin wooden matchstick. Dip the end in wood glue and jam several into the pilot hole until it’s packed tight. Let the glue dry for an hour. Then, gently push the screw back in—it should now bite securely into the fresh wood plug.
Problem 2: The Knob Looks Too High/Low After Installation
If you step back and it just looks off, don’t panic. If you haven’t drilled the final screw holes yet, you can adjust!
The Fix: If you only drilled the pilot holes, gently use the pilot hole as a pivot point and slightly angle the mounting screws as you tighten them. If the hardware is already mounted, you will need to use wood filler to patch the old holes and start over. For bifold doors, a slight visual misalignment is sometimes necessary to ensure clearance inside the track mechanism, so trust the function over pure aesthetics if there is a slight discrepancy.
Problem 3: The Door Catches When Opening After Installation
If the knob or handle hits the door jamb or the adjacent panel when you pull it open, your horizontal placement (Step 3) was too close to the edge.
The Fix: If the hardware protrudes too far, you may need to mortise (recess) the back of the hardware deeper into the door edge using a chisel. If the hardware is flat enough but still hitting, the only real fix is filling the old holes and moving the hardware further toward the center of the door (e.g., moving from 2.5 inches out to 3.5 inches out).
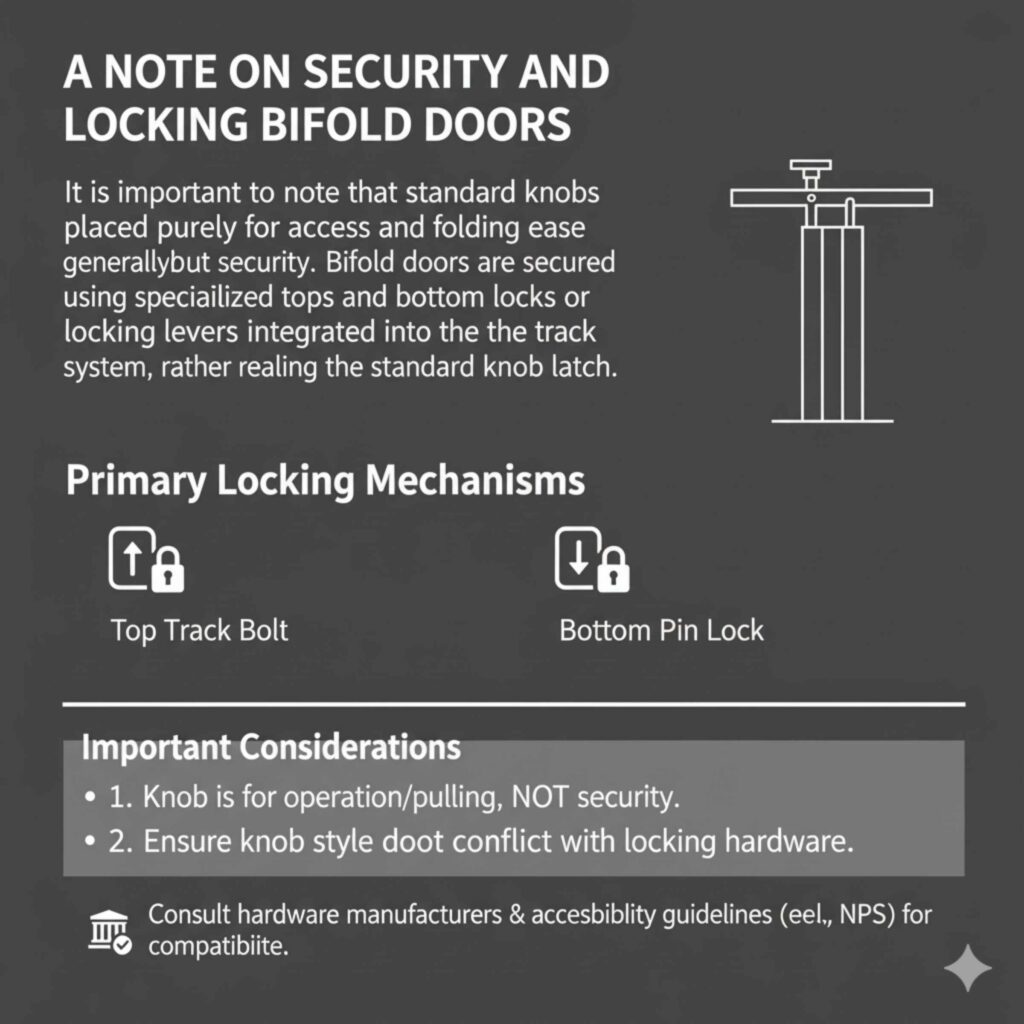
A Note on Security and Locking Bifold Doors
It is important to note that standard knobs placed purely for access and folding ease generally do not offer robust security. Bifold doors are secured using specialized top and bottom locks or locking levers integrated into the track system, rather than relying on the standard knob latch.
When placing your operational knob, you are placing the handle for opening and closing, not the primary locking mechanism. Make sure your chosen knob style does not conflict with where the locking bolts or catches engage on the top track system. Good resources for track and hardware compatibility can often be found through reputable door hardware manufacturers like the National Park Service (NPS) accessibility guidelines, which often influence door operation standards for clearance.
Frequently Asked Questions (FAQ) About Bifold Door Knobs
Q1: Can I use a standard door handle set on a bifold door?
A: Yes, you can, but usually only on the active panel. You must ensure the latch mechanism (if it has one) is either removed or left unlocked, as bifold doors are typically secured by track locks, not the knob latch. For simple pulls, any decorative hardware works well.
Q2: Do I need to drill holes on both sides of the bifold door panel?
A: Generally, no. If you are installing a simple knob or pull, you only need hardware on the side you use to open the door. If you install hardware on both sides, make sure the internal mounting screws do not hit any internal structural elements or the folding hinge mechanism.
Q3: What if my bifold door is very thin?
A: Thin doors (less than 1 3/8 inches thick) are very prone to stripping. Use shorter, high-quality screws. If the knob requires a spindle that goes all the way through, consider using a through-bolt mechanism where the screws pass through and are secured by a backplate, which distributes the pressure evenly across both faces of the door.
Q4: Should I put the knob higher or lower than on my standard doors?
A: For aesthetic consistency, you should aim for the same height (36–38 inches from the floor). If the door track mechanism requires clearance, you may have to adjust slightly lower, but try to keep it within 1 inch of the standard height for a good look.
Q5: How far from the edge should I place the handle to prevent scraping?
A: Aim for a depth measurement of 3 inches from the closing edge. This provides enough space for your hand while keeping the bulk of the hardware away from the frame where binding is most likely to occur during the folding motion.
Q6: Do I need to measure the height from the actual floor or the door threshold?
A: Always measure from the finished floor surface where you stand. The hardware height standard is based on the floor level, not the sill or threshold of the door opening.
Conclusion: Confidence in Your Placement
Installing hardware on bifold doors doesn’t have to be a mystery! By focusing on accurate vertical placement (usually 37 inches high) and maintaining a safe, functional horizontal depth (around 3 inches from the edge), you ensure your new knobs look fantastic and work perfectly every single time. Remember to measure twice, drill once, and always prioritize pilot holes, especially on lighter, hollow-core doors. You have the plan, the tools, and the guidance now. Take your time with the measurements, and you will find that achieving professional-looking results on your bifold door hardware is well within your DIY capabilities. Enjoy the smooth, easy operation of your newly outfitted.