
How to Replace Wood Under Kitchen Sink Easily
Sometimes the wood under your kitchen sink can get a little worn out or even damaged from leaks. For many people, especially those just starting out with home repairs, figuring out How to Replace Wood Under Kitchen Sink Easily can seem like a big task. You might worry about making mistakes or not having the right tools.
But don’t let that stop you! This guide will break down the whole process into simple, manageable steps. We’ll show you exactly what you need to do, making it much less scary than you think.
Get ready to learn how to fix it up yourself.
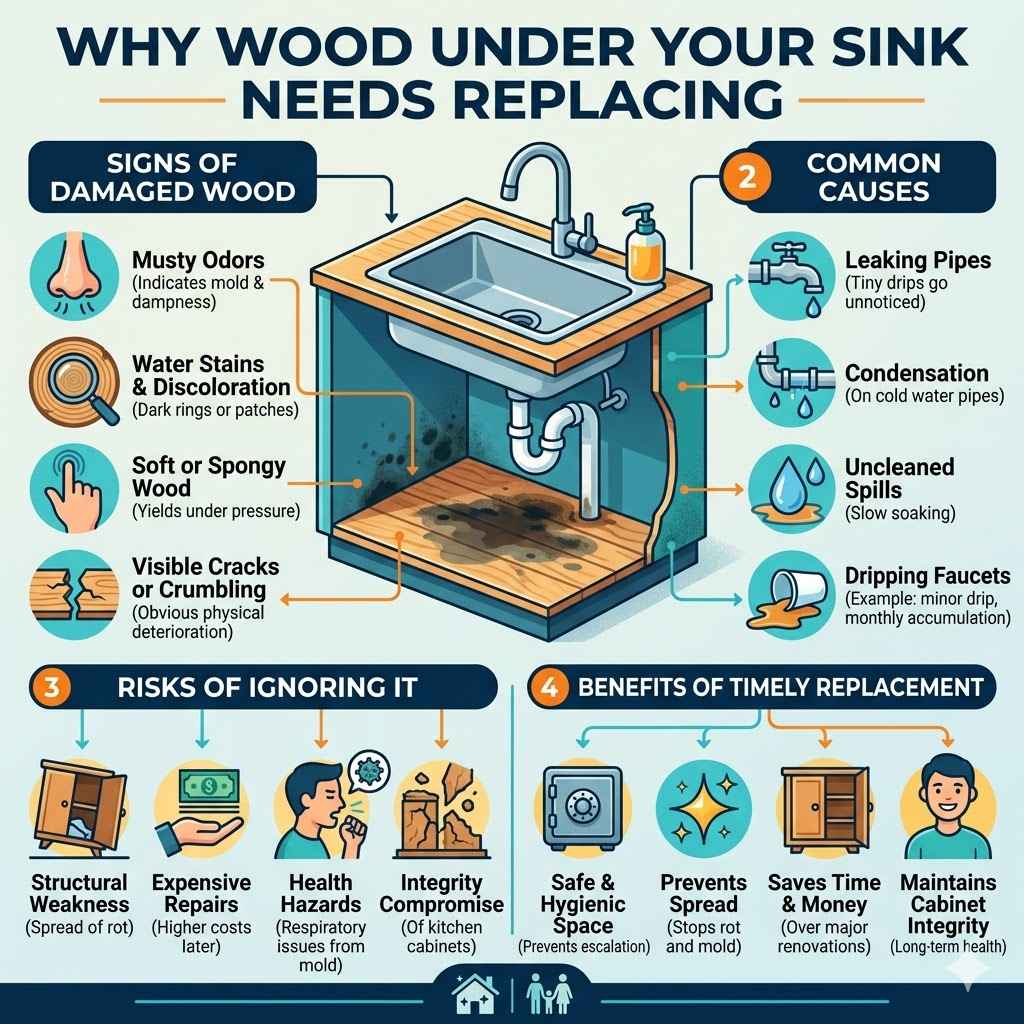
Why Wood Under Your Sink Needs Replacing
The area under your kitchen sink is prone to moisture. Small leaks from pipes, dripping faucets, or even condensation can slowly damage the wood over time. This damage can lead to rot, mold growth, and structural weakness.
Replacing this wood is important for maintaining the integrity of your kitchen cabinets and preventing bigger problems down the line. It ensures a safe and hygienic space.
Signs of Damaged Wood Under the Sink
You might notice a musty smell coming from under the sink, which can indicate mold or rot. Water stains on the cabinet floor or the bottom of the sink base are also clear signs. If the wood feels soft or spongy when you press on it, it’s definitely time for a change.
You might even see visible cracks or crumbling pieces of wood.
- Musty Odors: A persistent damp smell is a strong indicator of water damage and potential mold growth within the wood structure. This can affect air quality in your kitchen.
- Water Stains and Discoloration: Visible rings or dark patches on the wood surface clearly show where water has been seeping in, compromising the material.
- Soft or Spongy Wood: When the wood loses its firmness and feels yielding under pressure, it means it has absorbed a lot of moisture and is likely beginning to rot.
- Visible Cracks or Crumbling: Deterioration might become obvious through physical cracks or if small pieces of the wood break off easily.
Common Causes of Wood Damage
Leaks are the primary culprit. Even tiny drips from the plumbing connections under the sink can go unnoticed for a long time, slowly soaking into the wood. Condensation from cold water pipes can also cause moisture buildup.
Sometimes, spills that aren’t cleaned up quickly can contribute to the problem. Over many years, constant exposure to these small amounts of water wears down the wood.
For example, a slowly dripping faucet that seems minor might drip a few ounces of water each day. Over a month, that’s almost a gallon of water soaking into the wood. This consistent exposure is what causes the slow breakdown of the material.
The Importance of Timely Replacement
Ignoring damaged wood can lead to more expensive repairs later. Rot can spread, weakening the entire cabinet structure. Mold is also a health hazard, potentially causing respiratory issues.
Replacing the wood promptly prevents these issues from escalating, saving you time, money, and potential health risks.
Gathering Your Tools and Materials
Before you start the actual work of replacing the wood, it’s essential to have everything you need ready. This includes safety gear, tools for removing the old wood, and materials for the new piece. Having all your supplies on hand will make the process smoother and faster.
Essential Safety Gear
Safety always comes first. You’ll need a good pair of work gloves to protect your hands from splinters and sharp edges. Safety glasses are a must to keep dust and debris out of your eyes.
If you’re dealing with any potential mold, a dust mask or respirator will help you breathe easier.
- Work Gloves: Sturdy gloves protect your hands from rough wood, nails, and potential cuts.
- Safety Glasses: Essential for shielding your eyes from falling debris, dust, and splintered wood.
- Dust Mask or Respirator: If mold is present or you’re creating a lot of dust, this will protect your lungs.
Tools for Removal and Installation
You’ll likely need a pry bar to gently lift the old wood away. A screwdriver or drill with the appropriate bits will be useful for removing any screws holding the old piece in place. A measuring tape is crucial for getting the exact dimensions for your new wood.
You’ll also need a saw to cut the new piece to size, a jigsaw is often handy for tight spaces. A utility knife can be useful for scoring caulk or cleaning edges.
Choosing Your Replacement Wood
The best material for replacing the wood under your sink is moisture-resistant plywood or a composite material. Plywood, especially exterior-grade or marine-grade, holds up better against damp conditions. If you prefer, you can also use treated lumber, but ensure it’s safe for indoor use and has no harsh chemical odors.
The thickness should match the original piece, often 1/2 inch or 3/4 inch.
A common mistake is using standard particleboard, which quickly disintegrates when wet. Opting for plywood or a similar water-resistant material ensures your repair will last.
How to Measure for Your New Wood Piece
Carefully measure the length, width, and depth of the damaged area. If the damaged piece is a single panel, measure its exact dimensions. If it’s integrated into the cabinet structure, you’ll need to measure the opening it fits into.
It’s better to measure twice and cut once to ensure a perfect fit for your new piece.
How to Replace Wood Under Kitchen Sink Easily Step-by-Step
Now that you have your tools and materials, you’re ready to tackle the replacement. This section breaks down the process into easy steps.
Step 1 Clearing Out the Cabinet
First, remove everything from under the sink. This includes cleaning supplies, trash cans, and anything else stored there. This will give you a clear workspace and prevent items from getting damaged or in the way.
Take this opportunity to clean out the cabinet. Wipe down the shelves and walls to remove any dust or debris. This ensures a fresh start for your repaired space.
Step 2 Turning Off the Water Supply
Before you start disconnecting any plumbing, it’s crucial to turn off the main water supply to your sink. You’ll usually find shut-off valves under the sink, one for hot and one for cold water. Turn these valves clockwise until they are completely closed.
To ensure the water is off, turn on the faucet. A little water will come out, but it should stop quickly. If water continues to run, you may need to turn off the main water supply to your house.
Step 3 Disconnecting Plumbing (If Necessary)
In some cases, you might need to disconnect the pipes or drain assembly to get to the damaged wood. Place a bucket or basin underneath the pipes to catch any residual water. Use a wrench to loosen the slip nuts that connect the pipes.
Be gentle, as older pipes can be brittle.
If the wood is not directly under the pipes, you might be able to work around them. Assess your situation to see if disconnection is truly needed.
Step 4 Removing the Damaged Wood
Now it’s time to remove the old, damaged wood. If it’s a separate panel, look for screws or nails holding it in place. Use your screwdriver or drill to remove screws.
If there are nails, use a pry bar to carefully lever the wood up. Work slowly and deliberately to avoid damaging the surrounding cabinet structure.
If the wood is glued or heavily adhered, you might need to use a utility knife to score any caulk or sealant around the edges. A chisel can also help break stubborn adhesion.
Example: Removing a Rotten Base Panel
Imagine a thin plywood panel forming the floor of the cabinet under your sink that has become soft from a slow leak. You’d first locate any screws that attach it to the cabinet sides and base. Removing these screws with a cordless drill would be the first step.
If it’s also adhered with caulk, you’d use a utility knife to cut through that seal. Then, a pry bar would be inserted under an edge to lift the panel up and away. This process can sometimes feel stuck, but gentle, persistent pressure usually works.
Step 5 Cleaning the Area
Once the old wood is out, take some time to clean the cabinet thoroughly. Remove any loose debris, dust, mold, or old sealant. A brush and dustpan will be useful.
If mold was present, you might want to wipe down the area with a mold killer or a bleach solution (ensure good ventilation if using bleach).
A clean surface is essential for the new wood to sit properly and for any new sealant or adhesive to bond effectively.
Step 6 Cutting and Fitting the New Wood
Using your measurements, cut the new piece of moisture-resistant plywood to the correct size. If you don’t have a saw, many hardware stores can cut wood for you if you provide the exact dimensions. Test-fit the new piece in the cabinet opening.
It should fit snugly without being too tight or too loose.
You may need to trim a little off the edges for a perfect fit. Use sandpaper to smooth any rough edges after cutting.
Consider the layout of your pipes and drains. You might need to cut out sections of the new wood to accommodate these. Measure carefully around any pipes before making these cuts.
A jigsaw is very helpful for these intricate cuts.
Step 7 Installing the New Wood
Now, place the new wood piece into the cabinet. Secure it in place. You can use wood screws or construction adhesive, depending on how the original piece was attached and what kind of support you need.
If using screws, pre-drill pilot holes to prevent the wood from splitting.
Ensure the new piece is level and sits flush with the surrounding cabinet surfaces.
Scenario: Securing a New Plywood Floor
Let’s say you’re installing a new 1/2-inch plywood floor. After cutting it to fit perfectly, you would lay it in the cabinet. You’d then use 1.5-inch wood screws.
Place a screw every 6-8 inches along the edges where the plywood meets the cabinet frame. Pre-drilling a slightly smaller hole than the screw’s diameter helps the screw go in smoothly without splitting the wood. Make sure the screws are countersunk slightly so they don’t protrude.
Step 8 Reconnecting Plumbing (If Disconnected)
If you disconnected any pipes, now is the time to reconnect them. Hand-tighten the slip nuts first, then use a wrench to tighten them a bit more. Don’t overtighten, as this can crack the plastic fittings.
Turn the water supply valves back on slowly. Check all connections for leaks.
Step 9 Sealing and Finishing Touches
Once everything is reconnected and you’ve confirmed there are no leaks, you can apply sealant. Use a waterproof caulk or sealant around the edges of the new wood where it meets the cabinet walls or any pipes. This creates a barrier against future moisture.
Wipe away any excess sealant immediately. Let it dry completely according to the product instructions before putting items back into the cabinet.
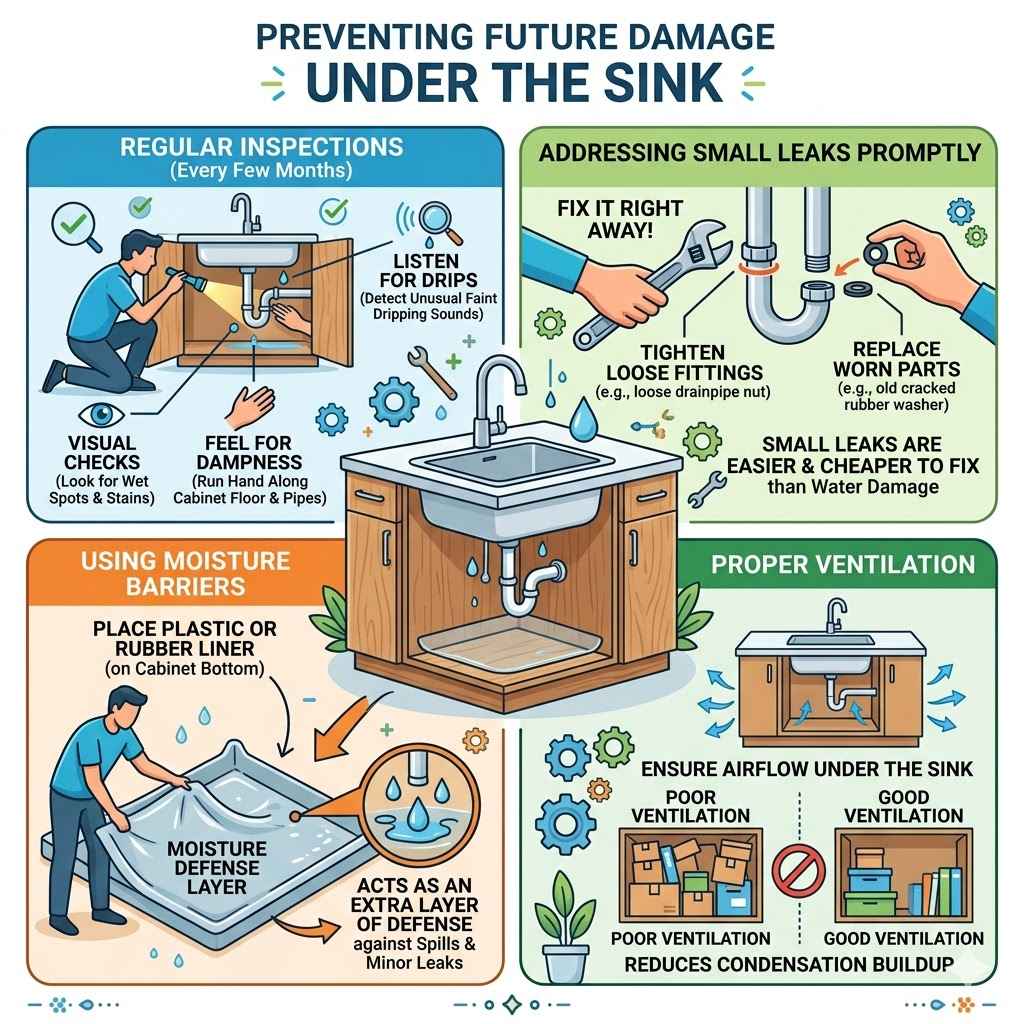
Preventing Future Damage Under the Sink
Now that you’ve successfully replaced the wood, taking steps to prevent future damage is key. Regular checks and quick fixes can save you a lot of trouble down the road.
Regular Inspections
Make it a habit to peek under your sink every few months. Look for any signs of moisture, drips, or discoloration on the wood. Catching small issues early can prevent major problems.
- Visual Checks: Simply look for any wet spots, new stains, or unusual dampness around the pipes and on the cabinet floor.
- Feel for Dampness: Run your hand along the bottom of the cabinet and the pipes. Any unusual coolness or dampness is a warning sign.
- Listen for Drips: Sometimes, you can hear a faint dripping sound that might indicate a small leak.
Addressing Small Leaks Promptly
If you spot a small drip from a pipe fitting or faucet connection, fix it right away. Often, tightening a loose fitting is all it takes. If a part looks worn or corroded, replace it before it fails completely.
Small leaks are much easier and cheaper to fix than water damage.
For instance, a common issue is a loose nut on the drainpipe. A quick quarter-turn with a wrench can often stop a slow drip. If the rubber washer inside a fitting looks old and cracked, replacing it is a simple and effective repair.
Using Moisture Barriers
You can enhance protection by placing a plastic or rubber liner on the bottom of the cabinet. This acts as an extra layer of defense against spills or minor leaks. Ensure the liner is slightly larger than the cabinet floor so it can catch any drips.
Proper Ventilation
Ensure there is some airflow under the sink. While not always easy, avoiding storing items that block all air circulation can help. Good ventilation reduces condensation buildup.
Frequently Asked Questions
Question: How much does it cost to replace wood under a kitchen sink?
Answer: The cost can vary greatly. If you do it yourself, you’ll mainly pay for materials, which could range from $20 to $50 for plywood and sealant. Hiring a handyman or plumber could cost anywhere from $100 to $300 or more, depending on your location and the extent of the damage.
Question: Can I use regular plywood or do I need special wood?
Answer: It’s best to use moisture-resistant plywood, like exterior-grade or marine-grade plywood. Regular plywood can absorb water and degrade quickly. Treated lumber can also work if it’s safe for indoor use.
Question: How long should the new wood last?
Answer: If you use moisture-resistant materials and take steps to prevent future leaks, your new wood could last for many years, potentially a decade or more. Regular checks are key to its longevity.
Question: What if the damage is really bad and widespread?
Answer: If the rot has spread significantly and affected other parts of the cabinet or floor, it might be time to call a professional. They can assess the structural integrity and recommend the best course of action, which might include cabinet repair or replacement.
Question: Do I need to disconnect the garbage disposal if I have one?
Answer: If the garbage disposal unit is directly above the area you need to repair, you will likely need to disconnect it for easier access. Always turn off the power to the unit at the breaker box before working on it.
Summary
Replacing wood under your kitchen sink is a manageable DIY project. By gathering the right tools, following these simple steps, and taking preventative measures, you can restore your cabinet and avoid future water damage. You’ve learned how to identify the problem, prepare your workspace, and make the repair effectively.
Keep up with regular checks to maintain a healthy kitchen space for years to come.