I Learned to Chisel Door Hinges, and You Can Too!.
I still remember my first time chiseling door hinges. My old bedroom door squeaked, and I wanted to fix it myself. With a chisel and some patience, I made it fit perfectly! This article will teach you how to chisel door hinges step-by-step. It’s easy, fun, and saves money. Whether you’re new to woodworking or a pro, you’ll find simple tips and tricks to make your doors work smoothly
What Is Chiseling Door Hinges?
Chiseling door hinges means cutting a small slot, called a mortise, into a door or frame. This slot lets the hinge sit flat, so the door closes nicely. It’s important because a good hinge fit makes doors quiet and sturdy. You don’t need fancy tools—just a sharp chisel and a hammer.
Why Chisel Hinges Instead of Using a Router?
Routers are fast but expensive. Chiseling is cheaper and works well for small jobs. It’s also quiet and great for beginners. However, it takes practice to get clean cuts. If you’re doing many doors, a router might save time. For one or two doors, a chisel is perfect.
Tools and Materials You’ll Need
You don’t need much to start. Here’s what I use:
- Chisel: A ¾-inch or 1-inch bevel-edge chisel works best.
- Hammer: A small one for gentle taps.
- Utility knife: To mark the hinge outline.
- Pencil: For drawing lines.
- Combination square: To measure straight lines.
- Hinges: Standard 3½-inch or 4-inch door hinges.
-
Screws: To secure the hinges.
I recommend Stanley Fatmax chisels for beginners. They’re affordable and easy to use. Always keep your chisel sharp for clean cuts.
Table 1: Tool Comparison for Chiseling Door Hinges
| Tool | Cost | Why It’s Useful | Where to Buy |
|---|---|---|---|
| ¾-inch Chisel | $10-$20 | Perfect for hinge slots | Home Depot |
| 1-inch Chisel | $15-$25 | Good for larger hinges | Amazon |
| Router (Optional) | $50-$100 | Faster for many doors | Lowes |
| Caption: Compare tools to decide what’s best for your project. |

Step-by-Step Guide to Chiseling Door Hinges
Here’s how I chisel door hinges. Follow these steps carefully.
Step 1: Mark the Hinge Location
Hold the hinge against the door edge. Use a pencil to trace its outline. A combination square helps keep lines straight. This step is key for a good fit.
Step 2: Score the Outline
Use a utility knife to cut along the pencil lines. Make shallow cuts to guide your chisel. This prevents the wood from splitting.
Step 3: Set the Depth
Check the hinge thickness. Score the depth with a knife or awl. I use two hinge leaves stuck together as a depth gauge. Aim for a mortise as deep as the hinge.
Step 4: Start Chiseling
Hold your chisel at a 45-degree angle. Tap gently with a hammer to cut across the grain. Make cuts ¼-inch apart. Go slow to avoid mistakes.
Step 5: Remove Waste Wood
Turn the chisel bevel-up. Gently shave off wood inside the scored lines. Use hand pressure for smooth cuts. Clean the mortise until it’s flat.
Step 6: Test the Fit
Place the hinge in the mortise. It should sit flush with the door. If it’s too deep, add a cardboard shim. If too shallow, chisel a bit more.
Step 7: Secure the Hinge
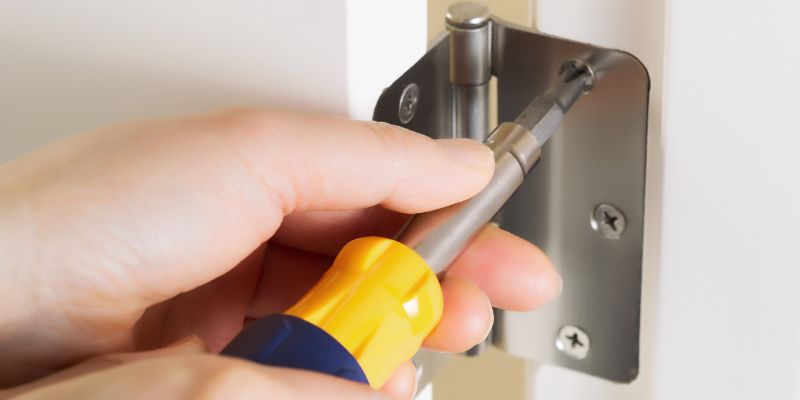
Screw the hinge into place. Use a screwdriver to avoid stripping screws. Check that the door swings smoothly.
Visual Idea: A diagram showing chisel angles (45-degree for cutting, bevel-up for smoothing) would help beginners.
Safety Tips for Chiseling
Safety is important! Here are my top tips:
- Wear gloves: Protect your hands from splinters.
- Keep chisels sharp: Dull tools slip and cause accidents.
-
Work slowly: Rushing leads to mistakes.
I once slipped with a dull chisel and scratched my door. Sharpen your tools to stay safe.
Table 2: Common Chiseling Mistakes and Fixes
| Mistake | Fix |
|---|---|
| Mortise too deep | Add cardboard shims |
| Uneven cuts | Use a sharp chisel |
| Wood splits | Score deeper with knife |
| Caption: Avoid these mistakes for a perfect hinge fit. |
Benefits and Drawbacks of Chiseling
Chiseling is affordable and gives you control. It’s great for small projects and feels rewarding. However, it’s slower than a router and requires practice. If you’re new, expect a few uneven cuts. With time, you’ll get better. I love the hands-on feel of chiseling—it’s like sculpting!
My Personal Tips for Success
- Practice on scrap wood: Try chiseling on old boards first.
- Sharpen often: A sharp chisel makes clean cuts.
-
Go slow: Patience gives you better results.
I learned these tips after ruining a door with rushed cuts. Take your time, and you’ll love the outcome.
Table 3: Cost-Saving Ideas for Chiseling
| Idea | How It Saves Money |
|---|---|
| Use a single chisel | Avoid buying a set |
| Sharpen at home | Skip professional sharpening |
| Reuse old hinges | No need to buy new ones |
| Caption: Save money with these simple tricks. |
Other Ways to Install Hinges
You can use a router with a hinge template for speed. It’s great for big jobs but costs more. A corner chisel tool can square rounded hinges quickly. I’ve tried both, but chiseling is my favorite for small fixes. It’s cheap and satisfying.
Visual Idea: A side-by-side comparison of chiseling vs. router cuts would show the difference clearly.
Conclusion
Chiseling door hinges is a fun, simple skill. You just need a chisel, a hammer, and patience. Follow my steps, stay safe, and practice a bit. You’ll soon hang doors like a pro! Try chiseling a hinge this weekend. Share your project with friends or on social media. It feels great to fix something yourself!
Frequently Asked Questions
What Is a Door Hinge Mortise?
A mortise is a small slot cut into the door or frame. It holds the hinge so it sits flat. This makes the door close smoothly without gaps.
Do I Need a Special Chisel for Hinges?
No, a ¾-inch or 1-inch bevel-edge chisel works fine. Just keep it sharp. Fancy chisels are nice but not necessary for beginners.
How Do I Keep My Chisel Sharp?
Use sandpaper or a sharpening stone. Rub the flat side and bevel until shiny. A sharp chisel cuts wood like butter.
Can I Chisel Hinges Without a Hammer?
Yes, but a hammer helps. You can press the chisel by hand for small cuts. A hammer gives better control for deeper cuts.
What If My Mortise Is Too Deep?
Add a thin cardboard shim under the hinge. It lifts the hinge to sit flush. I’ve done this, and it works great.
How Long Does Chiseling a Hinge Take?
It takes about 20-30 minutes per hinge for beginners. With practice, you’ll do it in 10-15 minutes. Go slow for the best results.
Can I Use a Router Instead of a Chisel?
Yes, a router is faster for many doors. But chisels are cheaper and good for small jobs. Try chiseling first to learn the skill.