How To Fix Rotted Wood: Simple Step-By-Step Guide
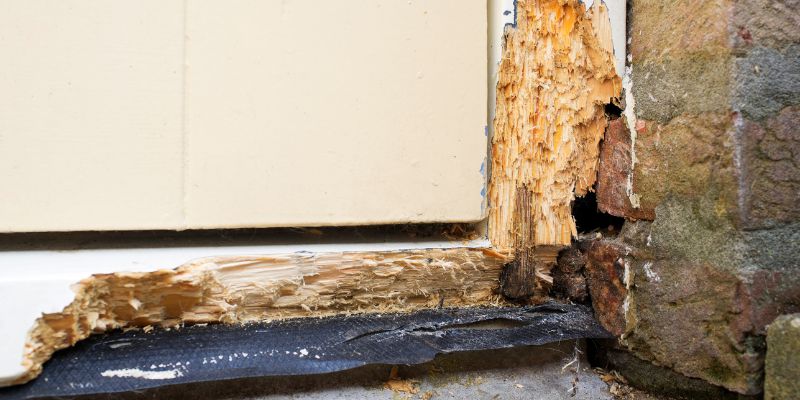
Rotted wood presents a significant challenge in construction and renovation projects, often resulting from prolonged exposure to moisture and inadequate ventilation. Understanding the intricacies of wood decay, including fungal growth and structural integrity, is crucial for effective remediation. Professionals typically assess the extent of the damage, identifying not only the visible decay but also potential hidden problems that may compromise the overall stability of a structure.
Addressing rotted wood requires a strategic approach that encompasses both removal and repair techniques, emphasizing the necessity for proper materials and tools. Discover the essential methods and insights on how to fix rotted wood to restore your projects to their original glory.
How To Fix Rotted Wood: Step-By-Step Guide For Repairs
Rotted wood can compromise the integrity of your structures, making timely repair essential. This summary provides key insights into how to fix rotted wood effectively. Covering identification, treatment options, and prevention techniques, the guidance caters to both DIY enthusiasts and those seeking professional help. With the right tools and methods, you can restore your wood elements and enhance their longevity. Understanding these steps will empower you to tackle wood rot issues confidently and maintain your property’s value.
Understanding Rotted Wood
Definition of rotted wood. Common causes of wood rot. Types of wood rot: dry rot vs. wet rot.
Rotted wood is wood that has decayed due to moisture and fungi. It becomes weak and crumbly. Common causes include:
- Water damage from leaks
- Poor ventilation
- High humidity
- Pest infestations
There are two main types of wood rot:
- Dry rot: Caused by a specific fungus, it thrives in dry conditions but can spread quickly.
- Wet rot: Occurs in damp areas, leading to a mushy texture and often needing moisture removal for repair.
Identifying Rotted Wood
Signs of wood rot to look out for. Tools needed for inspection. How to test wood for rot.
Wood rot can sneak up on you like a squirrel stealing your sandwich! Look for signs like soft spots, discoloration, or a musty smell. These clues tell you that the wood is in trouble.
To inspect your wood, grab a screwdriver, chisel, and your trusty flashlight. Gently poke at the wood. If it feels spongy or crumbles, you’ve got rot! Keep your eyes peeled, or the wood could keep munching away!
| Signs of Wood Rot | Tools for Inspection |
|---|---|
| Soft spots | Screwdriver |
| Discoloration | Chisel |
| Musty smell | Flashlight |
Safety Precautions
Importance of personal protective equipment (PPE). Safe handling of tools and materials. Environmental considerations.
Safety is key when fixing rotted wood. Use personal protective equipment (PPE) like gloves, goggles, and masks to protect yourself. These items help keep you safe from dust and sharp tools. Always handle tools carefully to avoid accidents.
Store materials properly to prevent spills or injuries. Consider your environment too. Make sure your workspace is clean and well-ventilated.
Here are some important tips:
- Wear gloves to protect your hands.
- Use safety goggles to shield your eyes.
- Keep the area tidy to prevent trips.
- Ensure fresh air to avoid inhaling fumes.
Preparing the Area for Repair
Clearing the workspace. Removing any furniture or obstructions. Proper ventilation tips.
Before diving into wood repair, you need a clear space. Really? No one wants to trip over Grandma’s old chair! Move any furniture or obstructions out of the way.
This helps you work without accidents. Don’t forget ventilation! Open windows to let fresh air in; it’s like giving your workspace a deep breath.
Here’s a quick checklist:
| Task | Status |
|---|---|
| Clear furniture | ✅ Done! |
| Remove obstructions | ✅ Ready to go! |
| Check ventilation | ✅ Fresh air! |
With the area prepared, you’re one step closer to fixing that rotted wood. And remember, a tidy workspace is a happy workspace—just like clean socks on laundry day!
Removing Rotted Wood
Tools required for removal. Stepbystep process for extracting damaged wood. How to dispose of rotted wood safely.
To kick things off, grab your superhero tools: a pry bar, hammer, chisel, safety goggles, and gloves. First, wear your goggles—safety first, folks! Next, use the pry bar to carefully lift the rotted wood away from the good wood.
Tap the chisel gently if needed. Dispose of the pieces in a trash bag, making sure they don’t end up making friends with your garden. Remember, your trash needs a little drama too!
| Tool | Purpose |
|---|---|
| Pry Bar | Lifts the rotted wood |
| Hammer | Helps with prying off sections |
| Chisel | Clean edges and remove stubborn pieces |
| Safety Goggles | Protects your eyes from splinters |
| Gloves | Keeps your hands safe and clean |
Patching and Repairing Rotted Wood
Choosing the right patching materials. Methods for filling voids: epoxy, wood filler, or inserts. Stepbystep guide to applying patches.
Fixing rotted wood can be a fun adventure! First, pick the right patching materials like epoxy, wood filler, or even inserts. Each has its charm and purpose.
Epoxy is great for large holes, while wood filler works wonders for smaller cracks. Here’s a quick table to help you choose:
| Material | Best For |
|---|---|
| Epoxy | Big holes and cracks |
| Wood Filler | Small voids |
| Inserts | Structural support |
Now, let’s get into the patching action. Start by cleaning the area, like it’s your baby’s room! Then, apply your chosen material.
Follow the instructions, but don’t worry, this isn’t rocket science. Once dry, sand it smooth. Wham!
Your wood is ready to shine again!
Preventing Future Wood Rot
Tips for maintaining wood surfaces. Importance of sealing and painting. Best practices for moisture control.
Wood surfaces need regular care to stay strong. Here are some easy ways to prevent future rot:
- Seal your wood: Use a good sealant to block water from entering.
- Paint protectively: A fresh coat of paint can keep wood safe from harsh weather.
- Control moisture: Keep items off the ground to prevent water buildup.Use a dehumidifier in damp areas.
These simple tips will help your wood last longer and stay free from rot.
When to Call a Professional
Indicators that require expert intervention. Types of professionals to consider. Cost considerations for hiring a specialist.
If you notice signs of severe rotting, it’s time to seek help. Indicators include large cracks, soft spots, or mold growth. These issues can spread quickly and may need expert attention. Types of professionals to consider are carpenters, contractors, or wood specialists.
Hiring a professional can vary in cost, often ranging from $50 to $100 per hour, depending on the severity and location of the damage.
- Signs of severe rotting
- Presence of mold
- Soft or crumbling wood
Additional Resources and References
Recommended reading materials for DIY enthusiasts. Online forums and communities for advice. Relevant organizations and their resources.
For those keen to dive deeper into fixing rotted wood, there are plenty of helpful resources out there. Books like “The Complete Manual of Woodworking” are great for DIY buffs, offering loads of tips. Also, online forums like Reddit’s r/HomeImprovement provide advice from real people who may have survived their own wood disasters—trust us, their tales are *hilarious*!
Lastly, organizations like the Home Improvement Research Institute share tons of valuable info. Check out the table below for some awesome finds!
| Resource Type | Name | Link |
|---|---|---|
| Book | The Complete Manual of Woodworking | Amazon |
| Online Forum | r/HomeImprovement | |
| Organization | Home Improvement Research Institute | HIRI |
Conclusion
In summary, fixing rotted wood requires careful assessment, removal of damaged sections, and proper restoration techniques. By utilizing quality materials and ensuring adequate drying and sealing, you can effectively prolong the life of your wood structures. Following these steps not only enhances the aesthetic appeal but also ensures structural integrity, safeguarding your investment for years to come.
FAQs
What Are The Signs That Indicate Wood Is Rotting Beyond Repair?
Signs of wood that is rotting beyond repair include deep discoloration, often appearing dark or blackened. You may notice a soft, crumbly texture when touched or pressed, indicating significant decay. Additionally, the presence of fungi, mold, or a strong musty odor suggests extensive decay. Finally, if the wood is structurally compromised, showing signs of bending or crumbling under weight, it is likely beyond repair.
How Do I Assess The Extent Of Wood Rot Before Starting The Repair Process?
To assess the extent of wood rot, visually inspect the affected area for discoloration, softness, or crumbling wood. Use a screwdriver or similar tool to probe the wood; if it penetrates easily, rot is likely present. Check surrounding areas for moisture sources, such as leaks or poor drainage, as these contribute to rot. Finally, consider cutting out a small section of the wood to examine the internal structure, ensuring a comprehensive assessment before proceeding with repairs.
What Materials And Tools Do I Need To Fix Rotted Wood Effectively?
To fix rotted wood effectively, you’ll need a few essential materials and tools. Gather wood epoxy or resin, wood filler, sandpaper, a chisel, and a putty knife for applying the filler. Additionally, you’ll need protective gear, including gloves and a mask, along with a saw for removing damaged sections. A paint or stain can also be helpful for finishing the repair after it’s dried and sanded.
Can I Use Epoxy Or Wood Filler To Repair Minor Wood Rot, And How Should I Apply It?
Yes, you can use epoxy or wood filler to repair minor wood rot. First, clean the affected area by removing any loose or decayed wood, then dry it thoroughly. For epoxy, mix it according to the manufacturer’s instructions and apply it with a putty knife, ensuring it fills the entire damaged area. If using wood filler, press it into the hole and smooth it out; once it cures, sand it down for a flush finish.
What Preventive Measures Can I Take To Avoid Wood Rot In The Future?
To prevent wood rot, ensure proper ventilation and drainage around wooden structures to minimize moisture buildup. Regularly inspect and maintain roofs, gutters, and downspouts to prevent leaks and water accumulation. Apply protective coatings, such as paint or sealants, to wooden surfaces to create a barrier against moisture. Additionally, use pressure-treated lumber or naturally decay-resistant wood species for external projects.