How To Keep Screws From Coming Loose In Wood (Fix It Fast)
It’s a common frustration. You think you’ve finished a project, whether it’s a wobbly chair or a shelf that’s sagging. You check the screws, and they feel… loose.
It’s disheartening. This often happens when wood expands and shrinks. It can make even the best work fall apart.
But don’t worry, there are smart ways to fix this. This guide will show you how to keep screws from coming loose in wood, making your projects last.
Keeping screws from coming loose in wood involves understanding why they loosen and using simple methods to create a tighter grip. This includes using the right type of screw, pre-drilling, and employing various filling and anchoring techniques to ensure a long-lasting hold.
Why Do Screws Come Loose in Wood?
Wood is a natural material. It breathes and changes. This is the main reason screws loosen over time.
Wood fibers can expand when they get wet. Then, they shrink when they dry out. This constant movement puts stress on the screw.
It can gradually loosen its grip. Temperature changes also play a role.
Another reason is the type of wood. Softwoods, like pine, are easier to drive screws into. But they also hold screws less tightly than hardwoods.
Over time, the wood fibers can just wear out around the screw. This creates a larger hole. The screw then has less to grip.
Sometimes, it’s about the screw itself. Using a screw that’s too short or too thin for the job is a common mistake. If the screw doesn’t go deep enough into solid wood, it won’t hold well.
Using the wrong type of screw, like one without good threads, can also cause problems. Vibration is another factor. Things that shake a lot, like furniture or outdoor structures, can make screws loosen faster.
Understanding Screw Grip: The Basics
Think about how a screw works. It’s like a tiny ramp with threads. When you turn it, the threads dig into the wood.
This creates friction. This friction is what holds the screw in place. A good grip means lots of friction.
A loose screw means not enough friction.
The depth of the screw matters. A screw that’s only partly in the wood doesn’t have enough surface area to grip. It needs to go into the main body of the wood.
The type of wood also changes things. Hardwoods have denser fibers. They offer more resistance.
This means they hold screws better. Softwoods are more forgiving to drive screws into. But they can wear down easier.
The threads on the screw are key. Coarse threads are good for softwoods. They grab better.
Fine threads are better for hardwoods. They can be driven in without splitting the wood as easily. The condition of the threads also matters.
Rusty or damaged threads won’t grip well. They might even damage the wood more.
Personal Experience: The Wobbly Kitchen Stool Saga
I remember a kitchen stool my grandpa made years ago. It was a beautiful, solid oak piece. For years, it was perfect.
Then, one day, I sat on it, and it wobbled. I checked the screws holding the legs to the seat. They were all slightly loose.
I tightened them, but a few weeks later, the wobble returned. It was so frustrating! This happened several times.
I finally realized I couldn’t just keep tightening them.
I’d see my grandpa fix things around the house. He’d always have a little box of tricks. This stool problem reminded me of him.
I felt a bit annoyed that I couldn’t fix something so simple. I wondered if I’d just have to live with a wobbly stool. Then I remembered a tip he’d once given me about using something to fill the screw hole.
That was the turning point for me. It wasn’t about brute force; it was about smart filling.
Quick Screw Check Guide
- Feel for Wobble: Gently try to move the attached piece.
- Visual Inspection: Look for gaps between wood pieces.
- Tap Test: Lightly tap the screw head with a hammer. A dull thud might mean looseness.
- Tightening Effort: Does the screw turn easily without much resistance?
When Is It Normal for Screws to Loosen?
It’s not always a sign of poor work. Some loosening is natural. Wood expands and contracts with humidity.
Think about the seasons. In summer, wood might swell. In winter, it can shrink.
This movement is normal. It can cause screws to feel a bit loose.
Furniture that is moved often or used heavily will experience more stress. Legs on chairs or tables can get a lot of force. Outdoor items like decks or fences are exposed to weather.
They will definitely see more movement. This means screws might need checking more often.
The type of wood also plays a part. Softwoods like pine or fir are prone to loosening more than hardwoods like oak or maple. This is because their cell structure is less dense.
It doesn’t hold fasteners as tightly over time.
When Should You Worry About Loose Screws?
You should worry when the loosening is significant. If a piece of furniture feels unstable, that’s a concern. If a shelf looks like it’s about to fall, pay attention.
You don’t want any accidents. If you find yourself tightening the same screws over and over, and they keep loosening, something is wrong.
Look for signs of damage. Is the wood around the screw hole cracking or splitting? This means the wood can no longer hold the screw.
Is there a large gap forming? This indicates the screw has lost its grip. If the piece attached by the screw is no longer flush with the main structure, it’s a problem.
Safety is the biggest reason to worry. Loose screws in structural elements like stairs, decks, or railings can be dangerous. They can lead to falls.
Always check these areas regularly, especially if they are old or have seen a lot of use. If a screw head is completely stripped, it makes fixing it much harder.
The Best Ways to Keep Screws From Loosening
There are several effective methods. They range from simple tricks to more involved fixes. The best approach often depends on the situation.
1. Use the Right Screw for the Job
This is fundamental. For wood, you generally want screws with coarse threads. These grip wood fibers better.
Make sure the screw is long enough. It should penetrate the main body of the wood. A good rule of thumb is for the screw to go at least halfway into the piece it’s fastening into.
Consider the wood type. Hardwoods need screws that won’t split them. Softwoods benefit from screws that bite well.
Look at screw material too. For outdoor use, use rust-resistant screws, like stainless steel or coated screws. Standard steel screws will rust and weaken.
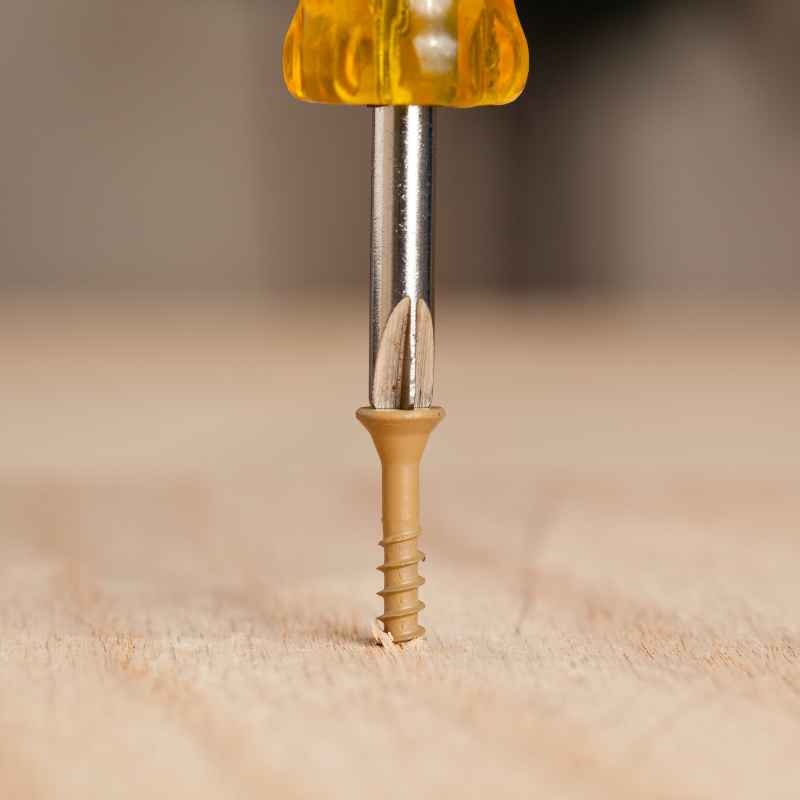
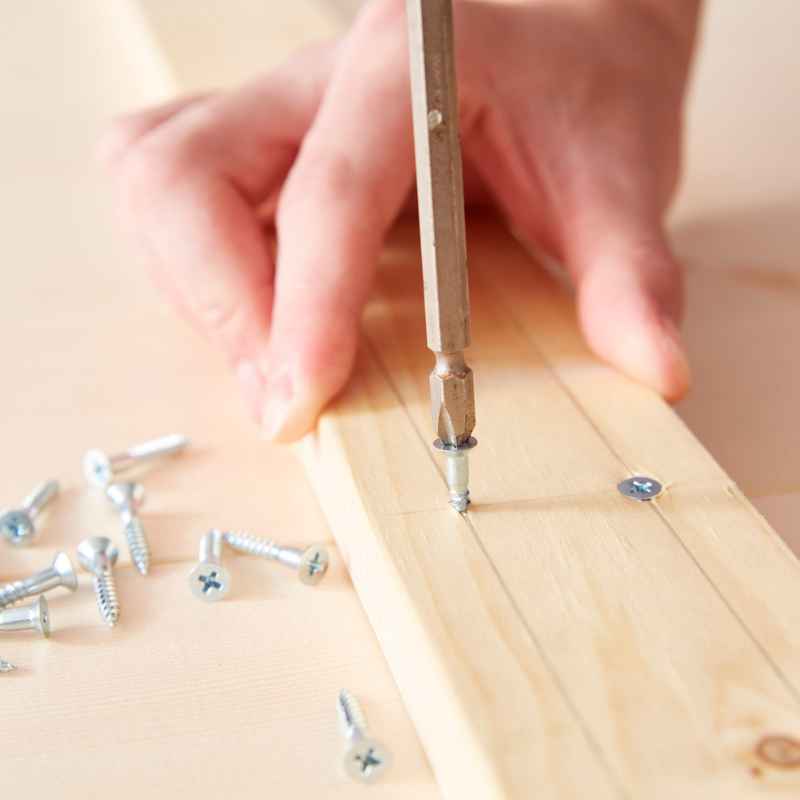
2. Pre-Drill Pilot Holes
This is crucial, especially in hardwoods or when screwing near the edge of a board. A pilot hole is a small hole drilled before the screw. It guides the screw.
It also removes a small amount of wood. This prevents the wood from splitting.
The pilot hole should be slightly smaller than the screw’s shank (the part without threads). If you’re using coarse-threaded screws in soft wood, the pilot hole can be a bit closer to the screw’s minor diameter. For hardwoods, you might want the pilot hole closer to the screw’s minor diameter.
For very hard woods, you might drill a pilot hole for the screw’s shank and then a slightly larger one for the threads.
Pilot Hole Size Guide (General)
For Softwoods (Pine, Fir): Drill a hole slightly smaller than the screw’s shank diameter.
For Hardwoods (Oak, Maple): Drill a hole about the same size as the screw’s shank diameter, or slightly larger. For threads, drill a hole about 60-70% of the screw’s thread diameter.
3. Wood Glue: The Unsung Hero
Wood glue is a powerful tool. Apply a thin layer of wood glue to the screw threads before driving it in. Or, apply it to the pilot hole.
When the screw is driven in, the glue fills small gaps. It hardens, creating a very strong bond. It helps lock the screw in place.
When using glue, make sure you’re using screws that are designed to be used with glue. Some screws have coatings that might not bond well with glue. For most common wood screws, though, glue is a great addition.
Wipe away any excess glue that squeezes out immediately.
4. Toothpicks or Wooden Dowels
This is a classic fix for an already loose screw hole. If the hole is too big, you can fill it. Take a few wooden toothpicks or a small wooden dowel.
Dip them in wood glue. Shove them into the stripped screw hole. Break them off flush with the wood surface.
Let the glue dry completely. This creates a solid mass. Then, you can drill a new pilot hole into this glued-up material.
Drive your screw into this new pilot hole. It will feel snug again. This is a great way to revive an old screw hole.
DIY Screw Hole Repair Kit
- Items Needed:
- Wooden toothpicks or small wooden dowels
- Wood glue
- Hammer or mallet
- Drill with bits
- New screws
- Sandpaper (optional)
5. Wood Filler or Epoxy
For more significant damage or larger holes, wood filler or epoxy can be used. These products fill the void. They create a hard surface for the screw to grip.
Wood filler is easy to use. You just push it into the hole. Epoxy is stronger.
It’s often a two-part mixture you stir together.
Apply the filler or epoxy according to the product instructions. Let it cure completely. This might take several hours.
Once cured, it’s very hard. You can then drill a new pilot hole into the hardened filler. Drive your screw into this.
This method is very effective for severely stripped holes.
6. Thread-Locking Compounds
For certain applications, especially where vibration is a factor, a thread-locking compound can help. These are often used in metalwork. But some versions are suitable for wood.
They act like a glue. They harden and prevent the screw from backing out. You apply them to the screw threads before insertion.
Be careful with these. Some are very permanent. Make sure you choose a type that is removable if you might need to take the piece apart later.
Always test on a scrap piece first if you’re unsure.
7. Using Longer or Thicker Screws
If your current screws are too short, simply use longer ones. Make sure the new screws are long enough to reach solid wood. If the hole is stripped, but the wood itself is sound, you might be able to use a slightly thicker screw.
This can sometimes provide a better grip.
However, be careful not to split the wood. If you’re using a thicker screw, you might need a larger pilot hole. This is especially true if you’re going from a thin screw to a much thicker one.
Always consider the surrounding wood.
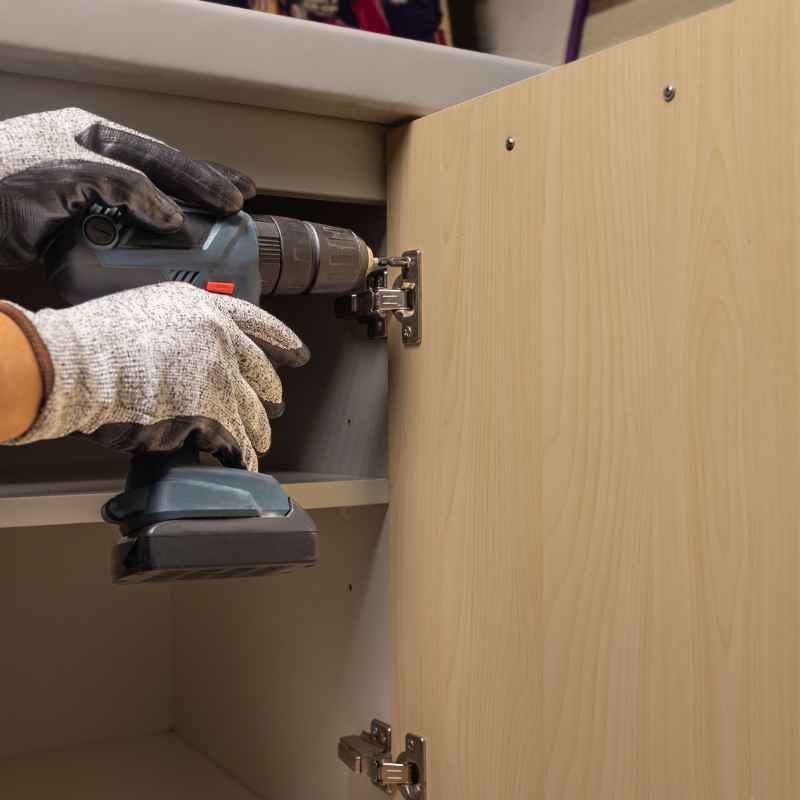
8. Wood Plugs or Inserts
For very demanding applications or when you need maximum strength, you can use wood plugs or threaded inserts. Wood plugs are pre-made dowels that you glue into the hole. Then you drill a new pilot hole into the plug.
Threaded inserts are metal or plastic sleeves with threads. They screw into the wood, creating a strong, repeatable fastening point.
These are more advanced solutions. They require precise drilling. But they offer very secure and durable results.
They are common in cabinet making or furniture repair where strength is paramount.
Screw Types for Different Woods
Softwoods (Pine, Cedar, Fir): Look for coarse threads. These bite into the wood easily and provide good holding power.
Hardwoods (Oak, Maple, Walnut): Fine threads are often better here. They reduce the risk of splitting. Pilot holes are almost always needed.
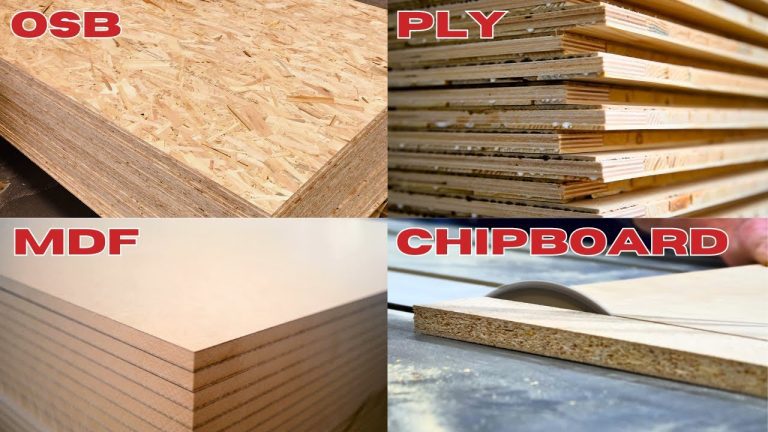
Plywood/MDF: Coarse threads are generally best. Screws designed for particle board work well.
Real-World Contexts and Scenarios
Let’s look at where this problem pops up most often.
Furniture: The Constant Wobble
Chairs, tables, and beds are common culprits. Legs can loosen. Drawer slides can sag.
Hinges can become wobbly. This is because these pieces get a lot of use. They experience movement and stress.
The wood in furniture can also dry out over time. This leads to shrinking.
In these cases, wood glue and filling stripped holes with toothpicks or dowels are very effective. For a wobbly chair leg, you might remove the leg. Fill the screw holes with glue and toothpicks.
Let it dry. Then reattach the leg with new pilot holes. This often makes it stronger than before.
Decks and Fences: Weather’s Toll
Outdoor wood is constantly exposed to rain, sun, and temperature changes. This causes significant expansion and contraction. Deck boards can loosen.
Railing posts can become unstable. Fence pickets can droop.
For decks, using galvanized or stainless steel screws is a must. They resist rust. Regular tightening might be needed.
If boards loosen, you can sometimes drive a slightly longer screw or use a wood plug to fill the old hole and create a new anchor point.
Cabinets and Shelving: The Sagging Shelf Syndrome
Kitchen cabinets and bookshelves can suffer from loose screws. This is especially true for adjustable shelves. Or for the brackets holding them up.
The weight of items can cause sagging. This puts stress on the screws.
For shelves, ensure the screws go into the studs in the wall if possible. If not, use good wall anchors. If the cabinet itself is loosening, you might need to reinforce the connection points.
This could involve using larger screws or adding wood glue to the joints.
Protecting Your Wood Projects
- Use Exterior Grade Screws: For any outdoor project.
- Seal Your Wood: Apply a good quality sealant or stain. This helps control moisture absorption and drying.
- Regular Checks: Periodically inspect wooden structures for loose fasteners.
- Avoid Over-Tightening: Screws driven in too hard can strip the wood or even break.
What This Means for You: Simple Checks
So, what does all this mean for your projects? It means a little bit of foresight goes a long way. You don’t need to be a master carpenter to keep your screws tight.
When It’s Perfectly Normal
A slight loosening over time, especially with seasonal changes, is normal for wood. If you have to tighten a screw once a year or so, that’s usually okay. It just means the wood is doing its thing.
Think of it as the wood settling.
When to Start Worrying
Worry if the loosening is frequent. If you feel significant wobble or instability. If the wood around the screw is visibly damaged.
If safety could be compromised. Don’t ignore loose screws in things like railings or structural supports.
Easy Checks You Can Do Today
Grab a screwdriver. Gently try to tighten any screws on furniture you use daily. Do the same for anything attached to your walls.
Feel for any movement in deck boards or fence posts. A quick check can prevent bigger problems later.
Quick Fixes and Tips for Long-Lasting Holds
Here are some quick takeaways to help your screws stay put.
- Always pre-drill. It’s rarely a bad idea.
- Use a dab of wood glue. It’s a simple step with big results.
- Match screw to wood. Coarse for soft, fine for hard.
- Go deep enough. Ensure screws bite into solid wood.
- Fill stripped holes. Toothpicks and glue are magic.
- Consider the environment. Use appropriate screws for outdoors.
The “Screw Saver” Method (Toothpicks)
Step 1: Remove the loose screw.
Step 2: Get some wooden toothpicks and wood glue.
Step 3: Dip a few toothpicks in glue.
Step 4: Jam them into the stripped screw hole.
Step 5: Snap them off flush with the surface.
Step 6: Let the glue dry completely (a few hours).
Step 7: Drill a new pilot hole into the glued toothpicks.
Step 8: Drive your screw back in. It should feel tight!
Frequently Asked Questions About Loose Screws
Can I use regular glue to keep screws from loosening?
While regular white craft glue might offer a little hold, wood glue is specifically designed to bond with wood fibers. It creates a much stronger and more durable bond. For best results, always use wood glue for wood projects.
What if the screw head is stripped and I can’t remove it?
A stripped screw head is frustrating! You can try using a rubber band between the screwdriver and the screw head for better grip. If that doesn’t work, specialized screw extractors can be purchased at hardware stores.
They are designed to grip damaged screw heads.
How long should screws be for a deck?
For deck boards, screws should be long enough to go through the deck board and at least 1 inch (2.5 cm) into the joist below. Common sizes are 2.5 inches or 3 inches (6.3 cm or 7.6 cm) for standard 2x material joists.
Is it okay to use screws with plastic anchors in drywall?
Yes, plastic anchors are designed for drywall. They spread out behind the drywall to create a secure anchor point for screws. Make sure you use the correct size anchor for the screw and the weight you plan to hang.
How do I know if I’m using the right size pilot hole?
A pilot hole should be slightly smaller than the screw’s shank (the smooth part) and about the same size as the screw’s core diameter (the part between the threads). This allows the threads to bite into the wood. If you’re unsure, test on a scrap piece of the same wood.
Can I reuse old screws if they are still in good condition?
You can reuse screws if they are not damaged, rusted, or stripped. However, if they were previously holding something together and you’re reassembling, the wood might have compressed. You might need to use a slightly larger pilot hole or a filler method if they feel loose.
What’s the difference between wood screws and deck screws?
Deck screws are essentially heavy-duty wood screws. They are made with materials that resist corrosion from weather and pressure-treated lumber. They often have self-drilling tips and specialized threads to prevent splitting and provide strong holding power in outdoor applications.
Conclusion: Building with Confidence
Dealing with loose screws can feel like a losing battle. But it doesn’t have to be. By understanding how wood behaves and using simple, effective techniques, you can ensure your projects stay strong.
Pre-drilling, using glue, and knowing how to fix stripped holes are your best tools. Keep these tips in mind, and you’ll be building with confidence, knowing your screws will stay put for a long time.