Best Solar Driveway Lights for Edges (2026): We Compared
For driveway edges, curves, and entrances, choose low-glare solar markers at 5–20 lumens for boundary lines, 20–50 lumens for turn points, and stake or surface-mount styles that match the edge they mark. Poor placement leaves dark gaps, hides curb edges, and can send cars onto the wrong line or into landscaping. This guide compares solar driveway lights by brightness, mounting style, weather resistance, and the best spot for each one.
Quick comparison
| Product | Badge | Best for | Price | ||
|---|---|---|---|---|---|
 |
DenicMic Solar Lights Outdoor Waterproof 10 Pack PathwayDenicMic | Our pick | 10 Pack · Cool White · Pathway Lights | $22.99
Price as of 15 Oct 2026
|
View |
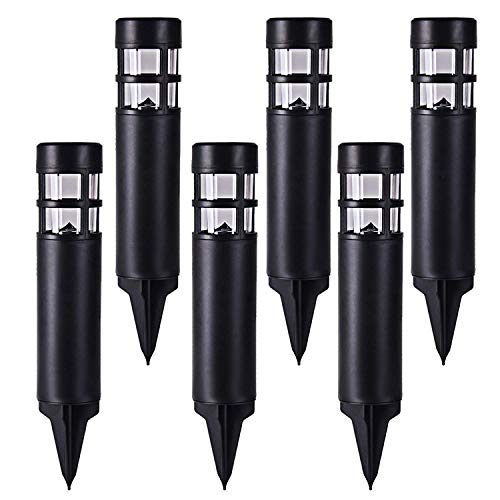 |
SUNWIND Solar Garden Lights Outdoor LED Bollard SolarSUNWIND | Budget pick | 6 Pack · Black · Solar Bollard | $29.99
Price as of 15 Oct 2026
|
View |
 |
Solar Driveway Reflectors, 2 Modes Reflective MarkerAolyty | Also great | Red · Reflective · Solar Marker | $29.99
Price as of 15 Oct 2026
|
View |
The best option depends on where the light sits, not just how bright it looks on a box. A straight run wants even spacing and low glare. A curve needs stronger turn-point markers, and a shaded driveway needs less-panel, shorter-runtime planning.
📊 Wikipedia says almost half of solar power installed in 2022 was rooftop-mounted. Source: Solar power.
How we chose
We compared products and formats by five practical checks: visibility at car-approach distance, mounting fit for asphalt, concrete, pavers, and gravel, battery and panel limits, weather resistance for rain and frost, and likely failure points near tires, snow, and standing water.
That matters because solar energy technologies capture sunlight and turn it into useful energy, but driveway conditions can block the part that counts most: direct exposure. The Department of Energy also notes that solar installations can help maintain power during extreme weather and disruptions, which is useful context for off-grid driveway marking when the grid is down.
Solar driveway edge lights: best overall?
Solar driveway edge lights are best when you need boundary guidance, not decorative sparkle. Put them at the outer line of the driveway, where a driver needs to read the edge before turning, backing out, or pulling in near landscaping, curbs, or drop-offs. Low-glare lenses and sturdy mounting matter more than sheer brightness.
What edge lights should do
Edge lights should define the driveway boundary from the driver’s seat. They are different from path lights, which mainly decorate a walkway. For vehicle use, the light should point the eye to the edge, not flood the whole area with brightness that can cause glare or wash out nearby markers.
A useful edge light is often in the 5–20 lumen range for boundaries, with the lower end of 20–50 lumens commonly used for entrance points or sharper corners. That keeps the line visible without creating a bright spot that hides the curb edge at night.
What to look for in glare control and lens shape
Look for a diffused lens, a shielded face, or a one-sided beam pattern when the goal is guidance. A 360-degree glow can work for centerline markers or decorative runs, but at the edge it can scatter light where you do not need it. Retroreflective elements help too, especially when headlights hit at an angle.
For driveway edges near traffic, weather resistance matters. Aim for an outdoor rating around IP65 or better if the fixture sits where rain, puddles, dust, frost, or splashback are common. If the light sits beside a tire path, impact-resistant housing is worth more than a polished finish.
Best mounting style for hard edges and borders
For asphalt and concrete borders, a screw-down or surface-mounted base usually holds position better than a stake. Flush installs fit pavers and tight borders best because they reduce tripping risk and are less likely to get clipped by a tire or snow shovel.
Stake lights work when there is soil or gravel beside the driveway. They are less suitable when the edge gets brushed by tires, because movement, frost heave, and snow clearing can loosen them. If the driveway has a clean curb or stone border, choose a low-profile body with a rigid base.
Solar driveway marker lights: best for curves?
Solar driveway marker lights are the right choice when the problem is line reading, not area lighting. Curves need repeated visual cues, especially where a driver must judge the bend from a moving car. One-sided markers work on a one-direction approach; 360-degree markers help when traffic comes from both ends.
Spacing on bends and sweeping turns
On straight runs, place markers at regular intervals that let the next light stay in view from the driver’s seat. On curves, shorten the spacing so each light catches the eye before the previous one drops out. A tighter bend usually needs more frequent markers than a gentle sweep.
Picture a 90-foot driveway with a soft S-curve and one shaded corner by a garage wall. If the lights are spaced evenly only for the straight section, the turn can go dark in the middle. The fix is tighter spacing through the curve and a separate marker at the entrance.
One-sided versus 360-degree visibility
One-sided lights aim their output where the car approaches, so they are efficient for a single direction. Omnidirectional markers make more sense on center islands, split drives, or entrances visible from several angles. The tradeoff is simple: directional beams give better usable guidance, while 360-degree glow gives broader visibility.
Beam pattern and lens design also shape how far the marker reads. A diffused lens creates softer guidance at shorter range. A tighter beam or reflective face increases pickup distance for a front-facing car approach, which can matter at an unlit entrance.
When reflective markers add value
Reflective markers add value when the solar portion cannot charge well every day or when you want a passive backup for fog, snow, or winter shade. They are especially useful along edges where headlights already sweep across the marker surface. The best setups use both light and reflection.
A common first-timer mistake is relying on illuminated markers alone beside a long curve under trees. The lights may still work on mild days, but the run can lose runtime after short winter charging. Reflective strips or posts keep the edge readable when the battery output drops.
Solar driveway lights for shade: best for low-sun driveways?
Low-sun driveways need bigger expectations and smaller promises. Shade cuts charge time, and cloudy stretches shorten runtime after a full charge. If part of the drive gets only partial sun, choose the most efficient panel you can fit, then mix illuminated markers with reflective markers where charging is weakest.
What shading does to charge and runtime
Shade reduces the hours the panel can turn sunlight into stored energy, so the light may work for fewer hours after dark. That is the main weakness of solar driveway lights in winter or under tree cover. Short winter days are the toughest test because they combine lower sun angle with less daylight.
Battery capacity matters because it sets how long the light can stay on after sunset. Most driveway markers use either lithium-ion or NiMH batteries. Lithium-ion usually offers better energy density; NiMH can be common in simpler lights. Battery replacement matters too, because a sealed battery eventually limits the whole fixture.
Which panel type and size matter most?
Monocrystalline panels generally make more sense in tight or partially shaded setups because they tend to be more efficient for a given size. Polycrystalline panels can work fine when the panel has open exposure and enough surface area. In either case, angle and exposure beat brand claims when the driveway only gets brief sun.
Panel area matters because a larger panel can collect more energy during weak light conditions, though only if it faces the sun. Put the panel where it gets the clearest sky view, not under overhangs, walls, or thick branches. If the panel is shaded all afternoon, runtime will usually suffer.
When to mix illuminated markers with reflectors
Mixing illuminated markers with reflectors makes sense when one section of the drive charges poorly but still needs nighttime guidance. Use solar lights at the entrance and on open stretches, then place reflective posts or markers through the shaded middle. That preserves the visual line without expecting every point to glow all night.
Solar energy can provide savings that accrue for the lifetime of the system, but driveway safety depends on the right format in the right place. The Department of Energy also says solar installations can help maintain power during extreme weather and disruptions, which is a good reason to treat this as a resilience upgrade, not a decoration.
Driveway marker placement matrix
This matrix matches common driveway conditions to the light format, spacing logic, mounting method, and likely failure mode. Use it as a placement tool first. The best product can still fail if the mount, beam, or spacing does not fit the surface.
| Driveway condition | Best solar format | Spacing logic | Mounting method | Likely failure mode |
|---|---|---|---|---|
| Straight edge | Low-glare edge lights | Even spacing that keeps the next marker visible from the driver’s seat | Stake on soil; screw-down or adhesive base on hard edge | Dark gaps between units |
| Curve | One-sided markers or brighter turn-point markers | Tighter spacing through the bend than on the straight run | Surface-mounted or flush at the border | Curve center disappears at night |
| Long run | Low-profile marker lights with reflective backup | Regular spacing, then add a brighter marker at the entrance | Mix of stake and hard-mounted bases | Battery fade before the far end |
| Shaded section | High-efficiency solar markers with reflectors | Use markers only where charging is strongest | Surface-mount on the sunniest edge available | Short runtime after a weak charge |
| Paver border | Flush or low-profile surface markers | Keep spacing tight enough to read joints and edges | Flush install or adhesive base rated for exterior use | Rocking, lifting, or trip hazard |
| Snow-prone edge | Raised but impact-tough markers | Keep lights outside plow path when possible | Screw-down base or flexible mount set back from the edge | Snowplow strike, frost lift, or crushed housing |
Which one should you buy?
Start with the driveway problem, not the product style. Budget buyers should choose simple low-profile marker packs for straight edges and short runs. Curves and entrances need directional markers or stronger turn-point lights. Snow, rain, and tire-path risk call for rigid mounting, higher weather resistance, and fewer exposed stakes.
Best choice for budget buyers
Choose a basic solar marker with a diffused lens and a weather rating of at least IP65 if your driveway is simple and mostly sunlit. The best budget fit is usually a straight run or short boundary line where you do not need long runtime, high lumens, or a special mount. Keep expectations practical.
Best choice for curves and entrances
Choose a brighter turn-point marker in the 20–50 lumen range with one-sided or controlled 360-degree visibility. Entrances need the driver to read the first few feet of the driveway quickly, so the light should signal direction without throwing glare onto the windshield. Reflective backup helps here too.
Best choice for snow, rain, and tire-path risk
Choose surface-mounted or flush lights with a tough housing, a secure base, and no tall stake where plows or tires can hit it. For snow-prone edges, set the light back from the active path if possible. Impact resistance and frost tolerance matter more than decorative output in this case.
Say your driveway has a 60-foot straight section, then a shaded bend by a tree line. Put low-glare markers on the straight run, a brighter unit at the curve, and reflective markers in the shaded section. That gives you usable guidance where the solar charge is strongest and passive backup where it is weakest.
Suppose the surface is concrete near the garage but gravel near the street. Use a screw-down or adhesive base on concrete and a stake only where the gravel edge is stable. Mixing mounts is often smarter than forcing one style across the whole drive.
Solar driveway edge lights: best options for edges and markers
DenicMic Solar Lights Outdoor Waterproof 10 pack pathway Lights
This DenicMic set is a practical choice for straight driveway edges, short borders, and homeowners who want a simple, budget-friendly marker pack. The integrated lamp head and transparent acrylic point toward even boundary reading, while the IP65 rating is a solid baseline for rain and dust.
The main drawback is the battery and panel setup: the polycrystalline panel and Ni-Cd battery are more basic than higher-end combinations, so long shaded sections and winter runs may need closer spacing or reflective backup. It also reads more like a pathway light than a purpose-built driveway marker, so use it where the edge is obvious.
SUNWIND Solar Garden lights Outdoor LED bollard Solar powered path lighting for Patio Pathway Backyard Lawn landscaping (Black-6 pack): best for entrance guidance
This SUNWIND bollard-style option fits entrances, long approach paths, and spots where you want a more visible post along the driveway edge. The six-pack layout works well for broad spacing on straight runs, and the claimed up to 8 hours runtime is useful when the driveway gets a full day of sun.
The drawback is size and style. Bollard lights are more visible than low-profile markers, which can be a plus at an entrance but a minus beside a tire path or narrow driveway. They also suit decorative path duty better than flush hazard marking, so they are not the first pick for plow-prone edges.
Solar Driveway Reflectors, 2 Modes Reflective Marker Lights, Red: best for curves and shade backup
This Aolyty marker is the strongest fit in the list for curves, entrances, and low-sun sections where visibility matters more than decorative glow. The 360-degree visibility claim and automatic night activation make sense for drivers approaching from different angles, and the reflective design adds a useful passive cue.
The downside is that IP54 is less protective than the IP65 class many buyers should prefer for driveway use, especially where puddles, splashback, and snowmelt are common. It is best treated as a marker and reflector first, not as a rugged, near-plow boundary light.
How to choose
Choose by driveway condition first. Straight edges favor low-glare boundary lights. Curves favor tighter spacing and directional markers. Long runs need dependable battery capacity and a panel with enough exposure. Shaded areas need either a bigger panel, a more efficient panel type, or reflective backup.
Then match the mount to the surface. Stakes suit soil and gravel. Flush or surface-mounted lights suit pavers, concrete, and hard edges. If a tire can clip it or a snowplow can catch it, keep the fixture low, rigid, and out of the active path.
Finally, check the failure mode. Rain and puddles call for a stronger weather rating. Frost calls for secure mounting. Poor sun calls for better panel exposure and realistic runtime expectations. In driveway lighting, the best product is the one that fits the edge you need to read.
Frequently asked questions
What are the best solar driveway lights for edges and markers?
The best choices are low-glare edge lights for straight boundaries, directional markers for curves, and surface-mounted or flush units for hard edges. For entrances, choose brighter turn-point markers in the 20–50 lumen range. The right light depends on the line the driver needs to follow.
How far apart should driveway marker lights be placed?
Use closer spacing on curves and wider spacing on straight runs. The simple rule is that the next marker should stay visible from the driver’s seat before the current one disappears. A bend usually needs tighter spacing than a flat boundary because the line changes direction faster.
Should driveway solar lights be stake, flush, or surface-mounted?
Stake lights suit gravel and soil edges. Flush lights suit pavers and places where trip risk matters. Surface-mounted lights work well on concrete and asphalt borders. If snowplows, tires, or repeated turning are involved, low-profile hard mounting is usually safer than a tall stake.
How many lumens do you need for driveway edge lights?
For boundary guidance, 5–20 lumens is usually enough. For turns and entrances, 20–50 lumens gives more confidence without turning the light into glare. More lumens are not automatically better if the light washes out the edge or makes it harder to judge distance.
Will solar driveway lights work in shaded or cloudy areas?
They can work, but output will usually be lower and runtime shorter after a full charge. Shade reduces charging, and cloudy weather extends the problem. Use more efficient panels, larger panel area where possible, and reflective markers in the weakest sections for backup.
Can solar driveway lights survive being run over?
Most should not be placed where tires directly pass. A low-profile, hard-mounted fixture is safer near the edge, but true run-over zones are still a risk. If tire contact is likely, move the light farther out or use reflectors instead of a vulnerable solar body.
Sponsored / affiliate links. As an Amazon Associate I earn from qualifying purchases. I may earn additional commission from eligible campaigns.