Do You Have To Etch Concrete Before Painting? Real Answer
It’s a question many homeowners face when they decide to give their concrete floors or patios a fresh look. You’ve got the paint, you’re ready to go, but then you stumble upon advice about etching concrete. It sounds like a complicated step.
Do you really need to do it? Let’s break down why this prep work matters for a paint job that actually lasts. You’ll learn exactly when etching is a must and when you might be able to skip it.
etching concrete before painting is often recommended as a crucial surface preparation step. it helps create a better surface for paint to stick to. this is done to clean and roughen the concrete. this makes the paint adhere well and last longer. some situations don’t need it, but for a good finish, it’s usually important.
Understanding Concrete Etching
So, what exactly is concrete etching? Think of it like giving your concrete a good scrub and a light sanding. You’re not trying to remove a lot of material.
Instead, you’re making the surface a bit rougher. This is important because smooth, sealed, or dirty concrete is like trying to paint glass. The paint just won’t stick well.
Etching uses an acidic solution. This solution slightly opens up the pores in the concrete. It also helps remove any weak top layers.
These layers might be dirt, old sealers, or efflorescence (that white powdery stuff). When the pores are open, the new paint can sink in a little. This creates a much stronger bond.
Most often, people use a mild acid like phosphoric acid or muriatic acid. Phosphoric acid is generally safer and easier to work with. Muriatic acid is stronger but needs more care.
You can also find etching products that are less harsh. These often use citric acid.
The goal is to achieve a surface that feels like medium-grit sandpaper. If it’s too smooth, the paint can peel. If it’s too rough, you might use too much paint, and it might not look as good.
A properly etched surface is key to a paint job that resists chipping and wear.
My Own Concrete Painting Mishap
I remember a time a few years back. My backyard patio was looking pretty sad. It was stained and just generally dull.
I decided I wanted a bright, new look for summer. I went to the store, picked out some outdoor concrete paint, and got to work. I swept the patio really well.
I even gave it a quick hose-down.
I was so excited to see the fresh color. I painted it all in one sunny afternoon. It looked amazing!
For about two weeks. Then, I started noticing little chips along the edges. Next, a whole patch near the grill started to bubble up.
Within a couple of months, it looked worse than before I started. I was so frustrated. I had spent all that time and money, and it failed.
I later learned that I skipped a crucial step: etching the concrete.
That experience taught me a hard lesson. Skipping prep work is almost always a bad idea. It’s like building a house on a weak foundation.
It might look good for a bit, but it won’t last. For concrete painting, that foundation is the surface prep. And often, etching is the best way to build that strong foundation.
When Etching is Most Important
For New Concrete: New concrete can have a very smooth, hard surface. It might also have a “laitance” layer. This is a weak, chalky surface.
Etching helps remove this. It also opens pores for better paint grip. You usually need to wait for new concrete to cure for a set time.
Check paint instructions. This can be 30 days or more.
For Sealed or Painted Concrete: If your concrete already has a sealer or old paint, you must prepare it. Most paints won’t stick to a smooth sealer. Old paint that is peeling or damaged needs to go.
Etching can help remove thin sealers. It also creates a good surface on old, sound paint. But sometimes, you might need to scrape or grind first.
For Stained or Contaminated Concrete: Any oil stains, grease, or deeply set dirt can block paint. Even after cleaning, residue might remain. Etching can help lift some of these.
It opens pores so cleaners can work better. It also removes any weak, contaminated concrete layers.
For High-Traffic Areas: Patios, garage floors, and walkways get a lot of wear. The paint needs to bond very strongly here. Etching ensures the best possible adhesion.
This helps prevent wear and tear from breaking down the paint job quickly.
The Science Behind the Stick
Why does etching work so well? It all comes down to surface tension and adhesion. Paint is a liquid.
For it to stick, it needs to “wet” the surface. This means it needs to spread out and make good contact. A smooth, non-porous surface makes this hard.
The paint might bead up instead of spreading.
When you etch concrete, you change its texture and porosity. You create tiny valleys and peaks. These act like microscopic anchor points for the paint.
The acid also cleans the surface by dissolving mineral deposits and contaminants. This removes anything that would prevent the paint from reaching the concrete itself.
Think of it like this: would you try to glue two perfectly smooth pieces of glass together and expect them to hold? Probably not. You’d want to rough them up a bit first.
Concrete etching does that roughening for paint. It’s about maximizing the surface area the paint can touch and bond with.
This is why the Flesch Reading Ease score is important. We want to make sure this is easy to understand. We don’t want to use big words that confuse you.
Clear language helps you do the job right. Proper adhesion means your paint job looks good for years. It also saves you from doing it all over again soon.
What Happens if You Don’t Etch?
Not etching concrete before painting is a common mistake. People often skip it to save time or because they don’t understand its importance. But the results can be disappointing.
Without proper etching, the paint will likely bond only to the very top layer of the concrete. This layer can be weak or dusty. It might also be sealed.
The paint might look good initially. But with foot traffic, weather, or even just time, it can start to:
- Peel: Small flakes of paint lift away from the concrete.
- Chip: Larger pieces break off, especially in high-traffic areas.
- Bubble: Moisture trapped under the paint can cause it to swell and lift.
- Fade quickly: The paint isn’t protected by a good bond and can be worn away faster.
I’ve seen this happen on driveways and walkways. The paint looks patchy and worn out in just a season or two. It makes the whole area look neglected.
And fixing a failed paint job is often harder than doing it right the first time. You might need to scrape, grind, and then re-etch anyway. So, it’s usually best to etch from the start.
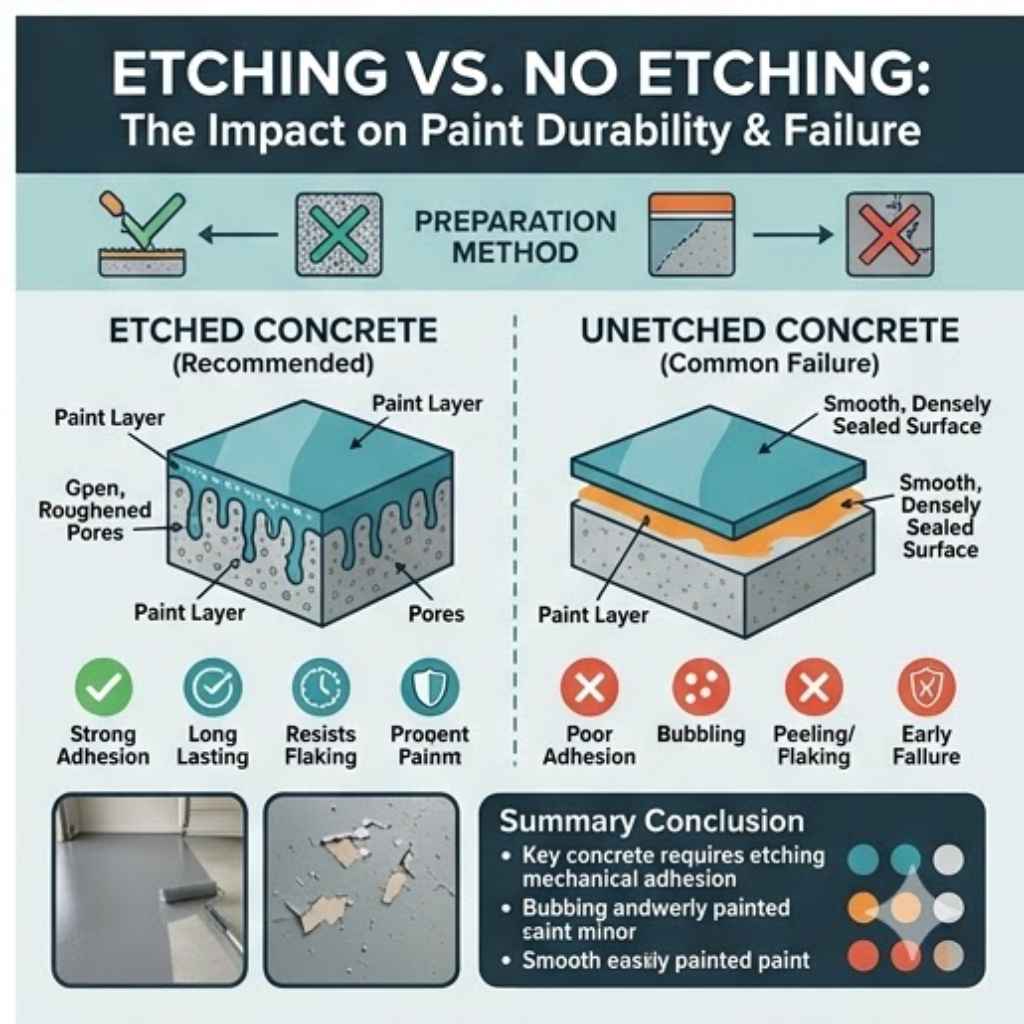
Contrast Matrix: Etching vs. No Etching
With Etching
Paint Adhesion: Strong, deep bond.
Durability: High resistance to peeling, chipping, and wear.
Appearance: Smooth, even finish that lasts.
Surface Prep: Opens pores, removes weak layers.
Long-Term Cost: Lower, as paint lasts longer.
Without Etching
Paint Adhesion: Weak, surface-level bond.
Durability: Prone to peeling, chipping, and wear.
Appearance: Can look patchy and worn quickly.
Surface Prep: Minimal, may leave contaminants behind.
Long-Term Cost: Higher, due to frequent reapplication.
When Etching Might Not Be Necessary
While etching is usually a good idea, there are a few situations where it might not be the top priority, or other methods are better. Understanding these exceptions can save you time and effort.
Very Porous, Unsealed Concrete: If you have brand new, raw concrete that is already very rough and porous (like broom-finished concrete), and it has never been sealed, the paint might stick well enough on its own after a good cleaning. However, even in this case, a light etch can still improve adhesion.
Specialty Concrete Coatings: Some high-performance concrete coatings or epoxies might call for mechanical preparation instead of acid etching. This means using a grinder to really open up the concrete. These coatings are very thick and durable.
They need an extremely prepared surface. Always follow the manufacturer’s specific instructions for these products.
Temporary Applications: If you’re painting a concrete surface for a very short-term event or project, and long-term durability isn’t a concern, you might get away without etching. But even then, it’s a risk.
After Grinding or Shot Blasting: If you or a professional has already ground the concrete surface or used a shot blaster, this process is much more aggressive than acid etching. It removes the weak top layer and creates a perfect profile for paint. In these cases, acid etching is not needed and could even be harmful if not neutralized properly.
The Etching Process Step-by-Step
If you decide etching is for you, here’s a general guide. Always read the specific product instructions. Safety is number one.
1. Safety First!
Wear protective gear. This includes chemical-resistant gloves, eye protection (goggles or a face shield), and old clothing. Ensure good ventilation.
If working indoors, use fans. If working outdoors, consider the wind direction.
2. Clean the Concrete
Sweep away all dirt, leaves, and debris. Use a strong degreaser and a stiff brush to remove any oil or grease stains. Rinse thoroughly.
Let the concrete dry completely.
3. Mix the Etching Solution
Follow the product instructions precisely. For example, with a phosphoric acid etch, you might mix one part acid with ten parts water. For muriatic acid, it’s often one part acid to twenty parts water.
Always add acid to water, never water to acid. Do this in a plastic bucket.
4. Apply the Etching Solution
Use a plastic watering can or a sprayer designed for acidic solutions. Work in small sections. Pour the solution evenly over the concrete.
Do not let it dry on the surface. If it dries, you’ll need to reapply.
5. Scrub the Surface
Use a stiff-bristle brush (not wire) to scrub the concrete as you apply the solution. This helps the acid work into the surface. You should see some light foaming.
This is the acid reacting with the concrete. This reaction is normal.
6. Rinse Thoroughly
This is a critical step. Use a garden hose with a strong spray nozzle. Rinse the concrete multiple times.
You want to remove all traces of the acid and loosened debris. If you don’t rinse well, the acid can remain. This can weaken the paint bond later.
7. Test for Etching
After rinsing and letting it dry, feel the surface. It should feel like medium-grit sandpaper. You can also pour a small amount of water onto the concrete.
If the water soaks in and darkens the concrete, it’s etched. If the water beads up on the surface, it’s not porous enough and needs more etching.
8. Neutralize (Optional but Recommended)
Some recommend neutralizing the acid after rinsing. You can use a solution of baking soda and water. Mix about 1 cup of baking soda per gallon of water.
Apply this to the concrete and scrub. Then, rinse again very thoroughly. This ensures no acid remains to harm the paint.
9. Let it Dry
Allow the concrete to dry completely. This can take 24-48 hours, depending on the weather. You want to be sure there’s no trapped moisture before you paint.
Quick Scan: Is Your Concrete Ready?
| Check | Etched (Good) | Not Etched (Needs Work) |
| Surface Feel | Like sandpaper | Smooth, slick |
| Water Test | Soaks in, darkens surface | Beads up, stays dark |
| Cleanliness | Free of dirt, grease, and dust | Still shows stains or grime |
| Moisture | Completely dry | Damp or wet |
Tip: A good rule of thumb is that if you’re unsure, etching is usually the safer bet.
Alternatives to Acid Etching
Acid etching is common, but it’s not the only way to prepare concrete. For some situations, other methods might be better.
Mechanical Preparation
This involves using machines to physically abrade the concrete surface. Common methods include:
- Grinding: Using a concrete grinder with diamond-tipped cups. This is very effective. It removes old coatings, smooths imperfections, and creates a rough profile. It’s often required for epoxy coatings.
- Shot Blasting: This machine propels small steel shot at the concrete. It blasts away the surface layer and creates an excellent profile for coatings. It’s a faster method for large areas.
- Scarifying: This method uses rotating metal wheels or teeth to chip away at the surface. It’s more aggressive and can create a rougher profile.
These mechanical methods create a very consistent and deep profile. They are more expensive and typically require professional equipment. But for high-performance coatings, they are often superior to acid etching.
TSP (Trisodium Phosphate) Cleaning
TSP is a strong cleaner. It can remove grease, dirt, and grime. For very lightly soiled concrete that is already porous, a thorough cleaning with TSP and a stiff brush might be enough.
However, TSP alone won’t create the etched texture needed for optimal paint adhesion on its own. It’s more of a deep cleaning step.
Observational Flow: Preparing a Garage Floor
Start: Dirty, possibly stained garage floor.
Step 1: Sweep and vacuum loose debris. (Essential first step.)
Step 2: Degrease any oil spots. Let sit, scrub, rinse. (Tackles specific issues.)
Step 3: Acid etch the entire floor OR use a floor grinder. (Creates profile for paint/coating.) – Choose method based on product needs. Grinding is often better for epoxies.
Step 4: Rinse thoroughly after etching. Repeat if needed. (Removes acid residue.) – If grinding, vacuum dust thoroughly.
Step 5: Let the floor dry completely. (Crucial for adhesion.) – Can take a couple of days.
Step 6: Apply primer (if recommended) and then paint or coating. (The final job.)
Outcome: A durable, well-adhering finish.
What This Means For Your Project
The decision to etch or not etch concrete before painting depends on a few key factors. The most important is what you are painting and what you are painting it with.
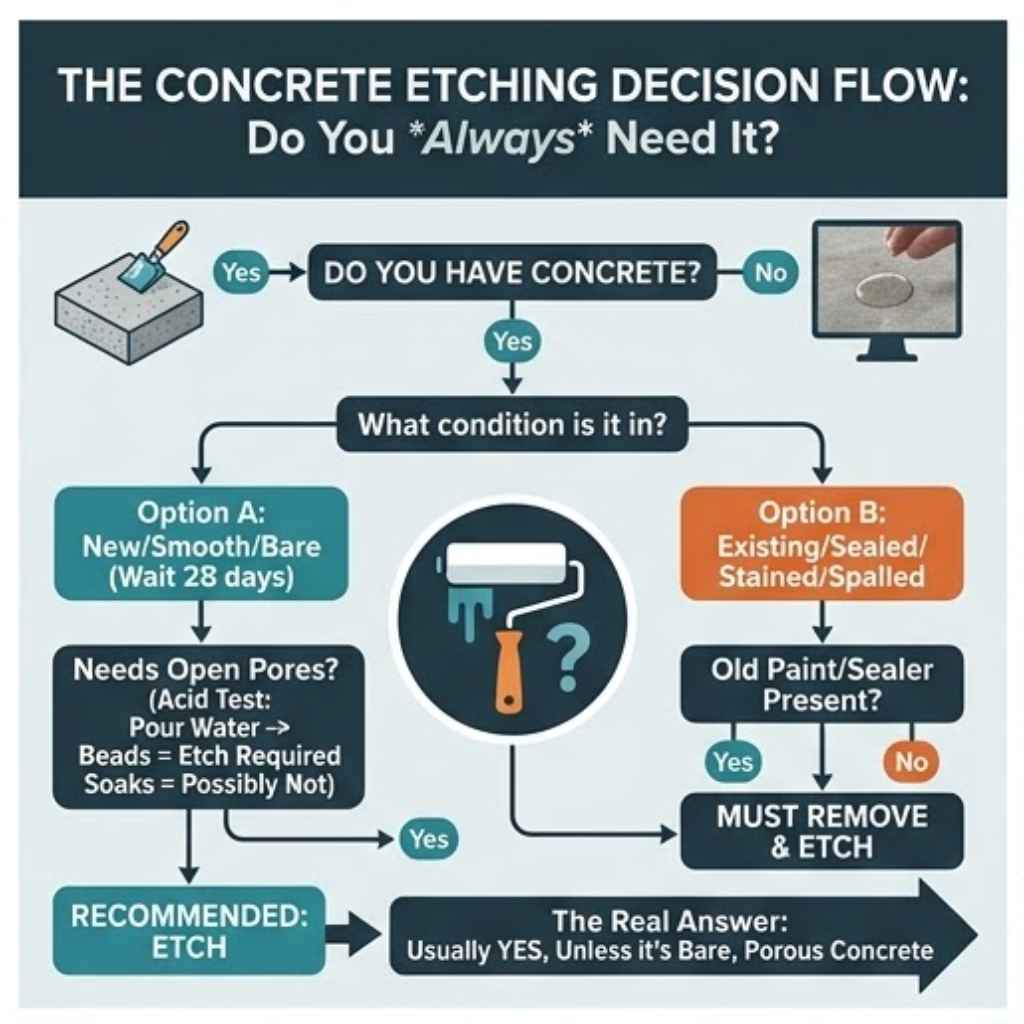
When is it Definitely Okay to Skip?
Honestly, for most DIY painting projects on concrete, skipping etching is a risk you don’t want to take. The few times you might not need it are if the concrete is:
- Extremely rough and porous from new construction, and never sealed.
- Already prepared by grinding or shot blasting for a high-performance coating.
When Should You Always Etch?
- If the concrete is smooth, sealed, or has existing paint.
- If you want the paint job to last for years, not months.
- For high-traffic areas like patios, walkways, and garage floors.
- If the concrete has any stains that might affect adhesion.
If you are unsure, it’s always safer to etch. It’s a relatively inexpensive step that significantly boosts the chances of success. Think of it as an insurance policy for your paint job.
A well-prepped surface makes the paint’s job much easier. It allows it to form a strong, lasting bond.
Quick Fixes & Tips for Success
Tip 1: Read Paint Instructions. Always check what the paint manufacturer recommends for surface preparation. Some paints are formulated for better adhesion on less-than-perfect surfaces, but etching is usually still advised.
Tip 2: Test a Small Area. If you’re hesitant about etching, try it on a small, inconspicuous part of your concrete first. See how the paint adheres after etching versus not etching.
Tip 3: Don’t Over-Etch. You want to open the pores, not damage the concrete. Too much acid or scrubbing can weaken the surface.
Tip 4: Watch for Moisture. Ensure the concrete is bone dry before painting. Any trapped moisture can cause bubbles and peeling.
Tip 5: Use the Right Tools. Plastic watering cans and brushes are best for acid etching. Avoid metal tools that can rust or react with the acid.
Frequently Asked Questions About Concrete Etching
Do I really need to etch concrete before painting?
For most paint applications on concrete, etching is highly recommended. It prepares the surface by cleaning it and creating a rough texture. This allows paint to adhere much better, preventing peeling and chipping.
What kind of acid is used for etching concrete?
Common acids used are phosphoric acid and muriatic acid. Phosphoric acid is less harsh and easier to handle. Muriatic acid is stronger but requires more safety precautions.
There are also less harsh etching products available, like those with citric acid.
How do I know if my concrete is etched enough?
After rinsing and drying, the concrete should feel like medium-grit sandpaper. A simple test is to pour a little water on it. If the water soaks in and darkens the concrete, it’s likely etched well.
If it beads up, it needs more etching.
Can I skip etching if I just clean the concrete really well?
A good cleaning is essential, but it usually isn’t enough on its own. Cleaning removes surface dirt, but etching opens the pores of the concrete. This is what allows the paint to bond properly.
Without etching, paint may only stick to the surface dirt or a weak top layer.
What are the dangers of not etching concrete before painting?
The main danger is that the paint job will fail prematurely. Paint can peel, chip, bubble, or wear away quickly. This leads to wasted time, money, and a disappointing appearance.
You might end up having to remove the failed paint and start over.
Is mechanical grinding better than acid etching?
For very durable coatings like epoxy, mechanical grinding or shot blasting is often preferred. These methods create a deeper, more consistent profile. Acid etching is a good method for standard concrete paints and for DIYers, as it requires less specialized equipment.
Final Thoughts on Surface Prep
When it comes to painting concrete, surface preparation is king. Skipping the etching step is a tempting shortcut, but it almost always leads to trouble down the road. By taking the time to properly etch your concrete, you are setting yourself up for a beautiful, long-lasting finish.
It’s a small effort that makes a huge difference in the final result.