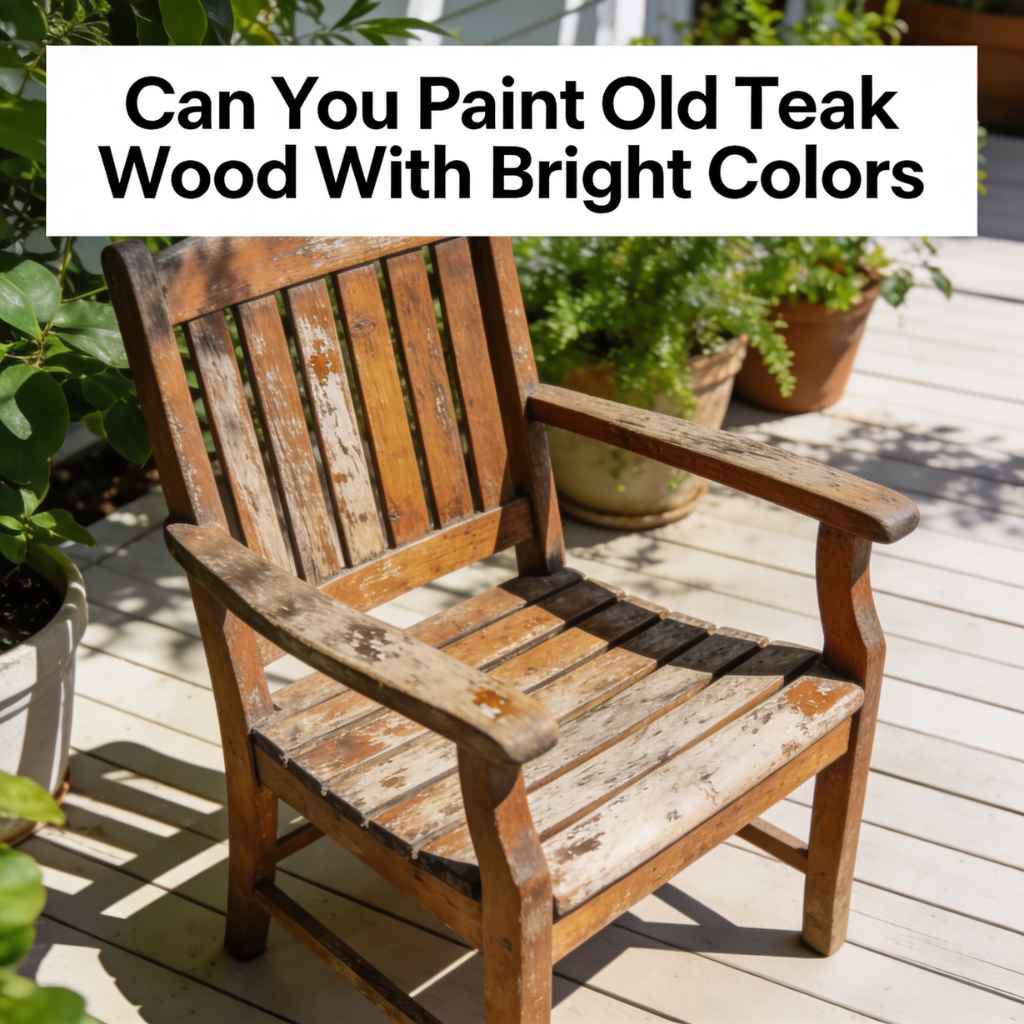
Can You Paint Old Teak Wood With Bright Colors
Many folks wonder if they can brighten up old teak wood with vibrant paint. It might seem tricky because teak is known for its natural beauty and oily surface. Beginners often worry about paint not sticking or the finish looking messy.
This guide makes it simple. We’ll show you exactly how to get that stunning, colorful look on your teak furniture.
Preparing Old Teak Wood for Paint
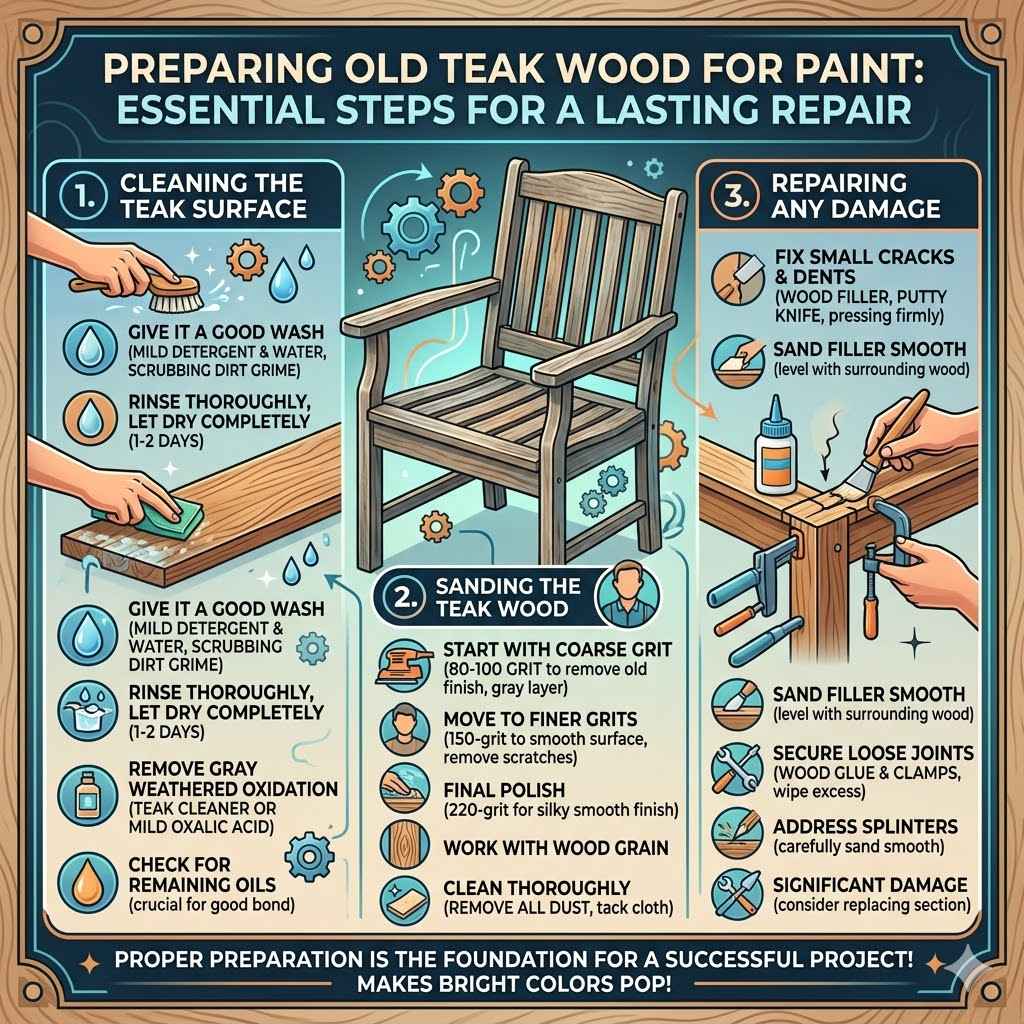
This section focuses on getting your old teak wood ready for a fresh coat of bright paint. It covers the essential steps to ensure the paint adheres well and lasts a long time. Proper preparation is the foundation for any successful painting project, especially with a wood type like teak.
Cleaning the Teak Surface
Before you even think about paint, the teak must be spotlessly clean. Any dirt, grime, or old finishes will prevent the new paint from sticking properly. This means giving it a good wash and making sure all residues are gone.
A clean surface is key to a smooth, long-lasting paint job.
Using a mild detergent and water is a good start. You might need a soft brush to gently scrub away stubborn dirt. Make sure to rinse thoroughly.
After washing, let the wood dry completely. This can take a day or two, depending on the weather.
Sometimes, teak can develop a gray, weathered look over time. This is a natural oxidation process. If your teak has this gray layer, you’ll need to remove it.
A teak cleaner or a mild solution of oxalic acid can help restore the wood’s natural color. Always follow the product instructions carefully.
Even after cleaning, check the surface for any remaining oils. Teak is naturally oily, and these oils can sometimes interfere with paint adhesion. A light sanding can help open up the wood’s pores, making it more receptive to primer and paint.
This step is crucial for a good bond.
Sanding the Teak Wood
Sanding is a vital step to create a surface that primer and paint can grip. For old teak, you’ll want to start with a coarser grit sandpaper to remove any old finish or oxidation. After that, you’ll move to finer grits to smooth out the surface.
Begin with sandpaper around 80-100 grit. This will take off any loose bits and the gray layer. Work in the direction of the wood grain.
Don’t scrub too hard; let the sandpaper do the work. After the initial sanding, wipe away all the dust with a clean cloth.
Next, move to a finer grit, like 150-grit sandpaper. This will smooth out the surface further. Again, sand with the grain.
This step removes any deeper scratches left by the coarser grit. A smooth surface ensures your paint goes on evenly and looks professional.
Finally, use a very fine grit, such as 220-grit sandpaper. This is for the final polish. It creates a silky smooth finish that is perfect for painting.
After sanding with the finest grit, clean the wood again to remove all fine dust. A tack cloth is excellent for picking up the last bits of dust. The wood should feel smooth and clean to the touch.
Proper sanding ensures that the primer will adhere well. Without it, the paint might peel or chip later. This preparation work prevents future problems and makes the bright colors really pop.
It’s worth the extra effort for a beautiful result.
Repairing Any Damage
Before painting, it’s important to fix any damage to the teak wood. Small cracks, dents, or loose parts need attention. A smooth, solid surface will make the final painted piece look much better.
It also helps the paint last longer.
For small cracks or holes, wood filler is your friend. Choose a filler that can be stained or painted. Apply it with a putty knife, pressing it firmly into the damaged area.
Let it dry completely according to the product’s instructions. Once dry, sand the filler smooth so it’s level with the surrounding wood.
If there are loose joints or parts, you might need wood glue and clamps. Apply the glue to the pieces that need joining. Then, clamp them tightly together.
Wipe away any excess glue that squeezes out. Let the glue cure fully before moving on. This ensures a strong, lasting repair.
Splintered areas should be carefully sanded smooth. If the damage is significant, you might need to consider replacing the damaged section altogether. However, for most cosmetic issues, fillers and sanding will do the trick.
Addressing these flaws now prevents them from showing through the paint later.
A well-repaired piece of furniture is a better canvas for your bright colors. It shows you care about the quality of the final product. Taking the time to fix these issues makes a big difference in how professional your painted teak looks.
Priming Old Teak Wood
Priming is a non-negotiable step when painting teak, especially with bright colors. It acts as a bridge between the wood and the paint, ensuring the colors are true and the finish is smooth. This section explains why primer is so important for teak and how to apply it correctly.
Why Primer is Essential for Teak
Teak wood has natural oils that can leach through paint. This is called tannin bleed. These oils can discolor the paint, especially lighter or brighter shades, turning them yellow or brown.
Primer creates a barrier that stops these oils from reaching the paint layer.
Primer also helps paint stick better. The oily nature of teak can make it hard for paint to adhere. A good primer creates a surface that paint can bond to securely.
This means your paint job is less likely to chip or peel over time. It adds durability to your project.
For bright colors, primer is even more critical. Bright paints often have less pigment and may require more coats to achieve full coverage. A tinted primer, or a white primer, can help the bright colors appear more vibrant and true to their original shade.
It reduces the number of topcoats needed.
Without primer, you might end up with uneven color, poor adhesion, and premature wear. It’s a critical step that sets the stage for a beautiful and lasting paint finish on your teak furniture.
Choosing the Right Primer
Not all primers are created equal, and for teak, you need one that seals effectively. Look for a stain-blocking primer. These are specifically designed to prevent oils and tannins from bleeding through.
They form a solid barrier on the wood’s surface.
Oil-based primers are often recommended for oily woods like teak. They are excellent at blocking stains. However, they can have strong fumes and require mineral spirits for cleanup.
Water-based or latex primers have improved significantly and some are now very effective stain blockers.
Look for primers labeled as “high-hide” or “stain-blocking.” These are formulated to cover imperfections and prevent bleed-through. Brands that specialize in wood primers often have excellent options. Some primers are designed for difficult surfaces, which can be ideal for teak.
Consider a primer that is also a good base for your chosen paint type. If you plan to use latex paint, a latex primer might be a good choice. If you’re using an oil-based paint, an oil-based primer would be best.
Check the product labels for compatibility.
A primer that is tinted white or a light gray can also be very helpful for achieving true bright colors. It provides a neutral base for your topcoats, making the vibrant hues stand out more effectively. This can reduce the number of paint layers you need.
Applying Primer
Once you have the right primer, applying it correctly is key. Make sure the wood is clean and dry before you start. Stir the primer thoroughly.
Don’t shake it, as this can create air bubbles.
Use a good quality paintbrush or a foam roller for application. For detailed areas, a brush is best. For larger flat surfaces, a roller can speed things up.
Apply a thin, even coat. Avoid applying too much, as this can lead to drips and an uneven finish.
Brush strokes should generally follow the direction of the wood grain. If using a roller, use light, overlapping strokes. Cover the entire surface of the teak wood.
Pay attention to edges and corners.
Let the first coat of primer dry completely. Check the primer can for recommended drying times. Once dry, inspect the surface.
If you see any areas where the oil is still bleeding through (discoloration), apply a second coat of primer. Some areas might need a third coat for full coverage.
After the primer is dry, lightly sand the surface with a very fine-grit sandpaper (around 220-grit). This will create a super smooth surface for your paint. Wipe away all dust with a tack cloth.
A well-primed surface is smooth, white (or tinted), and free of any oily spots.
This prepared surface is now ready for the bright, beautiful colors you want. It ensures the paint will adhere well and the colors will look their best.
Painting Old Teak Wood with Bright Colors
This is where the magic happens – applying those vibrant hues to your prepared teak. This section covers selecting the right paint, techniques for achieving smooth coverage, and making sure those bright colors truly shine.
Choosing the Right Paint for Teak
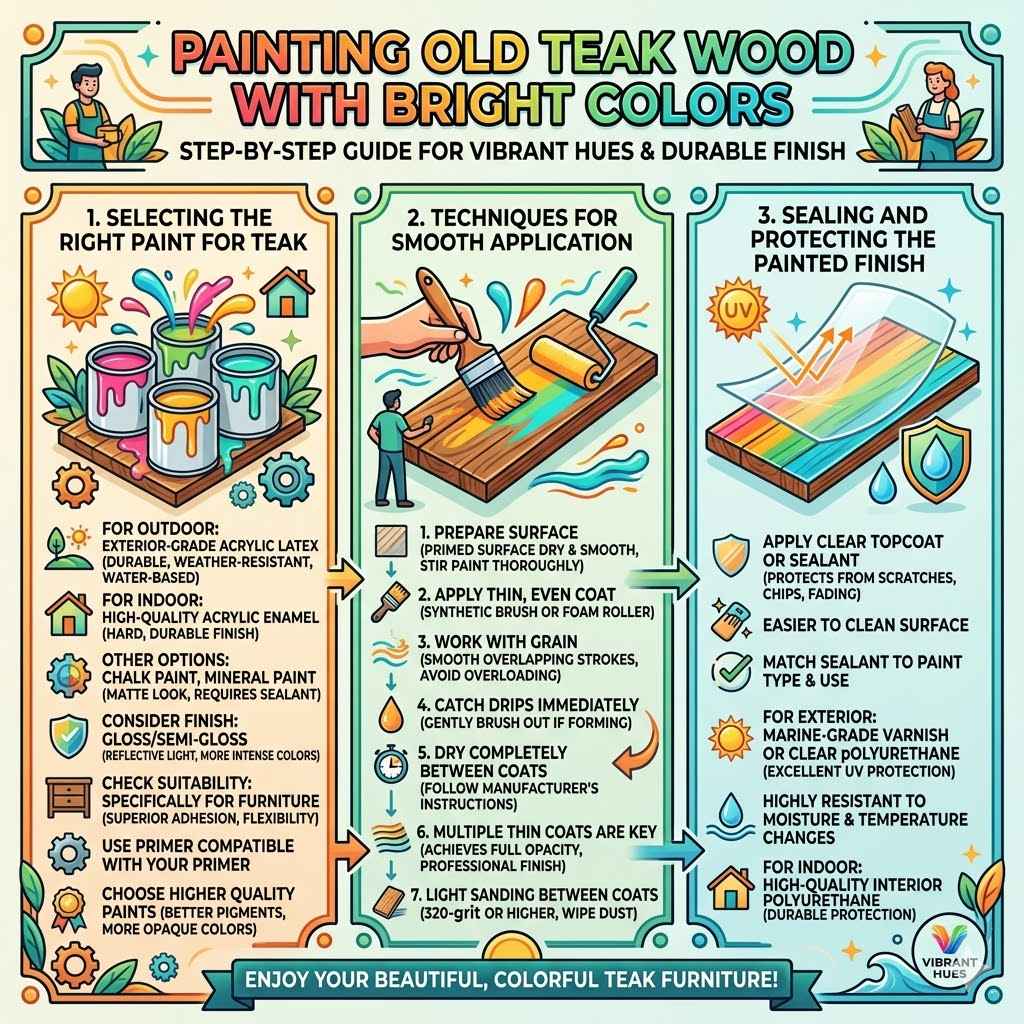
When painting teak with bright colors, the type of paint you choose matters a lot. You need paint that is durable, flexible, and can adhere well to a primed surface. For outdoor furniture, you’ll need paint that can withstand weather.
For furniture that will be outdoors, exterior-grade acrylic latex paint is a great choice. It’s durable, weather-resistant, and comes in a huge range of vibrant colors. It’s also water-based, making cleanup easy.
If you are painting indoor teak furniture, you have more options. High-quality acrylic enamel paints offer a hard, durable finish. They can be semi-gloss or gloss, which can make bright colors look even more striking.
For a more matte finish, chalk paint or mineral paint can also work well, though they may require a sealant.
Consider the finish you want. A gloss or semi-gloss finish will reflect light, making bright colors appear more intense and saturated. A matte finish will give a softer, more subtle look.
For outdoor items, a satin or semi-gloss is often preferred for durability and ease of cleaning.
Always check if the paint is suitable for wood surfaces. Some paints are specifically formulated for furniture and offer superior adhesion and flexibility. Ensure the paint you choose is compatible with your primer.
The quality of the paint is also important. Higher quality paints often have better pigments, which means the bright colors will be more opaque and vibrant. They may also provide better coverage, meaning you might need fewer coats.
Applying Bright Colors
Applying bright colors requires patience and attention to detail to get that flawless look. The goal is to achieve even coverage without streaks or drips, so the vibrant hue shines through.
Ensure your primed surface is completely dry and smooth. Stir your paint thoroughly. If you’re using multiple cans of the same color, mix them together in a larger container.
This helps ensure color consistency across your project.
Start with a thin, even coat. Use a good quality paintbrush or a small foam roller designed for smooth finishes. For intricate areas, a quality synthetic brush is best.
For larger surfaces, a small foam roller can provide a smooth, even application.
Apply the paint in smooth, overlapping strokes. Work in one direction, following the grain of the wood as much as possible. Avoid overloading your brush or roller, as this can lead to drips and unevenness.
If you see a drip forming, gently brush it out immediately.
Allow the first coat to dry completely according to the manufacturer’s instructions. This is very important. Trying to apply a second coat too soon can cause the first coat to peel or become damaged.
Once the first coat is dry, assess the coverage. Bright colors, especially yellows, oranges, and light blues, may require multiple coats to achieve full opacity. You might see some of the primer showing through.
Apply a second coat in the same manner as the first.
If needed, apply additional thin coats until you achieve the desired vibrant, uniform color. Light sanding with very fine-grit sandpaper (320-grit or higher) between coats can help create an even smoother finish. Always wipe away dust with a tack cloth after sanding.
The key to achieving stunning bright colors on teak is applying multiple thin coats rather than one thick one. This results in a more durable, professional-looking finish that truly showcases the vibrancy of your chosen hues.
Sealing and Protecting the Painted Finish
Once you have applied your final coat of bright paint and it has dried completely, it’s time to seal and protect it. This step is crucial for durability, especially if the teak furniture is used outdoors or in high-traffic areas.
A clear topcoat or sealant will protect the paint from scratches, chips, and fading. It also makes the surface easier to clean. The type of sealant you choose should match your paint type and intended use.
For exterior furniture, a marine-grade varnish or a clear exterior polyurethane is recommended. These products offer excellent UV protection, which helps prevent the bright colors from fading in the sun. They are also highly resistant to moisture and temperature changes.
For indoor furniture, a clear acrylic sealer or a polyurethane finish works well. Look for a product with UV inhibitors if the furniture will be placed in direct sunlight. A satin or semi-gloss finish often looks best with bright colors, adding a subtle sheen without being too reflective.
Apply the sealant in thin, even coats, following the manufacturer’s instructions. Just like with the paint, avoid applying too much at once. Allow each coat to dry thoroughly before applying the next.
Light sanding between coats with very fine sandpaper can ensure a smooth finish.
The number of coats needed will depend on the product and the expected wear and tear. For outdoor furniture, three to four coats might be appropriate. For indoor items, two to three coats may be sufficient.
This protective layer will ensure that your vibrant colors remain bright and beautiful for years to come. It’s the final touch that locks in your hard work and adds longevity to your newly painted teak furniture.
Frequently Asked Questions
Question: Can I paint over an old, peeling paint job on teak?
Answer: Yes, but you’ll need to do some prep work first. You must remove all the peeling and loose paint. Sand the entire surface until it’s smooth and any remaining old paint is well-feathered.
Then, proceed with cleaning, priming, and painting as you would with bare teak.
Question: How long does paint typically last on outdoor teak furniture?
Answer: With proper preparation, good quality paint, and regular maintenance, a painted finish on outdoor teak furniture can last anywhere from 3 to 7 years. Factors like weather exposure, sunlight, and the type of paint and sealant used will affect its lifespan.
Question: Do I need to use a special type of brush or roller for bright colors?
Answer: For bright colors, using high-quality synthetic brushes or foam rollers is recommended. These tools help ensure a smooth, even application without leaving brush marks or texture that can detract from the vibrancy of the color. They help achieve a professional look.
Question: Will painting teak make it less durable?
Answer: No, painting teak can actually enhance its durability, especially if the wood was already weathered or damaged. A well-applied paint and sealant system protects the wood from moisture, UV rays, and physical wear, potentially extending its life.
Question: How do I know if I’ve used enough primer to block teak oils?
Answer: You’ll know you’ve used enough primer when the wood surface looks uniformly opaque and there are no visible discolored patches (yellowing or browning) where teak oils might be trying to bleed through. If you see any discoloration, apply another coat of stain-blocking primer.
Summary
Yes, you can paint old teak wood with bright colors. The key is thorough preparation including cleaning and sanding. Always use a quality stain-blocking primer to prevent oil bleed-through.
Apply thin coats of durable paint, allowing each to dry fully. Finish with a protective clear coat for lasting vibrant color. Your teak can look stunning and new.