How To Connect Chain Link Fence To Wood Post The Right Way
Connecting chain link fence to wood posts involves using specific hardware. You’ll need lag screws or carriage bolts with washers. Common methods include tension bars and brace bands.
Proper alignment and secure fastening are key for durability. This ensures your fence stands firm against weather and use.
Understanding Your Chain Link Fence Connection
A chain link fence is great. It’s strong and lets you see through it. Wood posts add a nice look.
Connecting them right is important. If you don’t do it well, the fence can sag. It might even fall down.
This guide shows you how to make it work. We will cover the best tools and steps. You will learn how to make a sturdy fence.
The main parts are the fence fabric and the posts. The fabric is the diamond pattern. The posts are the strong uprights.
Wood posts are usually cedar or treated pine. They are strong and look natural. Connecting them needs special care.
Metal fences and wood posts are different. You need to bridge that gap.
Think about the weather too. Rain, wind, and sun can affect wood. They can also affect the metal fence.
Your connection needs to handle these things. A good connection lasts for many years. It protects your yard and keeps things in or out.
It’s a simple job when you know how. Let’s get into the details.
My First Fence Project: A Wood Post Mishap
I remember my first attempt at this. It was a sunny Saturday. I had a new roll of chain link fence.
I’d already set my wood posts. They looked solid. I thought, “This will be easy!” I grabbed some regular screws.
I started screwing the fence fabric directly to the post. It looked okay at first. Then, I tried to pull the fence tight.
The screws just ripped out of the wood. The fence sagged in the middle. I felt a wave of panic.
All that work seemed wasted. The sun felt hotter on my neck. I realized I needed a better way.
This taught me that you need the right parts for the job. Not just any screw will do. You need hardware that grips well.
Chain Link Connection Essentials
Fence Fabric: The metal diamond mesh.
Wood Posts: Treated lumber or cedar, set firmly.
Tension Bar: A flat metal bar that goes through the fence fabric.
Brace Bands: Metal straps that wrap around the post.
Lag Screws/Carriage Bolts: Strong fasteners to attach bands to posts.
Post Caps: To protect the top of the wood post.
The Right Hardware Makes All the Difference
Using the right hardware is super important. It’s the core of a strong connection. For chain link fence to wood posts, you can’t just nail it.
You need things that give a strong hold. These parts are designed for this. They help the metal and wood work together.
This prevents the fence from pulling away. It also stops the wood from getting damaged too much.
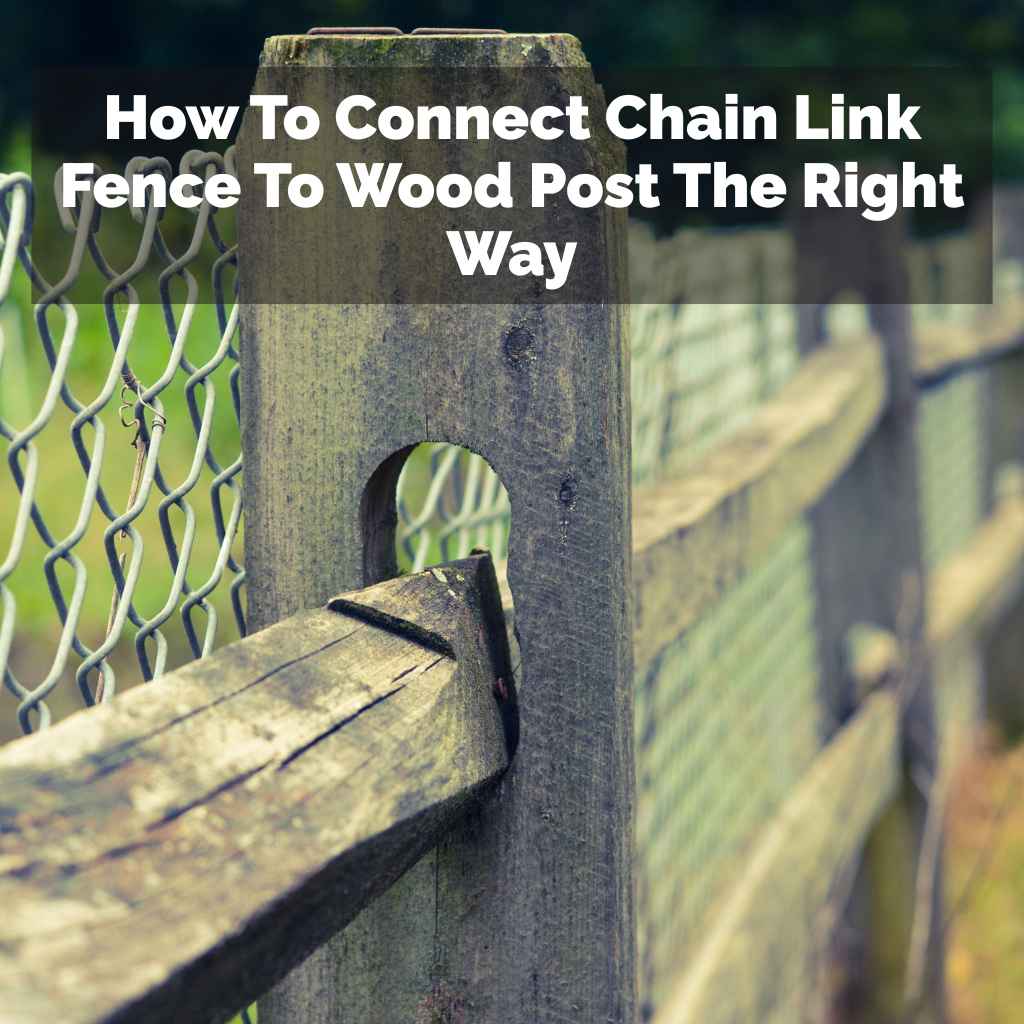
One key item is a tension bar. This is a flat metal bar. It slides into the end of the chain link fabric.
Think of it like a spine for the end of the fence. It keeps the fabric straight and tight. Without it, the fabric can fray or bend oddly.
This bar will then attach to your post.
Next, you need brace bands. These are metal straps. They wrap around your wood post.
They have holes in them. These holes match up with holes in the tension bar. The brace bands are usually secured to the post with lag screws.
These are big screws with a wide thread. They bite deep into the wood. This gives a very strong grip.
Sometimes, people use carriage bolts instead. These go all the way through the post. They have a nut on the other side.
Lag Screw vs. Carriage Bolt
Lag Screw: Screws directly into pre-drilled holes. Good for strong hold without going through the post.
Carriage Bolt: Goes through the entire post. Needs a nut on the back. Offers a very secure, through-and-through connection.
Step-by-Step: Connecting the Fence Fabric
Let’s break down the actual connection process. It’s like building block by block. Each step adds strength.
First, you need to get your fence fabric ready. You will unroll it carefully. You want to attach it to your last post, or corner post.
These are often called terminal posts. They are usually thicker. They are set very deep.
For a wood post, you will do a few things. You’ll slide the tension bar through the end links of the fence fabric. Make sure it goes all the way to the edge.
This bar will then sit against the wood post. You need to position it where you want the fence to end.
Now, you need to secure this tension bar to the post. This is where the brace bands come in. You’ll place one brace band on the front of the post.
It will go around the tension bar. You’ll likely need two brace bands. One above the other.
This gives a good, firm hold. These bands have holes that line up. You’ll use your lag screws or carriage bolts here.
Drill pilot holes into the wood post first. This makes it easier to drive the screws. It also helps prevent the wood from splitting.
The pilot hole should be a bit smaller than the screw. Then, drive the lag screws through the brace bands and into the wood. Make sure they are snug.
Don’t overtighten them. You don’t want to strip the wood. This fastens the tension bar and fence fabric tightly to the post.
Pilot Hole Tip
Always drill a pilot hole. For lag screws, make it about 70-80% the diameter of the screw shank. This ensures a strong grip without splitting the wood.
If using carriage bolts, drill a hole the same size as the bolt.
Tensioning the Chain Link Fence
This is a crucial step. A loose fence looks bad. It doesn’t do its job well.
You need to pull the fence fabric taut. This is usually done with a special tool. It’s called a fence stretcher or come-along.
You hook one end to the fence fabric. You hook the other end to another post. Then, you use the tool to pull the fence tight.
You want to pull it tight enough so there are no sags. But not so tight that you’re bending the posts or the tension bar. It takes some practice.
You might need to adjust it a few times. When it feels just right, you repeat the process of attaching the other end. You’ll use another tension bar and brace bands on the next post.
This is the moment of truth. As you pull the fence tight, watch the wood posts. Are they leaning?
Are the screws holding firm? If you see any wobbling, stop. You might need to reinforce the post.
Or use longer, thicker screws. The goal is a straight, taut line of fence.
Some people use a fence stretcher attached to a truck bumper. Or they use a manual come-along crank. Either way, the principle is the same.
You apply steady pressure. You then secure the fabric to the next post. This ensures the entire fence line is firm.
It looks professional and lasts longer.
Fence Stretcher Guide
Hook 1: To the fence fabric, a few links in from the edge.
Hook 2: To a temporary anchor point or another strong post.
Pull: Slowly and steadily. Watch for bending or strain.
Secure: Once taut, attach to the terminal post quickly.
Alternative: Connecting to Existing Wood Structures
What if you’re not building a new fence line? What if you need to connect to an existing wooden structure? This could be a shed wall, a deck railing, or a wooden fence built with different materials.
The method is quite similar. You still need to attach the tension bar to the fence fabric.
The difference is how you attach the tension bar to the existing wood. Instead of brace bands, you might use L-brackets. Or you might drill directly through the wood.
Then use carriage bolts with large washers. Washers are important. They spread the force over a bigger area of the wood.
This stops the bolt from digging in too much.
You need to ensure the wood is strong enough. If it’s an old deck railing, it might not be. You might need to add extra support.
Or use a much stronger anchor point. A shed wall is usually pretty solid. But you still need to use good hardware.
The key here is avoiding damage to the existing structure. You also want a connection that won’t loosen over time. Think about how the fence will pull against the wood.
Use hardware that can handle that tension. And always use pilot holes. Especially in older wood.
It can be brittle.
When to Use Carriage Bolts vs. Lag Screws
This choice depends on a few things. Both are strong. Both will hold your fence.
But they offer slightly different benefits. Think about the wood post itself. Is it thick and sturdy?
Or is it thinner? What is the overall load on that post?
Lag screws are generally easier. You drill a pilot hole and screw them in. They are great for many situations.
Especially if the post is solid and you don’t want to go all the way through. They provide excellent holding power. They are common for connecting brace bands to terminal posts.
Carriage bolts offer a more secure, through-and-through connection. You drill a hole all the way through the post. The bolt goes through.
Then you add a washer and a nut on the other side. This is very strong. It’s often used when you need maximum security.
Or when connecting to something where the bolt head might be an issue on the other side. For example, connecting to a fence post that is also a structural part of something else.
If you’re connecting to a very thick post, lag screws are usually sufficient. If you want the absolute strongest connection, or if the wood is less dense, carriage bolts might be a better choice. Always use large, flat washers with bolts.
They distribute the pressure nicely. This is crucial for preventing the bolt from sinking into the wood.
Hardware Selection Factors
Wood Strength: Dense, thick wood can handle lag screws well.
Connection Point: Is it a simple terminal post, or part of a structure?
Tension: How much force will the fence exert?
Ease of Installation: Lag screws are often simpler.
Security Needs: For maximum security, carriage bolts can be preferred.
Protecting Your Wood Posts
Wood posts are exposed to the elements. Connecting a metal fence to them means they might get wet. Or moisture could get trapped.
You need to protect them. This will make them last much longer. And it will keep your fence connection strong.
First, make sure you use treated lumber or cedar. These woods are naturally resistant to rot and insects. When you cut them, the inside is exposed.
You should seal the cut ends. Use a good quality wood preservative or sealant. This is especially important for the ends that go into the ground.
After you install the fence, consider adding post caps. These are caps that fit on top of the wood post. They are usually metal or plastic.
They have a rounded or flat top. Their main job is to keep water out of the top of the post. Water can soak into the wood grain.
This can lead to rot and splitting. Post caps stop this. They also give a finished look.
Check the area around the base of the post too. Make sure water drains away from it. You don’t want a puddle sitting there.
Good drainage helps prevent rot. Regular inspection is also wise. Look for signs of decay.
Or any looseness in the connection.
Common Pitfalls to Avoid
When I first tried this, I made some mistakes. Knowing these can save you time and headaches. One big mistake is not using the right hardware.
I already talked about this. But it bears repeating. Just screws or nails will not work long-term.
They just don’t have the grip.
Another pitfall is not tensioning the fence correctly. If it’s too loose, it will sag. It will look messy.
If it’s too tight, you could bend your posts or the fence frame. Or you could pull the hardware out of the wood. Finding that sweet spot takes a little care.
Not pre-drilling pilot holes is another common error. This can cause the wood to split. Especially when you’re driving large lag screws or bolts.
Split wood means a weak connection. It might fail sooner than you want.
Lastly, not considering the long-term. Wood needs protection. Don’t forget post caps.
Don’t ignore signs of rot or looseness. A little bit of maintenance goes a long way. Treating the wood and using the right parts upfront prevents bigger problems later.
Think of it as an investment in durability.
Mistake vs. Solution
Mistake: Using regular screws.
Solution: Use lag screws or carriage bolts with brace bands/L-brackets.
Mistake: Loose or over-tight fence.
Solution: Use a fence stretcher and find the right tension.
Mistake: Wood splitting.
Solution: Always pre-drill pilot holes.
Mistake: Wood rot.
Solution: Use treated wood, seal cuts, and add post caps.
What This Means for Your Yard
So, what’s the takeaway? Connecting chain link fence to wood posts is very doable. It requires specific hardware and a bit of patience.
The result is a sturdy, good-looking fence. It can define your property lines. It can keep pets safe.
Or it can just make your yard look more polished.
When it’s done right, you won’t have to worry about it. It will withstand normal weather. It will hold its shape.
The connection will stay tight. You might forget you even did the work. That’s the sign of a good job.
It just works.
When should you maybe think about getting help? If your wood posts are old and rotten. If you have very challenging terrain.
Or if you’re dealing with a very large fence project. It’s always okay to call a professional. But for most backyard fences, this is a DIY-friendly task.
Especially with this guide!
Quick Tips for a Smoother Install
Here are some easy tips to make your installation smoother. First, gather all your tools and hardware beforehand. Lay it all out.
This saves you from stopping mid-job. Make sure you have a good drill. And drill bits that are the right size.
You’ll also need a tape measure and a level.
When you attach the brace bands, use a level. This ensures your tension bar is perfectly straight. A crooked tension bar can make the whole fence look off.
It can also create weak spots.
If you have long runs of fence, you might need more than one person. Holding the fence fabric while tensioning can be tough alone. An extra set of hands makes a big difference.
Especially when you are pulling the fence tight.
Don’t be afraid to adjust. If the fence isn’t quite right after the first pull, let off some tension. Reposition.
Pull again. It’s better to take a few extra minutes. This ensures a perfect finish.
A fence you can be proud of.
Frequently Asked Questions About Connecting Fence to Wood Posts
What is the strongest way to attach chain link fence to a wood post?
The strongest way involves using a tension bar slid through the fence fabric. This is then secured to the wood post with two brace bands. These bands are attached to the post using lag screws or carriage bolts with large washers.
This method distributes the tension evenly and provides a very secure hold.
Can I just screw the chain link fence directly to the wood post?
No, you should not screw the chain link fence fabric directly to the wood post. The small screws will likely pull out under tension. You will also damage the fence fabric and the wood.
It’s essential to use a tension bar and brace bands for a durable connection.
How far apart should the brace bands be on a wood post?
Typically, you would place two brace bands on the wood post. One is positioned near the top where the tension bar attaches, and the other is placed lower down. This gives a secure, two-point connection for the tension bar.
The exact spacing might vary slightly, but they should be far enough apart to provide stability.
What type of wood is best for fence posts that will connect to chain link?
Pressure-treated lumber is the most common and recommended choice for fence posts. It is treated to resist rot, decay, and insect damage. Cedar is another good option, as it is naturally resistant to these issues.
Both provide a strong and long-lasting base for your fence.
How do I prevent my wood posts from rotting where the fence connects?
Use pressure-treated or cedar posts. After cutting the posts, seal any exposed ends with a wood preservative. Install post caps on top to prevent water from entering the wood grain.
Also, ensure good drainage around the base of the posts so water doesn’t pool there.
Do I need special tools to connect chain link fence to wood posts?
You will need basic tools like a drill, drill bits, a wrench or socket set, and a tape measure. For tensioning the fence, a fence stretcher (come-along) is highly recommended. This tool allows you to pull the fence fabric taut before securing it to the posts, ensuring a tight and professional look.
Can I connect chain link fence to an existing wooden fence panel?
Yes, you can connect chain link fence to an existing wooden fence panel. You will still use a tension bar with the chain link fabric. Then, you would use L-brackets or carriage bolts with large washers to attach the tension bar to the wooden panel.
Ensure the wooden panel is strong enough to handle the tension.
Putting It All Together
Connecting a chain link fence to wood posts is a solid skill. You now know the hardware needed. You know the steps to attach the fence fabric.
And you understand why tension matters. Remember to protect your wood posts. And avoid those common mistakes.
With the right approach, your fence will be strong. It will look great for years to come. Enjoy your new, secure yard!