How to Prepare a Subfloor for Tile Installation
Decide in this order: identify the substrate, check structure, check moisture, check flatness, then choose the right underlayment. If the floor is moving, wet, swollen, or outside the flatness limit, stop and fix that first. For ceramic and porcelain tile, the base must be sound, dry enough for the system, and flat enough for the tile size and layout you plan to install.
What you need before you start


- 4-foot level or a 4-by-6-foot straightedge for flatness checks
- Tape measure and pencil
- Moisture meter or a simple moisture check method suited to the substrate
- Utility knife, vacuum, and stiff broom
- Patch compound for concrete repairs
- Floor leveling compound or liquid underlayment for low spots
- Exterior-grade plywood if a structural layer needs replacement
- Cement backer board panels
- Thin-set mortar, preferably polymer-modified or latex-modified where the manufacturer calls for it
- Alkaline-resistant fiberglass tape for backer board joints
- Fasteners specified for the backer board system
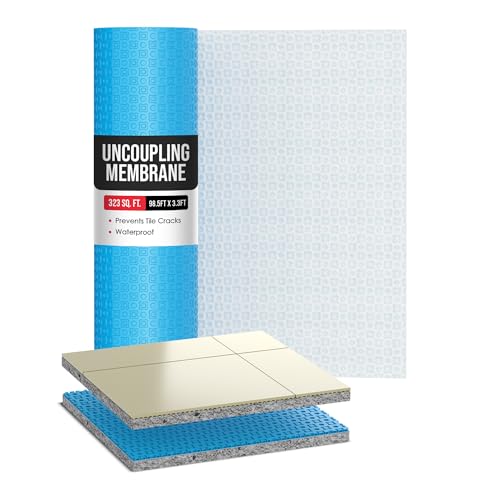
- Uncoupling membrane or crack-isolation membrane when the floor system calls for one
Subfloor prep decision matrix
| Substrate type | Pass/fail checks | Required underlayment | Moisture action | Flatness correction | Stop-work red flags |
|---|---|---|---|---|---|
| Concrete | Clean, solid, no active cracks that keep moving, no soft spots | Crack isolation, uncoupling, or approved tile underlayment as needed | Check for dampness before tile; let replacement patches dry at least 28 days | Fill cracks with sealant or patching compound; use floor leveling compound for uneven areas | Repeated moisture failure, crumbling concrete, major heaving, or structural cracking |
| Exterior-grade plywood | No squeaks, no bounce, no soft spots, no plumbing damage, no particleboard | Cement backer board or an uncoupling membrane, per the tile system | Find and fix leaks before covering the floor | Leveling compound for dips; add a second plywood layer if the subfloor is weak | Rot, delamination, severe flex, damaged joists, or wet framing |
| OSB | Proper thickness, sound fastening, no deterioration from moisture | Cover with an approved tile underlayment and, where required, backer board over wood | Dry the source first; do not tile over swollen or softened panels | Correct low spots before underlayment goes down | Swelling, edge breakdown, softened areas, or repeated wetting |
Use this table to decide whether you can repair, underlay, or rebuild. Tile needs a floor that stays still, stays dry, and stays flat. Flatness matters more than level for tile installation, and most failures come from movement, moisture, or both.
Prep the floor in this order: identify the substrate, fix movement, correct moisture, and bring the surface into flatness. The goal is not just to make the floor look ready; it is to make the floor match the tile system’s structural and moisture requirements before any tile is set.
- Identify whether the subfloor is concrete, plywood, or OSB.
- Check for squeaks, bounce, soft spots, cracks, and plumbing damage.
- Clean away dust, adhesive, debris, and loose material.
- Repair structural movement before any tile underlayment goes down.
- Fix cracks, fill low spots, and grind humps until the floor meets flatness limits.
- Install the correct underlayment, then tape and fasten it to spec.
- Check moisture again and wait for all repairs to cure fully.
What is the first check before tiling?
Start with the substrate type. Concrete, plywood, and OSB need different prep paths, and the wrong underlayment cannot fix a bad base. A tile system succeeds only when the structure is stable enough for the tile and the substrate is suitable for the underlayment you plan to use.
How do you know if the floor is structurally sound?
Walk the room and listen for squeaks, feel for bounce, and look for soft spots, cracked framing, or damaged panel edges. For ceramic and porcelain, the floor assembly also needs enough stiffness to meet the deflection limit used in tile standards. If the floor flexes, repair the structure before you think about tile.
How do you check moisture before tiling?
Moisture is a pass/fail issue, not a cosmetic one. Visible dryness is not always enough, especially on concrete or around plumbing. Use a method that fits the substrate, and stop if the floor is still damp, swollen, or showing signs of a leak.
What moisture tests work for concrete?
For concrete, practical pass/fail options include a calcium chloride test, in-slab relative humidity testing, or a moisture meter approved for concrete surface checks. If the slab is newly repaired or patched, wait for the repair product’s cure time, often 28 days unless the manufacturer states otherwise. If the slab still reads too wet for the tile system, stop and wait.
What moisture checks work for wood and OSB?
For wood panels, check for staining, swollen edges, cupping, mold, or a musty odor, then use a wood moisture meter if needed. If the panel is soft, delaminated, or shows active leak damage, that is a stop-work condition. Visible checks alone are not enough when the problem may be hidden around a tub, toilet, dishwasher, or exterior wall.
When should you stop and wait?
Stop if the source of moisture is active, if a patch has not cured, or if the substrate still reads outside the tile system’s acceptable range. Waiting is the right repair when the only problem is unfinished drying. Rebuilding is the right repair when the floor is already damaged.
How flat does a subfloor need to be for tile?
For ceramic and porcelain tile, aim for flat within 1/4 inch in 10 feet and 1/16 inch in 1 foot. That flatness target matches the kind of guidance commonly used for tile prep and is especially important with larger-format tile, where small dips and humps create lippage. Flat means the surface does not have dips or humps that throw off the tile; level means the floor is horizontal.
Check flatness with a straightedge
- Lay a 4-foot level or a 4-by-6-foot straightedge on the floor.
- Move it across the room in multiple directions.
- Mark every dip, hump, and transition that breaks contact.
- Measure the largest gap under the straightedge.
- Correct anything outside the flatness limit before tile work starts.
Suppose a bathroom floor has a 3/8-inch dip near the tub and a proud seam at the doorway. The dip needs filling and the seam needs grinding or feathering before tile goes down, because both create lippage risk and weak spots under the tile.
Fix dips, humps, and transitions before tile
Use floor leveling compound or liquid underlayment for low spots, then let it cure fully before tiling. Major manufacturers of leveling products and tile underlayments typically require their stated cure time before tile goes down, and that cure time overrides guesswork. High spots need grinding or another approved removal method, not extra mortar under the tile.
Can you tile over plywood or OSB?
Not directly unless the floor system is built for it. Exterior-grade plywood can be an acceptable wood-based subfloor, but particleboard is not suitable. OSB can be used only when it is properly covered and protected from moisture damage. Wood panels usually need an underlayment such as cement backer board or an approved uncoupling membrane.
Use the right underlayment over wood-based panels
On wood subfloors, cement backer board is a common choice. It is installed in thin-set mortar, and the mortar beds the panel rather than acting as the main structural layer. Backer board systems typically require a gap at the perimeter and between sheets so the panels do not bind against walls or each other, and the manufacturer’s spacing rules should control the install.
Leave the manufacturer’s specified gaps: about 1/4 inch at walls and 1/8 inch between sheets is a common requirement. Fasten the panels on the spacing the manufacturer lists, which is often every 6 to 8 inches. Tape the seams with alkaline-resistant fiberglass tape embedded in thin-set mortar.
Know when a second layer of plywood is needed
If the plywood subfloor feels weak, flexes too much, or has long spans between supports, a second layer of plywood may strengthen it. That is different from tile underlayment; strengthening a weak floor is a structural fix, while backer board or membrane is a tile prep layer.
Use a second plywood layer when the top layer is sound but not stiff enough for tile, and use underlayment alone only when the framing and first layer already meet the deflection requirement. Do not use underlayment to hide bounce, rot, or delamination.
Which underlayment should you use over plywood or OSB?
The choice comes down to movement control, height, and the tile system requirements. Cement backer board adds a cementitious tile-ready surface, while an uncoupling membrane can help isolate minor movement in the wood assembly. Use only the system the tile and underlayment manufacturers allow for your substrate and room conditions.
| Option | Best use | What it does | Tradeoffs |
|---|---|---|---|
| Cement backer board | Wood subfloors needing a rigid tile backer | Creates a stable, cement-based surface for tile | Adds height and requires thin-set, fasteners, and taped joints |
| Uncoupling membrane | Wood subfloors where minor movement isolation is needed | Separates tile from small seasonal movement in the wood assembly | Depends on exact product rules and still needs a sound subfloor |
If the floor is already stiff and dry, either option may work when approved by the manufacturer. If the floor is weak, wet, or damaged, neither option is a shortcut around structural repair.
How do you fix squeaky or spongy subfloor areas before tiling?
Squeaks and bounce mean the floor is moving, and tile will not tolerate that movement. Tighten or rebuild the structure before any underlayment goes down. A patch over a flexible floor usually cracks, even if the surface looks fine on day one.
Inspect movement, soft spots, and plumbing damage
- Walk the floor and mark every squeak, soft spot, and springy area.
- Check below the subfloor for loose fasteners, damaged joists, leaks, or pipe damage.
- Retighten or replace fasteners where the panel is loose.
- Replace rotted or delaminated sections before adding backer board or membrane.
- Recheck the area for bounce after the repair.
If the movement comes from damaged framing, the right fix may be from below, not above. Severe flex, rot, or repeated plumbing damage is a stop-work signal, because tile systems need a stable base first.
Common mistakes
Most tile prep failures come from trying to cover a structural problem instead of fixing it. If the floor flexes, leaks, or keeps moving, underlayment will not make it suitable for tile.
- Using particleboard as a tile base: replace it. It is not a suitable substrate for tile.
- Confusing flat with level: measure dips and humps, not just the bubble in a level.
- Skipping backer board joints: tape seams with alkaline-resistant fiberglass tape and embed it in thin-set mortar.
- Leaving out gaps: keep the wall and sheet gaps the underlayment manufacturer specifies.
- Tiling over green repairs: wait for liquid underlayment or patching to cure fully.
- Ignoring moisture damage: if the area stays damp, swollen, or soft after repair, rebuild it.
A common first-timer mistake is covering a squeaky hallway with backer board and tile because the surface looks smooth. The squeak usually means movement under the sheet, and movement is what cracks grout and tile later.
What causes tile failure after a bad subfloor prep?
Tile failures usually trace back to movement, moisture, or both. When the structure bends too much, grout lines can crack and tile can debond. When a slab or wood panel holds too much moisture, the bond can weaken and the floor can fail from below instead of from the surface.
Frequently asked questions
How do I prep floor for tile installation?
Vacuum the floor, remove loose adhesive, check for movement, and correct low spots before underlayment. The floor should be clean, solid, and flat enough for the tile system, and you should not tile until the repair products have cured fully.
Do I need cement board or uncoupling membrane over plywood?
Use the system the tile manufacturer and underlayment maker call for. Cement board is installed in thin-set mortar and taped at the seams, while uncoupling membranes are used to separate tile from minor movement in the wood assembly. Either way, the plywood must be exterior-grade and structurally sound.
How do I check a floor for moisture before tile installation?
Look for staining, swelling, dampness, and cool areas, then check the source before covering the floor. On concrete, use a concrete moisture test method that matches the tile system and wait for repair products to cure as directed. On wood, any recurring dampness near plumbing should be fixed before underlayment goes down.
What gaps should I leave at walls and between backer board sheets?
Leave about 1/4 inch at walls and 1/8 inch between backer board sheets unless the manufacturer specifies different gaps. Those spaces let the system move without pushing tile layers out of plane. Tape the joints with alkaline-resistant fiberglass tape and embed the tape in thin-set mortar.
Sponsored / affiliate links. As an Amazon Associate I earn from qualifying purchases. I may earn additional commission from eligible campaigns.