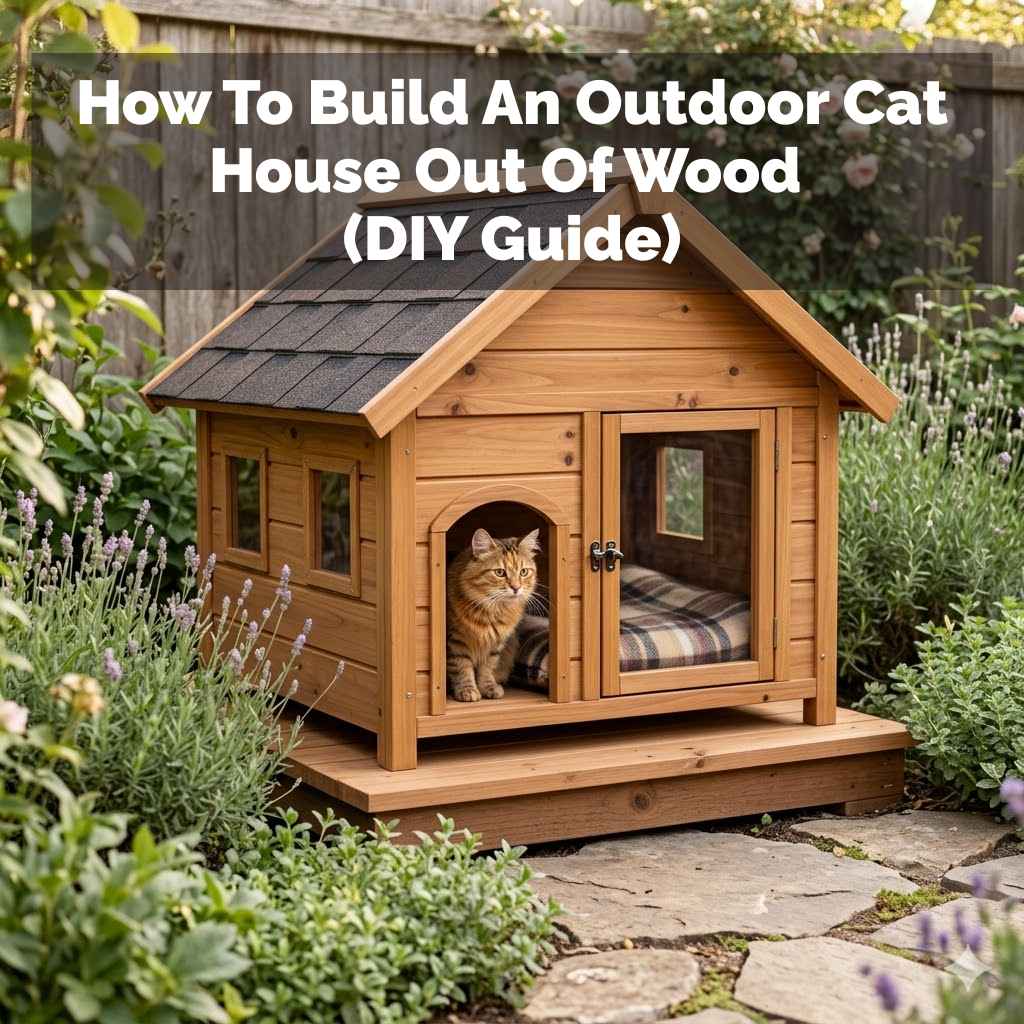
How To Build An Outdoor Cat House Out Of Wood (DIY Guide)
This guide helps you build a sturdy, weather-proof outdoor cat house using wood. You’ll learn about simple steps, necessary tools, and how to make it a safe haven for your cat. It’s easier than you think!
What is an Outdoor Cat House?
An outdoor cat house is a small shelter. It gives cats a safe place to rest. It keeps them out of the rain and sun.
It also protects them from cold winds. Think of it as a little cat condo for outside.
Many stray or feral cats live outdoors. Even pets that go outside need shelter. Wild weather can be tough on them.
A simple wooden house offers them protection. It can be a real lifesaver.
These houses are designed to be simple. They are also built to be sturdy. They need to stand up to wind and rain.
The main goal is comfort and safety for the cat. It’s a way to show you care about their well-being.
The size is important. It should be just big enough for a cat or two to curl up. Too big and it might not hold enough warmth.
Too small and they won’t be able to turn around easily. It’s a balance.
Materials matter too. Wood is a great choice. It’s natural.
It’s also easy to work with. It offers good insulation. But it needs to be treated correctly.
You want it to last. And you want it to be safe for cats.

My First Attempt at Building a Cat Shelter
I remember the first time I decided to build a shelter. It was a chilly autumn. I’d seen a shy stray cat visiting my yard.
It looked so thin. I worried about it through the long winter. I wanted to help.
I found some scrap wood in the garage. It was old plywood and some bits of pine. I thought, “How hard can this be?”
I had a hammer and some nails. I didn’t really have a plan. I just started nailing pieces together.
It looked… lopsided. The roof didn’t quite meet the walls. There was a big gap where water could get in.
I felt a pang of panic. Was this going to be good enough? I’d spent hours on it.
I wanted to do better. I realized I needed to learn more. I felt a bit silly, but also determined.
My goal was a cozy, dry home for my new feline friend.
Cat House Basics Checklist
What you need to think about:
- Size: Big enough for one cat, small enough to stay warm.
- Entrance: One door is best. Keep it small.
- Insulation: Helps keep heat in.
- Ventilation: Needs a little air flow.
- Drainage: Water needs to run out.
- Placement: Where will it go?
- Materials: Safe and weather-proof wood.
Choosing the Right Wood
For a sturdy, long-lasting cat house, picking the right wood is key. You want something that can handle the weather. It should also be safe for your cat.
Not all wood is created equal for this job.
Cedar is a great choice. It smells nice. It also naturally resists insects and rot.
This means your house will last longer. It’s a bit more costly. But it’s worth it for durability.
Pine is another popular option. It’s cheaper than cedar. It’s also easy to find.
However, pine needs more protection from the elements. You’ll need to seal it well. Untreated pine can rot quickly outside.
Avoid treated lumber. Some chemicals used to treat wood can be harmful to animals. It’s best to stick with natural, untreated wood.
If you use pine, make sure to seal it properly. This is very important for longevity.
Plywood can be used for the walls and roof. Use exterior-grade plywood. It’s made to withstand moisture better.
It’s also usually cheaper than solid wood boards. Just remember to seal all edges and surfaces.
Think about the thickness of the wood. You don’t want it too thin. It won’t offer enough protection.
Half-inch or three-quarter-inch thick wood is usually good. It gives strength and some insulation.
Wood Choices: Pros and Cons
Pine
Pros: Affordable. Easy to work with. Widely available.
Cons: Needs good sealing to prevent rot. Less durable than cedar.
Exterior Plywood
Pros: Cost-effective. Good for walls/roof. Resists moisture.
Cons: Edges must be sealed very well. Can warp if not sealed.
Gathering Your Tools and Materials
Before you start cutting, make sure you have everything you need. This saves time. It also makes the building process smoother.
You don’t want to stop halfway for a missing screw.
Tools you will need:
- Measuring tape: For accurate cuts.
- Pencil: To mark your wood.
- Saw: A hand saw or power saw will work.
- Drill: For making pilot holes and driving screws.
- Screwdriver bits: To match your screws.
- Sandpaper: To smooth rough edges.
- Safety glasses: Always protect your eyes!
- Work gloves: To protect your hands.
Materials:
- Wood: Your chosen type (cedar, pine, or exterior plywood).
- Screws: Use exterior-grade screws. They won’t rust. About 1.5 inches long.
- Wood glue: Exterior-grade wood glue adds strength.
- Sealant: A non-toxic, waterproof sealant or paint for the outside.
- Optional: Insulation (like rigid foam board), a door flap.
Having all these ready makes building much easier. It’s like having a recipe with all the ingredients laid out.
Essential Tools for Your Project
Make sure you have these on hand:
Measuring Tape
Pencil
Saw
Drill
Sandpaper
Safety Glasses
Simple Design for a Basic Cat House
Let’s keep this simple. A basic box shape is best. It’s easy to build.
It’s also functional. We’ll make a floor, four walls, and a roof. The roof should have a slight slope.
This helps water run off.
Dimensions: A good size is about 18 inches long, 15 inches wide, and 14 inches high. This is inside space. The outside will be a bit bigger.
This size is cozy for one or two cats. It’s not too big to lose heat.
Entrance: A single entrance is best. It keeps out drafts. Make it about 6 inches by 6 inches.
Place it on one of the front panels. It should be a few inches up from the floor. This stops rain from blowing in.
Roof: Make the roof slightly larger than the base. This creates an overhang. It protects the walls from rain.
A pitched roof (sloped) is better than flat. It lets water run off easily. You can make it a single slope or a peak.
Floor: Make the floor slightly raised. This keeps the bottom dry. You can use short wooden feet or blocks.
It lifts the house off the cold ground. This adds another layer of protection.
This basic design is a great starting point. You can always add more features later. But for a first house, simple is smart.
It ensures you can finish it. And it ensures it will be used.
Quick Design Plan
Key Features:
Size (Inside Approx. Feet)
1.5′ L x 1.25′ W x 1.2′ H
Entrance Hole
6″ x 6″ on front wall, a few inches up.
Roof Design
Sloped to shed water. Overhanging edges.
Floor
Raised off the ground on small feet.
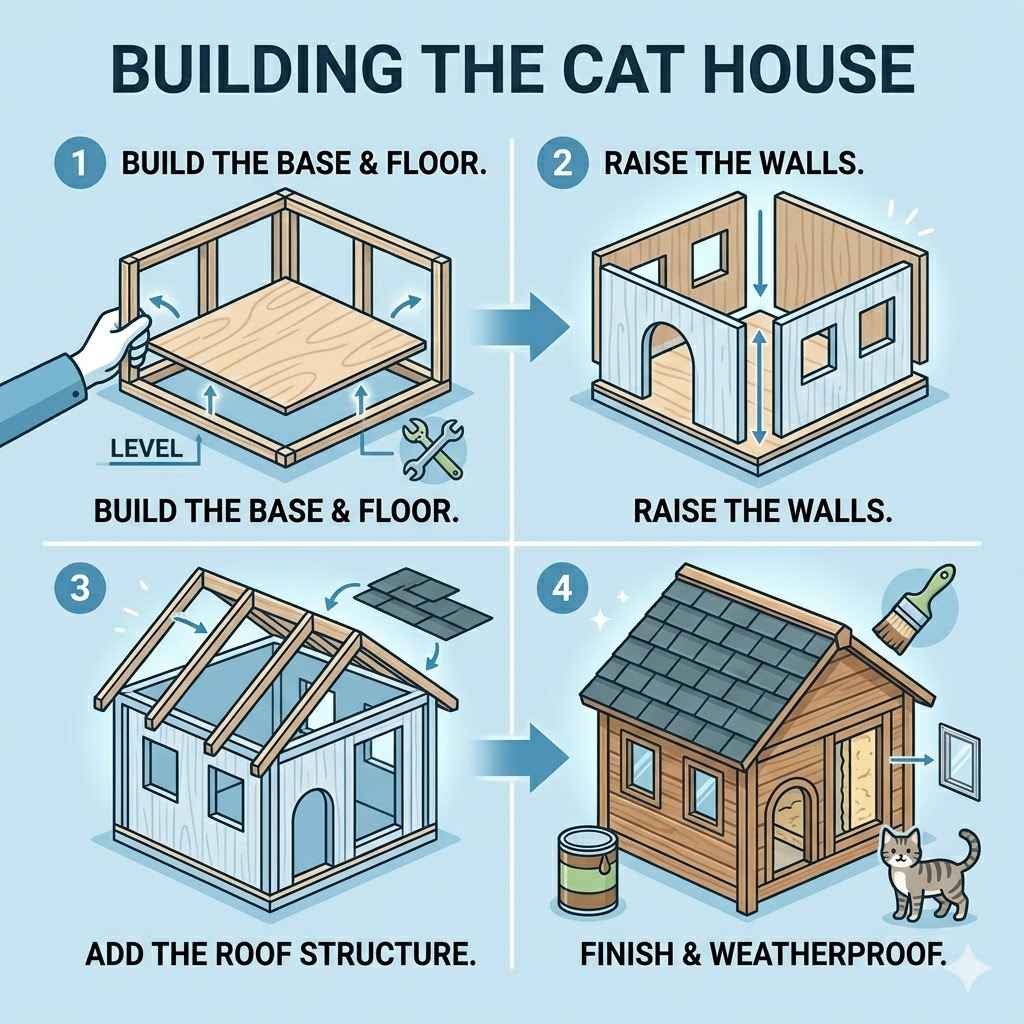
Step-by-Step Building Instructions
Now for the fun part! Let’s build this house. Take your time.
Measure twice, cut once. That old saying is true.
Step 1: Cut Your Wood Pieces
Using your measurements and saw, cut the wood for each part. You’ll need:
- Two side walls: 15 inches wide, 14 inches high at the back, sloping to 12 inches high at the front (for a sloped roof).
- Front and back walls: 18 inches long, 14 inches high. (You’ll cut the slope later if making a single-slope roof).
- Floor: 18 inches long, 15 inches wide.
- Roof pieces: Two pieces, each about 20 inches long and 10 inches wide (for a peaked roof), or one larger piece for a single slope.
If you are making a single-slope roof, cut the top edge of the front and back walls at an angle to match the slope you want. For a peaked roof, the front and back walls will be rectangular. The side walls will have a peak at the top.
Once cut, lightly sand all edges. This removes splinters. It makes the house safer for the cat.
Step 2: Assemble the Walls
Take the back wall and one side wall. Apply wood glue to the edge of the side wall. Place it against the back wall, making a corner.
Drill pilot holes. Then, secure with screws. Repeat for the other side wall and the front wall.
You should now have a box shape without a top or bottom. Make sure the corners are square. This ensures a sturdy structure.
If your walls are not yet sloped for the roof, now is the time. You can cut the top edges of the front and back walls to create a slope. Or, cut the top edges of the side walls to create a peak for a gabled roof.
This part builds the main structure. It’s where the house starts to take shape. Seeing it come together is rewarding.
Step 3: Add the Floor
Flip your wall assembly upside down. Place the floor piece on top. It should fit snugly inside or on the edges of the walls.
Apply glue. Drill pilot holes through the floor into the walls. Secure with screws.
If you want to raise the floor, attach small wooden blocks or feet to the bottom of the floor piece now. About 2-3 inches high is good. This prevents the floor from sitting directly on the damp ground.
A raised floor is crucial for keeping the inside dry. It also helps with air circulation underneath. This is a vital step for a healthy cat house.
Assembly Tips
Focus on strong joints:
- Glue first, then screw: Wood glue adds a lot of strength.
- Pilot holes: Always drill pilot holes. This stops the wood from splitting.
- Square corners: Use a carpenter’s square if you have one. It helps ensure everything is straight.
- Exterior screws: These won’t rust and stain the wood.
Step 4: Attach the Roof
If you have a single-slope roof, place the large roof piece on top. It should overhang the front, back, and sides. Apply glue to the top edges of the walls.
Position the roof. Drill pilot holes down into the walls. Secure with screws.
For a peaked roof, attach one roof piece first. Then, attach the second piece. Ensure they meet nicely at the top.
The overhang is important. It protects the walls from rain. Aim for at least a 2-inch overhang on all sides.
You can also hinge one side of the roof. This makes cleaning much easier later. To do this, attach one side of the roof to the house with hinges.
The other side can be secured with a hook and eye latch. This is a great advanced tip.
Make sure the roof is secure. It needs to withstand wind and rain. A well-attached roof is essential for keeping the inside dry.
Step 5: Cut the Entrance Hole
On the front panel, measure and mark your entrance hole. Aim for about 6 inches up from the bottom. Use a drill with a large bit (like a 1 1/4 inch bit) to make a starter hole.
Then, use a jigsaw or handsaw to cut out the 6×6 inch opening.
Smooth the edges of the hole with sandpaper. You don’t want any sharp splinters for the cat to catch on. This is where the cat will enter and exit.
If you want to add a flap, you can do that now. A heavy vinyl or rubber flap works well. It blocks wind and rain but lets the cat push through.
Step 6: Seal and Protect the Wood
This is a very important step for durability. Apply a non-toxic, waterproof sealant or exterior paint to the entire outside of the house. Cover all surfaces, including the roof and the bottom.
Pay close attention to edges and seams.
Allow it to dry completely. Then, apply a second coat. Ensure the product you use is safe for animals.
Many outdoor pet products are available. Check the label.
Do NOT paint or seal the inside of the house. Cats can be sensitive to strong smells. The inside should remain natural wood.
This keeps it safe and healthy for them.
This sealing process is what makes your wooden house last for years. It protects it from rain, snow, and sun. Without it, the wood would start to rot quickly.
Exterior Protection Steps
Keep it dry and safe:
- Use exterior-grade sealants or paints.
- Apply at least two coats.
- Cover all outside surfaces and edges.
- Allow full drying time before use.
- NEVER treat the inside.
Adding Insulation for Extra Warmth
In colder climates, insulation makes a big difference. It keeps the house warmer in winter. It also keeps it cooler in summer.
Rigid foam board insulation is a good choice. It’s easy to cut and fit. You can buy it at most hardware stores.
Cut pieces to fit snugly inside the walls. You can also put a piece on the floor and under the roof.
Before you attach the insulation, make sure your house is completely sealed and dry. Then, cut the foam board pieces to fit the inside dimensions of the walls. They should be a snug fit.
You can attach the foam board using a strong adhesive designed for foam. Or, you can secure it with small brad nails. Just be careful not to push the nails all the way through the outside of the house.
After the insulation is in place, you can add a thin layer of plywood or hardboard over it. This protects the foam from any chewing by the cat. It also creates a smoother interior surface.
Insulation is not strictly necessary everywhere. But if you live where winters are harsh, it’s highly recommended. It adds a significant level of comfort for any outdoor cat.
Insulation Ideas
Make it cozy:
Material
Rigid foam board (e.g., XPS or EPS)
Placement
Inside walls, floor, and ceiling.
Attachment
Adhesive or small brad nails.
Protection
Optional thin plywood layer over foam.
Ventilation: Why It Matters
It might seem strange. You want to keep the house warm and dry. So why add ventilation?
Good ventilation is key to a healthy environment.
When cats breathe, they create moisture. If this moisture can’t escape, it builds up. This leads to condensation inside the house.
Dampness can cause mold. It can make the bedding wet. It can make the whole house smell bad.
A little bit of air flow prevents this. You don’t need big vents. Small holes are enough.
You can drill a few small holes (about 1/4 inch) near the top of the side walls. Or, you can leave a tiny gap under the roof eaves.
The goal is to allow stale, moist air to escape. Fresh air can then come in. This keeps the air inside the house cleaner.
It also helps regulate the temperature. It prevents the house from getting too stuffy.
Think of it like a well-built home. It needs to breathe. This is a simple but crucial step for the health of any animal using the shelter.
Choosing the Right Location
Where you place the cat house is as important as how you build it. A good spot makes it more likely to be used. It also offers the best protection.
Find a sheltered area. Look for a spot that is protected from strong winds. Under a porch, a deck, or near a building can work well. If possible, face the entrance away from the prevailing wind and rain.
Elevate it. As mentioned, raising the house off the ground is important. It keeps it dry. It also helps deter pests like mice or snakes from entering.
Use bricks, pavers, or wooden blocks to lift it a few inches.
Consider the sun. In winter, a spot that gets some sun can help warm the house. In summer, place it where it gets shade. This prevents it from overheating.
Keep it clean. Try to place it in an area that’s easy to access. You’ll want to clean out old bedding and debris regularly.
A well-placed house is more likely to be a comfortable and safe retreat for your feline friend. It becomes a true haven.
Prime Placement Tips
Where to put your cat house:
- Sheltered from wind: Near buildings, under porches.
- Elevated off the ground: Use blocks or bricks.
- Sun and shade: Some sun in winter, shade in summer.
- Easy access for cleaning.
- Away from busy pathways.
Bedding: Making it Cozy Inside
Once the house is built and in place, you need to make it comfortable inside. Good bedding is essential for warmth and coziness.
Straw is an excellent choice for bedding. It’s natural. It doesn’t hold moisture like fabric can.
It also provides good insulation. Cats can burrow into it for warmth.
Avoid using blankets or towels directly. They can absorb moisture from the cat’s breath and body. This makes them cold and damp.
If you want to use fabric, consider putting it on top of straw.
Pine shavings or wood chips can also work. Just make sure they are not dusty. You want bedding that is soft and won’t irritate the cat’s eyes or breathing.
You’ll need to change the bedding regularly. Especially after rain or if it gets wet. Clean bedding keeps the house dry and inviting.
It makes the shelter a truly appealing place for a cat to rest.
The goal is to make it feel like a safe, warm nest. A place the cat will choose to retreat to.
What to Avoid When Building
While building your cat house, there are a few things to steer clear of. These can make the house unsafe or uncomfortable for your cat.
- Sharp edges or splinters: Sand everything down well.
- Toxic materials: Use only non-toxic paints and sealants on the exterior. Never treat the interior.
- Poor ventilation: Ensure there’s some air flow to prevent dampness.
- Flat roofs with no slope: Water will pool and leak.
- Too large a space: A smaller space holds body heat better.
- No elevation: Sitting directly on the ground makes it cold and wet.
- Painting the inside: The fumes can be harmful.
Avoiding these common mistakes will help ensure your cat house is a safe, healthy, and welcoming space. It’s about creating a truly beneficial retreat.
When is an Outdoor Cat House Normal vs. Concerning?
Most of the time, an outdoor cat house is a wonderful thing. It’s a sign of care and preparation. But there are times when you might want to pay closer attention.
Normal Scenarios:
- Cats using it regularly: This is the best sign! They find it safe and comfortable.
- Occasional visits: A cat might use it as a backup shelter. They have other safe spots too.
- Multiple cats sharing: If they get along, they might huddle for warmth.
- Seasonal use: Cats might use it more in cold or wet weather.
Concerning Scenarios:
- A cat is always in the house: If a cat is confined to the house and can’t get out, or seems sick and won’t leave, it might be ill.
- The house is damaged or unsafe: If the roof is leaking badly, or parts are falling off, it’s no longer providing good shelter.
- The house is always wet or moldy: This means ventilation or drainage is poor. It’s unhealthy.
- Cats fight over access: This might mean there aren’t enough shelter options.
Generally, if the house is dry, well-maintained, and provides a safe space, it’s a positive addition to your yard. If you notice signs of distress in the cat using it, that’s when you need to investigate further.
Cat House Health Check
Keep an eye on:
Good Signs
Cat uses it often. Dry and clean inside. Protected from weather.
Watch Out For
Constant dampness. Mold. Unsafe structure.
Cat seems trapped or sick.
Maintaining Your Outdoor Cat House
To ensure your cat house stays a safe and welcoming place, a little maintenance goes a long way. It’s not a lot of work, but it’s important.
Regular Cleaning: Aim to clean out the old bedding at least once a month. More often if it gets wet. A quick sweep out and fresh straw makes a big difference.
Check for Damage: Inspect the house periodically for any loose screws, cracked wood, or roof leaks. Make repairs as needed. This prevents small problems from becoming big ones.
Re-seal if necessary: Over time, the sealant might wear off. If you notice water soaking into the wood, it’s time for another coat of sealant on the outside.
Pest Control: Check for any signs of insects or rodents. If you find any, clean the house thoroughly. You might need to take steps to deter them from nesting near or in the house.
Taking care of the house means it will continue to provide reliable shelter for many seasons to come. It’s a small effort for a big comfort to a needy animal.
Frequently Asked Questions About Outdoor Cat Houses
How big should an outdoor cat house be?
A good size for one cat is about 18 inches long, 15 inches wide, and 14 inches high (inside dimensions). This is cozy and helps hold body heat. It should be just big enough for a cat to turn around in.
What kind of wood is best for an outdoor cat house?
Cedar is excellent because it resists rot and insects naturally. Pine is a more affordable option but needs to be well-sealed. Exterior-grade plywood is also good for walls and the roof, as long as edges are sealed.
Do I need to insulate an outdoor cat house?
Insulation is highly recommended, especially in colder climates. It helps retain body heat in winter and keeps the house cooler in summer. Rigid foam board insulation is easy to install inside the walls.
How do I make sure the cat house stays dry?
Ensure the roof has a good slope and overhangs the walls to shed water. Raise the house off the ground on feet or blocks to prevent ground moisture. Proper ventilation also helps prevent condensation from building up inside.
Can I paint the inside of the cat house?
No, it’s best not to paint or seal the inside of the cat house. The fumes can be harmful to cats. Leave the interior natural wood to ensure it’s safe and healthy for them.
What is the best bedding for an outdoor cat house?
Straw is the best bedding. It provides good insulation and does not hold moisture like fabric. Cats can burrow into straw for warmth.
Avoid using blankets or towels directly as they can become damp.
Where is the best place to put an outdoor cat house?
Place the house in a sheltered location, away from direct wind and heavy rain. Elevate it off the ground. Consider sun exposure: some sun in winter for warmth, and shade in summer to prevent overheating.
Final Thoughts on Building for Your Cat
Building an outdoor cat house is a rewarding project. It’s a practical way to help local cats. It shows you care about their well-being.
By using simple plans and safe materials, you can create a cozy haven. This shelter will offer protection from the elements. Your efforts will provide comfort and safety.
It’s a project that makes a real difference.