How To Remove Painted Ceiling Popcorn Without The Mess
Dealing with painted popcorn ceilings can feel like a real headache. You see that bumpy texture, maybe it’s peeling a bit, or you just want a smooth, modern look. But then you remember: popcorn ceiling removal is known for being messy. Really messy. And when it’s painted, that mess can feel ten times worse. It’s like a giant, dusty cloud waiting to happen. I’ve been there, staring up at it, wondering if there was a cleaner way. Good news – there is. We’ll walk through how to tackle this job and keep your home as clean as possible.
Removing painted popcorn ceilings requires careful prep and the right techniques to control dust and ensure a smooth finish. This guide breaks down the process step-by-step, focusing on minimizing mess and achieving professional results in your home. You’ll learn how to prepare your space, safely scrape the material, and deal with the aftermath.
Understanding Painted Popcorn Ceilings
Popcorn ceilings, also known as acoustic ceilings, were super popular in homes for decades. They were added to help with sound. They also hid imperfections in the drywall or plaster.
Most original popcorn ceilings were made with paper or cardboard fibers. Sometimes, asbestos was used. That’s why testing is often a good first step.
When you paint over popcorn ceilings, it changes things. The paint acts like glue. It sticks the popcorn material to the ceiling.
This makes it harder to remove. It can also make the material heavier. This means more dust and debris can fall when you try to scrape it.
The paint seals the texture. So, water or scraping might not work the same way as on unpainted popcorn.
You might be wondering why you’d want to remove it. Painted popcorn ceilings can look dated. They can also collect dust and cobwebs more easily.
A smooth ceiling makes a room feel bigger and brighter. It’s a common upgrade that can really transform a space. But getting there means facing that mess.
My Own Popcorn Ceiling Nightmare (and How I Learned)
I remember one Saturday morning, about five years ago. I decided it was time. My living room ceiling was this faded, slightly yellowed popcorn texture.
It had been painted who knows how many times. I’d watched a few videos. They made it look easy.
Just spray with water and scrape. Simple, right? Wrong.
I grabbed my garden sprayer. I filled it with warm water. I started misting a section of the ceiling.
I waited a few minutes. Then, I got out my trusty putty knife. I put a drop cloth down.
A big one. I put on my mask and old clothes. I thought I was ready.
The first scrape was… okay. A few chunks came down. But most of it just smeared.
Then I tried a bit more water. The water started to drip down the walls. It made little mud streaks.
And the dust. Oh, the dust. It wasn’t a controlled fall.
It was like a mini-avalanche. It went everywhere. It puffed out from under the drop cloth.
It got on the furniture I thought I had covered. I ended up looking like a ghost. My dog, who was watching from the doorway, looked completely terrified.
That day taught me a lot about what not to do.
The Essential Steps: Preparation is Key
This is where most people mess up. They think they can just start scraping. But good prep work saves you hours of cleaning later.
It keeps the dust from spreading all over your home. It also makes the scraping process go much smoother. Think of it like getting ready for a big painting job.
You wouldn’t skip the drop cloths.
First, clear the room. Move all furniture out if you can. If you can’t move it, push it to the center of the room.
Cover everything with plastic sheeting or old drop cloths. Get it right up to the edges. You can use painter’s tape to secure it.
Tape is your friend here. It helps create a seal.
Next, protect the floors. Use heavy-duty plastic sheeting. Or, use canvas drop cloths.
Canvas is better because it won’t slide. It also absorbs moisture better. Overlap the edges of your drop cloths by several inches.
Tape them down to the baseboards. This creates a barrier. It stops dust and debris from creeping under.
Think about your walls too. The dust can stick to walls. You can cover the top 3-4 feet of your walls with plastic sheeting.
Tape it securely along the ceiling line. This will really help contain the mess. Don’t forget light fixtures and vents.
Cover them up too. You don’t want dust getting into electrical parts or your HVAC system.
Wear old clothes. Seriously. Even with all the protection, dust gets everywhere.
Wear a mask. A good quality dust mask is important. N95 is a good choice.
Your eyes need protection too. Wear safety glasses. This stops dust and debris from getting in your eyes.
Consider gloves. They keep your hands cleaner.
Your Pre-Scraping Checklist
Gather Your Tools:
- Plastic sheeting or drop cloths
- Painter’s tape
- Putty knife or drywall knife (6-inch wide is good)
- Scraper tool with a long handle (optional, but helpful)
- Garden sprayer or pump sprayer
- Warm water
- Bucket
- Ladder or sturdy scaffolding
- Safety glasses
- Dust mask (N95 recommended)
- Old clothes and gloves
- Trash bags (heavy-duty)
Prepare the Room:
- Remove or cover all furniture.
- Cover floors completely. Tape edges to baseboards.
- Cover walls and any fixtures.
- Ensure good ventilation but avoid strong drafts.
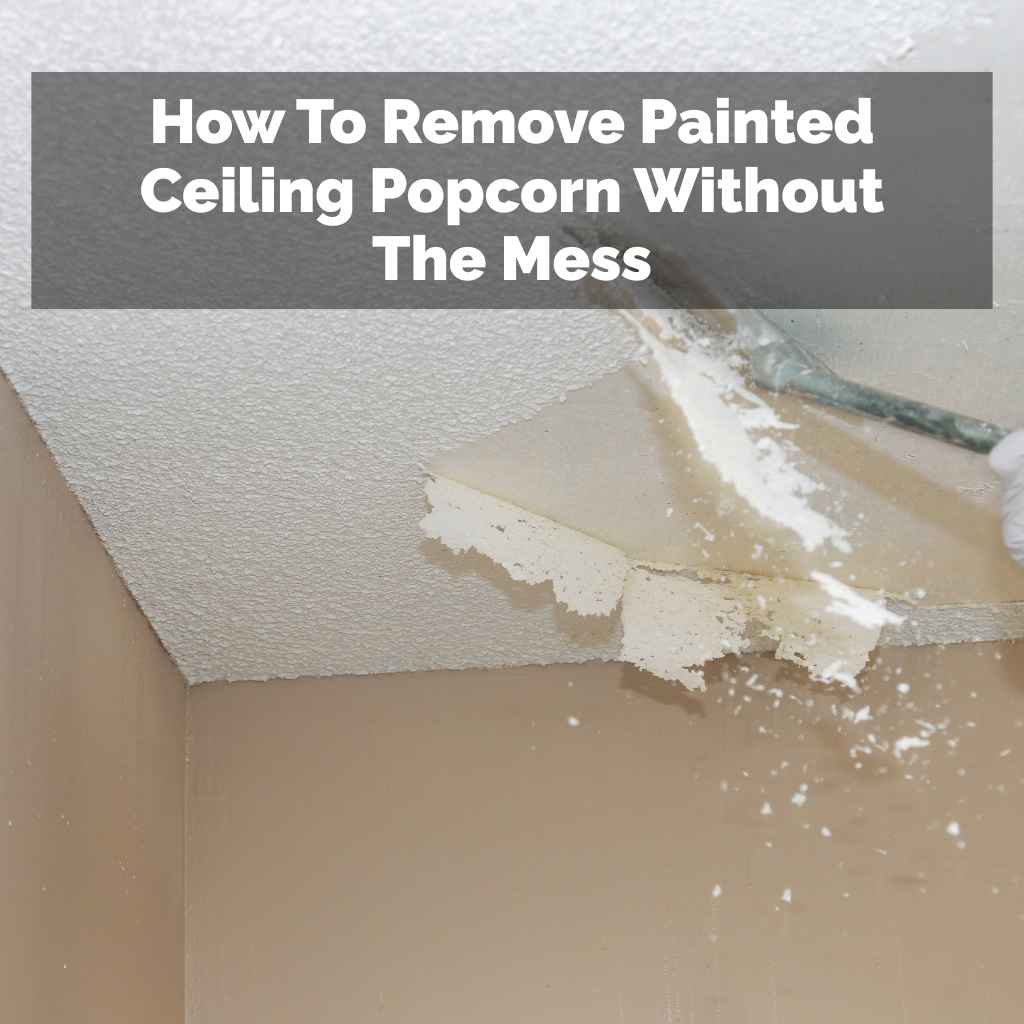
The Smear-Resistant Scraping Technique
Okay, you’re prepped. Now comes the scraping. The key to painted popcorn is not to just blast it with water.
Paint makes it tough. You need to soften it just enough. Too much water and it gets mushy and drips everywhere.
Too little, and it won’t budge.
Start with warm water. Put it in your sprayer. Lightly mist a small section of the ceiling.
About a 3-foot by 3-foot area. Wait for about 5-10 minutes. You want the water to soak in a bit.
It should soften the paint and the popcorn material. Don’t drench it. You’re not trying to make it fall off on its own.
Now, take your putty knife or scraper. Hold it at a shallow angle against the ceiling. Gently push it forward.
You want to get under the edge of the popcorn. If it’s softened enough, it should start to peel away. Work in small, overlapping strokes.
Try not to gouge the drywall underneath.
If the popcorn isn’t coming off easily, it needs more time or a little more water. Don’t force it. Forcing it will just cause more damage.
You might need to spray the same area again. Wait a few more minutes. Then try scraping again.
As you scrape, the material will fall. Try to direct it onto your drop cloths. Work your way across the ceiling.
Do one section at a time. This keeps the process manageable. It also helps you keep track of where you’ve been.
Scraping Tips for Painted Popcorn
Angle is Everything: Hold your scraper at a low angle (about 20-30 degrees). This helps lift the material without digging into the drywall.
Gentle Pressure: Use light, steady pressure. Let the water do most of the work.
Small Sections: Work in manageable areas, about 3×3 feet at a time. This prevents the water from drying out before you scrape.
Overlapping Strokes: Scrape in overlapping motions to ensure you get all the material.
Test First: Always test your water-to-scraping ratio on an inconspicuous area first.
Dealing with Stubborn Spots and Adhesives
Sometimes, no matter how much water you use, parts of the popcorn just won’t budge. This can happen if the paint is very thick. Or if there was a special adhesive used.
This is where a little extra effort comes in.
For really tough spots, you might need a specialized scraper. A drywall knife with a swivel head can be helpful. It lets you reach awkward angles.
Some pros use pole scrapers. These have long handles. They let you cover more area and apply even pressure from a distance.
Be careful with these. They can cause damage if used incorrectly.
Another trick is to use a wallpaper scoring tool. You can gently score the painted popcorn. This creates tiny holes.
The water can then penetrate deeper. Don’t press too hard. You don’t want to damage the drywall paper below.
If you suspect there might be old adhesive, water might not be enough. Some older adhesives are water-resistant. In extreme cases, you might need a specialized adhesive remover.
Always test these in a small spot first. And make sure the product is safe for use on drywall. Good ventilation is critical if you use strong chemicals.
Remember the goal is to remove the popcorn texture. You don’t want to damage the ceiling surface itself. If a spot is truly impossible to remove without major damage, you might have to consider skimming it with joint compound later.
But try all the gentle methods first.
When Scraping Gets Tough:
Test the Water: If scraping is hard, let the water sit a little longer. Or, try slightly warmer water.
Score and Soak: For very stubborn areas, gently score the painted surface with a scoring tool. Then, re-apply water and let it soak.
Use the Right Tool: A wider drywall knife or a pole scraper can help. But use them with care.
Consider Alternatives: If the material won’t budge without damage, you might need to plan for a skim coat later.
Cleaning Up the Aftermath: The Dust Buster
This is the part that makes people groan. Once you’re done scraping, you’ll have a mountain of debris on your drop cloths. The dust will have settled everywhere.
It’s time to tackle the cleanup.
First, carefully fold your drop cloths. Fold them inwards. This helps trap the dust and debris inside.
Carry them straight to your trash bags. Try not to shake them too much. Seal the bags tightly.
Now, for the dust on the floor. Use a shop vac with a fine dust filter. Vacuum all the debris from the drop cloths.
Then, vacuum the entire floor area. Pay close attention to the corners and edges where dust collects.
Next, use a damp cloth or sponge. Wipe down all the surfaces. This includes baseboards, window sills, and any furniture that was left in the room.
You’ll be surprised how much dust is still there. Damp wiping is much better than dry dusting. It traps the fine particles.
Wipe down the walls carefully. Start from the top and work your way down. Use a sponge or a microfiber cloth.
Rinse your cloth often. You want to remove any dust that may have settled on the walls. Don’t forget light switches and outlet covers.
If you used plastic sheeting on the walls, carefully take that down next. Fold it inwards as you did with the drop cloths. Dispose of it with the trash.
Cleanup Strategy: Minimize the Spread
Contain the Debris: Carefully fold drop cloths inwards to trap material before bagging.
Shop Vac is Your Friend: Use a shop vac with a good filter for floors and any lingering debris.
Damp Wipe Everything: Use damp cloths or sponges to capture fine dust from surfaces, walls, and baseboards.
Ventilate: Open windows after the main cleanup to air out the room.
Dealing with the Naked Ceiling: What’s Next?
Once the popcorn is gone, you’ll see your ceiling. It might look a bit rough. There might be minor gouges or uneven spots.
This is normal. The next step is to make it smooth and ready for paint.
Inspect the ceiling surface carefully. Look for any imperfections. Small scrapes or holes can usually be fixed with a bit of joint compound.
You can use a drywall mud knife to apply it. Spread a thin layer over the damage. Let it dry completely.
Then, sand it smooth.
For a truly smooth finish, you might need to apply a skim coat. This involves applying a very thin layer of joint compound over the entire ceiling. This is often called “mudding.” It’s a bit of a skill.
You can do it yourself, but it takes practice. If you’re not comfortable with this, you might want to hire a drywall professional for this step.
Once the ceiling is smooth and all patches are dry, it’s time to sand. Use fine-grit sandpaper. You can use a sanding pole with sandpaper attached.
This makes sanding the ceiling much easier. Wear your dust mask and safety glasses. Sand until the surface is smooth to the touch.
After sanding, wipe down the ceiling again with a damp cloth. This removes all the sanding dust. Then, you’re ready for primer and paint.
Use a good quality primer. Then apply your chosen ceiling paint. Two coats are usually best for a smooth, even finish.
Post-Scrape Ceiling Makeover
Inspect for Damage: Look closely for any scrapes, gouges, or uneven areas.
Patch and Repair: Use joint compound to fill small holes and imperfections. Let it dry fully.
Sand Smooth: Gently sand all patched areas and the entire ceiling surface until it feels smooth.
Prime and Paint: Apply a quality primer followed by two coats of your desired ceiling paint for a fresh, modern look.
When to Call a Professional
While removing painted popcorn ceilings can be a DIY project, there are times when it’s smarter to hire someone. If your home was built before 1980, there’s a chance the popcorn contains asbestos. You absolutely must have it tested by a professional.
Asbestos is dangerous if disturbed.
If the test comes back positive for asbestos, do not attempt to remove it yourself. You need a licensed asbestos abatement company. They have the special equipment and training to remove it safely.
The cost might seem high, but your health is worth it.
Even if there’s no asbestos, consider hiring a pro if you have very high ceilings. Working on a ladder for extended periods can be dangerous. Also, if you have large rooms or multiple rooms to tackle, the time commitment can be huge.
A professional can do the job faster and more efficiently.
If your ceiling has significant water damage or structural issues, it’s also a good idea to call in experts. They can assess the damage and recommend the best course of action. Sometimes, a simple scrape isn’t enough.
You might need repairs to the drywall or plaster itself.
Frequently Asked Questions About Painted Popcorn Ceilings
Is it safe to remove painted popcorn ceilings myself?
It can be safe if you take proper precautions. The biggest concern is asbestos in older homes. Always test for asbestos before starting.
If it’s clear, wear protective gear and control dust. Good ventilation is key.
How long does it take to remove painted popcorn ceilings?
This varies greatly. For a standard 10×12 foot room, it can take 4-8 hours for scraping and cleanup. Then, add time for repairs, sanding, priming, and painting.
If you hire someone, it might take them 1-2 days for the removal part.
What’s the best way to get rid of the dust?
The best method is to use plastic sheeting and drop cloths to cover everything. Fold them carefully inward when done. Use a shop vac with a HEPA filter for floors.
Damp wipe all surfaces afterward. Good ventilation also helps.
Can I use a power sander on the ceiling after scraping?
A power sander can work, but be very careful. It can easily remove too much drywall material or create deep scratches. Hand sanding with a pole sander is often safer for beginners.
Always wear a good dust mask and safety glasses.
What if the paint makes the popcorn too hard to scrape?
If the paint is making it difficult, try misting the ceiling with warm water and letting it soak longer (10-15 minutes). You might also gently score the painted surface with a scoring tool to help water penetrate. Don’t force it; you could damage the drywall.
Will removing painted popcorn damage my drywall?
It’s possible. If you scrape too aggressively or use too much water, you can damage the drywall paper. Minor damage can be patched with joint compound.
Significant damage might require more extensive repairs or even replacement of drywall sections.
Final Thoughts on a Smoother Ceiling
Removing painted popcorn ceilings is a project. It requires patience and careful work. But the reward is a clean, modern look.
By preparing well and using the right techniques, you can minimize the mess. You can get a smooth, beautiful ceiling. Enjoy your updated space!