How To Remove Dry Acrylic Paint From Brushes Easily
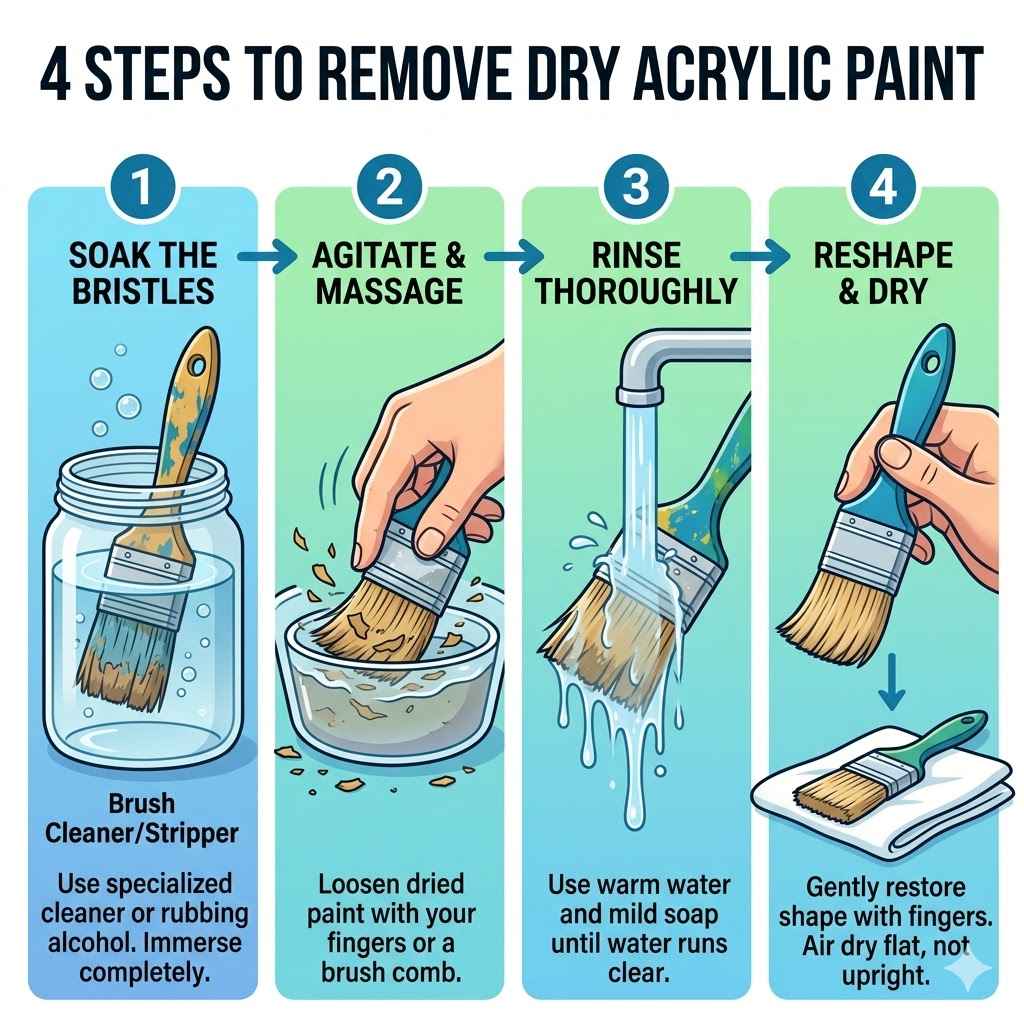
You can remove dry acrylic paint from brushes using a few common household items and a bit of patience. The process usually involves soaking the bristles to soften the hardened paint, then gently working it out with your fingers or a comb. Several solutions can help, from plain soap and water to stronger solvents like rubbing alcohol or even specialized brush cleaners.
Understanding Why Acrylic Paint Hardens
Acrylic paint is water-based when wet. This means you can easily clean your brushes with just soap and water right after you use them. It’s quick and simple.
But once acrylic paint dries, it changes. It becomes a plastic-like film. This film is very strong and sticks to the brush fibers.
It doesn’t dissolve in water anymore. That’s why a brush left uncleaned can become stiff. The pigment particles and the acrylic binder form a hard shell.
This hardening process is the paint’s strength when it’s on your canvas. It makes artwork durable. However, it’s the bane of a painter’s existence when it gets stuck in brush bristles.
The longer the paint sits, the harder it becomes. It pushes deep into the ferrule (the metal part) and the base of the bristles. This makes it even tougher to remove.
Think of it like cement drying; the longer it sits, the more solid it gets.
Many artists, especially beginners, learn this lesson the hard way. They might get distracted or forget to clean their brushes right away. Life happens.
A phone call, a sudden need for a snack, or just finishing a section and stepping away can lead to this problem. It’s not a sign of being a bad artist. It’s just a part of the learning curve with acrylics.
The good news is that knowing why it happens helps us understand how to fix it.
My Brush Nightmare: A Personal Story
I remember one time, years ago, I was working on a large landscape. The sky needed this perfect blend of blues and purples. I mixed a batch of paint and applied it, but something felt off.
I needed a slightly different shade. I grabbed a clean brush, mixed the new color, and applied it. Then, I got a call from my mom.
It was a long chat about family stuff. I put the phone down, got engrossed in another part of the painting, and completely forgot about the brushes I’d just used.
Hours later, I went to put my supplies away. I picked up one of those brushes. It felt…odd.
Stiff. Rock solid. My heart sank.
It was my favorite flat brush, the one with the perfect spring. I tried running it under water, but it was no use. The paint was like a hard helmet on the bristles.
I panicked a little. I thought, “That’s it. This brush is done for.” I felt so annoyed with myself.
It was a silly mistake, but it cost me a beloved tool.
I almost threw it in the trash. But then I remembered reading about different cleaning methods. I decided to give it a shot.
It took time and a few tries, but I managed to save it. That experience taught me a lot. It showed me that even seemingly hopeless situations with paint can often be fixed.
It also taught me to never leave wet acrylic paint on brushes for too long. The memory of that stiff brush still makes me shiver a bit, but it’s a good reminder.
When Your Brushes Feel Like Rocks
Dry acrylic paint acts like a tiny plastic coating. It seals the bristles together. This makes them stiff and unusable for painting.
It can happen in a few hours or overnight. The key is to break down this plastic coating. You need to soften it so you can remove it without damaging the brush.
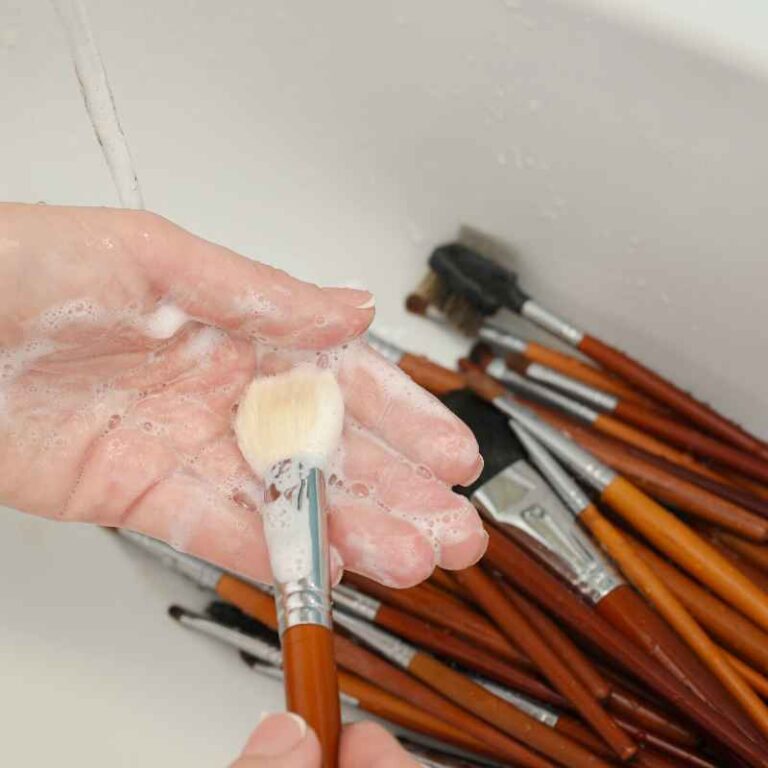
The Gentle Approach: Soap and Water Soak
Sometimes, the simplest solutions are the best. This method works best for paint that hasn’t been dry for too long. Or if you caught it early before it became rock-hard.
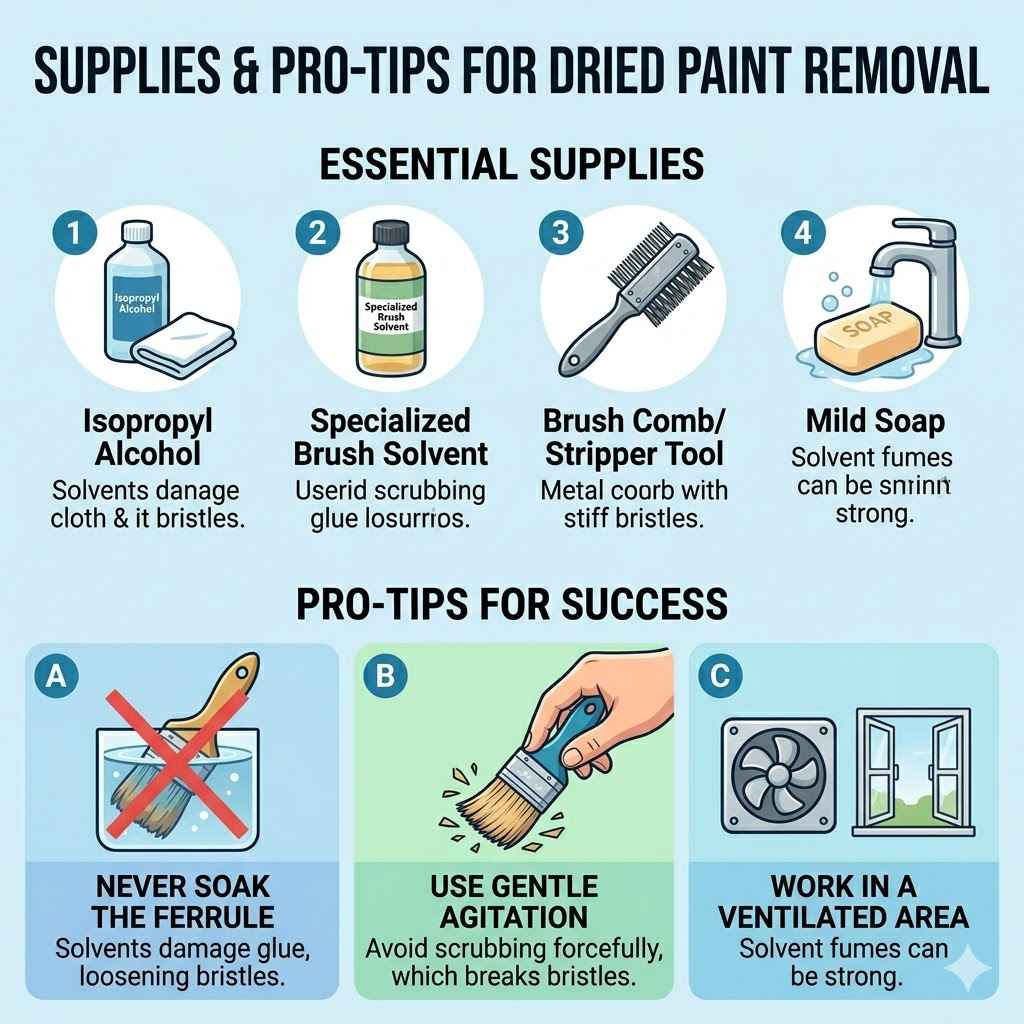
You’ll need mild soap. Dish soap like Dawn is great. It cuts through grease and grime.
It also helps lift the paint particles.
Start by getting some lukewarm water. It shouldn’t be too hot, as that can damage the brush glue. Fill a cup or a small bowl with the water.
Add a good squirt of dish soap to the water. Swish it around to make some bubbles. Now, dip the brush into the soapy water.
Make sure the water covers the bristles up to the ferrule. Let it soak for about 10 to 20 minutes. You should see some of the paint start to loosen.
After soaking, gently work the bristles with your fingers. Try to loosen any paint that’s clinging to them. You can also use a comb or a palette knife very carefully.
Be gentle. You don’t want to bend or break the bristles. If some paint comes out, rinse the brush under clean water.
Then, repeat the soaking process if needed. Sometimes, a second or third soak is necessary. This patient method is good for the brush’s health.
It’s also very safe.
Quick Scan: Basic Brush Revival
- What you need: Mild dish soap, lukewarm water, small bowl.
- Step 1: Mix soap and water.
- Step 2: Soak brush for 10-20 minutes.
- Step 3: Gently work bristles with fingers.
- Step 4: Rinse and repeat if needed.
Stepping It Up: Rubbing Alcohol’s Power
When soap and water aren’t quite cutting it, rubbing alcohol is a good next step. Isopropyl alcohol (70% or 91%) is readily available. It’s a solvent.
It can break down the acrylic binder more effectively than soap. This method is a bit stronger, so use it with care.
First, try to scrape off any loose, chunky paint with a paper towel or a soft cloth. Don’t force it. Then, pour some rubbing alcohol into a shallow container.
You don’t need a lot, just enough to dip the bristles. Submerge the bristles into the alcohol. Swirl the brush gently.
You should see the paint start to dissolve and bleed into the alcohol.
Let the brush soak for about 5 to 10 minutes. Keep an eye on it. You can gently work the bristles with your fingers again.
If the paint is stubborn, you might need to dip it again or add more alcohol. Once most of the paint is out, rinse the brush thoroughly with water. Follow up with a good wash using soap and water.
This helps remove any alcohol residue. Rubbing alcohol is effective but can be drying. So, the final soap wash is important.
I’ve used this method many times. It’s incredibly satisfying to see the colors lift off. It feels like magic.
One time, a whole palette knife got crusted over. I used rubbing alcohol, and it dissolved the thick acrylic layers. Brushes are smaller, so it’s usually quicker.
Just remember to work in a well-ventilated area. Alcohol fumes can be strong.
Contrast Matrix: Alcohol vs. Soap
Normal Use:
- Soap & Water: Best for fresh paint, gentle cleaning, regular maintenance.
- Rubbing Alcohol: Good for slightly older, tougher paint. Acts as a mild solvent.
When to Worry:
- Soap & Water: If paint doesn’t budge after a few soaks, try something else.
- Rubbing Alcohol: If you notice bristles becoming brittle or losing shape after use, reduce soaking time or try less often.
When Paint is Really Stuck: Denatured Alcohol or Brush Cleaner
For those truly “oh no” moments, when acrylic paint has hardened for days or weeks, you might need something stronger. Denatured alcohol is a more potent solvent than rubbing alcohol. Specialized brush cleaners are also formulated for this exact problem.
These are excellent options for stubborn, dried-on paint.
Denatured alcohol can be found at hardware stores. It’s typically used for cleaning paint brushes and tools. Pour a small amount into a glass container.
Carefully dip the brush bristles into the denatured alcohol. Let it soak for a few minutes. The paint should start to break down more quickly.
You might see chunks of paint dissolving. Gently work the bristles with your fingers or a brush comb.
Brush cleaners are often sold in art supply stores. They come in liquid or gel form. Follow the product’s instructions carefully.
Most involve soaking the brush. Then, working the softened paint out. These cleaners are designed to be effective without being overly harsh on the brush.
They often contain conditioners too. This helps protect the bristles.
After using denatured alcohol or a brush cleaner, it’s crucial to rinse the brush thoroughly. Then, wash it well with soap and water. This removes all traces of the solvent.
These stronger methods can dry out bristles if used too often. So, they are best saved for serious paint emergencies. Think of them as the heavy-duty rescue squad for your brushes.
Stacked Micro-Sections: Powerful Paint Removers
Denatured Alcohol: A strong solvent found in hardware stores. Excellent for tough, dried paint. Use in a well-ventilated area.
Requires thorough rinsing afterward.
Specialized Brush Cleaners: Available at art supply stores. Formulated specifically for acrylic paint. Often include conditioning agents.
Always follow product directions.
Important Note: Both these options can be harsh. Use them sparingly. Always finish with soap and water washing.
The Vinegar Trick: A Natural Solvent Alternative
Some artists prefer to avoid harsh chemicals. White vinegar can be a surprisingly effective, natural cleaner for dried acrylic paint. Vinegar is acidic.
This acidity can help to break down the acrylic binder. It’s gentler than alcohol but still packs a punch.
You can use plain white vinegar. Heat it up slightly in a saucepan or microwave. It should be warm, not hot.
Hot water can damage brushes. Pour the warm vinegar into a jar or cup. Submerge the bristles of the brush into the warm vinegar.
Let it soak for at least 30 minutes. For very stubborn paint, you might need to soak it for an hour or even longer.
After soaking, take the brush out. Gently work the softened paint out of the bristles. You can use your fingers.
A stiff brush or a comb can also help. You should see the paint start to loosen and wash away. Rinse the brush well under warm water.
Follow up with a good scrub using mild soap. Vinegar has a strong smell. The final soap wash helps to get rid of it.
I’ve found the vinegar method to be quite effective. It’s also reassuring to use something that’s not a strong chemical. It’s a great option if you have sensitive skin or want to keep your workspace less toxic.
Plus, most people have vinegar in their kitchen already. It’s a readily available solution for a common art problem. The smell is the only downside for some.
Observational Flow: Vinegar Cleaning Steps
Preparation: Heat white vinegar until warm (not hot).
Soaking: Place brush bristles into the warm vinegar. Let soak for 30 minutes to over an hour.
Gentle Removal: Work paint loose with fingers or a comb.
Rinsing: Rinse brush thoroughly with warm water.
Final Wash: Clean with mild soap and water to remove vinegar residue and scent.
Tools That Help (Besides Your Fingers!)
While your fingers are your primary tools for working out the paint, a few other items can make the job easier. These tools help you get into the bristles and lift the softened paint.
A palette knife can be very useful. Use the edge of the knife gently. Scrape away softened paint from the sides of the bristles.
Be careful not to gouge the bristles. A metal comb designed for hair can also work. Its fine teeth can comb through the bristles.
This helps to untangle and remove paint bits. You can find these in art stores or beauty supply shops.
A dedicated brush comb or rake is another option. These are designed for artists. They have sturdy teeth that can handle stiff bristles.
They help to pull out softened paint. Some artists also use a stiff toothbrush. It can be good for scrubbing the ferrule area where paint can build up.
When you’re trying to get paint out, think about untangling knots in hair. You use a comb and work from the ends up. It’s similar with paint.
Work the loosened paint from the tip of the bristles back towards the ferrule. Be patient. Rushing can damage the brush.
Quick-Scan Table: Helpful Brush Cleaning Tools
| Tool | Use | Caution |
| Palette Knife | Scraping softened paint from sides | Be gentle; avoid cutting bristles |
| Hair Comb (fine-toothed) | Combing out loosened paint | Work from tips to ferrule |
| Brush Comb/Rake | Untangling and removing paint | Designed for brushes, generally safe |
| Stiff Toothbrush | Scrubbing ferrule area | Use light pressure |
Real-World Context: Where Things Go Wrong
Why do brushes get so badly damaged? It often comes down to a few common habits. One is simply forgetting.
You finish painting for the day, and the brushes get left out. They might be sitting in a jar of water, which seems like a good idea. But water alone won’t dissolve dry acrylic paint.
Over time, the paint hardens around the bristles.
Another issue is using the wrong cleaning method while the paint is still wet. Some artists might use harsh solvents too early. This can strip the natural oils from the bristles.
It makes them brittle. Or they might scrub too hard. This damages the bristle shape.
The goal is to clean them gently when wet. This prevents the need for harsh cleaning later.
The environment also plays a role. If you live in a dry climate, paint can dry out faster. This makes it harden quicker on your brushes.
If you are painting outdoors, dust and debris can get into wet paint. This makes it harder to clean later. Understanding these common pitfalls helps you avoid them.
It’s about developing good studio habits.
What This Means for You: When to Worry
Most of the time, dried acrylic paint can be removed. Your brushes can be saved. The key is acting relatively quickly and using the right method.
So, when should you start to worry?
You should worry if the paint has been completely hardened for a very long time. We’re talking weeks or months. If the bristles feel brittle and are starting to splay out permanently, the damage might be too severe.
Also, if you’ve tried multiple methods, including stronger solvents, and the paint won’t budge, it might be time to let go.
A simple check is to feel the bristles. Are they still flexible? Do they spring back when bent?
If yes, there’s a good chance you can restore them. If they feel stiff, cracked, or like they might break, they’re likely beyond saving. Don’t feel bad if a brush is beyond repair.
It happens to every artist at some point. It’s a part of the journey. Focus on learning from it for future cleaning.
Split Insight Panel: Brush Health Check
Normal: Bristles are soft, flexible, and return to shape when bent.
Concerning: Bristles are stiff, brittle, splayed out permanently, or show signs of cracking. Paint is completely solid and won’t soften with mild treatments.
Quick Fixes & Tips for Prevention
The best way to deal with dry acrylic paint on brushes is to prevent it from happening in the first place. Here are some simple tips. They will save you a lot of time and frustration:
- Clean Brushes Immediately: This is the golden rule. As soon as you finish using a brush, wash it. Use soap and water. Rinse it thoroughly. Don’t let paint dry on it.
- Keep a Water Jar Handy: While painting, keep brushes in a jar of clean water. This keeps the paint wet. Change the water often.
- Use a Brush Keeper: For longer breaks, use a brush keeper. This is a device that holds brushes upright in water. It keeps the bristles from touching the bottom of the container.
- Wipe Brushes Dry: After washing, gently squeeze out excess water with a paper towel. Reshape the bristles.
- Store Brushes Properly: Once dry, store brushes bristle-up in a jar or brush holder. Avoid letting them lie flat or have heavy objects on top of them.
- Invest in a Brush Soap: A good brush soap is designed to clean and condition bristles. It helps prolong the life of your brushes.
These preventative measures are simple but incredibly effective. They ensure your brushes stay in good condition. They perform better for longer.
Think of them as small acts of kindness to your tools. They will thank you with better painting results.
Frequent Questions About Dry Acrylic Paint on Brushes
Can I save a brush that is completely hardened with dried acrylic paint?
Often, yes! While it takes effort, soaking the bristles in a solvent like rubbing alcohol, denatured alcohol, or white vinegar can soften and dissolve the hardened paint. Follow up with a good soap and water wash.
Some brushes, especially if left for weeks or months, might be too damaged to fully recover.
What is the fastest way to remove dried acrylic paint from brushes?
While speed is tempting, patience is key for brush safety. For fast results on moderately dry paint, rubbing alcohol or a dedicated brush cleaner often work quickly. Soak for a few minutes, then gently work the paint out.
Always follow with a thorough soap and water rinse.
Is it safe to use nail polish remover on my brushes?
Nail polish remover, especially acetone-based ones, is a strong solvent. It can break down dried acrylic paint. However, it can also be very harsh on brush bristles and glue.
It can make them brittle or even melt the glue holding the ferrule together. It’s generally better to use specialized brush cleaners, denatured alcohol, or white vinegar for safety.
How long should I soak my brushes in cleaning solution?
Soaking times vary. For mild soap and water, 10-20 minutes is usually enough to start. For rubbing alcohol or white vinegar, you might need 30 minutes to an hour.
For very tough, old paint, denatured alcohol or brush cleaners might require just a few minutes, or as directed on the product. Always check the brush periodically.
Can I use a wire brush to clean dried acrylic paint?
Absolutely not. A wire brush is too harsh. It will shred and damage your brush bristles.
You will ruin the brush’s shape and texture. Always use gentle methods and tools like your fingers, a soft comb, or a palette knife very carefully.
What should I do after removing dried paint from my brushes?
After successfully removing the dried paint, always wash the brush thoroughly with mild soap and lukewarm water. This removes any residual cleaning solution and restores the bristles. Reshape the bristles with your fingers, then let the brush air dry completely.
Store it bristle-up.
Conclusion: Brushes Saved!
Dealing with dried acrylic paint on your brushes can feel like a crisis. But as you’ve seen, it’s a problem with many solutions. From simple soap and water to stronger solvents, you have the tools.
You have the knowledge to rescue most of your beloved brushes. Remember that prevention is always the easiest route. Cleaning brushes right after use saves them.
It saves you effort later. So, don’t despair the next time you find a stiff brush. Try these methods.
You’ll be painting again in no time. Happy cleaning and happy painting!