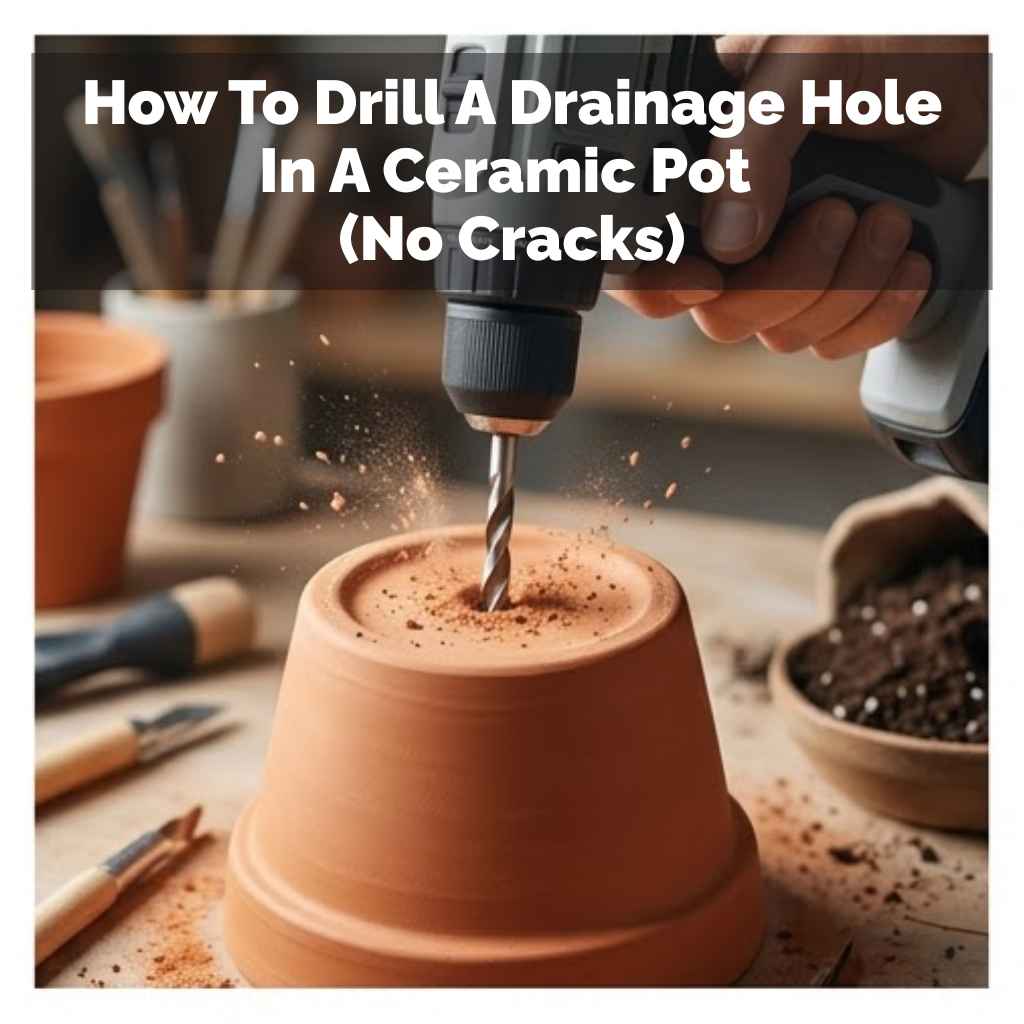
How To Drill A Drainage Hole In A Ceramic Pot (No Cracks)
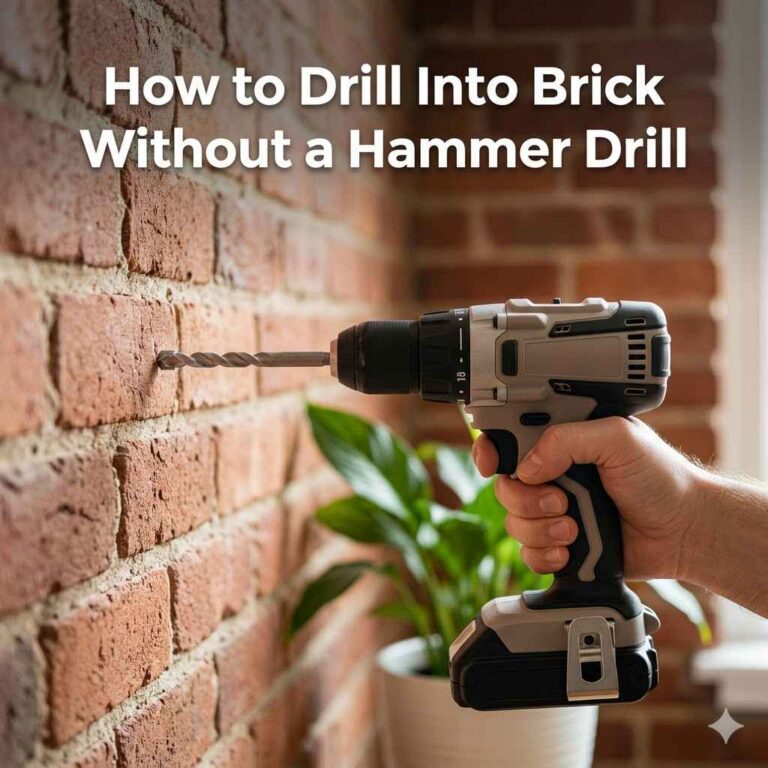
Drilling a drainage hole in a ceramic pot without cracking it involves using the right drill bit, controlling speed, and applying steady, light pressure. Start with a small pilot hole and gradually widen it to prevent stress fractures, ensuring the pot is stable and kept wet throughout the process.
Understanding Ceramic Pots and Drainage
Ceramic pots are lovely. They come in many shapes and colors. They can be glazed or unglazed.
Most are made from clay. This clay is fired in a kiln. This makes it hard.
But ceramic can still break. Especially when you drill into it. The main reason for a hole is drainage.
Plants need water. But they don’t like wet feet. Too much water can cause root rot.
This kills the plant. A drainage hole lets extra water escape. It keeps the soil healthy.
It helps air reach the roots too. This is super important for plant health. Many pots are made without holes for looks.
Or sometimes they are made as cache pots. These are decorative covers. They don’t have holes.
Adding a hole changes it to a planter. It makes it much more useful.
Why do some pots lack holes? Often, it’s for aesthetic reasons. Potters might design them to be purely decorative.
Or they might be intended as cachepots, holding another pot with drainage inside. The charm of a pot can sometimes overshadow its practicality for plant life. People often buy them because they look so good.
Then they realize the problem. Their plant starts to struggle. This is when the need for a drainage hole becomes clear.
It’s a very practical need for plant lovers. It’s a shame to see a plant suffer because of a pot. Making the change is often simpler than you think.
My First Cracked Pot Incident
I remember my first attempt. I was so excited about a new succulent. It needed a specific pot.
I found a small, deep ceramic one. It looked perfect. But no hole.
I felt a little nervous. I grabbed my regular drill. I had a standard wood bit.
I thought it would be fine. I put the pot on my workbench. I pressed the drill bit to the bottom.
I started drilling. It was loud. The drill felt like it was fighting me.
Then, a small crack appeared. I stopped. The crack grew quickly.
Within seconds, the pot was in two pieces. I was so upset. My beautiful new pot was ruined.
My succulent didn’t get its new home. It felt like a failure. I almost gave up on drilling holes forever.
But I knew there had to be a better way.
That day taught me a lot. It showed me I needed the right tools. And I needed to be much more careful.
It wasn’t just about brute force. It was about technique. I felt so disappointed.
The pot was gorgeous. It was a deep blue glaze. It looked expensive.
And I broke it in under a minute. That feeling is hard to shake. It makes you hesitant to try again.
You think, “What’s the point?” But the plant’s needs are real. It needs a healthy environment. So, I decided to research.
I learned about special drill bits. I learned about speed and pressure. I learned about keeping things cool.
It made all the difference. The next pot I tried turned out perfectly. It was still a little scary, but I knew what I was doing.
The Right Tools for the Job
To avoid breaking your pot, you need the right gear. Forget your old wood bits. They will just shatter the ceramic.
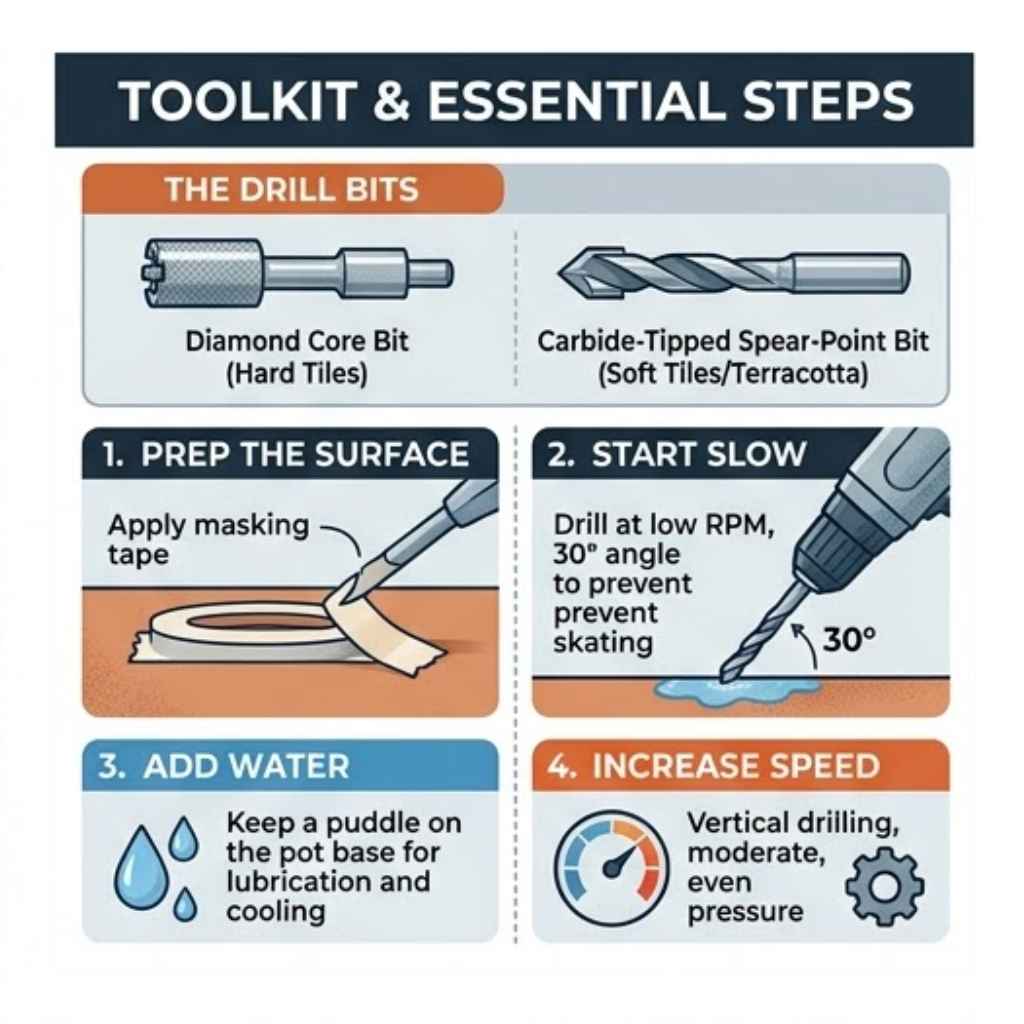
You need a special type of drill bit. These are called diamond-tipped drill bits. Or sometimes they are called carbide-tipped drill bits.
They are made for hard materials. Things like tile, glass, and stone. These bits cut through ceramic slowly.
They don’t try to rip through it. This is key. You also need a drill.
A standard corded or cordless drill works fine. Make sure it has adjustable speed. Slow speed is your friend here.
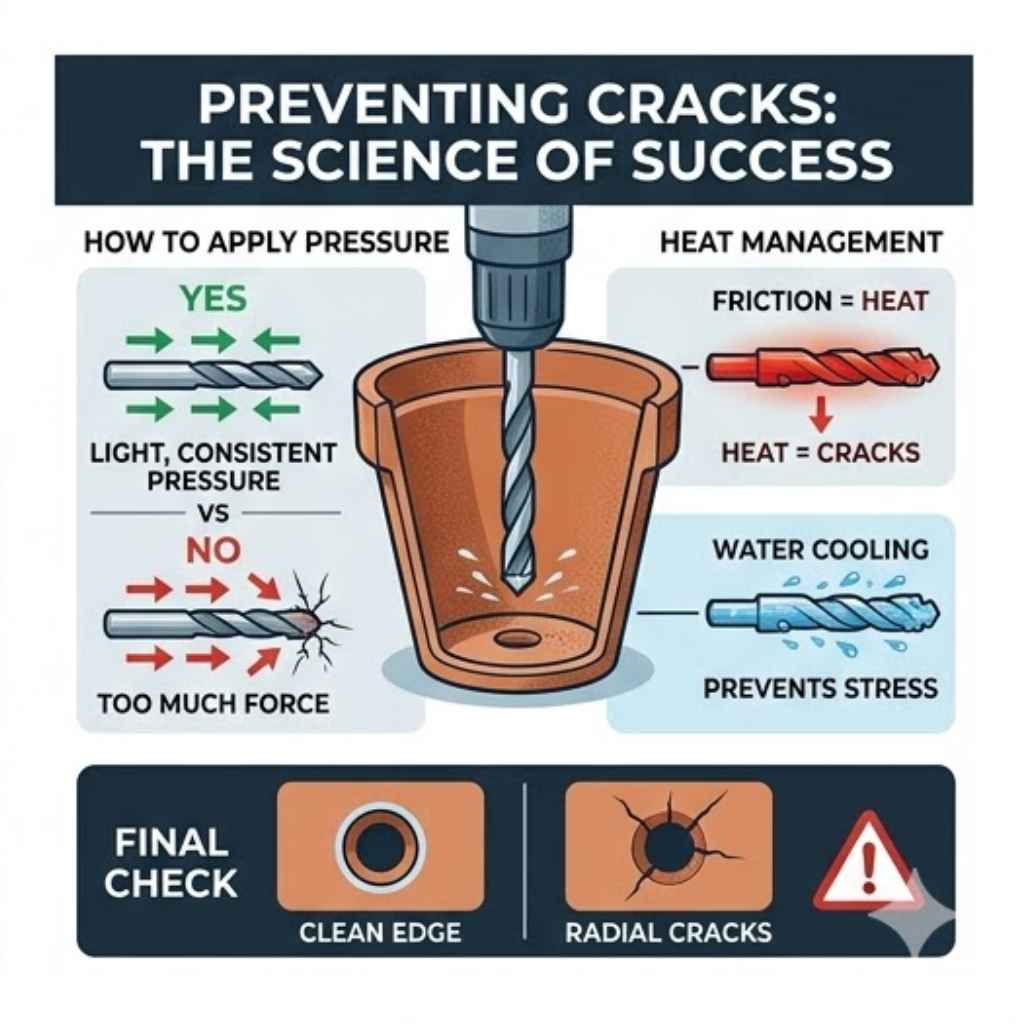
Too fast will generate heat. It can cause the ceramic to crack from the heat. Or it can just be too much force.
What else do you need? Safety glasses are a must. Ceramic dust can fly.
You don’t want that in your eyes. Gloves are a good idea too. They help you grip the pot.
They protect your hands. You’ll need some water. A spray bottle is perfect.
Or a small cup. Water cools the drill bit. It also helps wash away dust.
This keeps the drilling smoother. It prevents the bit from getting too hot. This is very important for preventing cracks.
Think of it like lubrication. It helps everything run better. And it’s safer for the pot.
So, gather these items. They will make the job much easier and safer.
Essential Drilling Supplies
What You Need:
- Diamond-tipped drill bit (sized for your hole)
- Power drill with variable speed
- Safety glasses
- Work gloves
- Water (spray bottle or cup)
- A stable surface
- Masking tape (optional, for marking)
Preparing Your Ceramic Pot
Before you start drilling, prep is important. First, choose where you want the hole. Most pots have a flat-ish bottom.
Pick a spot away from the edge. The center is usually best. Make sure the spot is clear of any decorations.
Or thick glaze. You don’t want to hit a bubble. If the bottom is curved, try to find the flattest part.
This gives you a stable surface for the drill bit.
Some people like to mark the spot. Use a pencil or a piece of masking tape. This helps guide the drill bit.
Especially when you start. The diamond bit can slip easily. Masking tape can also help reduce chipping.
It gives the bit something to grip onto. Make sure the pot is clean. Remove any dirt or debris.
This helps the bit grip better. And it keeps the dust down. A clean pot is a happy pot.
And a happy pot is less likely to crack.
Stability is crucial. Your pot must not move. Not even a little bit.
You can place it on a non-slip mat. Or wrap a towel around it. Then place the towel on your work surface.
This stops it from sliding. It also cushions it. If it does tip, it won’t hit the ground.
You can also ask someone to hold it. But be careful. Holding it yourself is often safer.
You control the pressure better. Make sure you are comfortable. Set up your workspace in a well-lit area.
You need to see what you are doing. This makes the whole process feel more secure.
Prep Steps Checklist
- Choose hole location (center, flat area).
- Mark the spot (optional, with tape or pencil).
- Clean the pot.
- Ensure the pot is stable (non-slip mat, towel).
- Work in a well-lit area.
The Drilling Process: Step-by-Step
Now for the actual drilling. It’s not hard if you go slow. First, put on your safety glasses.
And your gloves. Place the pot on its prepared stable surface. Hold the drill steady.
Start the drill at its slowest setting. This is very important. Gently bring the drill bit to your marked spot.
Don’t push hard. Just let the bit make contact. You want to create a small divot.
This gives the bit something to sit in. It stops it from wandering.
Once you have a small divot, you can start drilling. Keep the speed slow. Apply light, steady pressure.
Let the drill do the work. Don’t force it. Imagine you are grinding away the ceramic.
Not forcing your way through. Keep the drill bit cool. Spray a little water on the spot as you drill.
Or dip the bit in water now and then. You will see dust and water mix. This is normal.
It’s called slurry. It means you are cooling and cleaning. Continue drilling.
You will feel less resistance as you get closer to breaking through.
When you are about halfway through, you can stop. Take the pot off the drill. Flip it over.
Now, carefully drill from the other side. This helps prevent chipping on the exit side. It creates a cleaner hole.
The two drilled parts should meet in the middle. Continue drilling slowly and with light pressure. Spray water as needed.
Once the bit breaks through, stop immediately. Don’t keep drilling. You’ve made it!
The hole is there. You’ve done it without breaking your beautiful pot.
After you finish, gently rinse the pot. This washes away any remaining dust. You can use a small brush to clean the edge of the hole.
If there are any rough edges, you can smooth them. A piece of sandpaper can work. Or a small sharpening stone.
Just rub gently around the inside edge. Make sure it’s smooth enough not to snag roots. Most of the time, it’s fine as is.
The slurry and slow drilling usually create a smooth enough edge. But it’s always good to check. A little extra care goes a long way for the plant’s health.
Drilling Tips Recap
- Always wear safety glasses.
- Start with slow drill speed.
- Use light, steady pressure.
- Keep the drill bit and spot wet.
- Drill from both sides to prevent chipping.
- Stop as soon as you break through.
- Smooth rough edges if needed.
Alternative Methods and Considerations
What if you don’t have a diamond-tipped bit? Or you are still very worried about cracking? There are other ways.
One is using a rotary tool like a Dremel. These tools have very small bits. You can use a grinding bit.
It works much like a drill bit. But it’s slower. And you have more control.
You’d still need to keep it wet. And go very slowly. It’s a good option for very small pots or delicate ceramic.
Another method is to score the surface first. Use a glass cutter. Or a very sharp carbide tool.
Score a circle where you want the hole. Then use a small diamond bit. Start drilling inside the scored circle.
This might help guide the bit. It can give you a cleaner start. However, this is more advanced.
And still carries risk. For most people, the diamond drill bit is the best and safest way.
What about very old or valuable pots? If a pot is an antique or very expensive, you might want to rethink drilling. The risk of damage is higher.
And it might devalue the item. In these cases, it’s often better to use the pot as a cachepot. Or find a different pot for your plant.
If the pot is very thin-walled ceramic, it’s also riskier. Thicker pots are much more forgiving. Always assess your pot.
And your comfort level. If in doubt, err on the side of caution. There’s no shame in choosing not to drill.
When to Choose an Alternative:
- Pot is very old or valuable.
- Pot has very thin walls.
- You lack the proper drill bits.
- You prefer maximum control (rotary tool).
Real-World Scenarios and Successes
I’ve helped friends drill holes in their pots too. Sarah had a gorgeous terracotta planter. It was quite large.
She wanted to plant a small tree in it. But it had no drainage. We used a larger diamond bit.
About a 1/2 inch size. She was so nervous. We laid the pot on its side.
I held the drill steady. She sprayed water. It took a bit longer.
But we went slow. We drilled from both sides. It worked perfectly.
She was so relieved. Now her little tree has room to grow.
Then there was Mike. He had a set of small ceramic succulent pots. They were all the same size.
He wanted to pot up his collection. We used a small, 1/4 inch diamond bit. He did most of them himself.
He followed the advice: slow speed, light pressure, water. He told me later he did three pots. And all of them turned out great.
No cracks. He was so proud. He said it felt empowering.
Like he could finally use all his pretty pots. It’s really rewarding to see people gain confidence. And save their plants.
This simple skill makes a big difference for plant parents.
I’ve also seen people get creative. Some people use multiple small holes. Instead of one big one.
This can look nice. And it works just as well for drainage. You’d drill 3 or 4 smaller holes.
Spaced evenly around the bottom. This might be good for pots that are very deep. Or very thin.
It spreads the stress. It’s a good option to consider. Especially if you are worried about making one large hole.
Just make sure they are not too close to the edge. Or too close to each other. You still need structural integrity.
Success Story: Sarah’s Tree Pot
Challenge: Large terracotta planter with no drainage for a small tree.
Solution: Used a 1/2 inch diamond bit, drilled slowly from both sides, kept wet.
Outcome: Perfect hole, happy tree, relieved plant parent.
When Is It Okay to Worry?
Most ceramic pots are drillable. But some are not. You should worry if your pot is made of porcelain.
Porcelain is very dense and brittle. It’s much harder to drill. And more likely to crack.
Especially if it’s finely made. Also, look for hairline cracks already there. If you see any fine lines in the ceramic, do not drill.
These are weak points. Drilling will make them spread. And the pot will break.
Thin, delicate pots are also a concern.
If the pot has a very smooth, shiny glaze all over, be extra careful. The glaze can make the bit slip easily. It can also create thermal stress if it overheats.
Always test on an old, unwanted ceramic item first. If you have a spare tile or an old mug, try drilling that. It gives you a feel for the material.
It helps you practice. And see how the bit behaves. This practice is invaluable.
It builds your confidence. And reduces the risk of mistakes on your prized pots.
Finally, consider the thickness of the pot wall. If the wall is very thin, less than 1/4 inch, it’s risky. The drill bit might put too much pressure on it.
Even with slow speed. The vibration can cause stress. For these pots, consider creative solutions.
Like using them as a liner. Or for faux plants. Or finding a different pot that already has drainage.
Your plant’s health is the main goal. Don’t risk a beautiful pot if it’s too fragile. It’s better to be safe than sorry.
There are always other options.
When to Hesitate:
- Pot is made of porcelain.
- Existing hairline cracks are visible.
- Pot walls are very thin.
- Pot is extremely valuable or antique.
Quick Fixes and Tips for Success
One key tip is patience. Seriously, this cannot be stressed enough. Rushing this process is the fastest way to a broken pot.
Take your time. Let the drill bit work. Don’t apply extra force.
It’s a marathon, not a sprint.
Start small with the drill bit. If you need a 1/2 inch hole, start with a 1/8 inch diamond bit. Drill a small pilot hole.
Then switch to a 1/4 inch bit. Then a 3/8 inch bit. And finally, the 1/2 inch bit.
Each step is easier. And less stressful on the pot. This takes longer.
But it is much safer. Especially for beginners.
Keep it wet. I know I’ve said it a lot. But it’s vital.
Water cools the bit. It cools the ceramic. It reduces friction.
It washes away dust. A constant stream or frequent sprays are best. Don’t let the bit or the pot get hot to the touch.
If it feels hot, stop and let it cool.
Use a stable work surface. A non-slip mat or a thick towel is your best friend here. You need to ensure the pot won’t move.
Or slide. Any movement can cause the drill bit to slip. Or catch.
This is a recipe for disaster. Make sure your surface is flat and secure.
Practice on scrap first. If you can, grab an old ceramic tile. Or a broken piece of pottery.
Try drilling a hole in that. Get a feel for the resistance. See how much pressure is too much.
Learn how the water helps. This practice session is invaluable. It builds muscle memory.
And confidence. Before you touch your actual pot.
Top 5 Tips for Hole Drilling:
- Patience is Paramount: Go slow.
- Start Small: Use smaller bits first.
- Stay Wet: Keep everything cool with water.
- Stability is Key: Secure the pot well.
- Practice Makes Perfect: Try on scrap first.
Frequently Asked Questions About Drilling Ceramic Pots
Can I use a regular drill bit on ceramic?
No, you should not use a regular drill bit on ceramic. Standard drill bits are designed for wood or metal. They will likely shatter the ceramic or become dull very quickly.
You need a specialized diamond-tipped drill bit or a carbide-tipped drill bit for drilling into hard materials like ceramic, tile, or glass.
How do I know if the pot will crack?
A pot is more likely to crack if you drill too fast, use too much pressure, don’t keep it cool with water, or if the ceramic already has hidden flaws. Pots made of porcelain or those with very thin walls are also at higher risk. If you see any existing cracks, do not drill.
What size diamond drill bit should I use?
The size of the drill bit depends on the size of the drainage hole you need. For most houseplants, a 1/4 inch to 1/2 inch hole is sufficient. If you need a larger hole, consider drilling multiple smaller holes.
Always start with a smaller bit to create a pilot hole, then gradually increase the size.
How long does it take to drill a hole?
The time can vary. It depends on the size of the hole, the thickness of the ceramic, and the power of your drill. For a standard houseplant pot, it might take anywhere from 5 to 15 minutes of actual drilling time.
Remember, patience is key; it’s better to take longer than to risk breaking the pot.
What if the drill bit slips when I start?
If your drill bit slips, stop immediately. This usually happens because the surface isn’t stable or you haven’t created a small divot to guide the bit. Try placing a piece of masking tape on the spot, then gently create a small indentation with the tip of the bit before you start drilling at a very slow speed.
Ensure the pot is also very stable and won’t move.
Can I drill holes in glazed ceramic pots?
Yes, you can drill holes in glazed ceramic pots. The glaze itself doesn’t add significant strength. The main challenge with glazed pots is that the smooth surface can make the drill bit slip more easily.
Always start with a very slow speed and light pressure to create an initial divot before proceeding with drilling. Keeping the area wet also helps.
Final Thoughts on Giving Your Pots Drainage
Adding drainage to your ceramic pots doesn’t have to be a scary task. It’s about using the right tools and a calm approach. You’ve learned about diamond drill bits.
And the importance of slow speed. You know to keep things wet. And to ensure stability.
This simple skill opens up so many possibilities for your plant collection. You can finally use those beautiful pots. Your plants will be healthier and happier.
Enjoy the process. And enjoy your thriving plants.