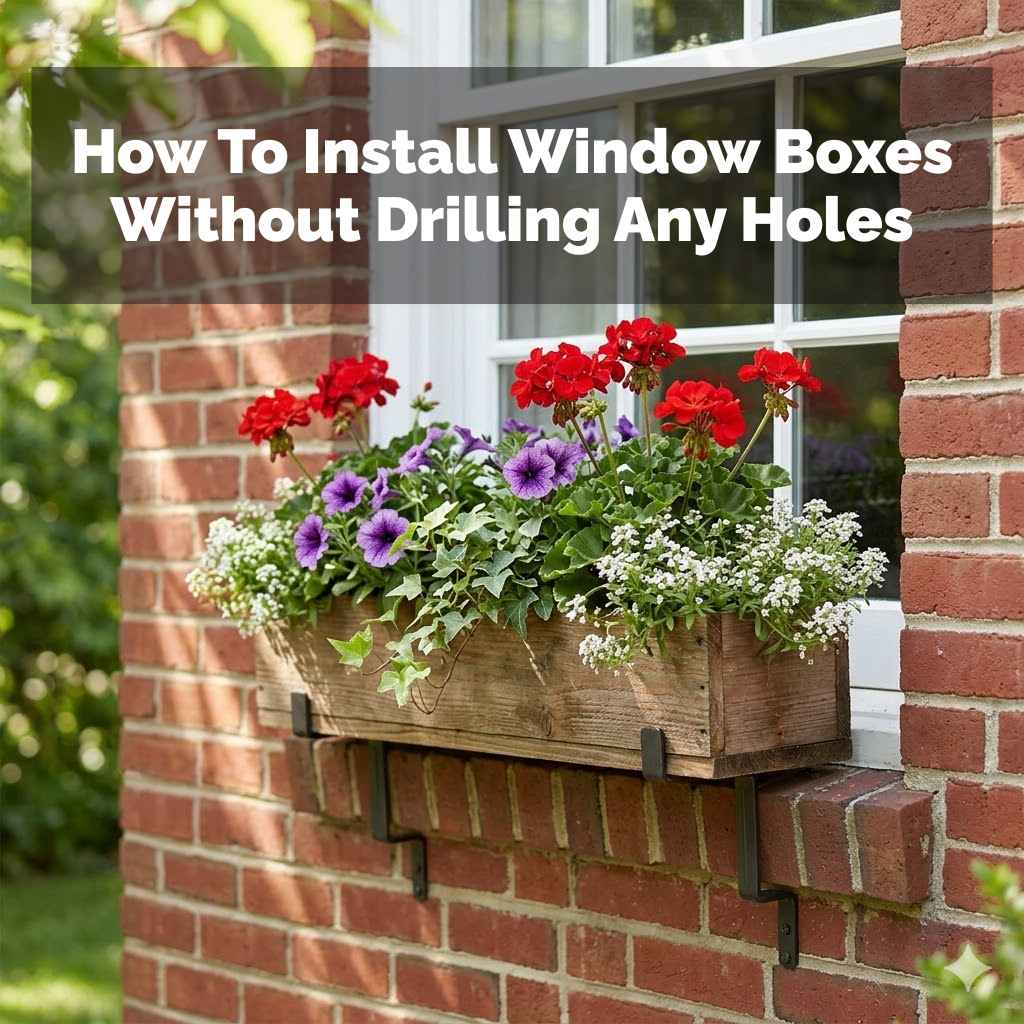
How To Install Window Boxes Without Drilling Any Holes
Adding a touch of green and color to your home’s exterior is a wonderful idea. Window boxes are a fantastic way to do this. But what if you can’t drill into your walls or windows?
It feels like a roadblock. Many people want beautiful planters but worry about making permanent changes. This guide will show you simple ways to get that charming look.
You’ll learn how to attach them securely. And you won’t need any tools that leave holes behind. Let’s make your home bloom!
Installing window boxes without drilling is very possible. You can use specialized brackets that clamp onto your window sill. There are also options that rest on the outside ledge. Some systems use strong adhesives or ties. These methods keep boxes secure. They also protect your home’s exterior.
Understanding Window Box Installation Without Drilling
Window boxes bring life to any home. They add curb appeal. They make windows look more inviting.
Traditionally, you might screw them into the wall or the window frame. This works. But it can leave damage.
This is a big problem for renters. It’s also a concern for historic homes. Or for anyone who likes to keep their property looking new.
Luckily, there are smart ways around this.
The main goal is to find a way to hold the box firmly. It needs to stay put even with plants, soil, and weather. Think about wind.
Think about rain. Think about the weight of everything. So, any non-drilling method must be strong and stable.
We will look at different types of hardware. We’ll also talk about materials. We’ll explore how they work.
This will help you pick the best one for your home.
My First Attempt at a No-Drill Window Box
I remember the first time I wanted window boxes. My rental apartment had this perfect spot. The windows were just begging for some flowers.
But the lease was clear: no drilling. No making holes. I felt a bit stuck.
I really wanted that pop of color. I imagined colorful petunias spilling out. I pictured cheerful marigolds lining my living room window.
So, I bought a standard window box. It looked sturdy. I also got a set of generic brackets.
I thought I could just… place them? Maybe lean them? It felt wrong from the start.
They just slid around. The box wobbled. I put a little soil in.
It immediately felt unsafe. I could picture the whole thing crashing down. It was a silly, frustrating moment.
I learned that “standard” doesn’t always mean “no-drill.” I needed a plan.
No-Drill Window Box Basics
Why Avoid Drilling?
Keeps walls intact. Great for renters. Protects historic homes.
Avoids weather damage to frames.
What’s Needed?
Secure attachment. Stable support. Weight distribution.
Key Features of No-Drill Options:
Adjustable clamps. Sturdy materials like metal. Non-slip pads.
Types of No-Drill Window Box Mounting Systems
The world of no-drill solutions is quite creative. Manufacturers know that not everyone wants to drill. They’ve made some clever systems.
Each one uses a different approach to stay secure. Understanding these can help you choose wisely.
Let’s break down the most common types you’ll find. This way, you can picture how they’d work on your home.
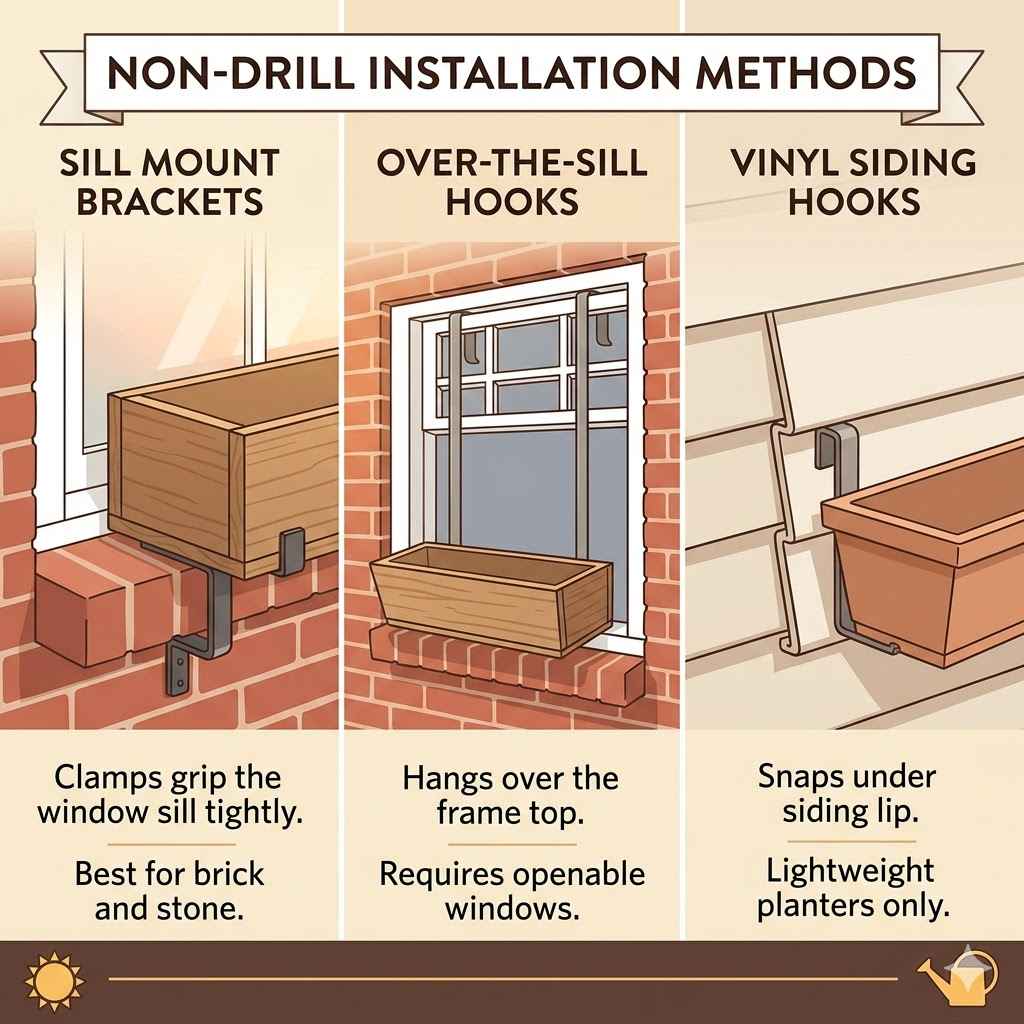
Adjustable Clamping Brackets
These are very popular for a reason. They work like a C-clamp. But they are designed for window boxes.
The bracket has a part that goes under the window sill. Another part goes over the top of the sill. A screw or knob tightens them together.
This holds the bracket firmly in place. The window box then sits on top of this bracket. Or it attaches to the bracket itself.
Pros: Very secure. Adjustable to fit different sill thicknesses. Easy to install and remove.
Minimal risk of damage to the window frame.
Cons: Might not work on all window styles. Can be visible from the outside. Make sure the sill is strong enough to hold the weight.
Ledge-Resting Brackets
These are simpler. They are designed for windows that have a decent-sized exterior ledge or sill. The bracket has a long arm.
This arm rests on the outside ledge. Another arm extends upwards. This arm supports the back of the window box.
The weight of the box and its contents helps keep it in place. Some might have a small lip or hook to catch the box.
Pros: Very easy to use. Often a one-piece design. Good for deep sills.
Cons: Less secure than clamping systems if the ledge is narrow. Might shift in high winds. Not suitable for windows without a distinct ledge.
Adhesive or Suction Cup Systems
Some systems use very strong, industrial-grade adhesives. Others use heavy-duty suction cups. These are attached to the exterior wall or window.
The window box then mounts onto these. This is less common for heavy window boxes. But it’s sometimes used for lighter decorative containers.
Pros: Completely invisible attachment. No visible hardware. Good for very clean aesthetics.
Cons: Adhesive can damage paint or siding upon removal. Suction cups can fail, especially in extreme temperatures or wet conditions. Weight limits are usually much lower.
Hanging Systems (Window Frame Mounts)
These are designed to hang over the top of the window sash. They have hooks that go over the top edge of the window. The window box then attaches to these hooks.
This works well for windows that open inwards or outwards. It avoids drilling into the wall itself.
Pros: Very secure if installed correctly. Keeps the box away from the sill. Can add a decorative element.
Cons: Can interfere with opening and closing the window. May not look good on all window styles. Might not be suitable for very large or heavy boxes.
Choosing the Right Bracket Style
Window Sill Type:
- Deep Sill: Ledge-resting or clamping brackets work well.
- Narrow Sill: Clamping brackets that wrap around are better.
- No Sill: Hanging systems might be your only non-drill option.
Window Type:
- Standard Double-Hung: Many options available.
- Casement (Opens Outward): Hanging systems might be tricky.
- Awning (Opens Inward): Hanging systems are usually not suitable.
Box Size & Weight:
- Heavy Boxes (Large, Soil-Filled): Clamping brackets are usually strongest.
- Lightweight Boxes (Plastic, Small Plants): Adhesive or suction cups might work.
Real-World Installation: A Step-by-Step Guide
Let’s say you’ve chosen adjustable clamping brackets. They are a great starting point for many homes. They offer security without damage.
First, gather your supplies. You’ll need the window box, the clamping brackets, and your plants. You’ll also need potting soil and a small trowel.
Step 1: Prepare Your Window Box
Make sure your window box is clean. If it’s a wooden box, check for any loose parts. If it’s plastic, ensure there are no cracks.
Some window boxes have drainage holes. This is important. You don’t want your plants to get waterlogged.
If yours doesn’t, consider drilling a few small holes yourself. But be careful not to compromise the box’s structure.
Step 2: Attach the Clamping Brackets to the Window Box
Most clamping brackets are designed to attach to the sides of the window box. Look for pre-drilled holes or slots on the bracket and the box.
Use the screws provided with the brackets. Often, these are stainless steel. This helps prevent rust.
Make sure the screws are long enough to hold firmly. But not so long that they poke through the inside of the box.
Tighten the screws snugly. You don’t want the brackets to wiggle. However, don’t overtighten.
You could crack the plastic or strip the screw.
Step 3: Position the Window Box on the Sill
Now, take your assembled window box and brackets to the window. Carefully place the window box on the outside of your window sill. The brackets should hang down on the sides.
One part of the clamp will be on the top of the sill. The other will be underneath.
Step 4: Secure the Clamps
This is the crucial step. You need to tighten the clamp screws. These screws are usually on the side of the bracket.
They push against the window sill. Slowly and evenly tighten each screw. You will feel resistance.
This is good! It means the clamp is gripping the sill.
Make sure the box is level. Adjust the tightness of the clamps as needed. You want it to be very secure.
Give it a gentle tug. It should not move at all. If it does, tighten the clamps more.
Step 5: Plant Your Flowers
Now for the fun part! Add your potting soil to the window box. Fill it about two-thirds full.
Arrange your plants. Consider their size and how much they will grow. Place taller plants in the back.
Let trailing plants hang over the edge.
Gently add more soil around the plants. Pat it down lightly. Water your new plants well.
Make sure the water drains through the holes.
Quick Scan: Installing Clamping Brackets
| Action | Details |
|---|---|
| Prepare Box | Clean, check for damage, ensure drainage holes. |
| Attach Brackets | Use provided screws, tighten snugly. |
| Position Box | Place on sill, clamps hanging down. |
| Secure Clamps | Tighten screws evenly, check for stability. |
| Plant | Add soil, arrange plants, water. |
Considering Other No-Drill Options
While clamping brackets are excellent, other methods have their place. Let’s briefly touch on how you might use them.
Ledge-Resting Brackets: If your window has a wide, flat exterior sill, these are simple. You just place the bracket on the sill. The back of the window box rests against the wall.
The bracket’s arm goes under the box. The weight holds it. You’d still want to check stability.
Give it a firm push to ensure it doesn’t slide.
Window Frame Hanging Systems: For these, you’d hang hooks over the top edge of your window. These hooks usually go inside the frame. Then, the window box attaches to these hooks.
Ensure the hooks are designed for your window type. They should not pinch or damage the frame. This method is good if your sill is too narrow for anything else.
DIY Solutions: Some creative folks use strong zip ties or bungee cords. They loop these around a sturdy window feature. Then, they secure the window box.
This is often best for very light decorative boxes. It’s not ideal for heavy, soil-filled ones. Always test these thoroughly.
Safety is key.
Contrast: Clamping vs. Ledge-Resting
Clamping Brackets:
- Myth: They damage window frames.
- Reality: When used correctly, they grip firmly without screws. Protects the frame.
- Best For: Narrow sills, security-focused installs.
Ledge-Resting Brackets:
- Myth: They can easily slide off.
- Reality: Rely on weight for stability. Best on wide, flat ledges. May need extra non-slip pads.
- Best For: Homes with deep, sturdy window ledges.
The Importance of Weight and Balance
When you’re not drilling, you’re relying on physics. Weight and balance become your best friends. A heavy window box can be dangerous if not secured properly.
Consider the total weight. This includes the box itself. It includes the soil.
It includes the plants. It also includes the water after you water them. Wet soil is much heavier than dry soil.
Your chosen mounting system must be rated for this weight. The manufacturer’s specifications are important here. Don’t guess.
If the bracket says it holds 20 pounds, don’t put 30 pounds on it. That’s a recipe for disaster.
Also, think about how the weight is distributed. A well-balanced box sits evenly on the sill. If one side is heavier, it can tilt.
This puts more stress on the mounting system.
I once saw a box where one side was packed with dense shrubs. The other side had light annuals. It looked a bit lopsided.
I worried about its stability. It’s better to spread the weight out.
Material Matters: Choosing Your Window Box
The material of the window box itself affects weight. It also affects how it interacts with the mounting system.
Plastic or Resin Boxes: These are usually the lightest. They are also often durable and weather-resistant. They can be a good choice for no-drill setups.
They are easy to clean. Make sure they have UV protection. This stops them from getting brittle in the sun.
Fiberglass Boxes: These are a bit heavier than plastic. They are very strong. They can look very high-end.
They hold up well to weather. They are a good option if you want a durable, stylish box.
Metal Boxes: These can be heavy. Some are made of aluminum, which is lighter. Others are steel.
Steel can rust if not treated. Metal boxes can get very hot in direct sun. This can stress plant roots.
Ensure the metal has a good coating.
Wood Boxes: These are classic. They can be beautiful. However, wood is heavy.
It also absorbs water, adding more weight. Wood can rot over time. You need to seal it well.
For no-drill, a lighter wood might be better. Or a smaller box.
When choosing a box, think about its shape too. A long, narrow box might put more stress on the ends of the mounting system. A deeper box will hold more soil and be heavier.
Always match the box to your chosen no-drill hardware.
Material Quick Facts
Plastic/Resin:
- Pros: Light, affordable, durable, easy care.
- Cons: Can look less premium, may fade over time.
Fiberglass:
- Pros: Very strong, stylish, weather-resistant.
- Cons: More expensive, can be heavy.
Metal (Aluminum/Steel):
- Pros: Modern look, durable (if coated).
- Cons: Can heat up, steel can rust, can be heavy.
Wood:
- Pros: Classic beauty, natural look.
- Cons: Heavy, requires maintenance, can rot.
Weather and Environmental Factors
Your beautiful window box is exposed to the elements. This is where no-drill solutions are tested. You must consider your local climate.
Wind: Strong winds are a major concern. They can lift or even rip a window box away. This is why clamping brackets are often best.
They grip the sill firmly. Ledge-resting boxes are more vulnerable. If you live in a windy area, choose the most secure system.
You might also choose plants that are less likely to catch the wind.
Rain and Snow: Water adds significant weight. Ensure your drainage is excellent. Snow accumulation also adds weight.
Make sure your mounting system can handle it. In winter, you might remove the box and plants to prevent damage.
Temperature Swings: Extreme heat or cold can affect materials. Adhesives can lose their grip in the heat. Some plastics can become brittle in the cold.
Metal can expand and contract. Wood can warp. Choose materials and mounting systems that can handle your climate.
I once visited a friend in a coastal town. The wind was fierce. Her beautiful, heavy window box, which was only resting on the ledge, had blown off.
Luckily, no one was hurt. But the box was ruined. She switched to a robust clamping system after that.
Maintaining Your No-Drill Window Boxes
Just because you didn’t drill doesn’t mean you can forget about maintenance. Regular checks are key.
Check Brackets: Every few weeks, give your window box a gentle shake. Check that the brackets are still tight. If you have clamping brackets, give the screws a little turn.
They can sometimes loosen slightly over time.
Inspect the Box: Look for any signs of wear. Is the box itself cracking? Is the paint peeling?
If it’s wood, are there any signs of rot? Address issues early.
Monitor Plants: Healthy plants help the box stay balanced. Wilting or dying plants can make the soil lighter, but it’s good to keep them looking their best anyway.
Seasonal Removal: For harsh winters or storms, consider removing the window box. Store it and the plants indoors. This protects them.
It also prevents the mounting system from being overstressed.
This simple routine ensures your window boxes stay beautiful and safe. It also prolongs their life.
Seasonal Window Box Tips
Spring:
- Clean the box and brackets.
- Check for any winter damage.
- Install for the new season.
Summer:
- Water regularly.
- Check bracket tightness weekly.
- Deadhead spent flowers.
Fall:
- Remove annuals.
- Consider removing the box for winter.
- Protect brackets from moisture if left on.
Winter:
- Store box and plants indoors.
- Ensure brackets are secure if left exposed.
What This Means for Your Home
Choosing to install window boxes without drilling opens up possibilities. It means you can beautify your home. You can do it without fear of permanent damage.
This is especially valuable if you rent.
It also means you have options. You don’t have to settle for a bare exterior. You can achieve that charming, floral look.
You just need the right hardware and a little care.
When is this approach best? It’s ideal for:
- Renters.
- Owners of historic homes.
- Anyone who dislikes making holes in their walls.
- People who want flexibility to move or change things later.
It’s important to know when it might not be the best choice. If you have extremely heavy window boxes or very unusual window designs, a professional installation might be better. Or you might need a very specific type of hardware.
But for most standard windows, non-drilling methods work wonderfully. They offer beauty and practicality.
Quick Fixes and Tips for Success
Here are some final tips to ensure your no-drill window box project is a success.
Use Non-Slip Pads: If you’re using ledge-resting brackets, add some rubber or silicone pads. Place them between the bracket and the sill. This adds grip and stops sliding.
Test Stability Rigorously: Before you fill the box with soil, test it. Gently push and pull. Make sure it doesn’t budge.
Do this test after you’ve put some weight in it, like a bag of soil.
Consider Drainage Layers: Add a layer of gravel or pot shards at the bottom of your window box. This helps with drainage. It also prevents the soil from becoming too heavy when wet.
Choose Lightweight Soil: Opt for a good quality potting mix. These are lighter than garden soil. They also provide better aeration for plant roots.
Plant Wisely: Don’t overstuff your window box. Give plants room to grow. This keeps the weight manageable.
It also helps prevent disease.
Read Reviews: Before buying any mounting hardware, read online reviews. See what other people say about its security and ease of use.
Top No-Drill Tips
Tip 1: Always check weight limits for your hardware.
Tip 2: Measure your window sill carefully before buying.
Tip 3: Consider your local weather conditions.
Tip 4: Regular checks are more important than you think.
Tip 5: When in doubt, choose a more robust system.
Frequently Asked Questions About No-Drill Window Boxes
Can I really install a window box without making any holes?
Yes, absolutely! There are many effective ways to install window boxes without drilling. These methods use specialized brackets, clamps, or ledge supports to hold the box securely.
They are perfect for renters or those who don’t want to damage their property.
What is the most secure way to attach a window box without drilling?
Adjustable clamping brackets are generally considered the most secure non-drilling option. They work by gripping the window sill from the top and bottom. This provides a very strong and stable attachment.
Always ensure the brackets are rated for the weight of your filled window box.
Will non-drilling window box methods damage my window sill?
When used correctly, non-drilling methods like clamping brackets should not damage your window sill. They are designed to grip without screws or nails. However, it’s wise to place a thin protective pad, like rubber or silicone, between the bracket and the sill.
This adds grip and prevents any potential scuffing.
How much weight can a no-drill window box system hold?
The weight capacity varies greatly depending on the type and quality of the mounting system. Simple ledge-resting brackets might hold less than robust clamping brackets. Always check the manufacturer’s specifications for the maximum weight limit.
A typical filled window box can weigh anywhere from 10 to 50 pounds or more.
Can I use suction cups to install a window box?
Heavy-duty suction cups are sometimes used for very lightweight decorative items. However, they are generally not recommended for traditional, soil-filled window boxes. Suction cups can fail due to temperature changes, moisture, or loss of seal, potentially causing the box to fall.
What kind of window is best for non-drilling window boxes?
Standard double-hung windows with a clear exterior sill are often the easiest to work with. Windows with a substantial ledge are great for ledge-resting brackets. For windows without a sill, you might need to explore hanging systems that attach to the frame, but these can sometimes interfere with window operation.
How do I choose the right size window box for my non-drilling system?
Measure the width of your window sill first. Then, select a window box that is slightly shorter than the sill’s length. Ensure the chosen mounting hardware is compatible with the depth and width of your window box.
Lighter boxes are also generally safer for non-drilling options.
Conclusion
Adding beautiful window boxes to your home doesn’t have to be complicated. You can achieve that charming look. You can do it without drilling any holes.
By choosing the right hardware. By understanding weight and balance. And by considering your home’s specific windows.
Whether you use clamping brackets or a clever ledge-rest system, enjoy the process. Soon, your home will have that lovely splash of color. Happy planting!