How To Use Epoxy Resin On Wood For Beginners (Full Guide)
Epoxy resin on wood for beginners involves careful preparation, proper mixing, and controlled pouring. Key steps include sealing the wood, mixing the resin and hardener accurately, pouring in thin layers, and allowing adequate cure time. Beginners should focus on understanding the resin’s properties and working in a controlled environment to achieve smooth, bubble-free finishes.
Understanding Epoxy Resin for Wood Projects
Epoxy resin is a liquid plastic. It hardens when you mix two parts together. These parts are called the resin and the hardener.
When they mix, a chemical reaction happens. This reaction makes the liquid turn solid. It becomes very hard and clear, like glass.
Many woodworkers love using it. It can fill cracks. It can also cover the wood surface.
This creates a shiny, protective layer. It also adds depth and color.
There are many types of epoxy. Some are thin and runny. Others are thick and syrupy.
For wood projects, you often want a clear, slow-curing epoxy. This type lets bubbles rise out. It also helps the resin spread evenly.
It’s great for things like tabletops. It’s also good for river tables. It can even be used for small crafts.
Understanding your epoxy is the first step.
Why is it so popular? Well, it looks amazing. It can make wood surfaces pop.
It seals the wood too. This makes it stronger and more water-resistant. It’s also very versatile.
You can add colors. You can add glitter. You can embed objects.
It really lets your creativity shine. For beginners, choosing the right epoxy is key. Look for epoxies made for tabletop or casting.
They usually work best.

The Essential Tools and Materials
Before you start, gather your supplies. Having everything ready makes the process smoother. You will need the epoxy resin kit.
This usually includes the resin and the hardener. Always check the manufacturer’s instructions. They will tell you the right mix ratio.
This is super important for the epoxy to cure correctly.
You’ll also need mixing cups. These should be disposable. Plastic or silicone cups work well.
Get several. You’ll need them for mixing. You’ll also need stirring sticks.
Popsicle sticks or plastic stirrers are fine. Make sure they are clean. Any dirt can mess up your finish.
Safety gear is a must. Wear gloves. Nitrile gloves are best.
They protect your skin from the epoxy. You should also wear safety glasses. This keeps the resin out of your eyes.
Good ventilation is also key. Work in a well-ventilated area. You can use a fan.
This helps fumes escape. A respirator mask is a good idea too. This protects your lungs.
For the wood, you need to prepare it. Sandpaper is needed. Start with a lower grit.
Go up to a higher grit. This makes the wood surface smooth. You might also need a wood sealer.
This stops air bubbles from forming. Wood sealers are very helpful. They block tiny air pockets in the wood.
Other useful items include a level. This helps keep your project flat. Heat gun or blow torch is needed.
This helps remove bubbles. A plastic sheeting or tarp is good. This protects your work surface.
Masking tape is useful too. It helps cover areas you don’t want resin on.
Preparing Your Wood Surface
This is a crucial step. Good prep means a better final product. First, make sure your wood is clean.
Dust and dirt will ruin the finish. Sand your wood smooth. Start with a grit like 120.
Work your way up to 220. The smoother the wood, the better the epoxy will stick. You want a nice, clean surface for the resin.
After sanding, wipe the wood down. Use a tack cloth. This picks up fine dust.
You can also use a damp cloth. Let the wood dry completely. Any moisture can cause problems.
Especially with bubbles or poor adhesion.
Now, consider sealing the wood. Wood has tiny pores. These pores trap air.
When you pour the epoxy, this air can escape. It forms bubbles. Sealing the wood fills these pores.
This prevents bubbles. You can use a thin coat of epoxy. Mix a very small amount.
Paint it onto the wood. Let it dry. This is called a flood coat.
Or use a commercial wood sealer. Follow the product instructions.
If you are covering a live edge, be careful. The bark can sometimes fall off. You might want to remove it.
Or secure it with a strong adhesive. Sometimes, tiny insects can hide in bark. This is not good.
You want a clean surface. Plan for any live edge issues. Make sure it’s firmly attached.
Make sure your wood is completely dry. Wood can absorb moisture from the air. This can still cause bubbles.
If you live in a humid area, let your wood sit in your workspace for a day. This lets it adjust to the room’s humidity. Your workspace should be warm.
This helps the epoxy flow better.
Mixing the Epoxy Resin
This is where many beginners stumble. Precise measuring is vital. Always read your epoxy kit’s instructions.
They will tell you the mix ratio. It might be 1:1 by volume. Or it might be 2:1.
Never guess. Wrong ratios mean the epoxy won’t cure. Or it will cure soft and sticky.
Use clean, disposable mixing cups. Measure the resin into one cup. Measure the hardener into another cup.
Be exact. Use measuring lines on the cups. Or use a small digital scale for accuracy.
Pour one part into the second cup. This helps ensure the correct ratio.
Now, stir. Stir slowly and thoroughly. Scrape the sides and bottom of the cup.
Do this for several minutes. The instructions will say how long. Usually, it’s 3-5 minutes.
The mixture might look cloudy at first. Keep stirring. It should become clear.
This means the parts are fully mixed.
Watch for streaks. If you see streaks, you haven’t mixed enough. Keep stirring until it’s all clear and uniform.
Don’t whip the mixture. This adds air bubbles. You want to mix it gently but completely.
Once mixed, pour it into a second clean cup. Stir that mixture again for a minute. This is called “double-pouring.” It helps ensure no unmixed resin remains at the bottom or sides.
The pot life is important. This is how long you have to work with the mixed epoxy. Thicker epoxies have a shorter pot life.
Thin epoxies last longer. Don’t mix more than you can use in that time. It will start to get thick and hot in the cup.
This is called “exothermic reaction.”
Pouring the Epoxy Resin
Once your wood is prepped and your epoxy is mixed, it’s time to pour. Make sure your project is on a level surface. Use a level to check.
If it’s not level, the epoxy will flow to one side. This creates an uneven layer. Use shims if needed.
Pour the mixed epoxy onto the wood. Start in the middle. Let it flow outwards.
You can use your stirring stick to guide it. Spread it to the edges. If it’s a tabletop, let it self-level.
Don’t overwork it. For river tables, pour into the routed channels first.
Pour slowly. This helps avoid trapping air. If you are doing multiple pours, let the first pour gel slightly.
It should be tacky. This helps the next pour bond well. Check the epoxy’s instructions for cure times between pours.
Don’t pour too thick at once. Most epoxies have a maximum pour depth. Exceeding this can cause overheating and cracks.
For small pieces, you might pour the entire thing at once. For larger pieces, like a table, you might pour in stages. If doing a river, pour one side of the river, let it cure.
Then pour the other side. This prevents warping and ensures a good bond.
Watch for drips over the edges. You can catch these with tape. Or use a brush to smooth them.
Or just let them form a nice “drip edge.” This is a matter of style. For a clean edge, tape off the sides well before pouring.
Beginner Pouring Tips
Start Small: Begin with smaller projects. This helps you learn without risking a big piece.
Temperature Matters: Work in a warm room (70-80°F or 21-27°C). Cold temperatures make epoxy thick. It won’t flow well.
Thin Layers: For large areas, pour in thin layers. Wait for each layer to cure partially. This reduces heat build-up.
Edge Control: Use masking tape on the underside of edges. This catches drips and gives a clean finish.
Dealing with Air Bubbles
Bubbles are the enemy of a smooth epoxy finish. But don’t worry, they can be managed. As mentioned, sealing the wood helps a lot.
Proper mixing also reduces bubbles. Avoid whipping the mixture.
After pouring, let the epoxy sit for a bit. Bubbles will start to rise to the surface. Then, you can remove them.
A heat gun is a popular tool. Hold it a few inches above the surface. Move it quickly across the epoxy.
The heat pops the bubbles. Don’t hold it in one spot. You don’t want to scorch the resin.
A small propane torch works too. Use it very carefully and quickly. A light pass is all you need.
A long kitchen lighter can also work. Just a quick sweep.
Another trick is to use a heat gun on a low setting. Some people use a small butane torch. Others use a heat gun.
You can also use a toothpick. For tiny bubbles, a toothpick can carefully coax them to the surface. Or just pop them.
Some specialized epoxies are “self-degassing.” They are designed to let bubbles escape on their own. These are great for beginners. But most standard epoxies will need some help.
Patience is key here. Check your work often in the first hour.
Bubble Removal Methods
- Heat Gun: Quick passes over the surface to pop bubbles.
- Propane Torch: Similar to a heat gun, but use with extreme caution and speed.
- Toothpick: For tiny, isolated bubbles, gently poke them to release air.
- Long Lighter: A quick sweep can help release surface bubbles.
Tip: Always keep your heat source moving. Never stay in one spot.
Curing and Finishing Your Project
Once poured, the epoxy needs to cure. This is when it hardens fully. Check the epoxy’s instructions.
Cure times vary. They depend on the epoxy type and temperature. It can take 24-72 hours to be dry to the touch.
Full cure can take 7 days or more.
During curing, keep the area free of dust. Cover it loosely with a box or plastic sheet. Make sure the cover doesn’t touch the epoxy.
Drafts can also cause problems. Keep the temperature stable. Avoid direct sunlight.
After the epoxy is fully cured, you can sand it. This is for a super smooth finish. Start with a lower grit sandpaper.
Then move to higher grits. Sanding can be done wet or dry. Wet sanding can help prevent dust.
It also gives a smoother finish.
After sanding, you can polish the epoxy. Use a polishing compound. Buff it with a soft cloth.
This will make it super shiny. You can also apply a top coat of wax. This adds extra protection and shine.
For tabletops, a good polish is often the final step.
If your finish isn’t perfect, don’t despair. You can often sand down imperfections. Then, pour another thin coat of epoxy.
This is called a flood coat. Make sure the first layer is fully cured. And that it’s clean and smooth before pouring again.
This can fix minor issues like dust or small waves.
Remember that patience is your best friend here. Rushing the curing process can lead to a sticky mess. Always allow the full recommended time.
It’s worth the wait for a durable, beautiful finish.
Curing vs. Hardening
Hardening: The epoxy reaches a solid state. It’s often dry to touch. But it’s not yet at its full strength.
Curing: The epoxy reaches its maximum hardness and chemical resistance. This takes much longer.
Why it Matters: Don’t sand or put heavy items on epoxy before it’s fully cured. It can damage the surface.
Common Mistakes Beginners Make
We all learn from mistakes. But it’s good to know what to look out for. One big mistake is not measuring correctly.
This is the most common error. Always double-check your ratios. Use a scale if you can.
It’s more accurate than cups.
Another error is poor ventilation. Epoxy fumes can be strong. They can cause headaches or worse.
Always work in a well-ventilated space. Wear a respirator if needed. Your health comes first.
Not sealing the wood is a frequent oversight. This leads to lots of bubbles. It’s frustrating to deal with later.
A quick seal coat saves a lot of trouble.
Pouring too thick is also a problem. Especially with higher viscosity resins. This can cause overheating.
It might crack or yellow. Always check the maximum pour depth. And work in layers if needed.
Ignoring temperature is another issue. Cold temperatures slow curing. They can also cause fisheyes.
Work in a warm environment. Aim for 70-80°F (21-27°C). Consistency is important.
Not protecting your work area is also common. Epoxy is sticky and hard to remove. Cover your floor and tables well.
Use plastic sheeting or tarps. And wear old clothes. You don’t want to ruin your good stuff.
Finally, rushing the process. Trying to speed up curing or sanding too soon. It’s tempting, but it rarely works out well.
Be patient. Let the epoxy do its thing.
Mistake vs. Solution
| Mistake | Solution |
|---|---|
| Incorrect Ratio | Measure precisely. Use a scale. Read instructions. |
| Poor Ventilation | Work in a warm, well-ventilated area. Wear a respirator. |
| No Wood Seal | Apply a thin seal coat of epoxy or wood sealer. |
| Pouring Too Thick | Follow max pour depth. Use multiple thin layers. |
| Wrong Temperature | Work in 70-80°F (21-27°C). Avoid drafts. |
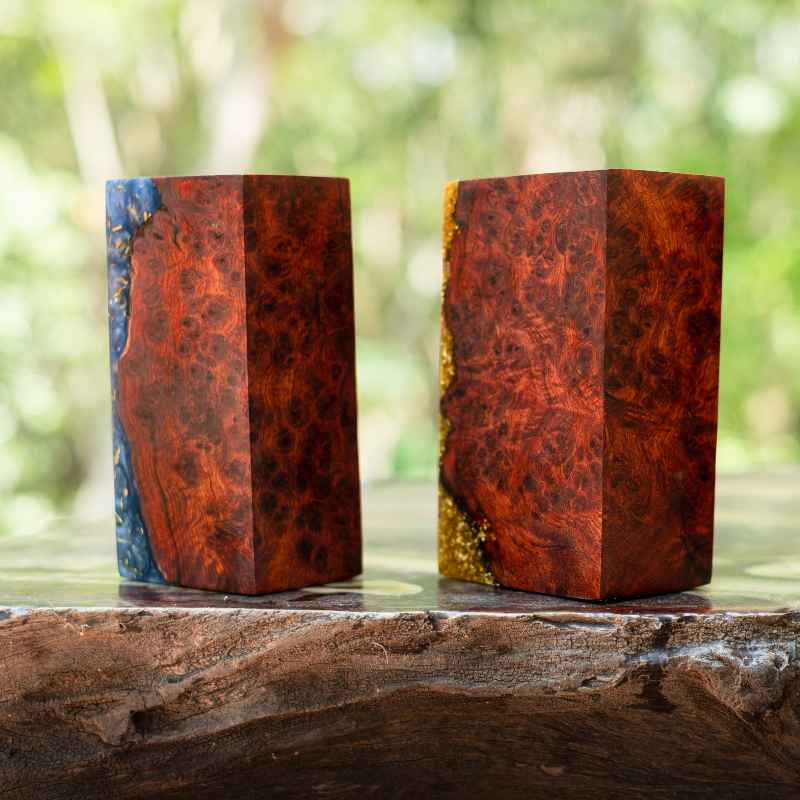
Adding Color and Effects to Your Epoxy
Epoxy isn’t just clear. You can add amazing colors and effects. This is where the real art comes in.
Use epoxy-specific colorants. These are called pigments or dyes. They are made to mix with epoxy and cure properly.
Don’t use craft paints or food coloring. They often don’t mix well. And can cause curing issues.
There are two main types of colorants. Liquid dyes and mica powders. Liquid dyes give a transparent or translucent color.
Mica powders give an opaque or shimmery look. You can layer colors. You can swirl them.
You can create cloudy effects.
For transparent colors, add just a little dye. Stir it in well. You can achieve deep blues.
Or vibrant reds. Or sunset oranges. Add more dye for a darker shade.
But don’t add too much. It can affect curing. Stick to the recommended amounts.
Mica powders create pearlescent or metallic effects. They give a beautiful shimmer. You can mix mica into the epoxy.
Or dust it onto the surface of a wet pour. This can create stunning depth. Try mixing different colors.
Like gold and black for a galaxy effect.
You can also add glitter. Or metallic flakes. Or even small objects.
Like seashells or coins. Make sure anything you embed is dry. And sealed if needed.
They should also be able to withstand the heat of the curing epoxy.
Experiment with different techniques. Try pouring two colors side-by-side. Then swirling them with a stick.
Or pour a base color. Let it partially cure. Then pour a different color on top.
This creates layers. Or use a blow dryer to push wet epoxy around.
Remember that adding color can sometimes affect the epoxy’s viscosity. And its cure time. Always test your colorant in a small sample first.
This way, you know how it behaves.
Working with Different Wood Types
Different woods behave differently with epoxy. Some woods are very porous. Like oak or ash.
These will need extra sealing. Others are oily. Like teak or walnut.
The oil can sometimes interfere with the epoxy bond. You might need to wipe these woods with a solvent. Like denatured alcohol.
Before sealing and pouring.
Softwoods like pine are also porous. They can also be prone to warping. Make sure they are well-supported.
And sealed thoroughly. They are also lighter in color. So pigments can really show up well.
Hardwoods generally perform well. They are less prone to warping. And have fewer issues with oil.
But they still need to be sanded and sealed. Even dense woods have tiny pores.
Live edge wood is popular. It has the natural edge of the tree. This edge can be uneven.
It might have bark. You need to decide what to do with the bark. Sometimes it’s removed.
Or it’s secured with a strong adhesive. If you keep the bark, check it for insects. And ensure it’s well-attached.
Any loose bits will fall into the epoxy.
When choosing wood, consider its color. And its grain pattern. These will affect the final look.
Light woods show vibrant colors best. Darker woods can make colors appear deeper. Or they might need metallic pigments to stand out.
Always try to use dry wood. Kiln-dried wood is best. If you are using air-dried wood, ensure it’s fully seasoned.
Moisture is the enemy of good epoxy work. It causes bubbles and can weaken the bond.
Wood & Epoxy Notes
Porous Woods (Oak, Ash): Require extra sealing. More prone to bubbles.
Oily Woods (Teak, Walnut): May need cleaning with solvent before sealing.
Softwoods (Pine): Seal well. Be mindful of warping. Good for bright colors.
Hardwoods: Generally good performers. Still need prep.
Live Edge: Plan for bark. Secure loose pieces. Ensure it’s clean.
Safety First: Essential Precautions
I can’t stress this enough. Safety is paramount when working with epoxy resin. Always read the Safety Data Sheet (SDS) for your specific product.
It has crucial information.
Ventilation: Work in a large, open area. Use fans to move air. Open windows and doors.
If you can’t get good ventilation, wear a respirator with organic vapor cartridges. This is vital for your lung health.
Skin Protection: Wear chemical-resistant gloves. Nitrile gloves are a good choice. They are strong and offer good protection.
Avoid latex gloves. They can break down. Wash your hands thoroughly after removing gloves.
If epoxy gets on your skin, wash it with soap and water immediately. Do not use solvents on your skin.
Eye Protection: Wear safety glasses or goggles. Epoxy can splash. It can irritate your eyes.
Or cause serious damage. Always wear them when mixing or pouring.
Protective Clothing: Wear old clothes. Or an apron or coveralls. Epoxy can stain permanently.
Consider closed-toe shoes too.
Fire Safety: Most epoxies are not highly flammable. But the chemical reaction can create heat. Keep them away from open flames or sparks.
Especially during the curing phase.
Disposal: Dispose of uncured epoxy properly. Never pour it down the drain. It can clog pipes.
Mix small amounts of resin and hardener. Let it cure fully. Then dispose of the solid waste according to local regulations.
For cured epoxy, it’s generally safe to dispose of as solid waste. But check your local rules.
Remember, even “non-toxic” epoxies can cause skin sensitization. If you develop a rash or irritation, stop using the product. And seek medical advice if needed.
Treating epoxy with respect is key to a safe and enjoyable experience.
When It’s Normal and When to Worry
It’s good to know what’s expected and what’s not. Some things are normal during the epoxy process. Others mean something is wrong.
Let’s look at what’s okay.
Bubbles: As we discussed, small bubbles are normal. Especially when you first pour. Or if your wood isn’t perfectly sealed.
The key is to remove them. If they persist and you can’t remove them, that’s a sign something might be off.
Heat: Epoxy generates heat as it cures. This is called exothermic reaction. It’s normal for the mixture in the cup to get warm.
Or even hot. It’s also normal for the poured epoxy to feel warm. Especially with thick pours.
However, if it gets extremely hot. So hot it’s uncomfortable to touch. Or it starts to smoke or crack.
That means it’s overheating. This could be due to a wrong ratio. Or pouring too thick.
Or a very warm room.
Slight Yellowing: Some epoxies can yellow over time. Especially if exposed to UV light. This is more common in older formulations.
Modern epoxies are much better. But a very slight amber tint might be normal for some. If it yellows quickly or severely, that’s a worry.
Viscosity Changes: Epoxy starts thin. It gets thicker as it cures. This is normal.
If it cures too fast in the cup. Or it cures too slowly. That could be a ratio or temperature issue.
Now, what to worry about:
Sticky or Tacky Surface: If after 24-72 hours, the surface is still sticky. Or it feels rubbery. This is a big problem.
It usually means the ratio was wrong. Or it wasn’t mixed enough. Or the temperature was too low.
Or the humidity was too high. You might need to sand it down and try again.
Cracking: If you see cracks appearing in the epoxy. Especially large ones. This could be due to overheating.
Or pouring too thick. Or the wood warping. Small hairline cracks might be from rapid temperature changes.
Delamination: If the epoxy starts to separate from the wood. Or from a previous layer. This indicates poor adhesion.
It could be due to poor surface prep. Or a dirty surface. Or pouring onto a fully cured layer instead of a partially cured one.
Strong Chemical Smell After Curing: Once cured, epoxy should have very little odor. If it still smells strongly of chemicals after days. It might not have cured properly.
Or there’s an issue with the product.
If you experience any of these worrying signs, don’t force it. Assess the situation. Sometimes a small fix is possible.
But often, it means starting over. Learn from it for your next project.
Maintaining Your Epoxy Wood Projects
Once you’ve created something beautiful, you’ll want to keep it that way. Epoxy resin is durable. But it’s not indestructible.
Proper care will ensure it lasts for years.
Cleaning: For daily cleaning, use a soft cloth. Dampen it with water. A mild soap can be used if needed.
Wipe the surface dry afterward. Avoid abrasive cleaners or scrub pads. These can scratch the surface.
They can dull the shine.
Heat: Avoid placing very hot items directly on the epoxy. Like steaming pots or pans. While it’s heat-resistant, extreme heat can cause damage.
Discoloration or even cracking. Use trivets or hot pads. These protect the surface from direct heat.
UV Exposure: Prolonged exposure to direct sunlight can cause epoxy to yellow over time. Or become brittle. If your project is near a window, consider using UV-resistant coatings.
Or simply keep the blinds closed during peak sun hours. Some epoxies have built-in UV inhibitors. But they aren’t foolproof.
Scratches: While epoxy is hard, it can still scratch. Try to avoid dragging sharp objects across the surface. If minor scratches do occur, they can often be buffed out.
With a fine-grit sandpaper and a polishing compound.
Chemicals: Avoid exposing the epoxy to harsh chemicals. Like acetone or strong solvents. These can soften or damage the finish.
If a spill happens, clean it up immediately.
Minor Repairs: If you get a small chip or a deeper scratch, you might be able to repair it. Lightly sand the damaged area. Clean it thoroughly.
Then, pour a small amount of epoxy over the spot. Let it cure fully. Then sand and polish it smooth.
Treat your epoxy wood creations with care. And they will remain stunning for a long time. Think of it like caring for fine furniture.
Regular, gentle cleaning is best.
Maintenance Checklist
- Daily: Wipe with a soft, damp cloth. Dry completely.
- Weekly: Use mild soap if needed. Wipe dry.
- Avoid: Abrasive cleaners, sharp objects, extreme heat, direct sun.
- Use: Trivets for hot items.
- Repairs: Light sanding and re-pouring for small damage.
Frequently Asked Questions About Epoxy on Wood
Is epoxy resin food safe for wood projects?
Many epoxy resins are marketed as food-safe. But this usually applies after they have fully cured. Always check the product’s label and SDS.
Ensure it’s FDA-approved for food contact. And follow all curing instructions precisely. It’s best for surfaces that don’t directly contact food.
Or for decorative items.
How long does epoxy resin take to cure on wood?
Cure times vary widely. They depend on the specific epoxy product and room temperature. Most epoxies are dry to the touch in 24-72 hours.
But full cure, meaning maximum hardness and durability, can take 7 days or longer. Always refer to the manufacturer’s instructions for exact times.
Can I pour epoxy over existing finishes like varnish or paint?
Generally, it’s not recommended. Epoxy adheres best to bare wood. Existing finishes might prevent a proper bond.
Or they could react with the epoxy. If you must pour over a finish, test it in an inconspicuous area first. Or sand the finish thoroughly to create a key for the epoxy.
What is the difference between epoxy resin and polyurethane for wood?
Epoxy resin is typically a two-part system that hardens chemically. It creates a thick, hard, and often glossy layer. It’s great for filling voids and creating a 3D effect.
Polyurethane is usually a one-part finish. It dries by evaporation. It forms a thinner protective film.
It’s often used for sealing and protecting wood surfaces from wear.
Why is my epoxy resin staying sticky?
A sticky surface is usually due to incorrect mixing ratios. Insufficient mixing. Or working in a temperature that is too cold.
High humidity can also sometimes interfere with curing. Ensure you measure precisely. Stir thoroughly.
And maintain a warm, dry workspace.
Can I sand and re-coat epoxy if I mess up the first pour?
Yes, you often can! Once the epoxy is fully cured, you can sand down imperfections. Clean the surface well.
Then you can pour another layer of epoxy over it. This is called a flood coat. It’s a great way to fix errors or achieve a thicker finish.
Conclusion
Working with epoxy resin on wood can be incredibly rewarding. It opens up a world of creative possibilities. Remember to prepare your workspace and materials carefully.
Always prioritize safety. Measure your epoxy accurately. And be patient through the curing process.
Every project is a learning experience. So don’t be afraid to dive in. Enjoy the journey of transforming wood with stunning epoxy finishes!