How to Keep a Garage Warm in Winter on a Budget
To keep a garage warm on a budget, seal air leaks first, then add insulation where the shell is weakest. A common rule of thumb is to spend about $20 to $200 on weatherstripping, caulk, and foam before buying a heater. Skip that step, and heat escapes, bills rise, and cold corners stay cold. This guide ranks low-cost fixes from gap sealing to the heater that makes sense only after the garage holds heat.
Budget ladder for garage heat



The cheapest path is straightforward: block air leaks, tighten the door, add the most useful insulation, then choose a heater only if the garage still will not hold a useful temperature. That order usually gives more comfort per dollar than buying heat first, because a heater cannot keep up with a leaky shell for long.
| Rank | Fix | Estimated cost | Difficulty | Typical temperature impact | Best for |
|---|---|---|---|---|---|
| 1 | Weatherstripping, door sweep, caulk, expanding foam sealant | Low | Easy | Stops drafts and cold spots more than it adds raw heat | Any garage with obvious leaks |
| 2 | Garage door insulation kit or rigid foam board | Low to moderate | Easy to moderate | About 10 to 12 degrees warmer in many setups | Thin metal doors |
| 3 | Fiberglass batt insulation in walls and ceiling | Moderate | Moderate | Smaller daily swings and better heat retention | Unfinished garages used often |
| 4 | Portable space heater | Moderate | Easy | Localized heat where you stand | Short tasks in one area |
| 5 | Propane heater | Moderate | Easy | Fast, powerful heat | Short, well-ventilated use |
| 6 | Mini-split system | High | Professional install | Efficient heating and cooling | Frequent workshop use |
Say your garage has a thin metal door, a man door with daylight at the bottom, and bare studs on one wall. Seal the door edges first, add a sweep, and only then decide whether the wall is worth insulating. That order often cuts the draft problem before a heater enters the picture.
Where cold air gets
Cold air usually enters through the biggest openings first: garage doors, passage doors, windows, trim gaps, ceiling penetrations, and the floor-to-wall joint. Fix those paths before buying heat, and the garage feels warmer at the same thermostat setting while the heater cycles less often.
Garage doors and passage doors
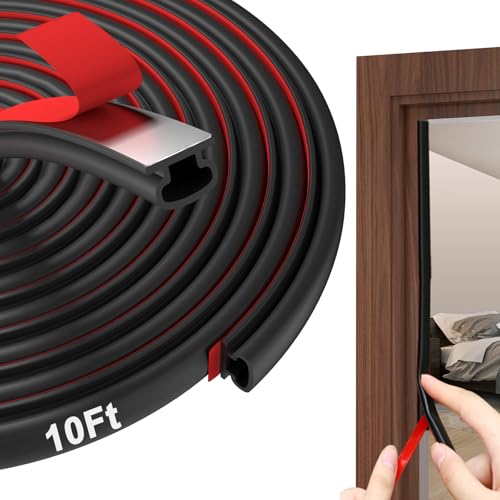
The garage door perimeter is the main leak path in many garages, and the man door often leaks right behind it. Replace worn weatherstripping around both doors, and add a door sweep at the threshold so moving air cannot slip under the door.
Windows, trim, and wall gaps
Use caulk for small cracks around window trim, siding transitions, and interior trim gaps. Use expanding foam sealant for larger openings around wall edges, pipe penetrations, and the wall-to-floor line, where a bead of caulk is too small to do the job.
Ceiling, floor, and utility penetrations
Heat rises, but leaks at the ceiling still matter because they let warm air escape and draw in cold air below. Check light boxes, attic access points, cable holes, and the joint where the wall meets the slab. Those openings often explain frost on tools and condensation on cold surfaces.
How do you seal a garage on a budget?
Start with weatherstripping, a door sweep, caulk, and expanding foam sealant before buying insulation or heat. These low-cost fixes usually deliver the fastest comfort gain because they slow draft speed, which lowers the chill you feel near doors, corners, and the floor.
-
Inspect the edges.
Close the garage door, then look for light, feel for moving air, and note gaps around the perimeter, threshold, windows, and trim. Pay extra attention to the bottom corners of the door and the bottom of any passage door. -
Replace worn seals.
Install fresh weatherstripping around the garage door and the man door if the old material is cracked, flattened, or missing. Add a door sweep so the bottom edge meets the threshold cleanly. -
Fill the small gaps.
Run caulk along narrow cracks and trim joints, then use expanding foam sealant for larger holes around framing, pipes, and wiring. Keep foam away from moving parts and trim it after it cures. -
Check both garage types.
In an attached garage, seal the door to the house carefully because that opening affects the home as well as the garage. In a detached garage, focus on the exterior shell first, since there is no interior door to protect the home from drafts.
Picture a 2-car attached garage with a utility door into the laundry room. If that door leaks cold air, the room next to the garage can feel colder even when the garage itself gets some heat. Tightening that one door often pays back faster than adding more heater output.
Garage door insulation that pays off first
Garage door insulation is often the best next step after sealing leaks, especially on thin metal doors. An insulated garage door can make the space an average of 10 to 12 degrees warmer in winter, and many kits are made to fit thin metal doors without major changes.
Insulation kits for thin metal doors
Insulation kits are the simplest option when you want a faster install and a cleaner fit. They usually use panels sized for common door sections, which makes them a practical choice when the goal is to reduce radiant cold from the door itself.
Rigid foam board for a tighter fit
Rigid foam board works well when you want a custom fit or need to fill shallow door panels more precisely. Cut each piece carefully, press it into place, and seal the edges so air cannot slip behind the board and carry heat away.
What kind of temperature gain to expect
Do not expect the door alone to turn a freezing garage into a heated room. The main value is a measurable lift in winter temperature and a big drop in draft comfort, which makes any later heater far more effective.
Should you insulate the walls or ceiling?
Insulate the ceiling first if warm air is escaping upward, then insulate the walls if the garage is unfinished and used often. Fiberglass batt insulation in stud spaces is a cost-effective option, but it works best when the wall or ceiling can be finished with drywall, plywood, or OSB.
Fiberglass batt insulation in stud bays
Most garage walls are just the studs, covered on the outside with sheathing and siding. That means the cavities are open for fiberglass batt insulation, which can be installed in each stud space before the wall is finished.
When drywall or paneling is worth it
Pairing batts with drywall or paneling makes the insulation more durable and useful. Without an interior finish, insulation is easy to damage and less effective at controlling airflow across the wall cavity.
Why ceiling insulation matters in unfinished garages
If the garage has living space above it, ceiling insulation matters even more because the floor of the room above is tied to that heat loss. For an attached garage, keeping the garage warmer can help the room above or beside it feel less cold, as long as you still keep fumes and fire risks separated.
What heater makes sense for your garage?

Use a heater only after the shell is tighter, then match the heater to the job. A portable space heater is best for localized heat, a propane heater gives fast heat with ventilation caution, and a mini-split is the higher-upfront-cost option for frequent heating and cooling.
Portable space heater for localized heat
A portable space heater with a thermostat and tip-over shutoff is often the simplest option for short, one-zone tasks. It works best when you only need to warm the bench area or one corner of the garage, not the whole building.
Propane heater for fast heat with ventilation caution
Propane heaters are often reported as affordable up front and able to produce strong heat, but they need careful ventilation because combustion heaters can raise moisture and carbon monoxide risk. Use them only in a garage that can be vented properly and never treat them as a sealed-space solution.
Mini-split for higher upfront cost and year-round use
A mini-split has an indoor unit and an outdoor condenser, and it can provide efficient heating and cooling. It costs more upfront, but it makes more sense than a portable heater if the garage is a frequent workshop and you want steadier temperature control.
A common first-timer mistake is cranking up a space heater before weatherstripping the garage door and sealing the gaps around the windows. A garage of about 400 square feet with a leaky door and open ceiling gaps can still feel cold even with a strong heater, because the warm air can leave as fast as it arrives.
Garage temperature targets
Pick the temperature based on use, not habit. For minimal use, 40-45°F is acceptable; for regular activities, 45-50°F is a better target; and for a warmer garage that supports longer work sessions, 50-55°F is the usual range to aim for.
40 to 45 F for storage and minimal use
This range is enough when the garage mainly holds vehicles, tools, or supplies that should stay above freezing. It limits frost risk without trying to make the garage feel like a house.
45 to 50 F for routine use
Choose this range if you enter the garage often for errands, light maintenance, or short projects. It usually feels far less harsh than an unheated garage while still keeping fuel and utility costs more manageable than a fully heated space.
50 to 55 F for comfortable work sessions
This is the better target if you spend time wrenching, assembling, or painting in the garage. It is warmer, but still low enough to stay practical for many unfinished garages when the shell is tightened first.
Garage warming checklist
Use this checklist to decide what to do first. It separates attached from detached garages, workshop from storage use, and rental-friendly fixes from permanent upgrades, so you can spend money where it will matter most.
| Decision | Choose this first | Next step |
|---|---|---|
| Attached garage, room above or beside it | Seal the garage-door perimeter and the man door | Insulate the garage door, then consider wall or ceiling insulation |
| Detached garage used for storage | Weatherstripping, door sweep, and gap sealing | Garage door insulation if freezing is still a problem |
| Detached garage used as a workshop | Air sealing plus door insulation | Fiberglass batt insulation and a heater sized to the space |
| Renter | Removable weatherstripping, sweep, and temporary gap sealing | Portable heater if allowed by the lease |
| Owner planning permanent upgrades | Seal leaks, then insulate the door | Wall and ceiling insulation, then a better heat source if needed |
-
Classify the garage use.
Decide whether the garage is storage-only, a workshop, or a mixed-use space. Also note whether it is attached or detached, because that changes how much heat loss and indoor comfort matter. -
Fix the cheapest leaks.
Replace worn weatherstripping, add a door sweep, and seal obvious cracks. These are the fastest rental-friendly upgrades and the easiest to reverse later if needed. -
Insulate the door next.
Add an insulation kit or rigid foam board to the garage door if it is thin metal. This is usually the best value after sealing drafts. -
Insulate the shell.
Add fiberglass batt insulation to stud bays and finish the surface if the garage is used often. This is the point where longer work sessions start to make sense. -
Choose heat last.
Use a portable space heater for local warmth, a propane heater only with ventilation caution, or a mini-split for regular use. Size the heater to the garage square footage, especially if you choose a ceiling-mounted garage heater. -
Watch for moisture.
Check for condensation on cold surfaces and frost near gaps after each upgrade. If the garage stays damp, add ventilation and reduce combustion heating before spending more on heat.
Frequently asked questions
What is the cheapest way to heat a garage in winter?
The cheapest practical approach is usually not a heater at all. It is sealing air leaks, tightening the garage door, and using insulation where it matters most. If you still need heat, a portable electric space heater is usually the lowest-cost way to add localized warmth.
What temperature should a garage be in winter?
For storage and minimal use, 40-45°F is acceptable. For routine activities, 45-50°F is a better target. If you want a more comfortable work space, aim for 50-55°F, but only after you have reduced air leaks and insulated the weak spots.
Sponsored / affiliate links. As an Amazon Associate I earn from qualifying purchases. I may earn additional commission from eligible campaigns.