How to Stop Drafts From a Pet Door in Winter
Start by checking the pet door for air leaks: if the flap does not lie flat, fix the flap first; if air moves through the frame, add weatherstripping; if the wall or door opening leaks, seal the perimeter. Leaving it alone can raise heating bills and create cold spots near the door. This guide helps identify the leak path and choose the lightest fix that still allows pet access.
What you’ll need


- Utility knife
- Replacement flap matched to the pet door model
- Adhesive-backed foam weatherstripping
- Bulb seal weatherstripping
- Door sweep sized to the door width
- Caulk for the bottom edge or perimeter gaps
- Screws or fasteners for the sweep or threshold parts
- Incense stick or candle for leak tracing
- Foil-backed insulation or a removable insulated panel for seasonal cover
- Gloves and a flashlight
📊 Family Handyman uses a 30-minute timeframe for its door-draft fix. That timing comes from its entry-door draft article, so use it as a general repair reference rather than a pet-door-specific guarantee. Source: Familyhandyman.
Where is the draft coming from?
Find the leak before buying parts. A pet door can leak through the flap, the frame, the bottom edge, or the wall or panel around it, and the right fix depends on which path is moving air. A quick smoke test and a light check usually identify the opening that matters.
Check the opening in order
- Run a smoke test. Hold an incense stick or candle near the flap edges, hinge line, frame joint, and panel perimeter on a calm day. Watch for smoke that bends or pulls in, but keep flame away from curtains, flooring, and pets.
- Check for light gaps. Turn off nearby lights and look from the opposite side for daylight around the bottom edge, corners, and insert edges. A visible line of light usually means the seal is incomplete or the parts are out of alignment.
- Inspect the moving parts. Open and close the flap by hand. Look for warped vinyl, weak magnets, a stiff hinge, cracked seals, or a flap that misses the frame at one corner.
Say the flap sits flat at the top but lifts at the bottom in a breeze. That points to magnet strength or flap weight, not the wall. A replacement flap or stronger closure usually works better than adding more tape around the frame.
How do you seal the flap and frame?
Start here if air comes through the flap edges or the frame itself. Replace worn seals rather than patching them, because cracked or compressed material usually keeps leaking. On steel doors, the knob side and top use magnetic weather stripping, and the same idea applies to pet doors with magnetic closure strips.
Replace the parts that failed
- Match the replacement part. Check whether the unit is single-flap, double-flap, or electronic, then buy a flap made for that model or opening size. Compatibility matters because the wrong material can sit crooked or fail to seal against the frame.
- Replace worn seals. Remove cracked, flattened, or loose gasket material and install adhesive-backed foam or bulb seal cut to length. Foam works for small uniform gaps; bulb seal handles uneven contact better when the flap presses against a rounded edge.
- Correct the alignment. Re-seat the frame so the flap closes squarely and the magnets meet evenly. If the flap touches only one side, the draft path stays open even when the part looks intact.
A common first-timer mistake is buying a thicker seal to cure every leak. If the flap itself is warped, extra foam can make closing harder and still leave the bottom edge loose.
How do you stop drafts at the bottom edge?
If the strongest draft is under the opening, treat the bottom like any other exterior-door gap. A door sweep, a correctly set threshold, and a light check can close the low edge without blocking pet access. Family Handyman includes a door sweep in its draft-control fix and says to adjust the threshold until light no longer leaks through.
Seal the low edge first
- Install the sweep. Add a door sweep sized to the door width and caulk along the bottom edge before fastening it. Family Handyman recommends caulk there before the sweep, and the sweep should end tight enough to stop visible light without scraping.
- Adjust the threshold. Use the threshold screws to raise or lower the contact line until light no longer leaks through. Stop as soon as the door still closes smoothly; too much pressure can make the door bind and weaken the seal over time.
- Check the closing action. Open and close the door several times. If the sweep drags, trim or reset it, because a bottom seal that jams the door can push the flap out of alignment and create a different leak path.
Picture a roughly 24-inch pet-door opening with a door sweep added first and the threshold kept low. The sweep may block the straight-through draft, but the light gap under the flap can still show that the threshold needs a turn or two before the seal is even.
Pet door fix table
This table ranks the six most useful fixes by leak severity, pet-access compatibility, install time, cost, and fit. Use the lightest option that still leaves safe access for the pet. If the door is rarely used, a temporary cover can make more sense than buying a full replacement flap.
| Fix | Leak severity tier | Pet-access compatibility | Install time | Estimated cost | Best when | Avoid when |
|---|---|---|---|---|---|---|
| Flap replacement | High | Always open | 30 to 60 minutes | Low to moderate | The flap is warped, cracked, or no longer closes flat. | The frame is the real leak and the flap still seals evenly. |
| Weatherstripping upgrade | Medium | Always open | 20 to 45 minutes | Low | The frame or edge gaps are small and the hardware still fits squarely. | The flap is warped, loose, or missing contact across most of the opening. |
| Door sweep | Medium | Always open | 20 to 40 minutes | Low | The draft is strongest at the bottom edge and the door still closes cleanly. | The sweep would scrape, bind, or interfere with flap movement. |
| Threshold adjustment | Medium | Always open | 15 to 30 minutes | Low | Light shows under the bottom edge and the threshold still has adjustment left. | The door is already tight or the seal would become too compressed. |
| Removable seasonal cover | High | No access during cover use | 10 to 30 minutes | Low to moderate | The opening is unused for winter and a reversible cover is acceptable. | The pet needs daily access through that opening. |
| Wall or panel air sealing | High | Always open or seasonally closed | 30 to 90 minutes | Low to moderate | The leak is around the surrounding insert, panel, or wall perimeter. | The flap or frame still has an unresolved leak path. |
How do you seal an unused pet door for winter?
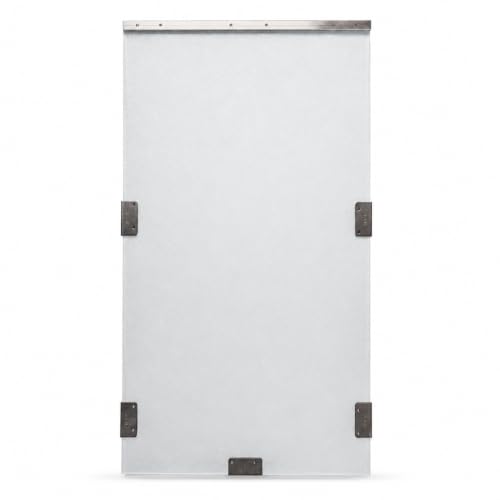
If the pet door will sit idle for weeks, a removable cover can be the lightest useful fix. Use foil-backed insulation or a cut-to-size insulated panel that fits the opening and removes without damage. Keep it out of the path of active use, or the pet loses access.
Use a removable seasonal barrier
- Measure the opening. Size the cover to the actual clear opening, not the rough frame. A cover that is too small leaves edge leaks, and a cover that is too large can bow or fall out.
- Install a removable barrier. Fit the insulated panel from the inside so the weather side still sheds moisture. Secure it lightly enough to remove later, but firmly enough that indoor air cannot escape around the edges.
- Seal the perimeter. Add temporary gasket material around the panel if needed, then recheck for smoke movement. Do not block an opening that a pet still needs for active access.
Suppose an older wall-installed pet door leaks at the panel edge and the dog only uses it once a day. A removable interior cover may be the better winter choice than adding heavier hardware that still leaves the old wall cavity leaking.
How do you find air leaks with incense or a candle?
Use smoke to locate moving air around the flap, frame, and wall insert. It works best on still days because drafts show up as a clear bend in the smoke stream. Keep flame away from fabric, paper, and the pet door itself, and never leave a burning test unattended.
Trace the path before sealing it
- Test one seam at a time. Move the smoke source slowly along the flap edge, frame joints, and the perimeter of the wall or door insert. Watch for a sharp pull rather than a weak drift, which usually means an actual gap.
- Mark each leak point. Use small pieces of tape or chalk to note where smoke bends. That keeps the repair focused on the opening that matters instead of sealing parts that are already tight.
- Retest after each fix. Repeat the smoke pass after every change so you can see whether the leak moved or disappeared. If the smoke still pulls at the panel edge, the problem is outside the flap itself.
How do you weatherproof a dog door for winter?
Weatherproofing a pet door means choosing the least invasive fix that still stops the real leak path. For single-flap units, that may be a new flap or seal. For double-flap and electronic units, the opening, magnets, and compatibility between parts matter more because the mechanism can create extra resistance and gaps.
Match the fix to the door type
- Review the door type. Single-flap doors often leak at the lower edge; double-flap models usually reduce wind but can bind if the spacing is off; electronic doors can leak at the housing if the seals are worn.
- Upgrade only what failed. If the flap is sound but the frame leaks, replace the weatherstripping instead of the whole unit. If the magnets are weak, choose the correct replacement part rather than stacking on extra foam.
- Check for wall leaks. Older homes can leak around the surrounding wall or door panel, and those gaps can carry moisture as well as cold air. Seal the perimeter after the flap and frame are verified.
Common mistakes
The biggest mistake is treating every pet-door draft like a standard door draft. The flap, the magnets, and the panel edges can all leak separately, so one fix rarely solves everything. Another common miss is blocking an active opening when the pet still needs it.
- Using thick foam over a warped flap instead of replacing the flap.
- Adding a door sweep before checking whether the threshold is out of adjustment.
- Ignoring cracks or compression in weatherstripping, which usually means replacement is due.
- Sealing the inside edge while the outside wall cavity still leaks.
- Using a temporary cover on a door that a pet still uses every day.
- Skipping a smoke test and guessing at the source.
Family Handyman advises planning the work on a warm day because the door must come off, and it lists a utility knife, weather stripping, and a door sweep among the needed materials. That advice fits pet doors too, because cold weather can make some seals stiff and harder to fit cleanly. Treat it as general door guidance, not a guarantee for every pet-door model.
If that didn’t work, try this next
If the flap, frame, and bottom edge are all sealed but the draft remains, the leak is probably at the surrounding wall or door panel. Move from the lightest fix to the more invasive one: replace the flap, then the seals, then the sweep or threshold, and only then open the perimeter or wall area for a deeper repair.
Escalate only as needed
- Recheck the flap fit. Confirm the flap sits flat across the opening and closes against the frame with even contact. A weak magnetic closure can look fine and still leak under pressure from wind.
- Inspect the panel insert. Look for gaps between the pet-door unit and the surrounding door or wall panel. If the insert was cut oversize or installed off-center, air can move around the frame even when the flap is sealed.
- Address wall leaks. Seal exposed gaps around older installations, especially where the wall cavity meets the pet-door frame. If moisture is present, stop there and repair the opening properly before adding more interior sealant.
Family Handyman recommends adjusting the threshold until light no longer leaks through, and that same light test helps here: if the frame is sealed but daylight still shows around the perimeter, the opening needs perimeter work rather than another flap.
Prevention
Check the flap and seals at the start of heating season, before they harden or compress. Replacing worn parts early is usually easier than trying to stop a larger leak after the frame or flap has already shifted.
Frequently asked questions
How to stop drafts from a pet door in winter
Start with the flap, then the frame, then the perimeter. Replace worn seals, fit a flap that matches the opening, and adjust the threshold until light no longer leaks through. If the opening is unused, a removable insulated cover can stop most air movement without a permanent change.
How to keep cold air from coming through a dog door
Use a smoke test to find the path, then seal the exact failure point. Adhesive-backed foam works for small frame gaps, while a replacement flap is better if the vinyl is warped or the magnets are weak. Avoid stacking fixes when one part has clearly failed.
How to stop drafts under a pet door flap
Check the bottom edge for light gaps and weak closure force. If the flap hangs loose, replace it with the correct model; if the lower edge is misaligned, adjust the threshold so the flap meets it evenly. A clean closing line matters more than adding extra foam.
What is the best draft stopper for a pet door?
The best option depends on how often the pet uses it. For rare use, a removable interior cover works well. For daily use, a door sweep or threshold adjustment preserves access better than a full block. Choose the least restrictive fix that still closes the leak.
How to stop drafts around exterior doors
Inspect the door’s perimeter first, then the bottom edge. Replace damaged weatherstripping, add a door sweep, and adjust the threshold until the light gap disappears. If the wall around the opening still leaks, seal that perimeter too. The same leak-first order works on pet doors and standard exterior doors.
Sponsored / affiliate links. As an Amazon Associate I earn from qualifying purchases. I may earn additional commission from eligible campaigns.