Why Can I See Light Around My Front Door?
If you can see daylight around a front door, the usual causes are a worn door sweep, a low or damaged threshold, hinge sag, or a warped slab. Light only at the bottom points first to the sweep or threshold. Ignoring it can waste heating and cooling, admit water and bugs, and let the door scrape or fail to latch cleanly. This guide shows how to match the gap location to the most likely fix before you buy parts.
This guide is part of our Winter Weatherproofing: How to Draft-Proof Your Home series.
Front door leak triage checklist



Start by mapping where the light shows up. A gap at the top, hinge side, latch side, or bottom often points to a different fix, and the repair order changes with the pattern of light around the door. Check the basic causes first so you do not replace weatherstripping when the real problem is alignment. For air-sealing basics, see the ENERGY STAR seal and insulate guidance and the U.S. Department of Energy’s air-sealing overview.
| Gap zone | What it usually means | What to test next | Most likely repair order | Likely DIY vs pro fix |
|---|---|---|---|---|
| Top | Hinge sag, loose screws, or an uneven reveal at the head | Check whether the top gap grows near the latch side | Tighten hinges, then adjust hinge position or shims | Usually DIY; pro if the frame is out of square |
| Hinge side | Loose hinge screws, worn hinges, or slab shift | Check for screw movement, rub marks, or a widening corner gap | Tighten screws, repair stripped holes, then fine-tune hinge alignment | Usually DIY; pro if hinges or framing are damaged |
| Latch side | Strike plate misalignment, sagging door, or warped slab | Check latch engagement and whether the reveal is wider at one end | Adjust strike plate after confirming the reveal is uneven | Usually DIY; pro if the slab is twisted |
| Bottom | Worn sweep, low threshold, or both | Look for daylight across the sill and feel for draft at the floor | Replace or adjust the sweep, then tune threshold height | Usually DIY; pro if the threshold is rotten or loose |
- Close the door and note exactly where daylight appears.
- Check the bottom edge first, then the hinge side, latch side, and top.
- Use a thin strip of paper or a smoke test to confirm where air moves.
- Inspect weatherstripping for flat spots, tears, or missing sections.
- Look at the reveal around the slab. It should be consistent.
- Only after that, decide between seal replacement, hardware adjustment, threshold tuning, or replacement.
A common first-timer mistake is to see one bright sliver near the latch and immediately buy a new weatherstrip set. If the door is sagging about 1/8 inch at the top hinge corner, a new seal can still leave the latch side open because the slab is no longer square in the frame. When the gap clusters in one corner, fix the geometry first and the seal second.
Why can I see light around my front door?
Visible daylight usually means an air gap at the perimeter, and the location matters more than the symptom alone. A small, even gap can be normal on some doors if the seal compresses when closed, while a larger or uneven gap usually signals air leakage, hardware drift, or a warped slab. ENERGY STAR notes that sealing leaks and adding weatherstripping are core air-sealing steps because uncontrolled gaps can waste energy and reduce comfort.
When daylight signals an air leak
Daylight that runs through the top, jamb, or bottom edge often matches a draft you can feel with a hand, tissue, or incense smoke. If the flame or smoke bends at one zone, that spot is the air path, not just a cosmetic seam. Air leaks at doors are a standard weatherization target because the opening is intended to seal when latched.
When a small gap is mostly cosmetic
Some doors show a hairline reveal along part of the frame, especially if the weatherstripping still compresses firmly and the latch closes without force. In that case, the gap may be visible without being a major leak. The key test is whether the seal contacts evenly all around the slab.
When recurring draft points to a geometry problem
If the same area opens again after you replace seals, the frame or slab may be out of square. That often happens with hinge sag, a loose threshold, or wood movement from moisture. In that case, the gap is a geometry problem first and a seal problem second. Extension and building-science guidance consistently notes that wood changes size with moisture, which can shift alignment seasonally.
Check the weatherstripping first
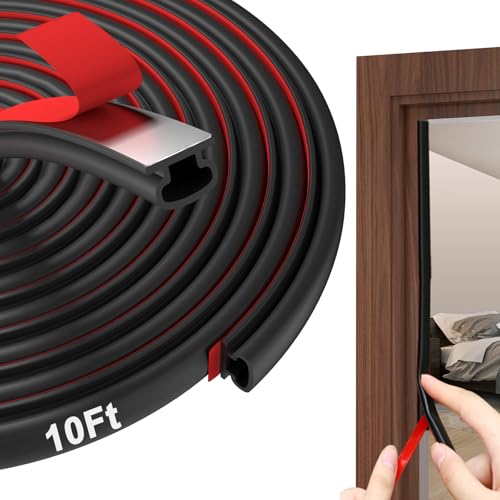
Exterior door weatherstripping is the first seal to inspect because it wears faster than the slab or frame. Bulb seal, foam, and kerf-in styles fail in different ways, and the right replacement depends on how the door closes. Look for compression, not just presence. If the strip has hardened, split, or stayed permanently flattened, it is no longer doing its job.
Bulb seal vs foam vs kerf-in styles
Bulb seal compresses into a rounded tube and is common on many exterior doors. Foam weatherstripping is softer and cheaper, but it flattens faster and can tear. Kerf-in weatherstripping tucks into a groove in the jamb or stop and usually gives a cleaner fit when the groove is intact. Use the existing profile and groove style as the guide for replacement.
Signs the seal is flattened, torn, or missing
If you can slide a finger through a section with no resistance, the seal may be compressed beyond usefulness or missing entirely. Flattened foam, split rubber, gaps at corners, and pulled-out kerf strips are all strong replacement triggers. A seal that no longer springs back will not close the gap well. In cold weather, a brittle seal can also shrink enough to show more daylight.
How compression fit affects the seal
The seal should compress enough to block light and air, but not so much that the door becomes hard to close. If the latch needs a shove, the seal may be too thick, the threshold may be too high, or the slab may be out of alignment. Fit matters as much as material. The goal is even compression around the perimeter, not maximum pressure.
Is the problem at the bottom of the door?

Light at the bottom points first to the door sweep or threshold. Those two parts work together, and a worn sweep can leave a visible line even when the rest of the door seals well. If the gap is lowest at the sill, start there before touching the jambs. Manufacturer installation guides commonly show the sweep and threshold as a matched pair, with the sweep adjusted to meet the threshold rather than crush hard against it.
Door sweep wear and coverage
A door sweep closes the gap at the bottom edge of the slab. Rubber fin or brush inserts can wear down, curl, or stop touching the sill. If daylight shows only at the bottom, the sweep may be too short, damaged, or not covering the full width of the door. Check both corners because one end can wear faster if the door is slightly out of level.
Adjustable versus fixed sweeps
Adjustable sweeps usually let you raise or lower the insert with screws, which helps when the bottom gap is close but still leaks. Fixed sweeps are simpler, but once the material wears out, replacement is the fix. A sweep that drags hard across the threshold may need readjustment, not more pressure. Many manufacturers advise small incremental adjustments so the seal contacts evenly without binding the door.
How the threshold and sweep work together
The threshold sets the landing point for the sweep. Many thresholds have adjustment screws that raise or lower the top profile a little at a time. If the sweep is intact but light still shows at the sill, the threshold may be too low, uneven, or set back from the sweep edge. For adjustable sill hardware, follow the product-specific instructions from the manufacturer before raising the profile more than a small amount.
For example, a steel door about 36 inches wide may close with a clean latch, but a bright strip can still show only at the bottom right corner. That pattern usually points to the sweep or threshold, not the hinge side. Raising the threshold slightly or replacing a worn insert is the first move, not hinge shimming. If the leak is concentrated at one corner, inspect for twist or a low sill before changing the latch-side hardware.
Check the reveal and hardware
An uneven door reveal usually means the space between the slab and frame is not consistent. That usually points to loose hinge screws, sagging hinges, or strike plate misalignment. Check the reveal before tightening random hardware, because the pattern tells you where the door moved. A standard gap check includes looking at both corners on the hinge side and latch side so you can tell whether the slab dropped or skewed.
What an uneven reveal means
The reveal should look fairly even around the slab. If the top gap is wider near the latch side, the door may have dropped on the hinge side. If the latch side opens at the middle while the top and bottom look tight, the slab may be twisted or the strike plate may be off. Corner-specific gaps are especially useful because they show whether the problem is sag, twist, or a low sill.
Loose hinge screws and sagging symptoms
Loose screws let the door shift down over time. Common signs are rubbing at the latch-side top corner, a latch that catches only when you lift the handle, or a reveal that narrows near one hinge and widens at the opposite corner. Replace stripped screws before assuming the door is warped. If the top hinge screws no longer bite, longer screws into framing can restore pull.
Strike plate alignment and latch closure
If the door nearly closes but the latch misses or binds, the strike plate may be out of line. That can create a visible seam on the latch side even when the weatherstripping is fine. Move the strike only after the reveal looks right; otherwise, you may mask a sagging door instead of fixing it. A mis-set strike should be a final adjustment, not the first one.
Shims and hinge adjustment
Shims or hinge adjustment can move the slab back into a better position, but they should follow a reveal check, not replace one. A small hinge adjustment can correct top or latch-side daylight when the slab is simply out of square. If the frame is badly off or the slab is twisted, the fix may be limited. For a corner-specific gap, start with the hinge corner that matches the widest reveal.
Can the frame or slab be warped?
Yes. Wood doors can move with moisture and season, and that movement can create gaps that return every winter or after humid weather. Fiberglass and steel doors are more stable, but they can still show problems if the frame shifts, the slab bows, or the hardware drifts out of alignment. Extension resources and wood-manufacturing guidance note that moisture changes can cause wood to swell, shrink, or cup.
Moisture-driven wood movement
Wood absorbs and releases moisture, so a door can swell, shrink, or cup. A winter gap may improve in humid weather and come back when the air dries. If the gap changes with the season, the door may need adjustment now and replacement later if the warp keeps growing. Look for a pattern that repeats with weather rather than random shifts.
Seasonal expansion and contraction
Seasonal movement can explain why a door leaks only part of the year. A small summer reveal may turn into a winter draft if the slab shrinks or the seals stiffen in cold weather. That pattern points to material movement, not just a bad sweep. This is why a door that “fixes itself” in one season can still need hardware tuning in another.
When repair limits point to replacement
If the slab is twisted, the frame is out of square, or the gap changes too much for the sweep and threshold to catch, repairs may reach their limit. At that point, replacing parts can help only so far. A door that will not hold a consistent reveal usually needs more than seal swaps. If the corner gap remains after hardware and seal work, replacement becomes the practical option.
Use the right sealant in the right place
Caulk is generally used at stationary exterior trim joints, not in the moving gap between the slab and frame. Use it where casing meets siding, brick, or wall material. Do not fill the door’s operating gap with caulk, because that area needs to open and close every time you use the door. Sealants belong on fixed joints, not on moving parts.
Caulk at stationary trim joints only
Inspect the exterior casing, the joint between trim and wall, and any cracked seams around the frame. Those fixed joints can admit water and air even when the door itself seals well. A neat bead of caulk belongs there, not along the door edge. If a trim joint is visibly split, that is a separate repair from the door seal.
Exterior-rated acrylic latex vs silicone
Exterior-rated acrylic latex is easier to tool and paint. Silicone handles movement and moisture better in many exposed joints, but it is harder to finish and paint. For trim-to-wall cracks, choose the product that matches the joint and the finish you need. The product choice matters most where the joint is exposed to rain or repeated movement.
Why caulk does not fix a moving door gap
The door edge must move every time it opens and closes, so any sealant there will fail or stop the door from working. If the gap is at the sweep, jamb, or latch edge, fix the door assembly instead. Caulk is for stationary cracks, not the operating perimeter. If the moving gap is the issue, adjust the door rather than sealing it shut.
How do I stop light and drafts around my front door?
Start with the cheapest likely fix and move outward only if the gap pattern demands it. A common practical order is weatherstripping, sweep, threshold, hinges and strike plate, then slab or frame replacement if the geometry is still wrong. That sequence keeps you from buying parts that do not fit the real problem. The best repair order follows the zone of the gap, not the order of the most convenient parts.
For wood doors, watch for seasonal movement before you replace every seal. For fiberglass and steel doors, pay more attention to hardware alignment and the threshold because the slab itself is less likely to move. If the gap stays uneven after adjustment, stop and reassess the frame. For threshold and sweep hardware, follow the manufacturer’s adjustment instructions before assuming the sill must be replaced.
Frequently asked questions
Can see light around exterior door?
Light around an exterior door usually means a gap that can leak air, but the location matters. Bottom daylight points first to the sweep or threshold. Side or top daylight more often points to weatherstripping wear, hinge sag, or strike misalignment. Map the gap before replacing parts.
Can see daylight around my door?
Daylight around your door is not always an emergency, but it should not be ignored if you also feel a draft, notice noise, or see water at the sill. A small, even reveal can be normal. Uneven light, especially near one corner, usually needs adjustment.
Should you see light around your front door?
You should not see obvious daylight through an exterior door that is closed and latched. A tiny, even reveal can still seal if the weatherstripping compresses properly. Large slivers, bright corners, or any visible line at the bottom usually mean the seal, hardware, or threshold needs work.
Can see light through door?
If you can see light through the door, first confirm where it enters. Through the slab itself points to damage or a failed core, while around the edges points to alignment or seals. Edge gaps are usually repairable. Light through the slab itself is a different problem.
Why is there light around my front door?
Light around a front door usually comes from a mismatch between the slab, frame, and seals. A worn sweep, flattened weatherstripping, low threshold, loose hinges, or a warped slab can all open a path for light. The gap location tells you which part to fix first.
Is it normal to see daylight around a front door?
It can be normal to see a very slight, even reveal in some spots, especially if the seal compresses and the door latches without force. It is not normal to see a bright gap, a draft, or uneven light at one corner. Those signs point to a problem.
How do I stop light and drafts around my front door: stop the leak by matching?
Stop the leak by matching the fix to the gap zone. Replace worn weatherstripping, adjust or replace the sweep, tune the threshold, and correct hinge or strike alignment if the reveal is uneven. Use caulk only for stationary trim joints. Do not seal the moving edge with caulk.
Does light around the door mean I need new weatherstripping?
Not always. New weatherstripping helps when the seal is flattened, torn, missing, or not compressing evenly. If the reveal is uneven because the door sagged, a new seal may still leave light at one side. Check alignment first if the gap is not uniform.
How do I tell if the door needs adjustment or replacement?
If the gap is small and tied to one zone, adjustment usually comes first. If the reveal stays uneven after hinge and strike fixes, or the slab is warped enough that seals cannot contact evenly, replacement may be the better path. Persistent geometry problems point beyond simple hardware tweaks.
What seals a front door gap best
The best seal depends on the gap. Weatherstripping seals the jamb and head, a sweep seals the bottom, and a properly set threshold supports that bottom seal. For stationary trim cracks, use exterior-rated caulk. No single product fixes every front-door gap, so match the seal to the location.
Sponsored / affiliate links. As an Amazon Associate I earn from qualifying purchases. I may earn additional commission from eligible campaigns.